fluid Acura TSX 2013 User Guide
[x] Cancel search | Manufacturer: ACURA, Model Year: 2013, Model line: TSX, Model: Acura TSX 2013Pages: 325, PDF Size: 8.61 MB
Page 228 of 325

227
uuMaintenance Minder
TMu
Continued
Maintenance
■
Maintenance Service Items
1Maintenance Service Items•Independent of the Maintenance Minder
information, replace the brake fluid every 3 years.•Inspect idle speed every 160,000 miles (256,000
km).•Adjust the valves during services A, B, 1, 2, or 3 if
they are noisy.
Maintenance Minder Message
System Message
Indicator
Sub Items
Main Items
*1: If message, SERVICE DUE NOW does not appear more than 12 months after the display is reset,
change the engine oil every year.
*2: If you drive primarily in dusty conditions, replace the air cleaner element every 15,000 miles (24,000 km).
*3: If you drive primarily in urban areas that have high concentrations of soot in the air from industry and from diesel-powered vehicles, replace the dust and pollen filter every 15,000 miles (24,000 km).CODE
Maintenance Main Items
A
●
Replace engine oil
*1
B
●
Replace engine oil
*1 and oil filter
●
Inspect front and rear brakes
●
Check parking brake adjustment
●
Inspect tie rod ends, steering gear box, and boots
●
Inspect suspension components
●
Inspect driveshaft boots
●
Inspect brake hoses and lines (Including ABS)
●
Inspect all fluid levels and condition of fluids
●
Inspect exhaust system
#
●
Inspect fuel lines and connections
#
*4: Driving in mountainous areas at very low vehicle speeds or trailer towing results in higher transmission temperatures. This requires transmission fluid changes more frequently than recommended by the
Maintenance Minder. If you regularly drive your vehicle under these conditions, have the transmission
fluid changed at 60,000 miles (100,000 km), then every 30,000 miles (48,000 km). (For A/T only.)
*5: If you drive regularly in very high temperatures (over 110°F, 43 °C), in very low temperatures (under -20°F, -29°C), or tow a trailer, replace every 60,000 miles/100,000 km. (6-cylinder models only)
# : See information on maintenance and emissions warranty.CODE
Maintenance Sub Items
1
●
Rotate tires
2
●
Replace air cleaner element
*2
●
Replace dust and pollen filter
*3
●
Inspect drive belt
3
●
Replace transmission fluid
*4
4
●
Replace spark plugs
●
Replace timing belt and inspect water pump
*5
●
Inspect valve clearance
5
●
Replace engine coolant
Page 230 of 325

229
Continued
Maintenance
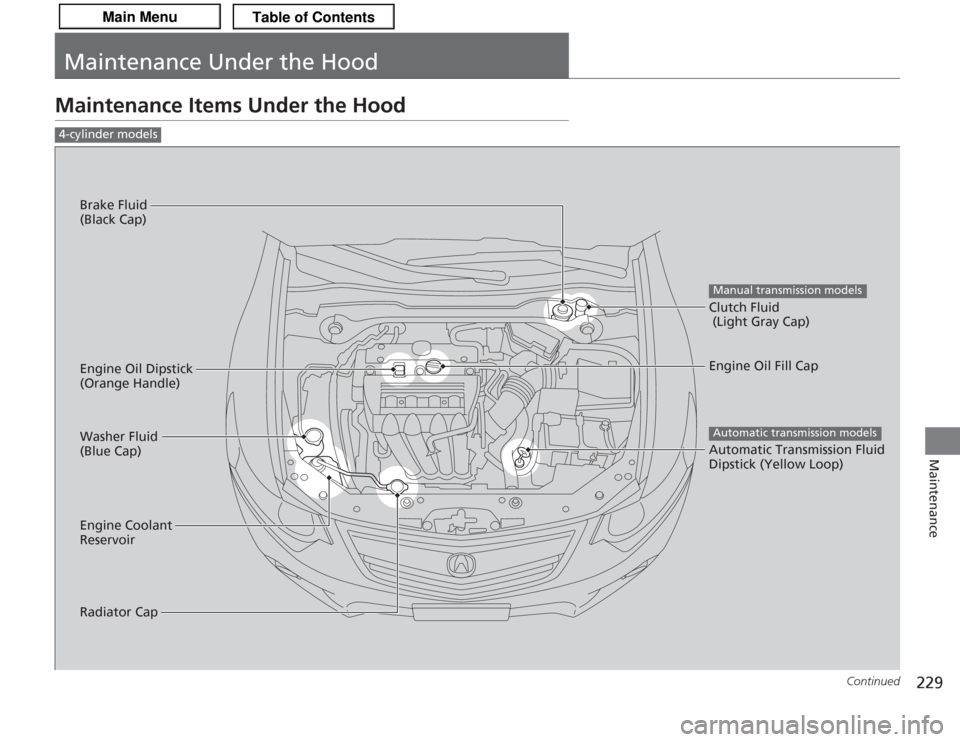
Maintenance Under the HoodMaintenance Items Under the Hood4-cylinder models
Brake Fluid
(Black Cap)
Engine Coolant
Reservoir
Radiator Cap Washer Fluid
(Blue Cap) Engine Oil Dipstick
(Orange Handle)Clutch Fluid
(Light Gray Cap)
Manual transmission modelsEngine Oil Fill Cap
Automatic Transmission Fluid
Dipstick (Yellow Loop)Automatic transmission models
Page 231 of 325

230
uuMaintenance Under the Hood uMaintenance Items Under the Hood
Maintenance
6-cylinder models
Engine Oil Dipstick
(Orange Loop)
Washer Fluid
(Blue Cap)
Engine Coolant
Reservoir
*
Radiator Cap
*
Brake Fluid
(Black Cap)
Engine Oil Fill Cap
Automatic Transmission
Fluid Dipstick
(Yellow Loop)
*: Located under the cover
Page 242 of 325

241
uuMaintenance Under the Hood uEngine Coolant
Maintenance
1. Remove the radiator cap cover.
2. Make sure the engine and radiator are cool.
3. Turn the radiator cap counterclockwise and
relieve any pressure in the coolant system.
Do not push the cap down when turning.
4. Push down and turn the radiator cap
counterclockwise to remove it.
5. The coolant level should be up to the base
of the filler neck. Add coolant if it is low.
6. Put the radiator cap back on, and tighten it
fully.
7. Pour coolant into the reserve tank until it
reaches the MAX mark. Put the cap back
on the reserve tank.
■
Radiator
1 Radiator
NOTICEPour the fluid slowly and carefully so you do not spill
any. Clean up any spills immediately; they can
damage components in the engine compartment.
3
WARNING
Removing the radiator cap while the
engine is hot can cause the coolant to spray
out, seriously scalding you.
Always let the engine and radiator cool
down before removing the radiator cap.
Radiator Cap
6-cylinder modelsAll models
Page 243 of 325

242
uuMaintenance Under the Hood uTransmission Fluid
Maintenance
Transmission FluidCheck the fluid level when the engine is at normal operating temperature.
1.Park on level ground, and start the engine.
2. Wait until the radiator fan starts and then
turn off the engine.
u Perform step 3 after waiting for about 60
seconds (less than 90 seconds).
3. Remove the dipstick (yellow loop) from the
transmission and wipe it with a clean cloth.
4. Insert the dipstick all the way back into the
transmission securely, as shown in the
image.
5. Remove the dipstick and check the fluid
level.
u It should be between the upper and
lower marks in the HOT range.
6. If the level is below the lower mark, add
fluid into the dipstick hole to bring it to the
level between the upper and lower marks,
and have your vehicle checked by a dealer
immediately.■
Automatic Transmission Fluid
Specified fluid: Acura ATF DW-1 (automatic transmission fluid)
1Automatic Transmission Fluid
NOTICEDo not mix Acura ATF DW-1 with other
transmission fluids.
Using a transmission fluid other than Acura ATF
DW-1 may adversely affect the operation and
durability of your vehicle’s transmission, and damage
the transmission.
Any damage caused by using a transmission fluid that
is not equivalent to Acura ATF DW-1 is not covered
by Acura’s new vehicle warranty.NOTICEPour the fluid slowly and carefully so you do not spill
any. Clean up any spills immediately; they can
damage components in the engine compartment.
Upper Mark
Lower Mark
HOT
Range Upper
Lower
Marks
Rubber
Cap
Guide
4-cylinder models6-cylinder models
Page 244 of 325

243
uuMaintenance Under the Hood uTransmission Fluid
Maintenance
Check the fluid level when the engine is at normal operating temperature.
1.Park the vehicle on level ground.
2. Remove the bolts with a wrench, then
carefully remove the under cover.
3. Remove the transmission filler bolt and
washer. Carefully feel inside the bolt hole
with your fingers.
u Check if the fluid level is up to the edge
of the bolt hole.
4. If the fluid level is not up to the edge of the
bolt hole, add Acura Manual Transmission
Fluid (MTF) until it runs out of the hole.
5. Put a new washer on the filler bolt, then
reinstall the filler bolt.
u Tightening torque:
33 lbf∙ft (44 N∙m, 4.5 kgf∙m)
6. Reinstall the under cover with the bolts.■
Manual Transmission Fluid
Specified fluid: Acura Manual Tran smission Fluid (MTF)
1Manual Transmission Fluid
If Acura MTF is not available, you may use the API
certificated SAE 0W-20 or 5W-20 viscosity motor oil
as a temporary measure.
Replace with MTF as soon as possible. Motor oil does
not contain the proper additives for the transmission
and continued use can cause decreased shifting
performance and lead to transmission damage.
Under Cover
Bolt
Page 245 of 325

244
uuMaintenance Under the Hood uBrake/Clutch Fluid
Maintenance
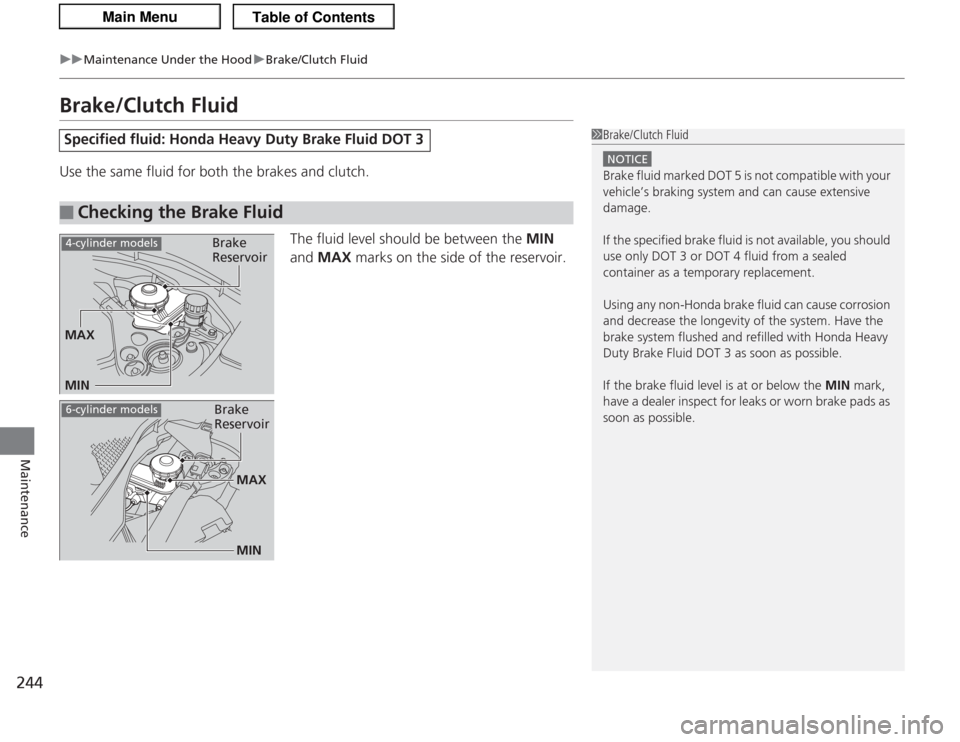
Brake/Clutch FluidUse the same fluid for both the brakes and clutch.
The fluid level should be between the MIN
and MAX marks on the side of the reservoir.Specified fluid: Honda Heavy Duty Brake Fluid DOT 3■
Checking the Brake Fluid
1Brake/Clutch Fluid
NOTICEBrake fluid marked DOT 5 is not compatible with your
vehicle’s braking system and can cause extensive
damage.
If the specified brake fluid is not available, you should
use only DOT 3 or DOT 4 fluid from a sealed
container as a temporary replacement.
Using any non-Honda brake fluid can cause corrosion
and decrease the longevity of the system. Have the
brake system flushed and refilled with Honda Heavy
Duty Brake Fluid DOT 3 as soon as possible.
If the brake fluid level is at or below the MIN mark,
have a dealer inspect for leaks or worn brake pads as
soon as possible.
Brake
Reservoir
MIN MAX
4-cylinder models6-cylinder models
Brake
Reservoir
MAXMIN
Page 246 of 325

245
uuMaintenance Under the Hood uBrake/Clutch Fluid
Maintenance
The fluid level should be between the MIN
and MAX marks on the side of the reservoir.
■
Checking the Clutch Fluid
1Checking the Clutch Fluid
If the clutch fluid level is at or below the MIN mark,
have a dealer inspect for leaks or an excessively worn
clutch plate as soon as possible.
Clutch Reservoir
MIN MAX
Page 247 of 325

246
uuMaintenance Under the Hood uRefilling Window Washer Fluid
Maintenance
Refilling Window Washer FluidCheck the amount of window washer fluid using the washer fluid level gauge on the
cap.
If the level is low, fill the washer reservoir.
1Refilling Window Washer Fluid
NOTICEDo not use engine antifreeze or a vinegar/water
solution in the windshield washer reservoir.
Antifreeze can damage your vehicle’s paint. A
vinegar/water solution can damage the windshield
washer pump.
Level Gauge
Page 275 of 325

uuCleaning uExterior Care
274Maintenance
A good coat of automotive body wax helps protect your vehicle’s paint from the
elements. Wax will wear off over time and expose your vehicle’s paint to the
elements, so reapply as necessary.
If you get gasoline, oil, engine coolant, or battery fluid on resin coated parts, they
may be stained or the coating may peel. Promptly wipe it away using a soft cloth and
clean water.
Wipe using a glass cleaner.
Aluminum is susceptible to deterioration caused by salt and other road
contaminants. Use a sponge and mild detergent to wipe away promptly.
Be careful not to use harsh chemicals (including some commercial wheel cleaners) or
a stiff brush. They can damage the clear coat of the aluminum alloy wheels that
helps keep the aluminum from corroding and tarnishing.■
Applying Wax
■
Maintaining the Bumpers and Other Resin Coated Parts
■
Cleaning the Window
■
Maintaining Aluminum Wheels
1Applying Wax
NOTICEChemical solvents and strong cleaners can damage
the paint, metal, and plastic on your vehicle. Wipe up
spills immediately.1Maintaining the Bumpers and Other Resin Coated Parts
Ask a dealer about the correct coating material when
you want to repair the painted surface of the parts
made of resin.1Cleaning the Window
Wires are mounted to the inside of the rear window.
Wipe along the same direction as the wires with a
soft cloth so as not to damage them.