navigation Acura TSX 2013 Owner's Manual
[x] Cancel search | Manufacturer: ACURA, Model Year: 2013, Model line: TSX, Model: Acura TSX 2013Pages: 325, PDF Size: 8.61 MB
Page 3 of 325
2Quick Reference Guide
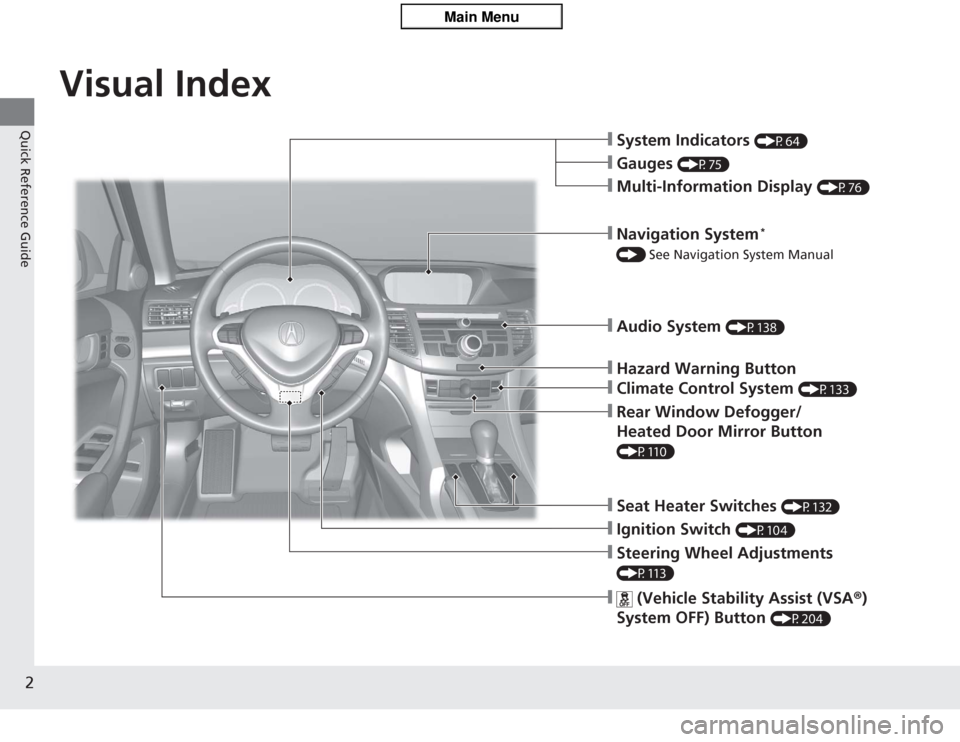
Quick Reference GuideVisual Index
❙System Indicators
(P64)
❙Gauges
(P75)
❙Navigation System
*
() See Navigation System Manual❙Audio System
(P138)
❙Hazard Warning Button❙Climate Control System
(P133)
❙Rear Window Defogger/
Heated Door Mirror Button (P110)
❙Seat Heater Switches
(P132)
❙Steering Wheel Adjustments (P113)❙Multi-Information Display
(P76)
❙
(Vehicle Stab ility Assist (VSA ®)
System OFF) Button
(P204)
❙Ignition Switch
(P104)
Page 4 of 325
3Quick Reference Guide
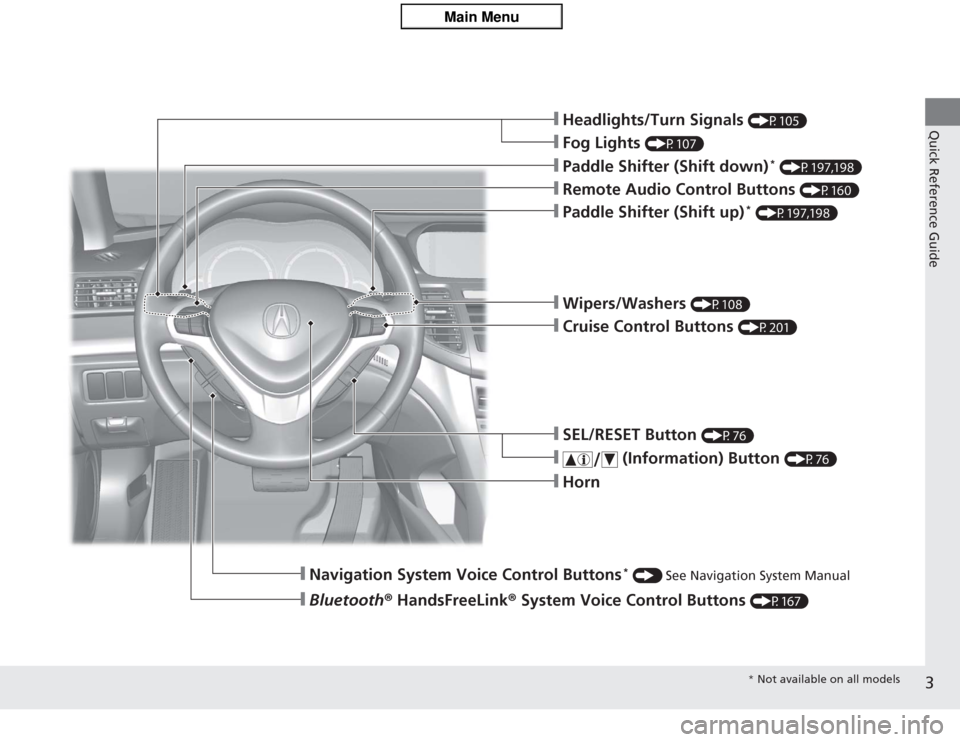
❙Headlights/Turn Signals
(P105)
❙Fog Lights
(P107)
❙Paddle Shifter (Shift down)
* (P197,198)
❙Navigation System Voice Control Buttons
* () See Navigation System Manual
❙Bluetooth ® HandsFreeLink ® System Voice Control Buttons
(P167)
❙Horn❙Remote Audio Control Buttons
(P160)
❙Paddle Shifter (Shift up)
* (P197,198)
❙SEL/RESET Button
(P76)
❙
(Information) Button
(P76)
❙Wipers/Washers
(P108)
❙Cruise Control Buttons
(P201)* Not available on all models
Page 7 of 325
Visual Index
6Quick Reference Guide
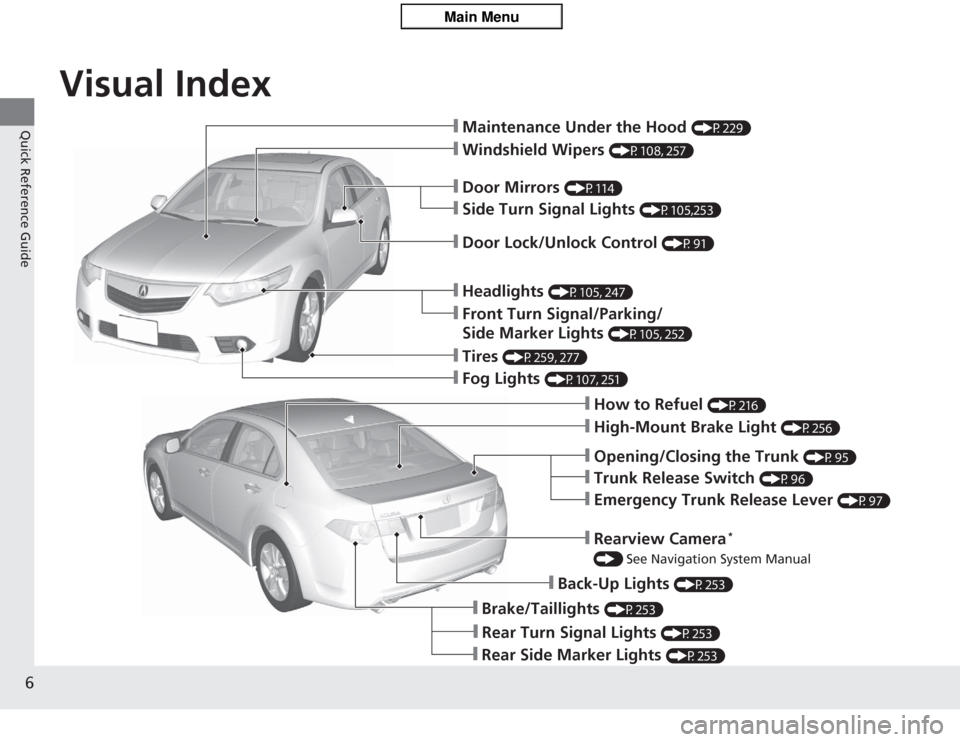
❙Maintenance Under the Hood
(P229)
❙Windshield Wipers
(P108, 257)
❙Tires
(P259, 277)
❙Fog Lights
(P107, 251)
❙Door Lock/Unlock Control
(P91)
❙Side Turn Signal Lights
(P105,253)
❙Headlights
(P105, 247)
❙Front Turn Signal/Parking/
Side Marker Lights
(P105, 252)
❙How to Refuel
(P216)
❙High-Mount Brake Light
(P256)
❙Emergency Trunk Release Lever
(P97)
❙Opening/Closing the Trunk
(P95)
❙Back-Up Lights
(P253)
❙Brake/Taillights
(P253)
❙Rear Side Marker Lights
(P253)
❙Door Mirrors
(P114)
❙Trunk Release Switch
(P96)
❙Rear Turn Signal Lights
(P253)
❙Rearview Camera
*
() See Navigation System Manual
Page 12 of 325
11Quick Reference Guide
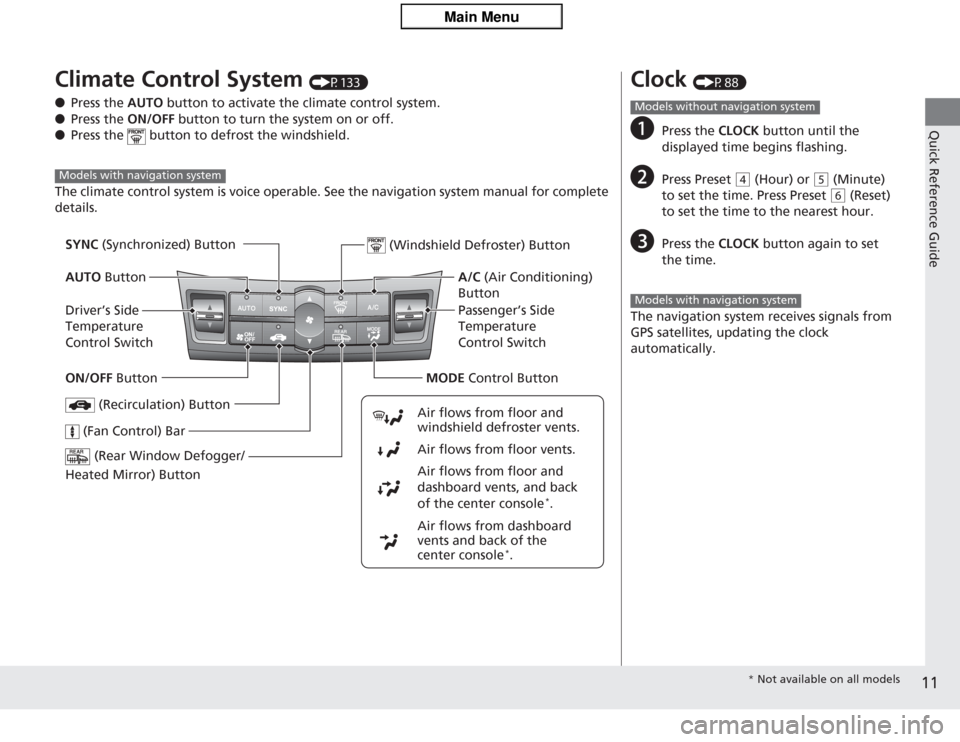
Climate Control System
(P133)
● Press the AUTO button to activate the climate control system.
● Press the ON/OFF button to turn the system on or off.
● Press the button to defrost the windshield.
The climate control system is voice operable. See the navigation system manual for complete
details.
Models with navigation system
(Rear Window Defogger/
Heated Mirror) Button
(Windshield Defroster) Button
A/C (Air Conditioning)
Button
Air flows from dashboard
vents and back of the
center console
*.
Air flows from floor and
dashboard vents, and back
of the center console
*.
Air flows from floor vents. Air flows from floor and
windshield defroster vents.
(Recirculation) Button
(Fan Control) Bar
Passenger’s Side
Temperature
Control Switch
SYNC
(Synchronized) Button
AUTO Button
Driver’s Side
Temperature
Control Switch
ON/OFF Button MODE Control Button
Clock
(P88)
a
Press the CLOCK button until the
displayed time begins flashing.
b
Press Preset
( 4
(Hour) or
(5
(Minute)
to set the time. Press Preset ( 6
(Reset)
to set the time to the nearest hour.
c
Press the CLOCK button again to set
the time.
The navigation system receives signals from
GPS satellites, updating the clock
automatically.
Models without navigation systemModels with navigation system
* Not available on all models
Page 13 of 325
12Quick Reference Guide
Features
(P137)
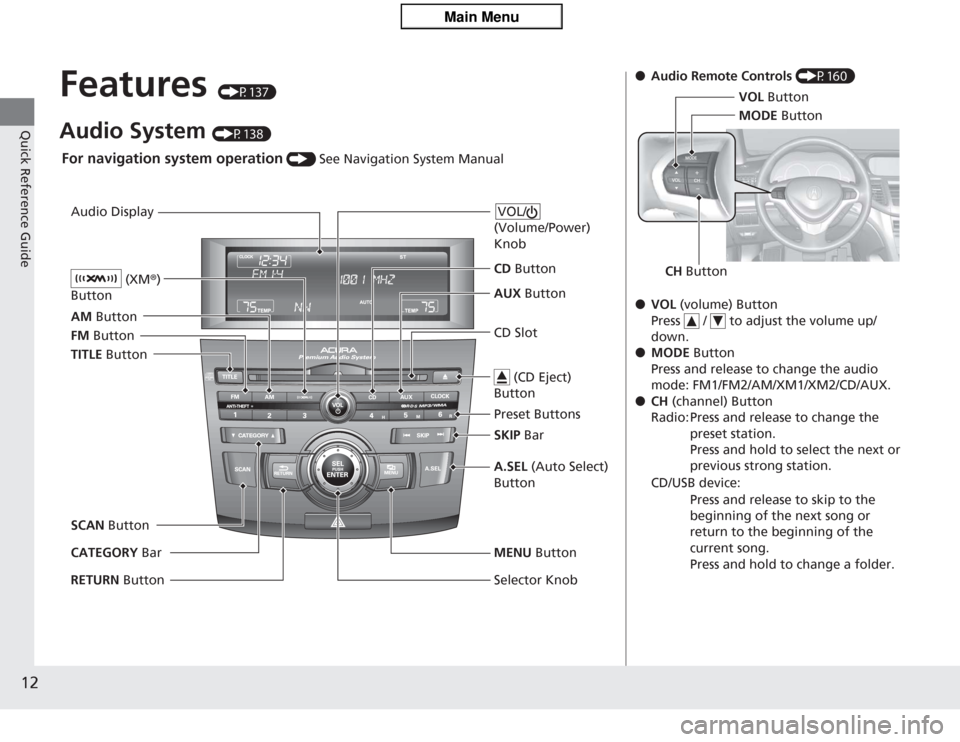
Audio System
(P138)
Audio Display
AM Button
FM Button
SCAN Button
CATEGORY Bar A.SEL
(Auto Select)
Button
(Volume/Power)
Knob
VOL/CD Slot AUX Button
CD
Button
(CD Eject)
ButtonPreset Buttons
SKIP Bar
TITLE
Button (XM
®)
ButtonMENU Button
Selector Knob
RETURN Button
For navigation system operation
() See Navigation System Manual
●Audio Remote Controls (P160)
● VOL (volume) Button
Press / to adjust the volume up/
down.
● MODE Button
Press and release to change the audio
mode: FM1/FM2/AM/XM1/XM2/CD/AUX.
● CH (channel) Button
Radio: Press and release to change the preset station.
Press and hold to select the next or
previous strong station.
CD/USB device: Press and release to skip to the
beginning of the next song or
return to the beginning of the
current song.
Press and hold to change a folder.
VOL Button
CH Button MODE
Button
Page 89 of 325
88Controls
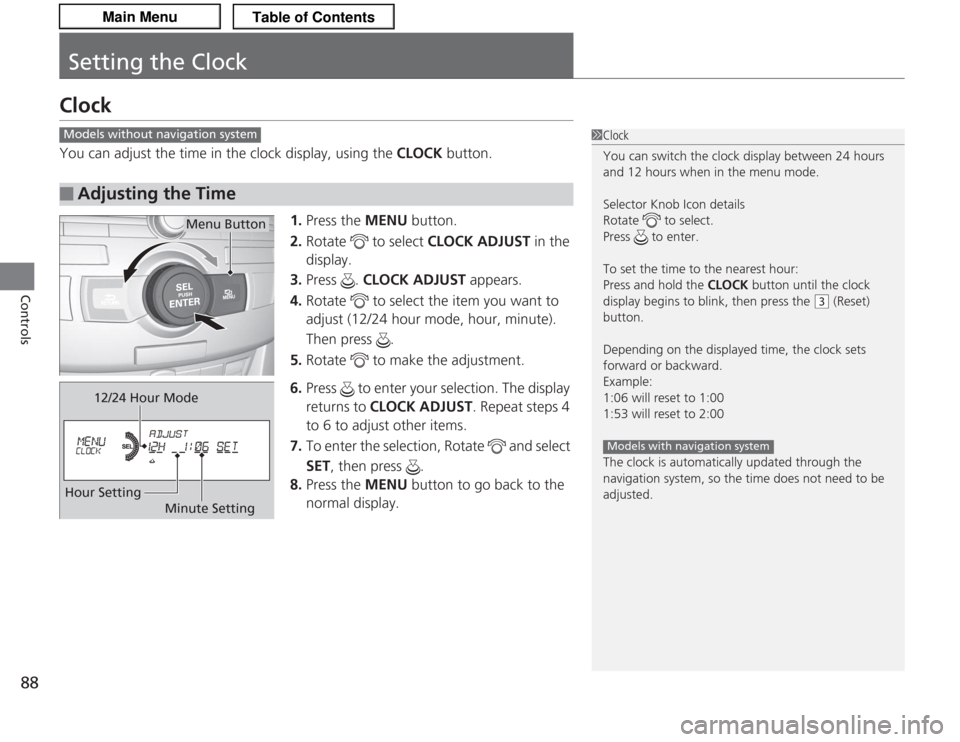
Setting the ClockClockYou can adjust the time in the clock display, using the CLOCK button.
1. Press the MENU button.
2. Rotate to select CLOCK ADJUST in the
display.
3. Press . CLOCK ADJUST appears.
4. Rotate to select the item you want to
adjust (12/24 hour mode, hour, minute).
Then press .
5. Rotate to make the adjustment.
6. Press to enter your selection. The display
returns to CLOCK ADJUST . Repeat steps 4
to 6 to adjust other items.
7. To enter the selection, Rotate and select
SET , then press .
8. Press the MENU button to go back to the
normal display.■
Adjusting the Time
1 Clock
You can switch the clock display between 24 hours
and 12 hours when in the menu mode.
Selector Knob Icon details
Rotate to select.
Press to enter.
To set the time to the nearest hour:
Press and hold the CLOCK button until the clock
display begins to blink, then press the
( 3
(Reset)
button.
Depending on the displayed time, the clock sets
forward or backward.
Example:
1:06 will reset to 1:00
1:53 will reset to 2:00
The clock is automatically updated through the
navigation system, so the time does not need to be
adjusted.
Models with navigation system
Models without navigation system
Menu Button
12/24 Hour Mode
Hour Setting Minute Setting
Page 139 of 325
138Features
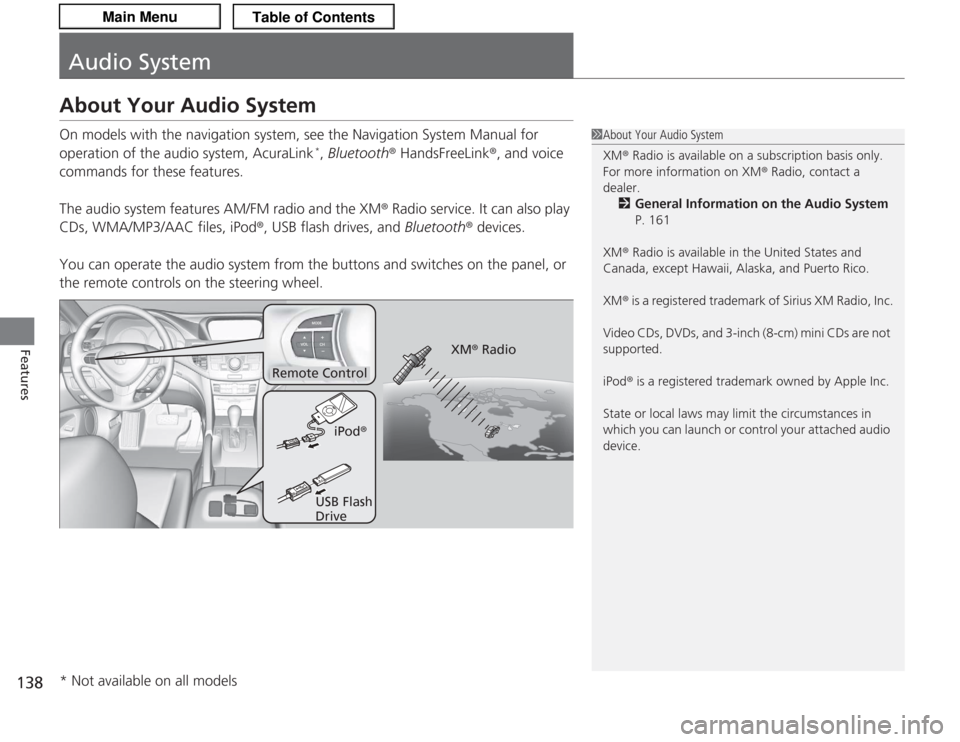
Audio SystemAbout Your Audio SystemOn models with the navigation system, see the Navigation System Manual for
operation of the audio system, AcuraLink
*, Bluetooth® HandsFreeLink ®, and voice
commands for these features.
The audio system features AM/FM radio and the XM ® Radio service. It can also play
CDs, WMA/MP3/AAC files, iPod ®, USB flash drives, and Bluetooth® devices.
You can operate the audio system from the buttons and switches on the panel, or
the remote controls on the steering wheel.
1 About Your Audio System
XM ® Radio is available on a subscription basis only.
For more information on XM® Radio, contact a
dealer.
2 General Information on the Audio System
P. 161
XM ® Radio is available in the United States and
Canada, except Hawaii, Alaska, and Puerto Rico.
XM ® is a registered trademark of Sirius XM Radio, Inc.
Video CDs, DVDs, and 3-inch (8-cm) mini CDs are not
supported.
iPod ® is a registered trademark owned by Apple Inc.
State or local laws may limit the circumstances in
which you can launch or control your attached audio
device.
Remote Control
iPod®
USB Flash
Drive XM
® Radio
* Not available on all models
Page 168 of 325
167
Continued
Features
Bluetooth® HandsFreeLink ®For models with the navigation system, see the Navigation System Manual for how
to operate Bluetooth® HandsFreeLink ®.
Bluetooth ® HandsFreeLink ® (HFL) allows you to place and receive phone calls using
your vehicle’s audio system, without handling your cell phone.Using HFL
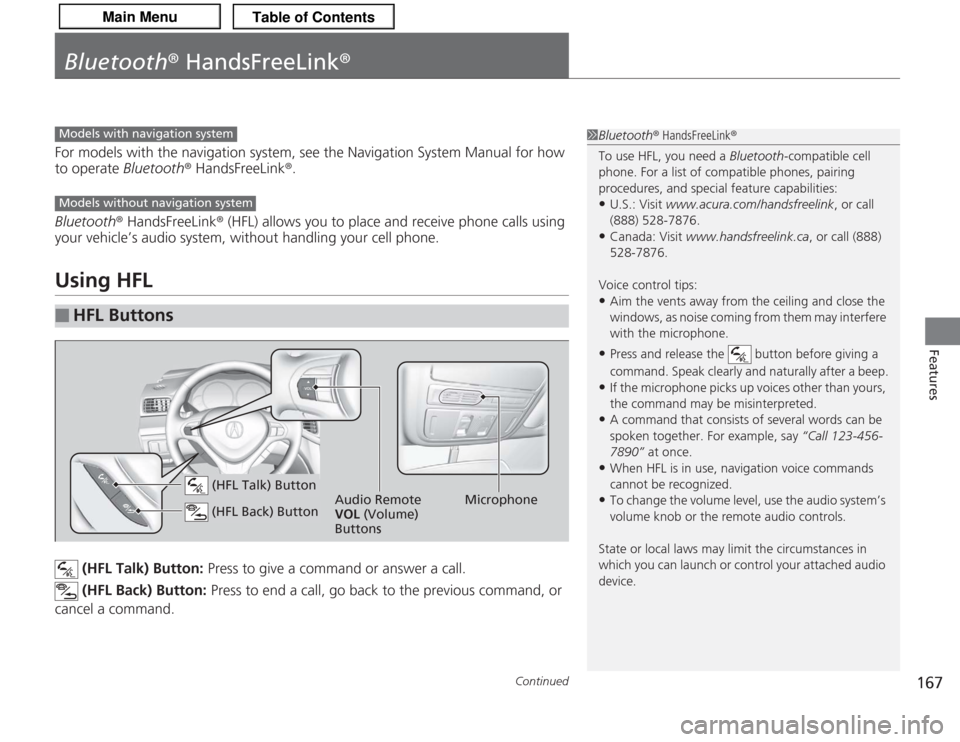
(HFL Talk) Button: Press to give a command or answer a call.
(HFL Back) Button: Press to end a call, go back to the previous command, or
cancel a command.
■
HFL Buttons
1 Bluetooth ® HandsFreeLink ®
To use HFL, you need a Bluetooth-compatible cell
phone. For a list of compatible phones, pairing
procedures, and special feature capabilities:•U.S.: Visit www.acura.com/handsfreelink , or call
(888) 528-7876.•Canada: Visit www.handsfreelink.ca , or call (888)
528-7876.
Voice control tips:•Aim the vents away from the ceiling and close the
windows, as noise coming from them may interfere
with the microphone.•Press and release the button before giving a
command. Speak clearly and naturally after a beep.•If the microphone picks up voices other than yours,
the command may be misinterpreted.•A command that consists of several words can be
spoken together. For example, say “Call 123-456-
7890” at once.•When HFL is in use, navigation voice commands
cannot be recognized.•To change the volume level, use the audio system’s
volume knob or the remote audio controls.
State or local laws may limit the circumstances in
which you can launch or control your attached audio
device.
Models with navigation systemModels without navigation system
Microphone
Audio Remote
VOL (Volume)
Buttons
(HFL Talk) Button (HFL Back) Button
Page 269 of 325

268Maintenance
BatteryChecking the Battery
Check the battery condition monthly. Look at
the test indicator window and check the
terminals for corrosion.
If your vehicle’s battery is disconnected or goes dead:
• The audio system is disabled.
2 Entering the audio security code P. 140
•The clock resets.
2 Adjusting the Time P. 88
•The navigation system is disabled. A PIN code will be required.
2 Refer to the navigation system manual
Charging the BatteryDisconnect both battery cables to prevent damaging your vehicle’s electrical system.
Always disconnect the negative (–) cable first, and reconnect it last.
1BatteryWARNING: Battery post, terminals,
and related accessori es contain lead
and lead compounds.
Wash your hands after handling.The test indicator’s color information is on the
battery.
When you find corrosion, clean the battery terminals
by applying a baking powder and water solution.
Rinse the terminals with water. Cloth/towel dry the
battery. Coat the terminals with grease to help
prevent future corrosion.
3
WARNING
The battery gives off explosive hydrogen
gas during normal operation.
A spark or flame can cause the battery to
explode with enough force to kill or
seriously hurt you.
When conducting any battery
maintenance, wear protective clothing and
a face shield, or have a skilled technician do
it.
Test Indicator Window
Page 316 of 325

315
Information
Authorized Manuals■
For U.S. Owners:
The publications listed below can be purchased from Helm Incorporated. You can
order a manual by phone at (800) 782-4356 (credit card orders only), or online at
www.helminc.com .
Make an inquiry to Helm Inc. at (800) 782-4356 if you are interested in ordering
other models’ or other years’ manuals.Publication
Form Number
Form Description
61TL204
2011-2013 Acura TSX L4 Sedan/Sport Wagon Service Manual
61TP103
2013 Acura TSX V6 Service Manual
61TL204EL
2011-2013 Acura TSX
Electrical Troubleshooting Manual
61TP103EL
2013 Acura TSX V6
Electrical Troubleshooting Manual
61TL232
2009-2013 Acura TSX Body Repair Manual
31TL1640
2013 Acura TSX Owner’s Manual
31TL1840
2013 Acura TSX
Navigation System Owner’s Manual
31TL1M40
2013 Acura TSX Maintenance Journal
31TL1Q40
2013 Acura TSX Advanced Technology Guide
ACU-R
Order Form for Previous Years-
Indicate Year and Model Desired
1 Authorized Manuals
Service Manual:
Covers maintenance and recommended procedures
for repair to engine and chassis components. It is
written for the journeyman technician, but it is simple
enough for most mechanically inclined owners to
understand.
Electrical Troubleshooting Manual:
Complements the Service Manual by providing in-
depth troubleshooting information for each electrical
circuit in your vehicle.
Body Repair Manual:
Describes the procedures involved in the replacement
of damaged body parts.
For Canadian Owners:
Si vous avez besoin d’un Manuel du propriétaire en
français, veuillez demander à votre concessionnaire
de commander le numéro de pièce 33TL1C40