buttons Acura TSX 2014 User Guide
[x] Cancel search | Manufacturer: ACURA, Model Year: 2014, Model line: TSX, Model: Acura TSX 2014Pages: 329, PDF Size: 15.95 MB
Page 144 of 329

143
Audio System Basic Operation
To use the audio system function, the ignition swit ch must be in ACCESSORY (q
or
ON
(w
.
Use the selector knob or MENU button to
access some audio functions.
Press to switch between the normal and
extended display for so me functions. The
extended display has three segments to
display detailed information.
Selector knob: Rotate left or right to scroll
through the availabl e choices. Press to set
your selection.
MENU button: Press to select any setting
such as the clock, sound control, or the
compass. Press this button again to cancel the
menu display mode.
RETURN button: Press to go back to the
previous display.
1 Audio System Basic Operation
These indications are used to show how to operate
the selector knob.
Rotate to select.
Press to enter.
RETURN
ButtonSelector
KnobMENU
Button
Menu Display
14 ACURA TSX 4D-31TL16500.book 143 ページ 2013年6月17日 月曜日 午前9時40分
QRG
Index
FeaturesTOC
Page 147 of 329

146
uu Audio System Basic Operation u Playing the AM/FM Radio
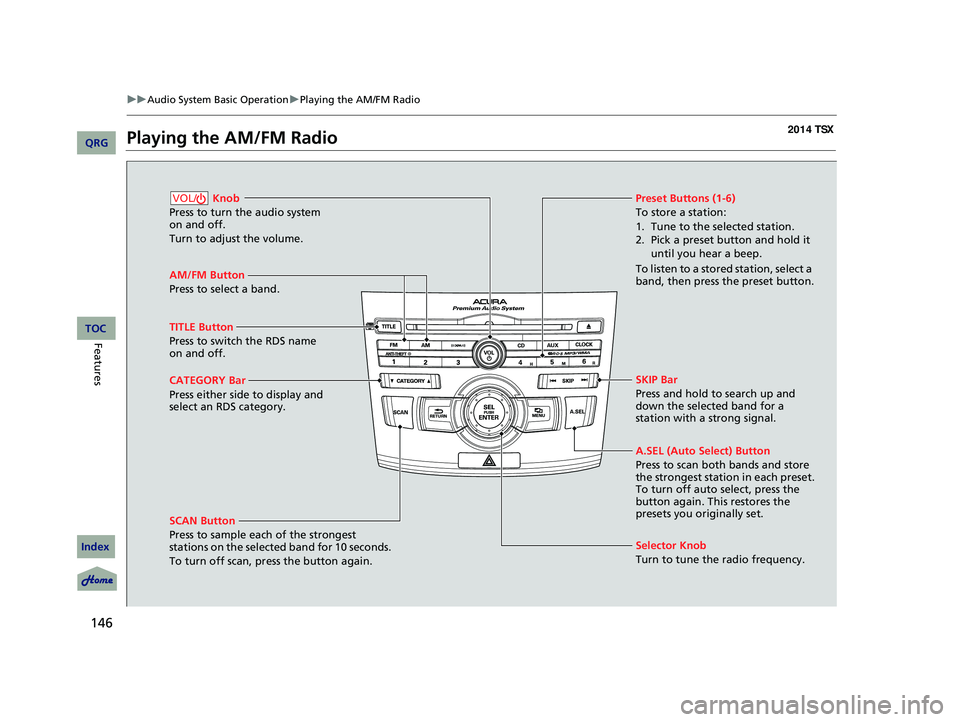
Playing the AM/FM Radio
AM/FM Button
Press to select a band.
SCAN Button
Press to sample each of the strongest
stations on the selected band for 10 seconds.
To turn off scan, pr ess the button again.
Knob
Press to turn the audio system
on and off.
Turn to adjust the volume.VOL/Preset Buttons (1-6)
To store a station:
1. Tune to the selected station.
2. Pick a preset button and hold it until you hear a beep.
To listen to a stored station, select a
band, then press the preset button.
Selector Knob
Turn to tune the radio frequency.
TITLE Button
Press to switch the RDS name
on and off.
CATEGORY Bar
Press either side to display and
select an RDS category. SKIP Bar
Press and hold to search up and
down the selected band for a
station with a strong signal.
A.SEL (Auto Select) Button
Press to scan both bands and store
the strongest station in each preset.
To turn off auto select, press the
button again. This restores the
presets you originally set.
14 ACURA TSX 4D-31TL16500.book 146 ページ 2013年6月17日 月曜日 午前9時40分
QRG
Index
FeaturesTOC
Page 149 of 329

148
uu Audio System Basic Operation u Playing the XM ® Radio
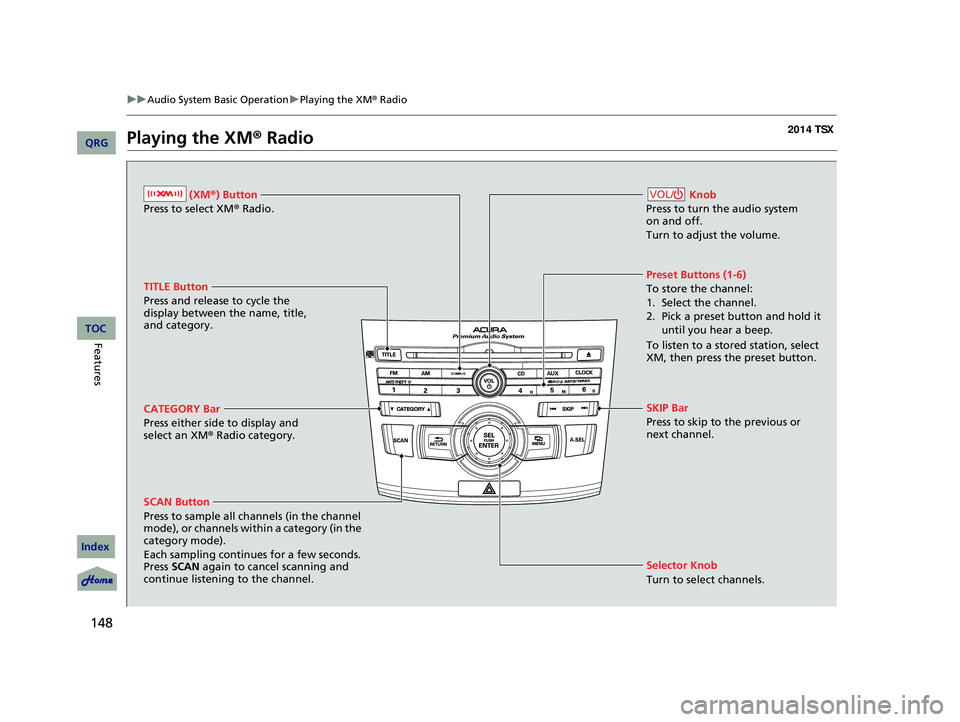
Playing the XM ® Radio
(XM ®) Button
Press to select XM ® Radio.
TITLE Button
Press and release to cycle the
display between the name, title,
and category.
CATEGORY Bar
Press either side to display and
select an XM ® Radio category.
SCAN Button
Press to sample all channels (in the channel
mode), or channels within a category (in the
category mode).
Each sampling continues for a few seconds.
Press SCAN again to cancel scanning and
continue listening to the channel.
Knob
Press to turn the audio system
on and off.
Turn to adjust the volume.VOL/
Preset Buttons (1-6)
To store the channel:
1. Select the channel.
2. Pick a preset button and hold it until you hear a beep.
To listen to a stored station, select
XM, then press the preset button.
SKIP Bar
Press to skip to the previous or
next channel.
Selector Knob
Turn to select channels.
14 ACURA TSX 4D-31TL16500.book 148 ページ 2013年6月17日 月曜日 午前9時40分
QRG
Index
FeaturesTOC
Page 150 of 329

149
uu Audio System Basic Operation u Playing the XM ® Radio
1. Press the button to select the XM ® radio band (XM1 or XM2).
2. Press and hold the TITLE button to switch between the channel mode and
category mode.
If you press the MENU button, rotate to select MODE/CATEGORY or MODE
CHANNEL . Each time you press , the mode switches between them.
Press the button to enter the setting.
3. Select a channel using the TUNE ( ), SKIP, CATEGORY , SCAN, or Preset
buttons.
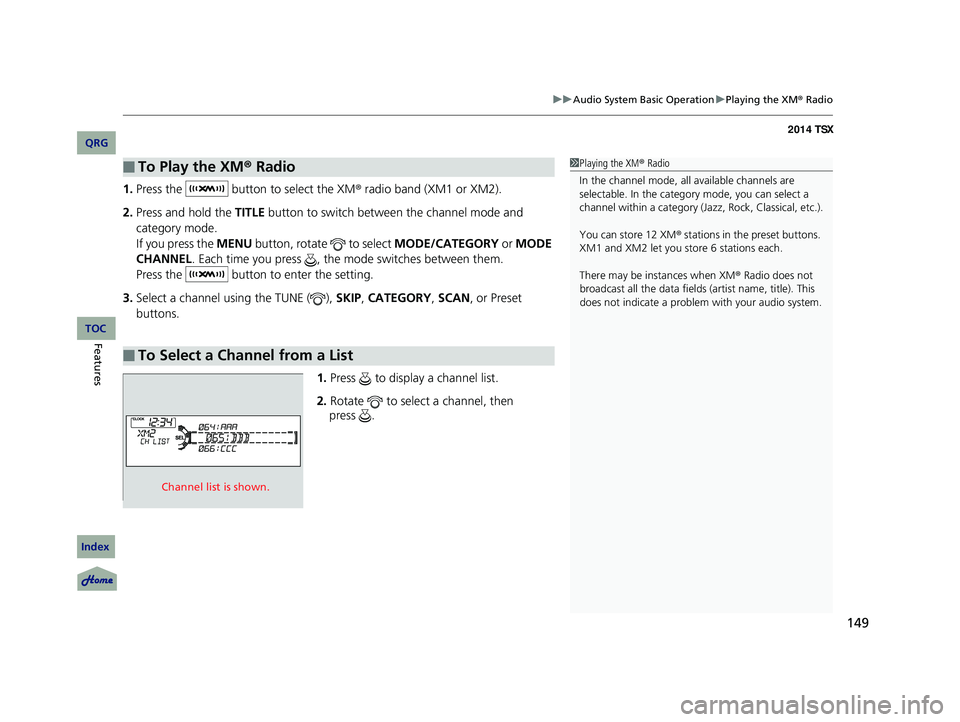
1.Press to display a channel list.
2. Rotate to select a channel, then
■To Play the XM ® Radio
■To Select a Channel from a List
1 Playing the XM ® Radio
In the channel mode, all available channels are
selectable. In the categor y mode, you can select a
channel within a ca tegory (Jazz, Rock, Classical, etc.).
You can store 12 XM ® stations in the preset buttons.
XM1 and XM2 let you store 6 stations each.
There may be instances when XM ® Radio does not
broadcast all the data fields (artist name, title). This
does not indicate a problem with your audio system.
Channel list is shown.
14 ACURA TSX 4D-31TL16500.book 149 ページ 2013年6月17日 月曜日 午前9時40分
QRG
Index
FeaturesTOC
press .
Page 168 of 329

167Continued
HomeLink® Universal Transceiver
The HomeLink ® Universal Transceiver can be programmed to operate up to three
remote controlled devices around your home, such as garage doors, lighting, or
home security systems.
Refer to the safety information that comes wi th your garage door opener to test that
the safety features are functioning properly. If you do not have the safety
information, contact the manufacturer.
Before programming HomeLink, make sure that people and objects are out of the
way of the garage or gate to prevent potential injury or damage.
When programming a garage door opener, park just outside the garage
door’s path.
Training HomeLink
If you have not trained any of the buttons in
HomeLink before, you should erase any
previously learned codes. To do this:
• Press and hold the two outside buttons for
about 20 seconds, until the red indicator
blinks. Release the bu ttons, and proceed to
step 1.
• If you are training the second or third
button, go directly to step 1.
■Important Safety Precautions
1HomeLink ® Universal Transceiver
HomeLink® is a registered tra demark of Johnson
Controls., Inc.
Before programming HomeLi nk to operate a garage
door opener, confirm that the opener has an external
entrapment protection system, such as an “electronic
eye,” or other safety and re verse stop features. If it
does not, HomeLink may not be able to operate it.
Red Indicator
14 ACURA TSX 4D-31TL16500.book 167 ページ 2013年6月17日 月曜日 午前9時40分
QRG
Index
FeaturesTOC
Page 169 of 329

uu HomeLink ® Universal Transceiver u Training HomeLink
168
■Training a Button1Training HomeLink
Retraining a Button
If you want to retrain a programmed button for a
new device, you do not ha ve to erase all button
memory. You can replace the existing memory code
using this procedure:
Erasing Codes
To erase all the codes, press and hold the two outside
buttons until the HomeLink i ndicator begins to blink
(about 10 to 20 secs). You should erase all codes
before selling the vehicle.
If you have any problems, see the device’s
instructions, visit www.homelink.com , or call
HomeLink at (800) 355-3515.
1.Press and hold the desired HomeLink button until the
HomeLink indicator begins to blink.
2.Continue to hold the HomeLink button and follow steps
1 - 3 under “Training a Button.”
Indicator remains on for
about 25 secs.Standard transmitterIndicator blinks rapidly for
two secs, then remains on
for about 23 secs.Rolling code transmitter
1.Position the remote transmitter you wish to lin k 1 to 3 inches (3-8 cm) from the HomeLink
button you want to program.
2.
3.
Press and hold the desired Home Link button and the button on
the remote transmitter.
Does the HomeLink indicator (LED) blink after 10 secs?
Press and hold the
programmed HomeLink
button for about a sec.
Does the device (garage
door opener) work?a.
4.
5.a.
b.
Training
Complete
Press and hold the
HomeLink button again.
The remote-controlled
device should operate.The remote has a rolling code. Press the
“learn” button on the remote-controlled
device (e.g. garage door opener).
Within 30 secs, press and hold the
programmed HomeLink button for 2 secs.
Press and hold the HomeLink button again.
Training Complete
NO
Press and hold the remote and the HomeLink
button at the same time. Then, while
continuing to hold the HomeLink button,
press and release the button on the remote
every 2 secs.
Dose the LED blink within 20 secs?
NOYES
YESNO
HomeLink LED
is on.HomeLink indicator blinks for 2 secs, then remains on.
YES
14 ACURA TSX 4D-31TL16500.book 168 ページ 2013年6月17日 月曜日 午前9時40分
QRG
Index
FeaturesTOC
Page 170 of 329

169Continued
Bluetooth® HandsFreeLink ®
See the Navigation System Manual for how to operate Bluetooth® HandsFreeLink ®.
Bluetooth ® HandsFreeLink ® (HFL) allows you to place and receive phone calls using
your vehicle’s audio system, without handling your cell phone.
Using HFL
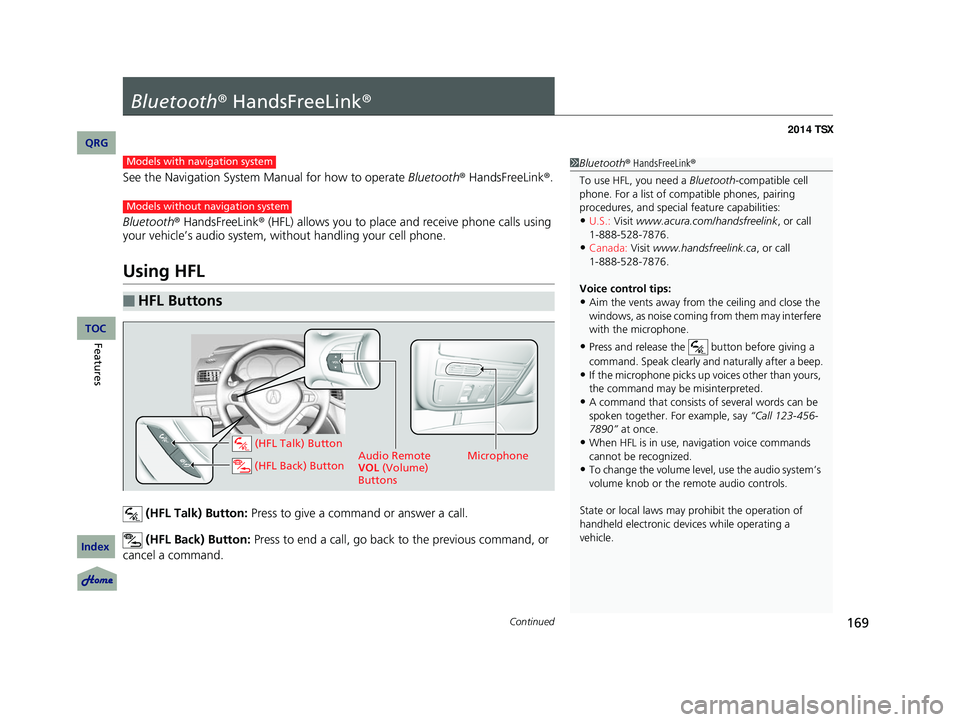
(HFL Talk) Button: Press to give a command or answer a call.
(HFL Back) Button: Press to end a call, go back to the previous command, or
cancel a command.
■HFL Buttons
1 Bluetooth ® HandsFreeLink ®
To use HFL, you need a Bluetooth-compatible cell
phone. For a list of compatible phones, pairing
procedures, and special feature capabilities:
•U.S.: Visit www.acura.com/handsfreelink , or call
•Canada: Visit www.handsfreelink.ca, or call
Voice control tips:
•Aim the vents away from the ceiling and close the
windows, as noise coming fr om them may interfere
with the microphone.
•Press and release the button before giving a
command. Speak clearly and naturally after a beep.
•If the microphone picks up vo ices other than yours,
the command may be misinterpreted.
•A command that consists of several words can be
spoken together. For example, say “Call 123-456-
7890” at once.
•When HFL is in use, navigation voice commands
cannot be recognized.
•To change the volume level, use the audio system’s
volume knob or the remote audio controls.
State or local laws may pr ohibit the operation of
handheld electronic devi ces while operating a
vehicle.
1-888-528-7876.
1-888-528-7876.
Models with navigation system
Models without navigation system
Microphone
Audio Remote
VOL (Volume)
Buttons (HFL Talk) Button
(HFL Back) Button
14 ACURA TSX 4D-31TL16500.book 169 ページ 2013年6月17日 月曜日 午前9時40分
QRG
Index
FeaturesTOC
Page 325 of 329

324
Manual Transmission ............................... 201
Glass (care)................................................ 277
Glove Box .................................................. 127
H
Halogen Bulbs ................................... 249, 253
Handling the Unexpected ........................ 279
HandsFreeLink® (HFL)............................... 169
Change Language ................................... 180
Help Features........................................... 170
HFL Status Display.................................... 170
Making a Call .......................................... 175
Menus ..................................................... 171
Muting a Call........................................... 176
Phone Setup ............................................ 173
Phonebook .............................................. 177
Receiving a Call ....................................... 176
Sending Numbers or Names During a Call ........................................................ 176
Transferring a Call ................................... 176
Hazard Warning Button .
.............................. 2
Head Restraints ......................................... 119
Headlights ................................................. 106
Aiming .................................................... 249
Automatic Operation ............................... 107
Dimming ......................................... 106, 108
Operating ................................................ 106
Heated Door Mirrors ......
.......................... 111
Heaters (Seat) ............................................ 133
High-Beam Indicator .................................. 69 HomeLink
® Universal Transceiver ............ 167
I
Identification Numbers ............................ 312
Engine and Transmission ......................... 312
Vehicle Identification ............................... 312
Ignition Switch ......................................... 105
Illumination Control ................................. 110
Knob ....................................................... 110
Immobilizer System .................................... 99
Indicator.................................................... 70
Indicators .................................................... 64
ABS (Anti-lock Brake System)..................... 66
Charging System ............................... 65, 294
Cruise Control ................................... 71, 204
Cruise Main....................................... 71, 203
Door and Trunk Open ......................... 25, 68
EPS (Electric Power Steering) System .. 68, 296
Fog Light ................................................... 70
High-Beam ................................................ 69
Immobilizer System ................................... 70
Lights On .................................................. 69
Low Fuel ................................................... 66
Low Oil Pressure ................................ 64, 294
Low Tire Pressure/TPMS ............. 68, 208, 210
Maintenance Minder
TM............................ 227
Malfunction Indicator Lamp............... 65, 295
Parking Brake and Brake System ................ 64
Seat Belt Reminder .............................. 27, 66
Security System Alarm ............................... 71Side Airbag Off ...................................
46, 70
Supplemental Restraint System ........... 44, 67
System Message ....................................... 69
Transmission ............................................. 65
Turn Signal ............................................... 69
VSA ® (V
ehicle Stability Assist)
System ............................................ 67, 206
VSA ® OFF .......................................... 67, 207
Information .............................................. 307
Information Buttons .................................. 76
Instant Fuel Economy ................................ 78
Instrument Panel ........................................ 63
Brightness Control .................................. 110
Interior Lights ........................................... 126
Interior Rearview Mirror ......................... 115
J
Jack (Wheel Nut Wrench) ........................ 284
Jump Starting ........................................... 288
K
Key Number Tag ........................................ 90
Keyless Lockout Prevention ....................... 92
Keys ............................................................. 89
Lockout Prevention ................................... 92
Number Tag.............................................. 90
Rear Door Won’t Open ............................. 95
Remote Transmitter .................................. 91
Retractable Master Keys ............................ 89
14 ACURA TSX 4D-31TL16500.book 324 ページ 2013年6月17日 月曜日 午前9時40分
QRG
Index
IndexA B C D E F G H I J K L M N O P Q R S T U V W X Y Z
H
I
J
K