lock Acura TSX 2014 Manual PDF
[x] Cancel search | Manufacturer: ACURA, Model Year: 2014, Model line: TSX, Model: Acura TSX 2014Pages: 329, PDF Size: 15.95 MB
Page 234 of 329

233
uu Maintenance Under the Hood u Opening the Hood
Continued
Opening the Hood
1. Park the vehicle on a level surface, and set
the parking brake.
2. Pull the hood release handle under the
lower left corner of the dashboard.
u The hood will pop up slightly.
3. Push up the hood latch lever in the center
of the hood to release the lock mechanism,
and open the hood.
4. Remove the support rod from the clamp
using the grip. Mount the support rod in
the hood.
When closing, remove the support rod, and
stow it in the clamp, then gently lower the
hood. Remove your hand at a height of
approximately 12 inches (30 cm) and let the
hood close.1 Opening the Hood
NOTICE
Do not open the hood when the wiper arms are
raised.
The hood will strike the wipers, and may damage
either the hood or the wipers.
When closing the hood, check that the hood is
securely latched.
If the hood latch lever moves stiffly, or if you can
open the hood without lifti ng the lever, the latch
mechanism should be cleaned and lubricated.
Hood Release Handle
Pull
Lever
Support Rod
Grip
Clamp4-cylinder models
14 ACURA TSX 4D-31TL16500.book 233 ページ 2013年6月17日 月曜日 午前9時40分
QRG
Index
MaintenanceTOC
Page 242 of 329

241
uu Maintenance Under the Hood u Changing the Engine Oil and Oil Filter
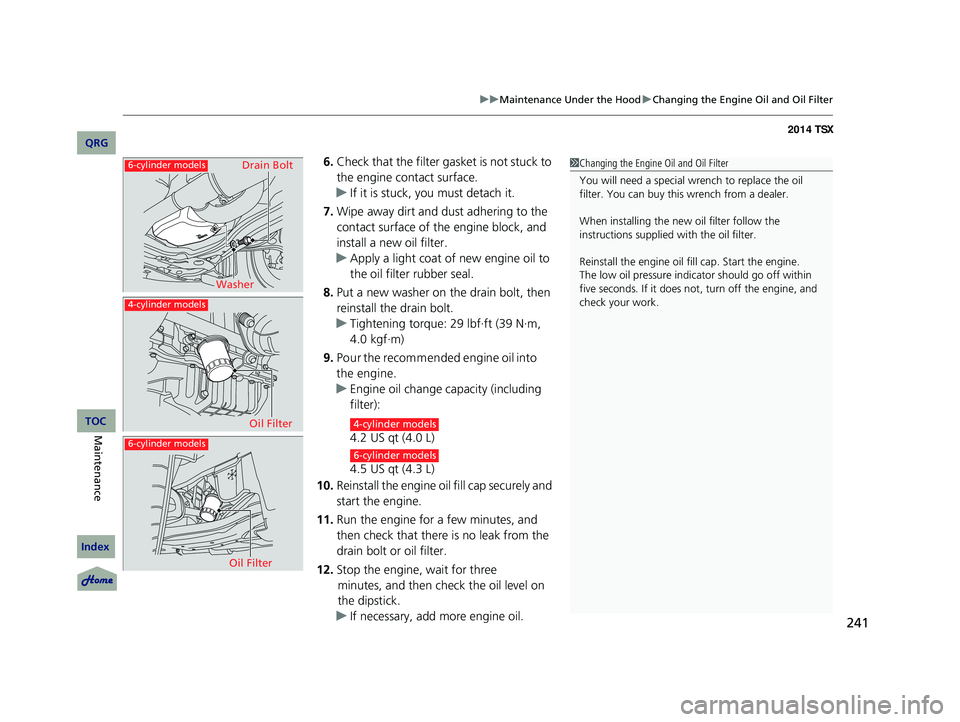
6. Check that the filter gasket is not stuck to
the engine contact surface.
u If it is stuck, you must detach it.
7. Wipe away dirt and dust adhering to the
contact surface of the engine block, and
install a new oil filter.
u Apply a light coat of new engine oil to
the oil filter rubber seal.
8. Put a new washer on the drain bolt, then
reinstall the drain bolt.
u Tightening torque: 29 lbf∙ft (39 N∙m,
4.0 kgf∙m)
9. Pour the recommended engine oil into
the engine.
u Engine oil change capacity (including
filter):
4.2 US qt (4.0 L)
4.5 US qt (4.3 L)
10. Reinstall the engine oil fill cap securely and
start the engine.
11. Run the engine for a few minutes, and
then check that there is no leak from the
drain bolt or oil filter.
12. Stop the engine, wait for three
minutes, and then check the oil level on
the dipstick.
u If necessary, add more engine oil.
1Changing the Engine Oil and Oil Filter
You will need a special wrench to replace the oil
filter. You can buy this wrench from a dealer.
When installing the new oil filter follow the
instructions supplied with the oil filter.
Reinstall the engine oil f ill cap. Start the engine.
The low oil pressure indi cator should go off within
five seconds. If it does not , turn off the engine, and
check your work.
6-cylinder models
6-cylinder models
4-cylinder models
Washer Drain Bolt
Oil Filter
Oil Filter4-cylinder models
6-cylinder models
14 ACURA TSX 4D-31TL16500.book 241 ページ 2013年6月17日 月曜日 午前9時40分
QRG
Index
MaintenanceTOC
Page 244 of 329

243
uu Maintenance Under the Hood u Engine Coolant
1. Remove the radiator cap cover.
2. Make sure the engine and radiator
are cool.
3. Turn the radiator cap counterclockwise and
relieve any pressure in the coolant system.
Do not push the cap down when turning.
4. Push down and turn the radiator cap
counterclockwise to remove it.
5. The coolant level should be up to the base
of the filler neck. Add coolant if it is low.
6 . Pu t th e rad iato r cap b ack o n , an d
tighten it fully.
7. Pour coolant into the reserve tank until it
reaches the MAX mark. Put the cap back
on the reserve tank.
■Radiator1 Radiator
NOTICE
Pour the fluid slowly and ca refully so you do not spill
any. Clean up any spills immediately; they can
damage components in the engine compartment.
3 WARNING
Removing the radiator cap while the
engine is hot can cause the coolant to spray
out, seriously scalding you.
Always let the engine and radiator cool
down before removing the radiator cap.
Radiator Cap6-cylinder models
All models
14 ACURA TSX 4D-31TL16500.book 243 ページ 2013年6月17日 月曜日 午前9時40分
QRG
Index
MaintenanceTOC
Page 255 of 329

254
uu Replacing Light Bulbs u Front Turn Signal/Parking/Side Marker Light Bulbs
2. Remove the coupler.
u It can be removed by pushing the tab.
3. Rotate the old bulb to the left to remove.
4. Insert a new bulb into the fog light
assembly and turn it to the right.
5. Insert the coupler into the connector of the
bulb.
Front Turn Signal/Parking/Side Marker Light Bulbs
When replacing, use the following bulbs.
Turn the steering wheel and pull the inner fender back in the same way as when
replacing the low beam headlights.
2 Changing the Low Beam Headlight P. 252
1. Turn the socket to the left and remove it.
2. Push in the old bulb, rotate to the left until
it unlocks, and remove.
3. Insert a new bulb.
Bulb
Coupler
Tab
Front Turn Signal/Parking/Side Marker: 21/5W
Socket
Bulb
14 ACURA TSX 4D-31TL16500.book 254 ページ 2013年6月17日 月曜日 午前9時40分
QRG
Index
MaintenanceTOC
Page 260 of 329

259Continued
Checking and Maintaining Wiper Blades
Checking Wiper Blades
If the wiper blade rubber has deteriorated, it will leave streaks and the metal wiper
arm may scratch the window glass.
Changing the Wiper Blade Rubber
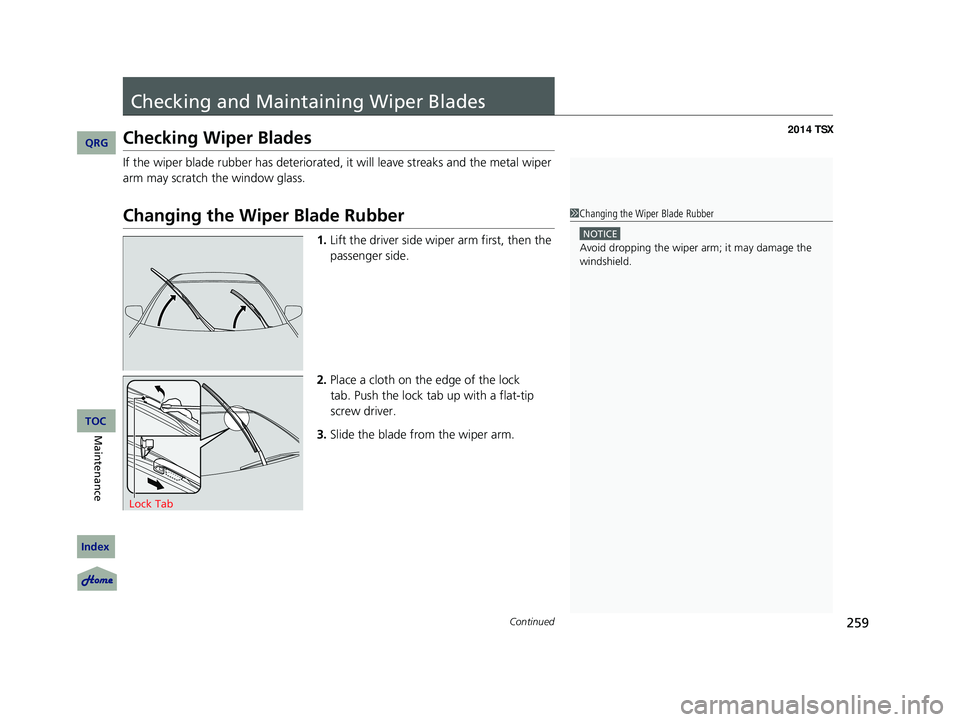
1.Lift the driver side wiper arm first, then the
passenger side.
2. Place a cloth on the edge of the lock
tab. Push the lock tab up with a flat-tip
screw driver.
3. Slide the blade from the wiper arm.
1Changing the Wiper Blade Rubber
NOTICE
Avoid dropping the wiper ar m; it may damage the
windshield.
Lock Tab
14 ACURA TSX 4D-31TL16500.book 259 ページ 2013年6月17日 月曜日 午前9時40分
QRG
Index
MaintenanceTOC
Page 261 of 329

260
uu Checking and Maintaining Wiper Blades u Changing the Wiper Blade Rubber
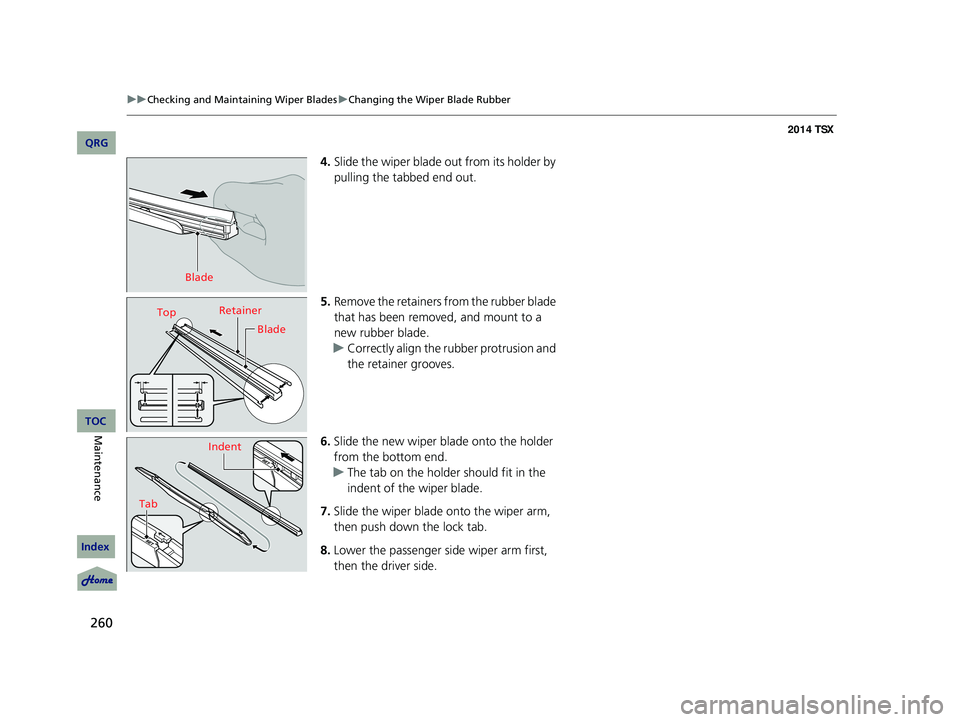
4. Slide the wiper blade out from its holder by
pulling the tabbed end out.
5. Remove the retainers from the rubber blade
that has been removed, and mount to a
new rubber blade.
u Correctly align the rubber protrusion and
the retainer grooves.
6. Slide the new wiper blade onto the holder
from the bottom end.
u The tab on the holder should fit in the
indent of the wiper blade.
7. Slide the wiper blade onto the wiper arm,
then push down the lock tab.
8. Lower the passenger side wiper arm first,
then the driver side.
Blade
Top Retainer
Blade
Tab Indent
14 ACURA TSX 4D-31TL16500.book 260 ページ 2013年6月17日 月曜日 午前9時40分
QRG
Index
MaintenanceTOC
Page 271 of 329

270
Battery
Checking the Battery
Check the battery condition monthly. Look at
the test indicator window and check the
terminals for corrosion.
If your vehicle’s battery is disconnected or goes dead:
• The audio system is disabled.
2 Entering the audio security code P. 142
• The clock resets.
2 Adjusting the Time P. 88
• The navigation system is disabled . A PIN code will be required.
2Refer to the navigation system manual
1Battery
WARNING: Battery post, terminals,
and related accessories contain lead
and lead compounds.
Wash your hands after handling.
The test indicator’s color information is on the
battery.
3 WARNING
The battery gives off explosive hydrogen
gas during normal operation.
A spark or flame can cause the battery to
explode with enough force to kill or
seriously hurt you.
When conducting any battery
maintenance, wear prot ective clothing and
a face shield, or have a skilled technician do
it.
Test Indicator Window
14 ACURA TSX 4D-31TL16500.book 270 ページ 2013年6月17日 月曜日 午前9時40分
QRG
Index
MaintenanceTOC
Page 276 of 329

275
uu Cleaning u Interior Care
The front floor mats hook over the floor
anchors, which keep th e mats from sliding
forward. To remove a mat for cleaning, turn
the anchor knobs to the unlock position.
When reinstalling the mat after cleaning, turn
the knobs to the lock position.
Do not put additional floor mats on top of
the anchored mats.
Vacuum dirt and dust from the leather frequ ently. Pay close attention to the pleats
and seams. Clean the leather with a so ft cloth dampened with a 90% water and
10% neutral soap solution. Then buff it with a clean, dry cloth. Remove any dust or
dirt on leather surfaces immediately.
■Floor Mats1 Floor Mats
If you use any floor mats that were not originally
provided with your vehicle, make sure they are
designed for your specific ve hicle, fit correctly, and
are securely anchored by the floor anchors.
Position the rear seat floor mats properly. If they are
not properly positioned, the floor mats can interfere
with the front seat functions.
To unlock
Driver’s floor mat is shown.
■Maintaining Genuine Leather *
* Not available on all models
14 ACURA TSX 4D-31TL16500.book 275 ページ 2013年6月17日 月曜日 午前9時40分
QRG
Index
MaintenanceTOC
Page 280 of 329

279
Handling the Unexpected
This chapter explains how to handle unexpected troubles.
Tools.................................................. 280
Types of Tools .................................. 280
If a Tire Goes Flat .............................. 281
Changing a Flat Tire ......................... 281
Engine Does Not Start Checking the Engine ........................ 287
Jump Starting ..........
.......................... 288
Shift Lever Does Not Move .............. 291
Overheating ...................................... 292
How to Handle Overheating ............. 292 Indicator, Coming On/Blinking
If the Low Oil Pressure Indicator Comes
On.................................................. 294
If the Charging System Indicator Comes
On ................................................. 294
If the Malfunction Indicator Lamp Comes On or Blinks ................................... 295
If the Brake System Indicator Comes On .. 296
If the Electric Power Steering (EPS) System
Indicator Comes On ............................ 296
If the Low Tire Pressure/TPMS Indicator Comes On or Blinks........................ 297 Fuses
Fuse Locations ................................. 298
Circuit Protected and Amps for Each Fuse........................................... . 300
Inspecting and Changing Fuses ........ 302
Emergency Towing ........................... 303
When You Cannot Unlock the Fuel Fill Door ................................................. 304
When You Cannot Open the Trunk .. 305
14 ACURA TSX 4D-31TL16500.book 279 ページ 2013年6月17日 月曜日 午前9時40分
QRG
Index2014 TSX
Page 282 of 329

281Continued
If a Tire Goes Flat
Changing a Flat Tire
If a tire goes flat while driving, grasp the steering wheel firmly, and brake gradually
to reduce speed. Then, stop in a safe place. Replace the flat tire with a compact
spare tire. Go to a dealer as soon as possible to have the full-size tire repaired
or replaced.
1. Park the vehicle on firm , level, and non-slippery surface and apply the
parking brake.
2. Move the shift lever in
(P
.
2. Move the shift lever in
(R
.
3. Set the parking brake.
4. Turn on the hazard warning lights an d turn the ignition switch to LOCK
(0 .
1
Changing a Flat Tire
Periodically check the tire pressure of the compact
spare. It should be set to the specified pressure.
Specified Pressure: 60 psi (420 kPa, 4.2 kgf/cm
2)
When driving with the compact spare tire, keep the
vehicle speed under 50 mph (80 km/h). Replace with
a full-size tire as soon as possible.
The compact spare tire and wheel in your vehicle are
specifically for this model.
Do not use them with another vehicle.
Do not use another type of compact spare tire or
wheel with your vehicle.
Do not mount tire chains on a compact spare tire.
If a chain-mounted front tire goes flat, remove one of
the full-size rear tires and replace it with the compact
spare tire. Remove the flat front tire and replace it will
the full-size tire that was removed from the rear.
Mount the tire chains on the front tire.
Do not use a puncture-repairi ng agent on a flat tire,
as it can damage the tire pressure sensor.
Automatic transmission models
Manual transmission models
All models
14 ACURA TSX 4D-31TL16500.book 281 ページ 2013年6月17日 月曜日 午前9時40分
QRG
Index
Handling the Unexpected
TOC