lights Alfa Romeo 147 2007 Owner handbook (in English)
[x] Cancel search | Manufacturer: ALFA ROMEO, Model Year: 2007, Model line: 147, Model: Alfa Romeo 147 2007Pages: 291, PDF Size: 5.52 MB
Page 15 of 291

GETTING TO KNOW YOUR CAR
13
– if the led continues flashing, but at dif-
ferent intervals than normal, this means that
different attempts to break in have occurred.
Through the number of flashes it is possi-
ble to identify the type of attempt:
1 flash:one or more doors
2 flashes:tailgate
3 flashes:bonnet
4 flashes:ultrasounds
5 flashes:abnormal vehicle lift-
ing/sloping (for ver-
sions/markets where ap-
plicable)
6 flashes:tampering with car starting
cables
7 flashes:tampering with battery ca-
bles or cutting emergency
key cables
8 flashes:connection line to sensors
and siren
9 flashes:at least three causes of
alarm.WHEN THE ALARM
IS TRIGGERED
When the system is on, the alarm comes
into action in the following cases:
– opening of one of the doors, bonnet or
tailgate;
– disconnection of the battery or section-
ing of electric cables;
– intrusion in the passenger compartment,
for example breakage of windows (volu-
metric protection);
– attempt to start the engine (key in
MARposition);
– abnormal car lifting/sloping (for ver-
sions/markets where applicable).
Depending on the markets, the cutting in
of the alarm causes operation of the siren
and hazard warning lights (for about 26 sec-
onds). The ways of operating and the num-
ber of cycles may vary depending on the
markets.
A maximum number of cycles is however
envisaged.
Once the alarm cycle has ended, the sys-
tem resumes its normal control function.
VOLUMETRIC PROTECTION
To make sure that the protection system
works correctly the side windows and sun-
roof (if fitted) must be properly shut.
The function can be cut off (if, for exam-
ple, leaving animals in the car) carrying out
the following operations in rapid succession:
starting from the condition with the igni-
tion key at MAR, move the key to STOP,
then immediately back to MARand then
toSTOPagain, then remove the ignition
key.
The deterrent led (A-fig. 7) on the dash-
board lights up for about 2 seconds to con-
firm that the function has been cut off.
To restore volumetric protection, move and
keep the ignition key at MARfor over 30
seconds.
If, with the volumetric protection function
deactivated, an electric control controlled by
the ignition key at MARis required (e.g.
power windows) turn the key to MAR, op-
erate the control and move the key to
STOPin a maximum time of 30 seconds.
This way volumetric protection is not re-
stored.
Page 16 of 291
GETTING TO KNOW YOUR CAR
14
HOW TO CUT OFF
THE ALARM SYSTEM
To deactivate the alarm system complete-
ly (for instance during prolonged inactivity
of the vehicle) simply lock the car turning
the key in the lock.
MINISTERIAL CERTIFICATION
In accordance with the law in force in each
country, on the subject of radio frequency,
we wish to point out that for the markets in
which the transmitter needs to be marked,
the certification number is given on the com-
ponent.
Depending on the versions/markets, the
code may also be given on the transmitter
and/or on the receiver.
IGNITION DEVICE
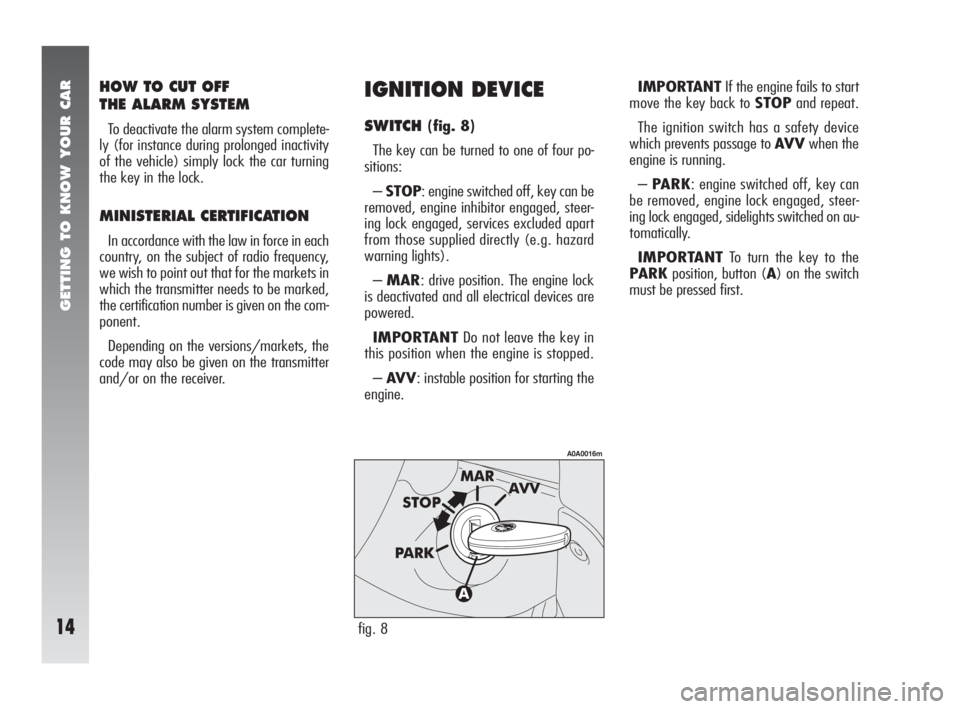
SWITCH(fig. 8)
The key can be turned to one of four po-
sitions:
–STOP: engine switched off, key can be
removed, engine inhibitor engaged, steer-
ing lock engaged, services excluded apart
from those supplied directly (e.g. hazard
warning lights).
–MAR: drive position. The engine lock
is deactivated and all electrical devices are
powered.
IMPORTANTDo not leave the key in
this position when the engine is stopped.
–AV V: instable position for starting the
engine.IMPORTANTIf the engine fails to start
move the key back to STOPand repeat.
The ignition switch has a safety device
which prevents passage to AV Vwhen the
engine is running.
–PARK: engine switched off, key can
be removed, engine lock engaged, steer-
ing lock engaged, sidelights switched on au-
tomatically.
IMPORTANTTo turn the key to the
PARKposition, button (A) on the switch
must be pressed first.
fig. 8
A0A0016m
Page 18 of 291
FRONT SEATSCENTRAL LOCKING
This allows central locking of the door
locks.
To engage central locking, the doors must
be perfectly shut, otherwise, locking is de-
nied.
IMPORTANTWith central locking en-
gaged, pulling the inside lever for opening
one of the doors causes the unlocking also
of the other door.
In the event of a power cut off (blown
fuse, battery disconnected, etc.) it is still pos-
sible to work the lock by hand.
fig. 11
A0A0019m
GETTING TO KNOW YOUR CAR
16
OPENING/CLOSING
FROM INSIDE
To open the door, pull the handle
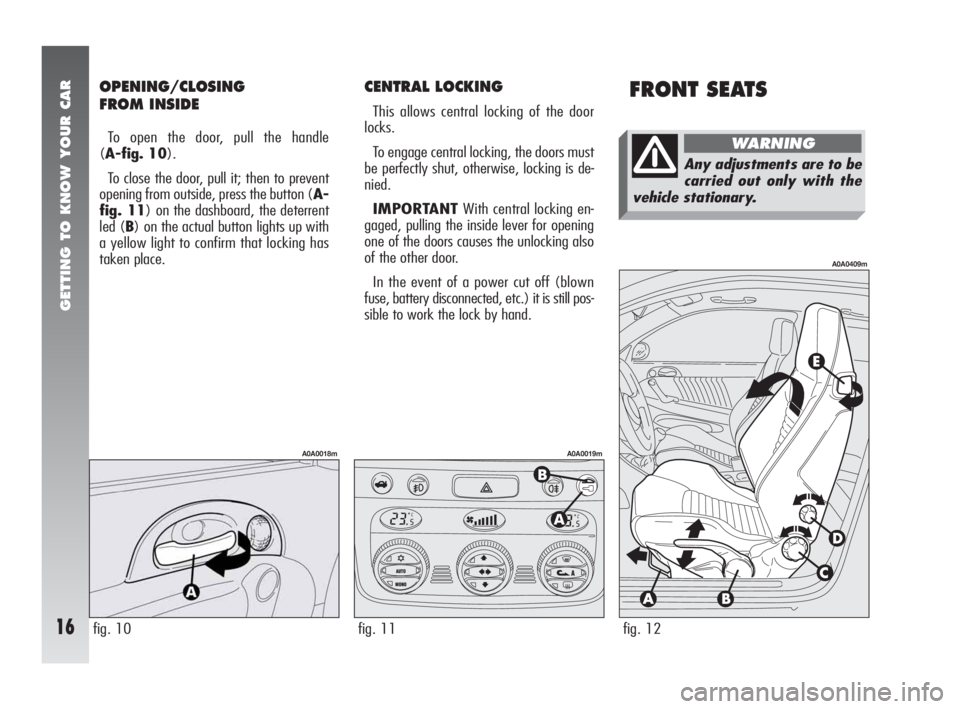
(A-fig. 10).
To close the door, pull it; then to prevent
opening from outside, press the button (A-
fig. 11) on the dashboard, the deterrent
led (B) on the actual button lights up with
a yellow light to confirm that locking has
taken place.
fig. 12
A0A0409m
Any adjustments are to be
carried out only with the
vehicle stationary.
WARNING
fig. 10
A0A0018m
Page 44 of 291
GETTING TO KNOW YOUR CAR
42
STEERING
WHEEL LEVERS
The devices and services controlled by the
levers on the steering wheel can only be ac-
tivated with the ignition key at MAR.
LEFT-HAND LEVER
The left-hand lever controls the outer lights
except the fog lamps and rear fog guards.
When the outer lights are switched on, the
various controls on the dashboard are illu-
minated.
Only with the ignition key at PARK, re-
gardless of the position of the knurled ring,
the side lights and number plate lights stay
on.
Position (1or2-fig. 57) of the lever
causes the turning on only of the side lights
(front and rear), on the right or left respec-
tively.
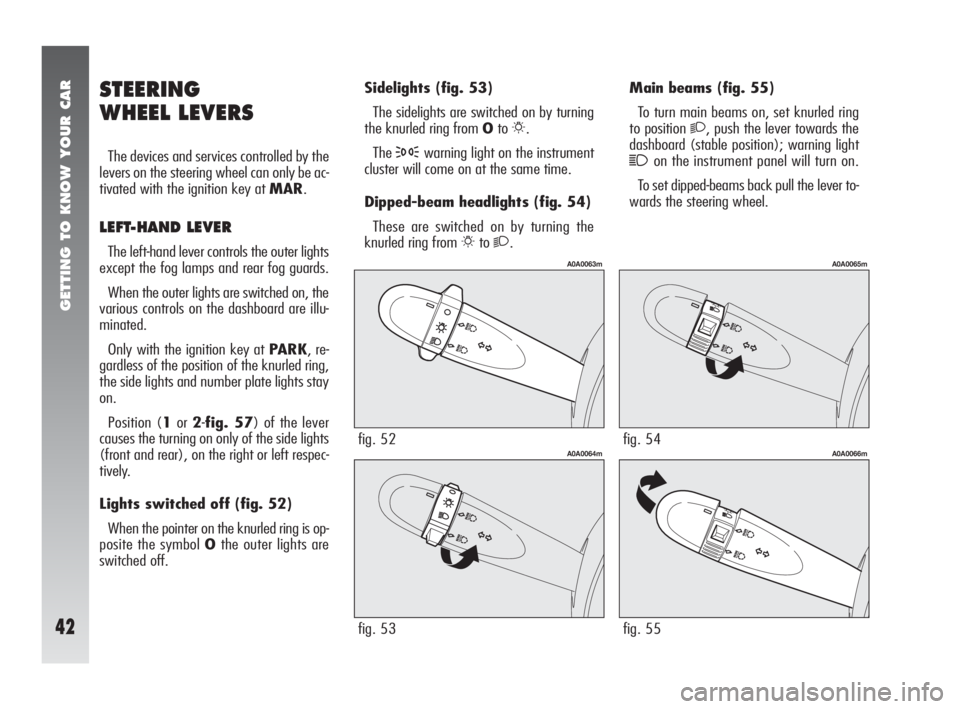
Lights switched off (fig. 52)
When the pointer on the knurled ring is op-
posite the symbol Othe outer lights are
switched off.Sidelights(fig. 53)
The sidelights are switched on by turning
the knurled ring from Oto
6.
The
3warning light on the instrument
cluster will come on at the same time.
Dipped-beam headlights (fig. 54)
These are switched on by turning the
knurled ring from
6to2.
fig. 52
A0A0063m
fig. 53
A0A0064m
Main beams (fig. 55)
To turn main beams on, set knurled ring
to position
2, push the lever towards the
dashboard (stable position); warning light
1on the instrument panel will turn on.
To set dipped-beams back pull the lever to-
wards the steering wheel.
fig. 54
A0A0065m
fig. 55
A0A0066m
Page 45 of 291
GETTING TO KNOW YOUR CAR
43
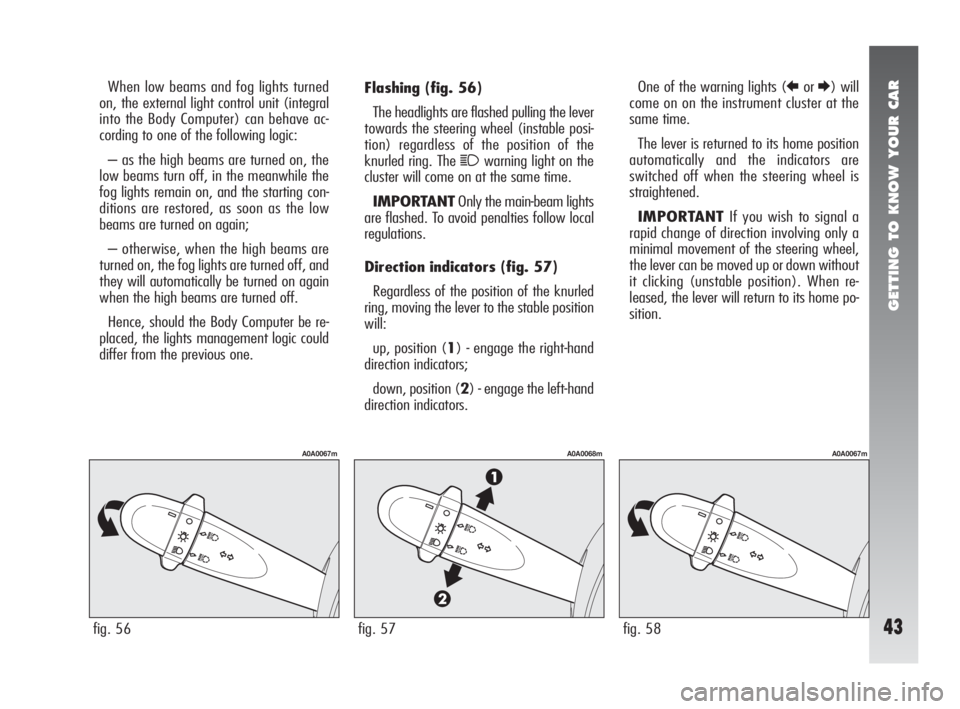
Flashing(fig. 56)
The headlights are flashed pulling the lever
towards the steering wheel (instable posi-
tion) regardless of the position of the
knurled ring. The
1warning light on the
cluster will come on at the same time.
IMPORTANTOnly the main-beam lights
are flashed. To avoid penalties follow local
regulations.
Direction indicators (fig. 57)
Regardless of the position of the knurled
ring, moving the lever to the stable position
will:
up, position (1) - engage the right-hand
direction indicators;
down, position (2) - engage the left-hand
direction indicators.One of the warning lights (
RorE) will
come on on the instrument cluster at the
same time.
The lever is returned to its home position
automatically and the indicators are
switched off when the steering wheel is
straightened.
IMPORTANTIf you wish to signal a
rapid change of direction involving only a
minimal movement of the steering wheel,
the lever can be moved up or down without
it clicking (unstable position). When re-
leased, the lever will return to its home po-
sition. When low beams and fog lights turned
on, the external light control unit (integral
into the Body Computer) can behave ac-
cording to one of the following logic:
– as the high beams are turned on, the
low beams turn off, in the meanwhile the
fog lights remain on, and the starting con-
ditions are restored, as soon as the low
beams are turned on again;
– otherwise, when the high beams are
turned on, the fog lights are turned off, and
they will automatically be turned on again
when the high beams are turned off.
Hence, should the Body Computer be re-
placed, the lights management logic could
differ from the previous one.
fig. 56
A0A0067m
fig. 58
A0A0067m
fig. 57
A0A0068m
Page 46 of 291
GETTING TO KNOW YOUR CAR
44
“Follow me home” device
(fig. 58)
This function allows the illumination of the
space in front of the car for the length of
time set, and is activated with the ignition
key at STOPor removed, pulling the left-
hand stalk towards the steering wheel.
This function is activated pulling the lever
within 2 minutes from when the engine is
turned off. At each single movement of the
lever, the staying on of the dipped beams
and sidelights is extended by 30 seconds up
to a maximum of 3.5 minutes; the lights
switch off automatically after the time set.
Each time the lever is operated, the
1
warning light on the cluster turns on.
This function can be interrupted by keep-
ing the lever pulled towards the steering
wheel for more than 2 seconds.
RIGHT-HAND LEVER
The right-hand lever is used to operate the
windscreen wiper-washer and rearscreen
wiper-washer. The windscreen washer con-
trol also activates the headlamp washers,
if fitted.
fig. 59
A0A0070m
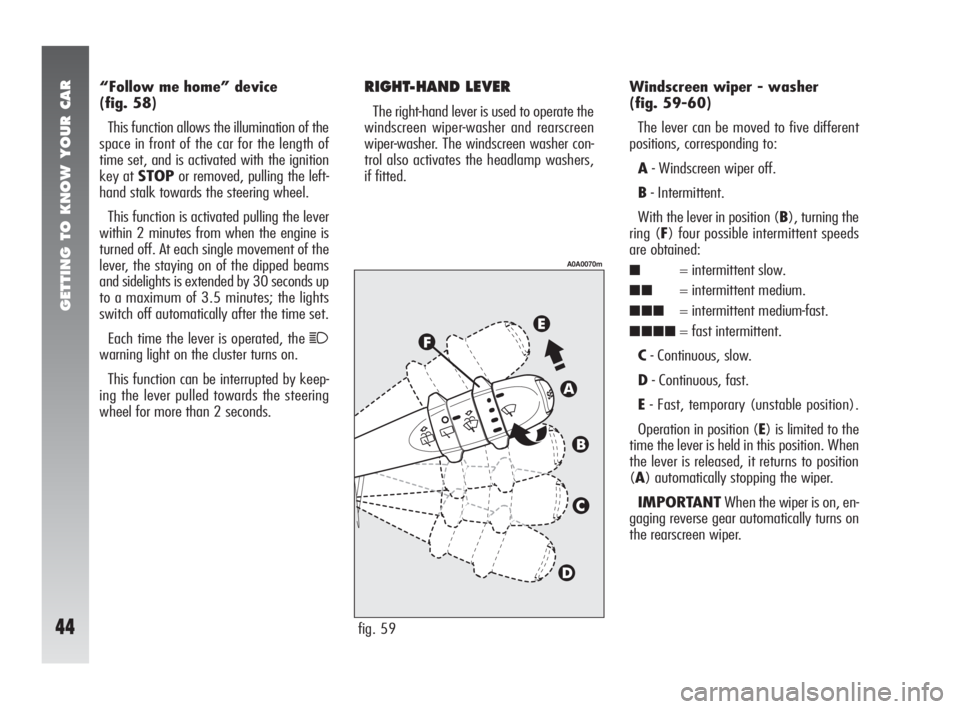
Windscreen wiper - washer
(fig. 59-60)
The lever can be moved to five different
positions, corresponding to:
A- Windscreen wiper off.
B- Intermittent.
With the lever in position (B), turning the
ring (F) four possible intermittent speeds
are obtained:
■= intermittent slow.
■■= intermittent medium.
■■■= intermittent medium-fast.
■■■■= fast intermittent.
C- Continuous, slow.
D- Continuous, fast.
E- Fast, temporary (unstable position).
Operation in position (E) is limited to the
time the lever is held in this position. When
the lever is released, it returns to position
(A) automatically stopping the wiper.
IMPORTANTWhen the wiper is on, en-
gaging reverse gear automatically turns on
the rearscreen wiper.
Page 48 of 291
GETTING TO KNOW YOUR CAR
46
At each start, the rain sensor automatically
stabilises at a temperature of about 40°C
to eliminate any condensation from the con-
trol surface and prevent the formation of ice.
The rain sensor is able to detect and au-
tomatically adapt to the presence of the fol-
lowing particular conditions which require
different sensitivity:
– impurities on the control surface (salt,
dirt, etc.);
– streaks of water caused by worn wiper
blades;
– difference between day and night (the
human eye is more disturbed during the
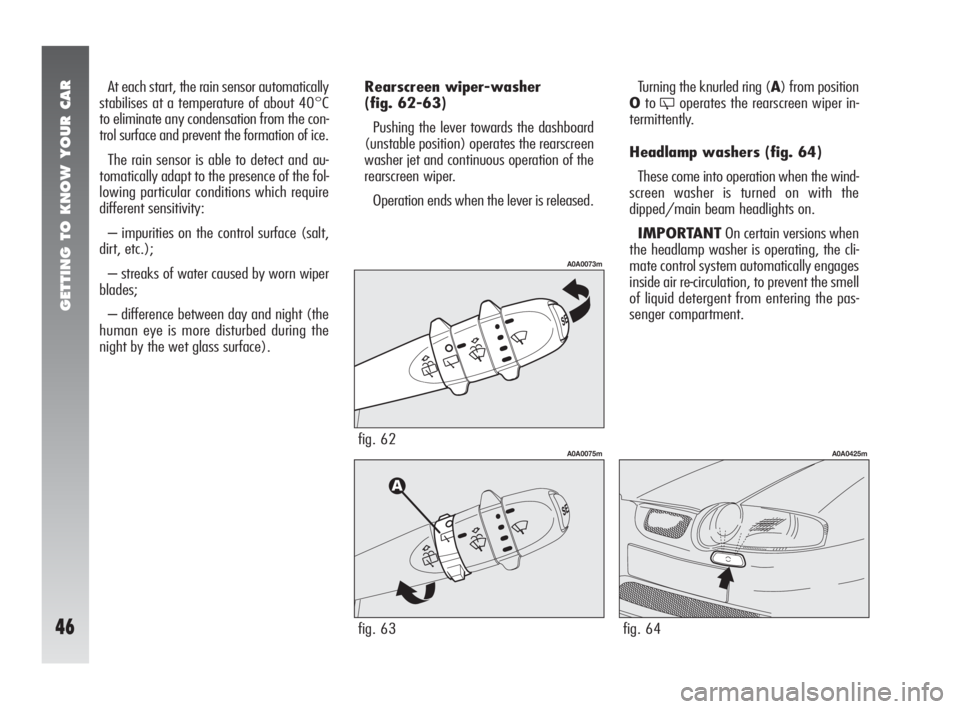
night by the wet glass surface).Rearscreen wiper-washer
(fig. 62-63)
Pushing the lever towards the dashboard
(unstable position) operates the rearscreen
washer jet and continuous operation of the
rearscreen wiper.
Operation ends when the lever is released.
fig. 62
A0A0073m
fig. 63
A0A0075m
Turning the knurled ring (A) from position
Oto
'operates the rearscreen wiper in-
termittently.
Headlamp washers (fig. 64)
These come into operation when the wind-
screen washer is turned on with the
dipped/main beam headlights on.
IMPORTANTOn certain versions when
the headlamp washer is operating, the cli-
mate control system automatically engages
inside air re-circulation, to prevent the smell
of liquid detergent from entering the pas-
senger compartment.
fig. 64
A0A0425m
Page 58 of 291
GETTING TO KNOW YOUR CAR
56
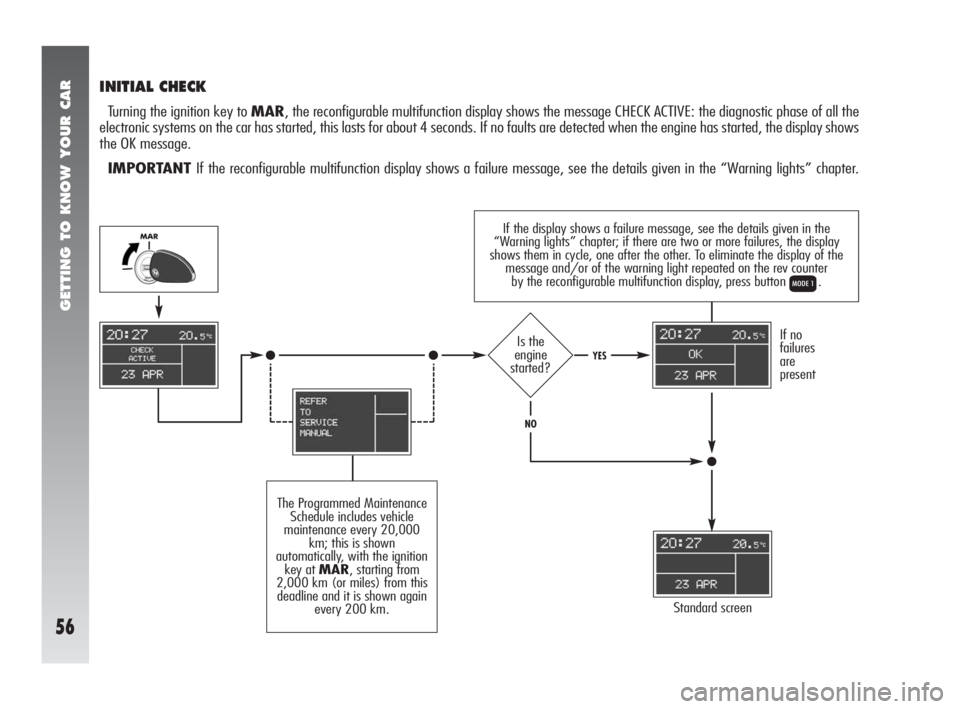
If the display shows a failure message, see the details given in the
“Warning lights” chapter; if there are two or more failures, the display
shows them in cycle, one after the other. To eliminate the display of the
message and/or of the warning light repeated on the rev counter
by the reconfigurable multifunction display, press button
Q.
INITIAL CHECK
Turning the ignition key to MAR, the reconfigurable multifunction display shows the message CHECK ACTIVE: the diagnostic phase of all the
electronic systems on the car has started, this lasts for about 4 seconds. If no faults are detected when the engine has started, the display shows
the OK message.
IMPORTANT If the reconfigurable multifunction display shows a failure message, see the details given in the “Warning lights” chapter.
Standard screen
The Programmed Maintenance
Schedule includes vehicle
maintenance every 20,000
km; this is shown
automatically, with the ignition
key at MAR, starting from
2,000 km (or miles) from this
deadline and it is shown again
every 200 km.
If no
failures
are
presentIs the
engine
started?YES
NO
Page 77 of 291
GETTING TO KNOW YOUR CAR
75
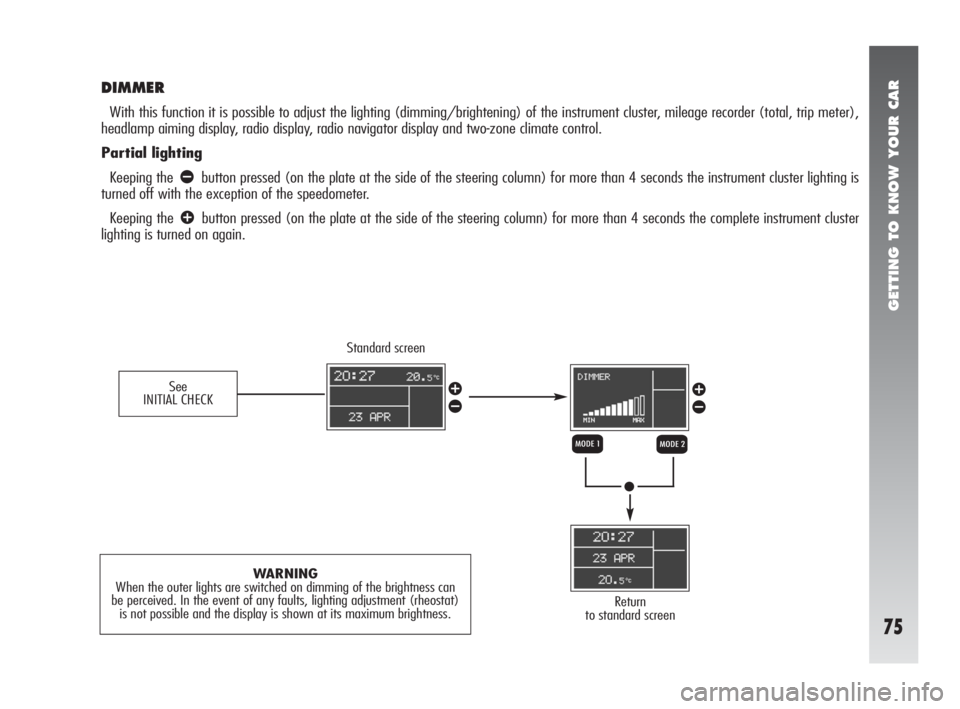
DIMMER
With this function it is possible to adjust the lighting (dimming/brightening) of the instrument cluster, mileage recorder (total, trip meter),
headlamp aiming display, radio display, radio navigator display and two-zone climate control.
Partial lighting
Keeping the
ãbutton pressed (on the plate at the side of the steering column) for more than 4 seconds the instrument cluster lighting is
turned off with the exception of the speedometer.
Keeping the
âbutton pressed (on the plate at the side of the steering column) for more than 4 seconds the complete instrument cluster
lighting is turned on again.
Standard screen
Return
to standard screen
WARNING
When the outer lights are switched on dimming of the brightness can
be perceived. In the event of any faults, lighting adjustment (rheostat)
is not possible and the display is shown at its maximum brightness.
QR
â
ãâ
ãSee
INITIAL CHECK
Page 78 of 291
GETTING TO KNOW YOUR CAR
76
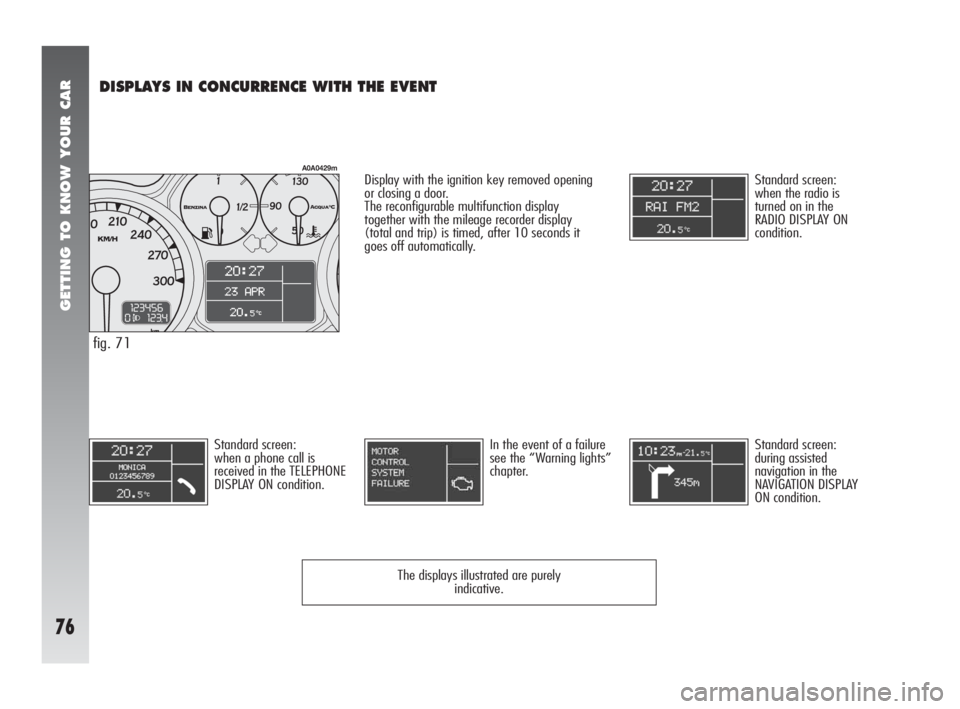
DISPLAYS IN CONCURRENCE WITH THE EVENT
Standard screen:
when the radio is
turned on in the
RADIO DISPLAY ON
condition.
Standard screen:
when a phone call is
received in the TELEPHONE
DISPLAY ON condition.Display with the ignition key removed opening
or closing a door.
The reconfigurable multifunction display
together with the mileage recorder display
(total and trip) is timed, after 10 seconds it
goes off automatically.
In the event of a failure
see the “Warning lights”
chapter.Standard screen:
during assisted
navigation in the
NAVIGATION DISPLAY
ON condition.
The displays illustrated are purely
indicative.
fig. 71
A0A0429m