low beam Alfa Romeo 147 2011 Owner handbook (in English)
[x] Cancel search | Manufacturer: ALFA ROMEO, Model Year: 2011, Model line: 147, Model: Alfa Romeo 147 2011Pages: 291, PDF Size: 5.52 MB
Page 181 of 291
CORRECT USE OF THE CAR
179
– Do not drive for long periods without a
break. During breaks get out of the vehicle
and move around a bit to shake off the
drowsiness.
– Make sure the air in the passenger com-
partment is changed constantly.
– Never coast the vehicle downhill with
the engine switched off: this eliminates the
engine braking and power steering effect
thus requiring a greater effort on the pedal
and steering wheel.
NIGHT DRIVING
Here are some suggestions for night dri-
ving.
– Drive with particular care: night driving
involves a greater degree of concentration.
– Reduce speed, especially on unlit roads.
– At the first signs of drowsiness stop the
car: continuing the journey is dangerous for
yourself and others. Continue driving only
after sufficient rest.
– Maintain a greater distance from the ve-
hicle in front than in the day: it is more dif-
ficult to judge the speed of a vehicle when
only the lights can be seen.
– Ensure that the headlights are correctly
aimed: if they are too low, visibility is re-
duced and eyesight is tired. If they are too
high they may cause disturbance to other
road users.
– Use the main beams only outside built-
up areas and only when you are certain that
other drivers are not disturbed by their use.
– When meeting oncoming vehicles,
switch off the main beams and drive with
the dipped-beam headlights on.
– Keep the headlights and light units
clean.
– Outside built-up areas take care of ani-
mal crossings.Always fasten the front and
rear seat belts including
those of any children’s seat. Trav-
elling without seat belts increases
the risks of serious injury or even
death in the event of an accident.
WARNING
Take car when fitting addi-
tional spoilers, alloy wheels
and wheel caps: they might reduce
ventilation of the brakes, thus their
efficiency, during abrupt and re-
peated braking, or long downhill
slopes.
WARNING
Never drive with objects
on the floor in front of the
driver’s seat: they might get stuck
under the pedals making it impos-
sible to accelerate or brake.
WARNING
Make sure any mats are
appropriate in size: even a
slight inconvenience to the braking
system may require a higher ped-
al stroke than normal.
WARNING
Water, ice and salt on the
roads may deposit on the
brake disks, reducing the effec-
tiveness of the brakes the first
time they are used.
WARNING
Page 182 of 291
CORRECT USE OF THE CAR
180
DRIVING WITH RAIN
Rain and wet roads can be dangerous.
If the road is wet, the traction between
wheel and asphalt is greatly reduced, thus
increasing the stopping distance and de-
creasing road holding.
Here are a few suggestions in the case of
rain:
– Reduce speed and keep further back
from the vehicle in front.
– Heavy rain also reduces visibility. In
these cases, turn on the headlights even dur-
ing the day to make yourself more visible
to others.
– Do not drive over puddles at high speed
and hold the steering wheel firmly: you may
lose control of the car (aquaplaning).
– Position the ventilation controls for
demisting (as described in the chapter (“Get-
ting to know your car”), to prevent visibili-
ty from worsening.
– Routinely check the conditions of the
windscreen wiper blades.
DRIVING IN FOG
– If fog is very thick, avoid travelling
where possible. If travelling with mist,
ground fog or the possibility of fog banks:
– Drive at moderate speed.
– Also in the day turn on the dipped-beam
headlights, rear fog guards and front fog
lights. Do not use the main-beam headlights.
IMPORTANTIf visibility in some parts
improves, switch off the rear fog guards; the
intense light disturbs the occupants of ve-
hicles behind.
– Remember that fog also involves wet
asphalt, thus greater difficulty in all types of
manoeuvres and longer stopping distances.
– Keep well away from the vehicle in
front.
– Where possible avoid sudden changes
in speed.
– Possibly avoid overtaking other vehicles.
– If the vehicle is forced to stop (faults,
impossibility to continue due to poor visi-
bility, etc.), firstly try to pull off the road.
Then turn on the hazard warning lights and,
if possible the dipped-beam headlights.
Rhythmically sound the horn if you note an-
other car coming.
MOUNTAIN DRIVING
– When travelling down hill use the en-
gine braking by engaging lower gears to pre-
vent the brakes from overheating.
– Never coast down hill with the engine
off or in neutral and especially not with the
ignition key removed.
– Drive at a moderate speed and avoid
cutting corners.
– Remember that overtaking up hill is
slower and therefore requires a greater
length of clear road. If you are being over-
taken on a hill, move over to enable the oth-
er vehicle to pass in safety.
Page 199 of 291
IN AN EMERGENCY
197
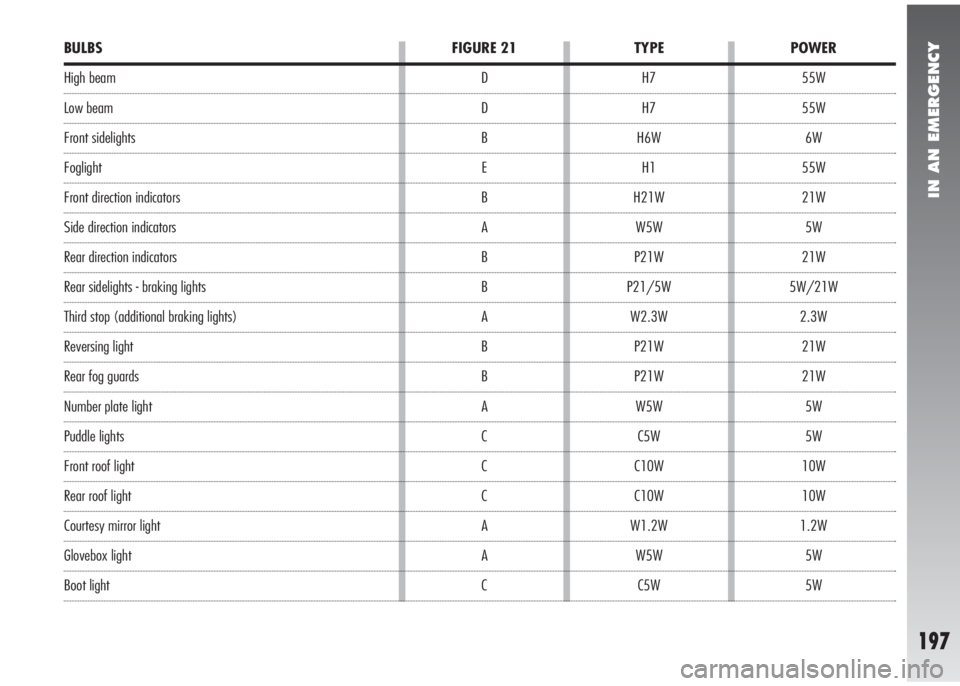
BULBS
High beam
Low beam
Front sidelights
Foglight
Front direction indicators
Side direction indicators
Rear direction indicators
Rear sidelights - braking lights
Third stop (additional braking lights)
Reversing light
Rear fog guards
Number plate light
Puddle lights
Front roof light
Rear roof light
Courtesy mirror light
Glovebox light
Boot lightFIGURE 21
D
D
B
E
B
A
B
B
A
B
B
A
C
C
C
A
A
CPOWER
55W
55W
6W
55W
21W
5W
21W
5W/21W
2.3W
21W
21W
5W
5W
10W
10W
1.2W
5W
5W TYPE
H7
H7
H6W
H1
H21W
W5W
P21W
P21/5W
W2.3W
P21W
P21W
W5W
C5W
C10W
C10W
W1.2W
W5W
C5W
Page 200 of 291
IN AN EMERGENCY
198
The front light units contain the front side-
light, dipped beam, main beam and fog
light bulbs.
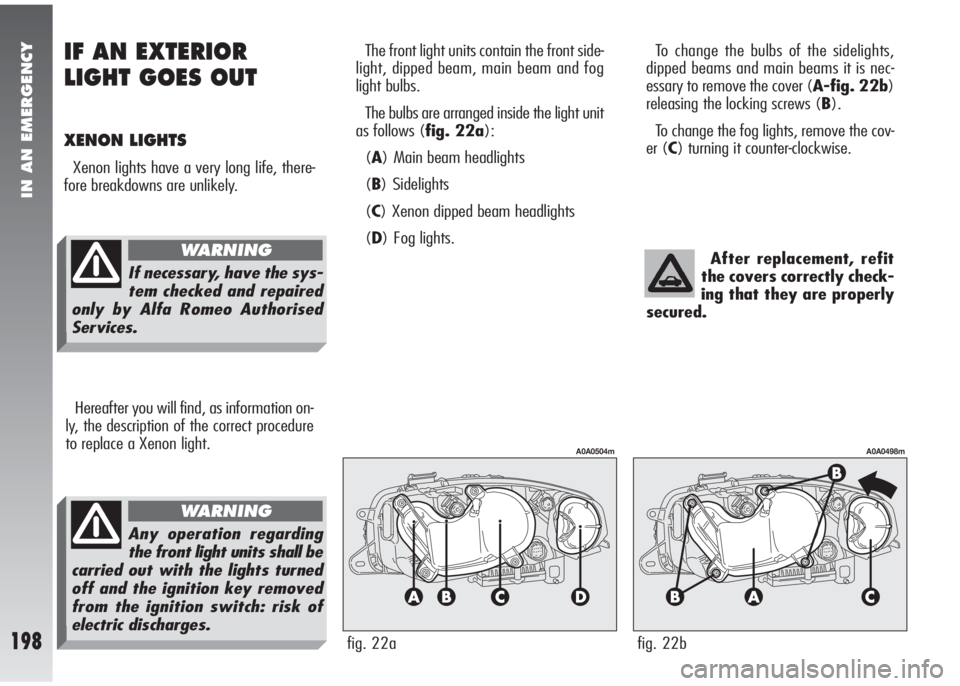
The bulbs are arranged inside the light unit
as follows (fig. 22a):
(A) Main beam headlights
(B) Sidelights
(C) Xenon dipped beam headlights
(D) Fog lights.
Hereafter you will find, as information on-
ly, the description of the correct procedure
to replace a Xenon light.
To change the bulbs of the sidelights,
dipped beams and main beams it is nec-
essary to remove the cover (A-fig. 22b)
releasing the locking screws (B).
To change the fog lights, remove the cov-
er (C) turning it counter-clockwise.
After replacement, refit
the covers correctly check-
ing that they are properly
secured.
IF AN EXTERIOR
LIGHT GOES OUT
XENON LIGHTS
Xenon lights have a very long life, there-
fore breakdowns are unlikely.
fig. 22a
A0A0504m
fig. 22b
A0A0498m
If necessary, have the sys-
tem checked and repaired
only by Alfa Romeo Authorised
Services.
WARNING
Any operation regarding
the front light units shall be
carried out with the lights turned
off and the ignition key removed
from the ignition switch: risk of
electric discharges.
WARNING
Page 201 of 291

IN AN EMERGENCY
199
Front fog lights(fig. 23a)
IMPORTANT When needing to change
the left bulb, the side trim next to the light
itself needs to be removed to facilitate ac-
cess to the engine compartment.
To change the bulb, proceed as follows:
– Remove the protective cover turning it
counter-clockwise.
– Disconnect the electric connector (A).
– Release the bulb catch (B).
– Remove the bulb and replace it.
– Fit a new bulb, making the tab of the
metal part coincide with the one on the
lamp unit, then hook the bulb holder catch
(B).
– Reconnect the electric connector (A).
– Refit the protective cover correctly.Xenon dipped beam
headlights
(fig. 23b)
To change the bulb, proceed as follows:
– Remove the protective cover releasing
the locking screws.
– Disconnect the electric connector (A)
turning it slightly counter-clockwise.
– Remove ring nut (B) turning it slightly
counter-clockwise
– Remove the bulb and replace it.
– Fit a new bulb correctly observing the
grooves on the lamp lens, then refit the ring
nut (B).
– Reconnect the electric connector (A).
– Refit the protective cover correctly.
Front sidelights(fig. 24a)
To change the bulb, proceed as follows:
– Remove the protective cover releasing
the locking screws.
– Using the extension (A), integral with
the bulb holder (B), withdraw the bulb hold-
er itself which is snap-fitted.
– Remove the bulb (C), pushing it gen-
tly and turning it counter-clockwise.
– Change the bulb and refit the bulb hold-
er making sure that it clicks into place; al-
so check that the bulb is in the correct po-
sition looking at the lamp from outside.
– Refit the protective cover correctly.
fig. 23a
A0A0499m
fig. 23b
A0A0500m
fig. 24a
A0A0501m
Page 202 of 291
IN AN EMERGENCY
200
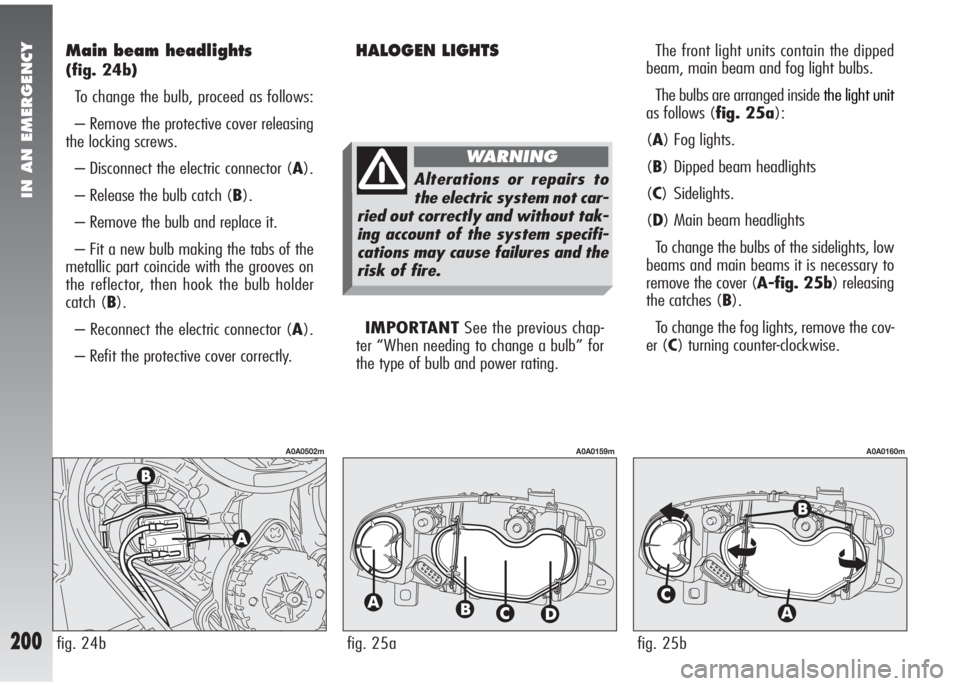
Main beam headlights
(fig. 24b)
To change the bulb, proceed as follows:
– Remove the protective cover releasing
the locking screws.
– Disconnect the electric connector (A).
– Release the bulb catch (B).
– Remove the bulb and replace it.
– Fit a new bulb making the tabs of the
metallic part coincide with the grooves on
the reflector, then hook the bulb holder
catch (B).
– Reconnect the electric connector (A).
– Refit the protective cover correctly.
HALOGEN LIGHTSThe front light units contain the dipped
beam, main beam and fog light bulbs.
The bulbs are arranged inside
the light unit
as follows (fig. 25a):
(A) Fog lights.
(B) Dipped beam headlights
(C) Sidelights.
(D) Main beam headlights
To change the bulbs of the sidelights, low
beams and main beams it is necessary to
remove the cover (A-fig. 25b) releasing
the catches (B).
To change the fog lights, remove the cov-
er (C) turning counter-clockwise.
IMPORTANTSee the previous chap-
ter “When needing to change a bulb” for
the type of bulb and power rating.
fig. 25a
A0A0159m
fig. 25b
A0A0160m
fig. 24b
A0A0502m
Alterations or repairs to
the electric system not car-
ried out correctly and without tak-
ing account of the system specifi-
cations may cause failures and the
risk of fire.
WARNING
Page 203 of 291
IN AN EMERGENCY
201
After replacement, refit
the covers correctly check-
ing that they are properly
secured.
IMPORTANTOn the inside surface of
the headlight there could appear a slight
coat of fogging; this does not show a de-
fect, since it is a natural occurrence due to
low temperature and to the degree of hu-
midity in the air; it will soon disappear as
soon as the lights are turned on. The pres-
ence of drops inside the headlight shows
water seepage, refer to the Alfa Romeo
Dealership.
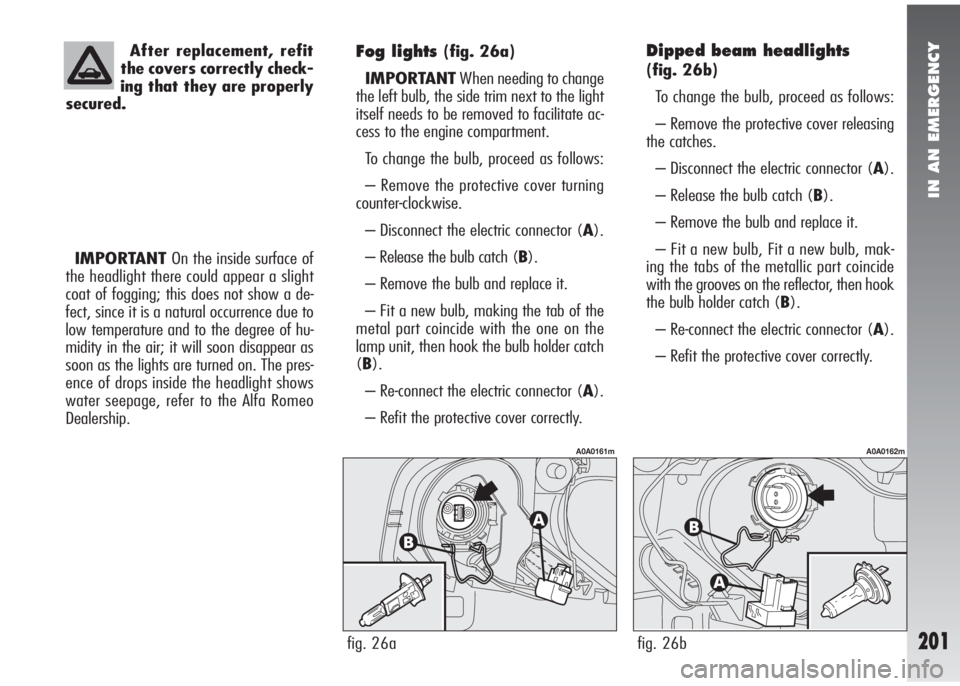
Fog lights(fig. 26a)
IMPORTANTWhen needing to change
the left bulb, the side trim next to the light
itself needs to be removed to facilitate ac-
cess to the engine compartment.
To change the bulb, proceed as follows:
– Remove the protective cover turning
counter-clockwise.
– Disconnect the electric connector (A).
– Release the bulb catch (B).
– Remove the bulb and replace it.
– Fit a new bulb, making the tab of the
metal part coincide with the one on the
lamp unit, then hook the bulb holder catch
(B).
– Re-connect the electric connector (A).
– Refit the protective cover correctly.Dipped beam headlights
(fig. 26b)
To change the bulb, proceed as follows:
– Remove the protective cover releasing
the catches.
– Disconnect the electric connector (A).
– Release the bulb catch (B).
– Remove the bulb and replace it.
– Fit a new bulb, Fit a new bulb, mak-
ing the tabs of the metallic part coincide
with the grooves on the reflector, then hook
the bulb holder catch (B).
– Re-connect the electric connector (A).
– Refit the protective cover correctly.
fig. 26a
A0A0161m
fig. 26b
A0A0162m
Page 204 of 291
IN AN EMERGENCY
202
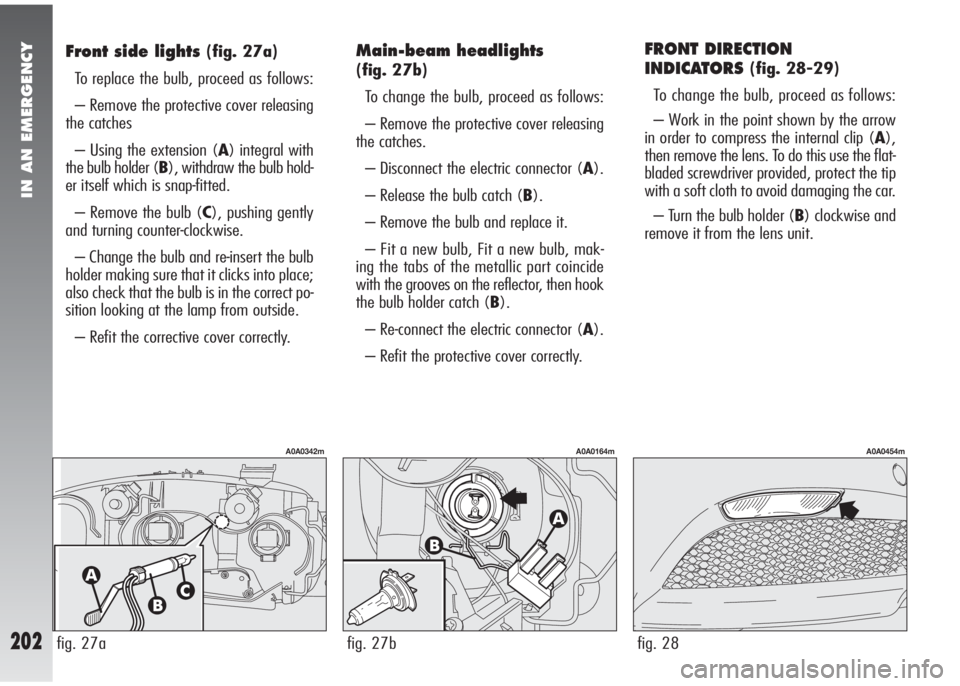
FRONT DIRECTION
INDICATORS
(fig. 28-29)
To change the bulb, proceed as follows:
– Work in the point shown by the arrow
in order to compress the internal clip (A),
then remove the lens. To do this use the flat-
bladed screwdriver provided, protect the tip
with a soft cloth to avoid damaging the car.
– Turn the bulb holder (B) clockwise and
remove it from the lens unit.
fig. 28
A0A0454m
Front side lights(fig. 27a)
To replace the bulb, proceed as follows:
– Remove the protective cover releasing
the catches
– Using the extension (A) integral with
the bulb holder (B), withdraw the bulb hold-
er itself which is snap-fitted.
– Remove the bulb (C), pushing gently
and turning counter-clockwise.
– Change the bulb and re-insert the bulb
holder making sure that it clicks into place;
also check that the bulb is in the correct po-
sition looking at the lamp from outside.
– Refit the corrective cover correctly.Main-beam headlights
(fig. 27b)
To change the bulb, proceed as follows:
– Remove the protective cover releasing
the catches.
– Disconnect the electric connector (A).
– Release the bulb catch (B).
– Remove the bulb and replace it.
– Fit a new bulb, Fit a new bulb, mak-
ing the tabs of the metallic part coincide
with the grooves on the reflector, then hook
the bulb holder catch (B).
– Re-connect the electric connector (A).
– Refit the protective cover correctly.
fig. 27b
A0A0164m
fig. 27a
A0A0342m
Page 274 of 291
RIGHT HAND DRIVE VERSION
272
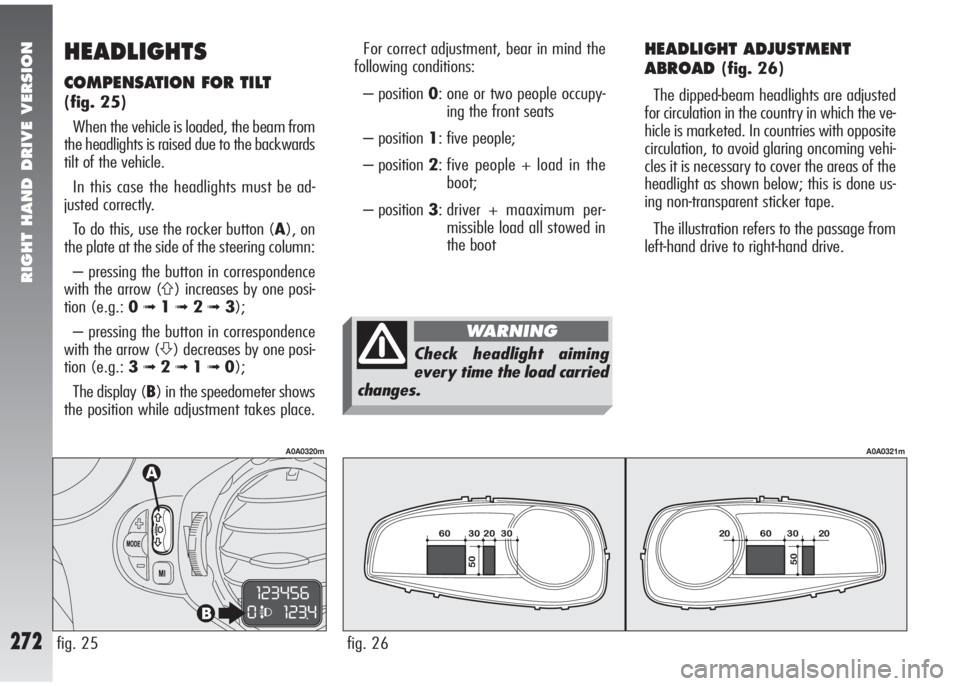
HEADLIGHTS
COMPENSATION FOR TILT
(fig. 25)
When the vehicle is loaded, the beam from
the headlights is raised due to the backwards
tilt of the vehicle.
In this case the headlights must be ad-
justed correctly.
To do this, use the rocker button (A), on
the plate at the side of the steering column:
– pressing the button in correspondence
with the arrow (
A) increases by one posi-
tion (e.g.: 0
➟1➟ 2➟3);
– pressing the button in correspondence
with the arrow (
S) decreases by one posi-
tion (e.g.: 3
➟2➟1➟0);
The display (B) in the speedometer shows
the position while adjustment takes place.
fig. 25
A0A0320m
HEADLIGHT ADJUSTMENT
ABROAD
(fig. 26)
The dipped-beam headlights are adjusted
for circulation in the country in which the ve-
hicle is marketed. In countries with opposite
circulation, to avoid glaring oncoming vehi-
cles it is necessary to cover the areas of the
headlight as shown below; this is done us-
ing non-transparent sticker tape.
The illustration refers to the passage from
left-hand drive to right-hand drive.
fig. 26
A0A0321m
For correct adjustment, bear in mind the
following conditions:
– position 0: one or two people occupy-
ing the front seats
– position 1: five people;
– position 2: five people + load in the
boot;
– position 3: driver + maaximum per-
missible load all stowed in
the boot
Check headlight aiming
every time the load carried
changes.
WARNING
Page 279 of 291
ALPHABETICAL INDEX
277
- marking ................................. 244
- specifications .......................... 245
Engine codes ............................... 244
Engine compartment
- bonnet ................................... 130
- washing ................................. 242
Engine coolant fluid
- checking level
and topping up ........................ 231
- temperature gauge and
warning light........................... 52
Engine oil
- checking the level and
topping up .............................. 227
- consumption ........................... 227
Engine starting ............................ 175
- emergency starting .................. 177
- ignition switch ......................... 14
- switching off ........................... 176
- warming the engine ................. 176Engine oil consumption ................. 227
EOBD (system)............................ 139
Environment (safeguarding) .......... 174
- emission reducing devices ......... 174
- reducing running costs
and environment pollution......... 181
- running economy ..................... 183
- safeguarding emission
reduction devices ..................... 184
- use of non-toxic materials ......... 174
Extending the luggage compartment
- partial .................................... 20
- total ...................................... 19
External lights (switching on) ........ 42
First-aid kit................................. 220
Flashing high beams..................... 43
Fluids (specifications) ................... 255
Fluids and lubricants.............. 255-256
Follow me home device ................ 44Foglights
- changing bulbs................. 199-201
- switching on ........................... 106
Front ceiling light ......................... 120
- changing bulbs ........................ 206
Fuel
- automatic shut off switch .......... 107
- consumption ........................... 257
- fuel cap.................................. 173
- level gauge and reserve
warning light........................... 52
- refilling .................................. 173
Fuel flap ..................................... 173
Fuel reserve ................................ 52
Fuel supply (technical data)........... 246
Fuses
- in control box in engine
compartment .......................... 210
- in control box on battery post .... 211