warning light Alfa Romeo 147 2011 Owner handbook (in English)
[x] Cancel search | Manufacturer: ALFA ROMEO, Model Year: 2011, Model line: 147, Model: Alfa Romeo 147 2011Pages: 291, PDF Size: 5.52 MB
Page 235 of 291
VEHICLE MAINTENANCE
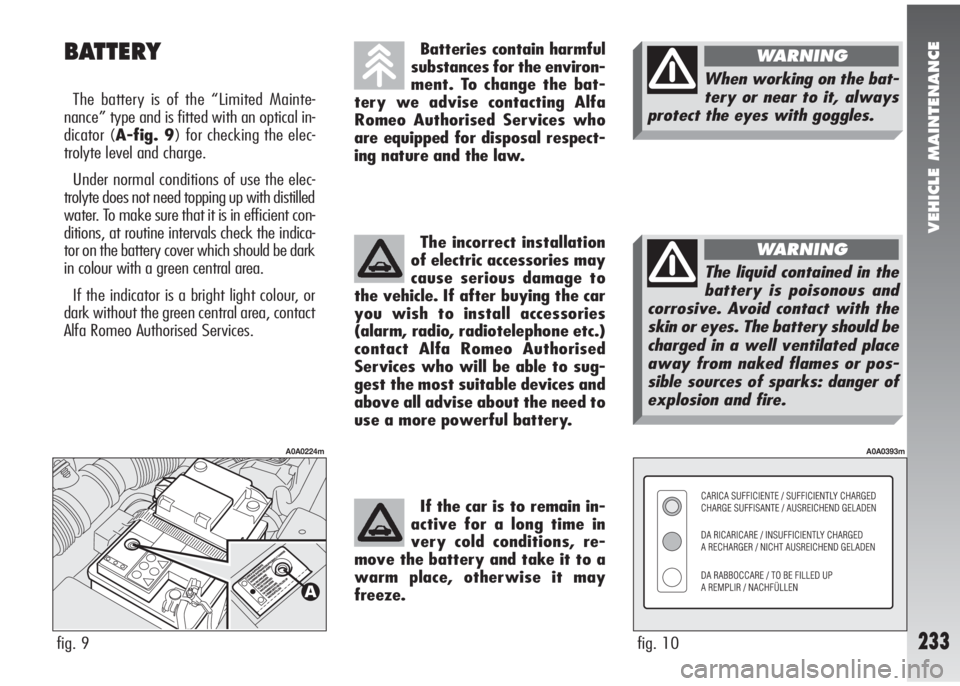
233fig. 10
A0A0393m
BATTERY
The battery is of the “Limited Mainte-
nance” type and is fitted with an optical in-
dicator (A-fig. 9) for checking the elec-
trolyte level and charge.
Under normal conditions of use the elec-
trolyte does not need topping up with distilled
water. To make sure that it is in efficient con-
ditions, at routine intervals check the indica-
tor on the battery cover which should be dark
in colour with a green central area.
If the indicator is a bright light colour, or
dark without the green central area, contact
Alfa Romeo Authorised Services.
fig. 9
A0A0224m
Batteries contain harmful
substances for the environ-
ment. To change the bat-
tery we advise contacting Alfa
Romeo Authorised Services who
are equipped for disposal respect-
ing nature and the law.
The incorrect installation
of electric accessories may
cause serious damage to
the vehicle. If after buying the car
you wish to install accessories
(alarm, radio, radiotelephone etc.)
contact Alfa Romeo Authorised
Services who will be able to sug-
gest the most suitable devices and
above all advise about the need to
use a more powerful battery.
If the car is to remain in-
active for a long time in
very cold conditions, re-
move the battery and take it to a
warm place, otherwise it may
freeze.
The liquid contained in the
battery is poisonous and
corrosive. Avoid contact with the
skin or eyes. The battery should be
charged in a well ventilated place
away from naked flames or pos-
sible sources of sparks: danger of
explosion and fire.
WARNING
When working on the bat-
tery or near to it, always
protect the eyes with goggles.
WARNING
Page 237 of 291
VEHICLE MAINTENANCE
235
You are also reminded that services with
high current absorption switched on by the
user, such as for example: baby bottle warm-
ers, vacuum cleaner, mobile phone, mini
fridge, etc., quicken the battery draining
processif they are turned on with
the engine offor running at idle speed.
IMPORTANT When installing addition-
al systems on the vehicle, bear in mind that
improper branches on connections of the ve-
hicle wiring are dangerous, particularly if
safety devices are involved.
Battery
60 Ah
70 AhMaximum permissible
loadless absorption
36 mA
42 mA
The maximum absorption of all the ac-
cessories (standard and fitted afterwards)
should be 0.6 mA x Ah (of the battery), as
shown in the following table:CHANGING THE BATTERY
When changing the battery it should be re-
placed with another original one with the
same characteristics. If it is replaced by a
battery with different characteristics, the
maintenance intervals given in the Sched-
uled Maintenance Programme in this chap-
ter are no longer valid and for maintenance
it will be necessary to follow the battery
Manufacturer’s instructions.
USEFUL HINTS TO EXTEND
THE LIFE OF YOUR BATTERY
To avoid rapidly draining the battery and
ensure that it continues to work correctly,
the following should be noted:
– The terminals must always be firmly
tightened.
– Within reason, avoid using electrical de-
vices for a long time when the engine is
switched off (radio, hazard warning lights,
parking lights, etc.).– When the vehicle is parked in a garage,
ensure that the doors, bonnet, boot and in-
ner lids are closed properly so that the lights
do not stay on permanently.
– Before carrying out any work on the
electric system, disconnect the negative ca-
ble from the battery.
– If after buying the car, you wish to in-
stall electric accessories which require a per-
manent electric supply (alarm, voice feature,
radionavigator with satellite antitheft func-
tion etc.) or accessories that burden the elec-
tric system, contact Alfa Romeo Authorised
services whose qualified personnel, in ad-
dition to suggesting the most suitable de-
vices belonging to Lineaccessori Alfa Romeo,
will evaluate the overall electric absorption,
checking whether the vehicle’s electric sys-
tem is capable of withstanding the load re-
quired, or whether it should be integrated
with a more powerful battery. In fact, as
some of these devices continue absorbing
energy even when the ignition key is off (car
stationary, engine off), they gradually drain
the battery.
Page 244 of 291

VEHICLE MAINTENANCE
242
CLEANING LEATHER SEATS
– Remove dried on dirt with a lightly
moistened chamois leather or cloth with-
out pressing too hard.
– Remove liquid and grease stains with
a dry absorbent cloth without rubbing. Then
wipe with a soft cloth or chamois leather
with water and neutral soap. If the stain per-
sists, use specific products, carefully follow-
ing the instructions for use.
IMPORTANTNever use alcohol. Make
sure that cleaning products do not contain
alcohol and alcohol derivatives even at low
strength.
INTERIOR PLASTIC PARTS
Use appropriate products designed to pre-
serve the appearance of components.
IMPORTANTNever use spirit or petro-
leum to clean the instrument cluster. Engine compartment
At the end of the winter the engine com-
partment should be carefully washed, with-
out directing the jet against electronic con-
trol units. Contact a specialised workshop to
have this done.
INTERIOR FITTINGS
Periodically check that water is not trapped
under the mats (due to water dripping off
shoes, umbrellas, etc.) which could cause ox-
idisation of the sheet metal.
Detergents cause water
pollution. Therefore the en-
gine compartment should
be washed in areas equipped for
collecting and purifying the liquid
used in the washing process.
IMPORTANTThe vehicle should washed
with the engine cold and the ignition key at
STOP. After washing make sure that the
various protections (e.g. rubber caps and
various covers) have not been damaged or
removed.CLEANING SEATS AND FABRIC
AND VELVET PARTS
– Use a soft brush or vacuum cleaner to
remove dust. Velvet is cleaned better if the
brush is moistened.
– Rub the seats with a sponge moistened
with a solution of water and neutral deter-
gent.
Never use inflammable
products like fuel oil ether
or rectified petrol for cleaning inside
the car. The electrostatic charges
generated when rubbing to clean
may cause fire.
WARNING
Do not keep aerosol cans in
the car. They might ex-
plode. Aerosol cans must never be
exposed to a temperature above
50°C. The temperature inside the
car exposed to the sun may go well
beyond that figure.
WARNING
Page 262 of 291
RIGHT HAND DRIVE VERSION
260
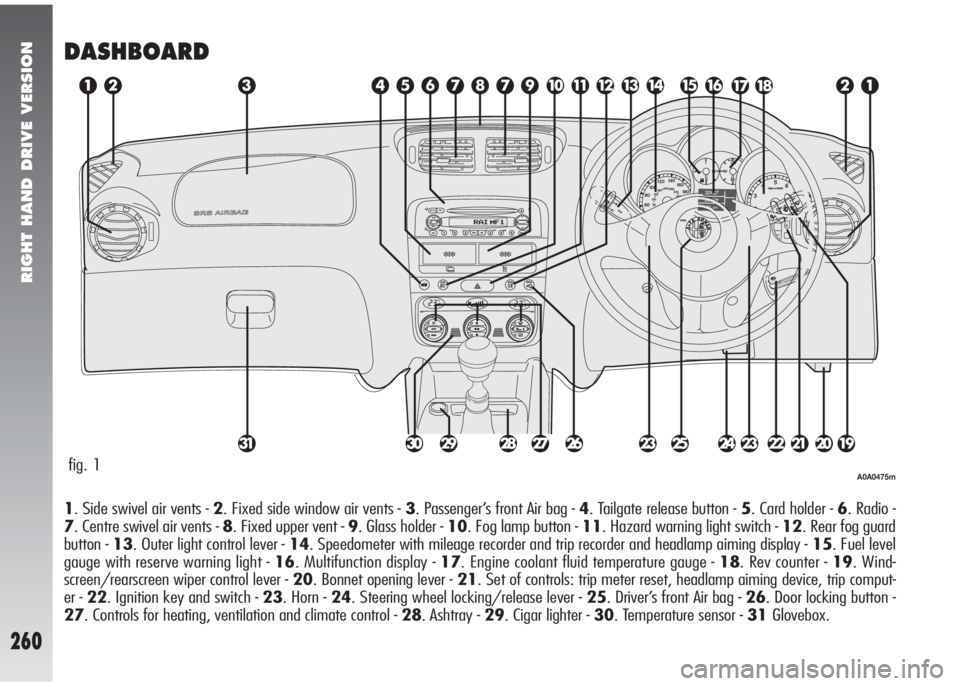
DASHBOARD
1. Side swivel air vents - 2. Fixed side window air vents - 3. Passenger’s front Air bag - 4. Tailgate release button - 5. Card holder - 6. Radio -
7. Centre swivel air vents - 8. Fixed upper vent - 9. Glass holder - 10. Fog lamp button - 11. Hazard warning light switch - 12. Rear fog guard
button - 13. Outer light control lever - 14. Speedometer with mileage recorder and trip recorder and headlamp aiming display - 15. Fuel level
gauge with reserve warning light - 16. Multifunction display - 17. Engine coolant fluid temperature gauge - 18. Rev counter - 19. Wind-
screen/rearscreen wiper control lever - 20. Bonnet opening lever - 21. Set of controls: trip meter reset, headlamp aiming device, trip comput-
er - 22. Ignition key and switch - 23. Horn - 24. Steering wheel locking/release lever - 25. Driver’s front Air bag - 26. Door locking button -
27. Controls for heating, ventilation and climate control - 28. Ashtray - 29. Cigar lighter - 30. Temperature sensor - 31Glovebox.
fig. 1A0A0475m
Page 263 of 291
RIGHT HAND DRIVE VERSION
261
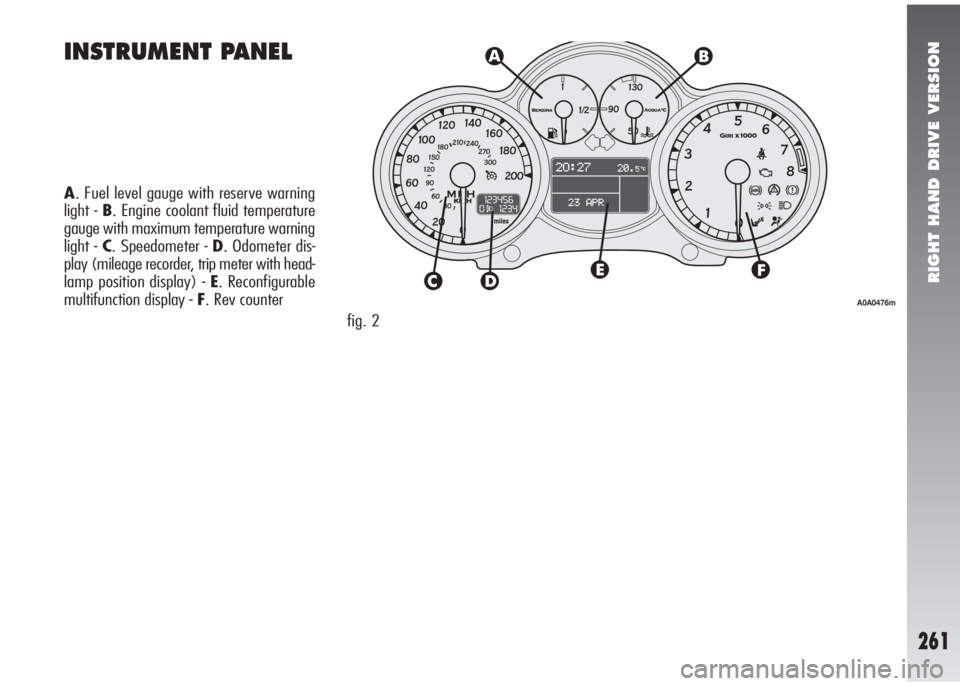
A. Fuel level gauge with reserve warning
light - B. Engine coolant fluid temperature
gauge with maximum temperature warning
light - C. Speedometer - D. Odometer dis-
play (mileage recorder, trip meter with head-
lamp position display) - E. Reconfigurable
multifunction display - F. Rev counter
fig. 2
A0A0476m
INSTRUMENT PANEL
Page 268 of 291
RIGHT HAND DRIVE VERSION
266
FRONT SEATS
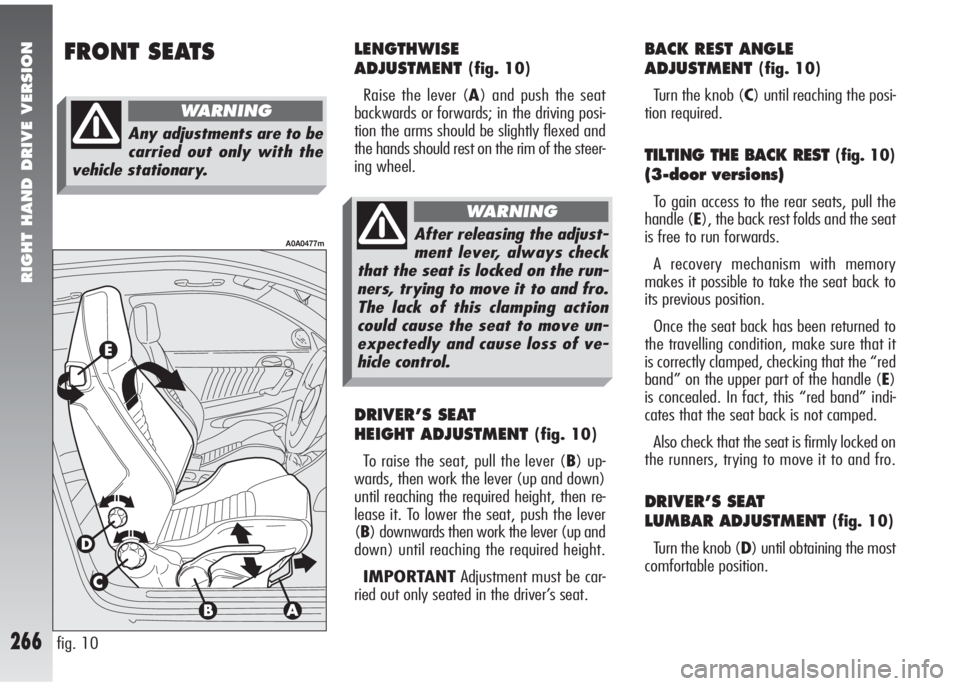
fig. 10
A0A0477m
LENGTHWISE
ADJUSTMENT
(fig. 10)
Raise the lever (A) and push the seat
backwards or forwards; in the driving posi-
tion the arms should be slightly flexed and
the hands should rest on the rim of the steer-
ing wheel.
DRIVER’S SEAT
HEIGHT ADJUSTMENT
(fig. 10)
To raise the seat, pull the lever (B) up-
wards, then work the lever (up and down)
until reaching the required height, then re-
lease it. To lower the seat, push the lever
(B) downwards then work the lever (up and
down) until reaching the required height.
IMPORTANTAdjustment must be car-
ried out only seated in the driver’s seat.
BACK REST ANGLE
ADJUSTMENT
(fig. 10)
Turn the knob (C) until reaching the posi-
tion required.
TILTING THE BACK REST (fig. 10)
(3-door versions)
To gain access to the rear seats, pull the
handle (E), the back rest folds and the seat
is free to run forwards.
A recovery mechanism with memory
makes it possible to take the seat back to
its previous position.
Once the seat back has been returned to
the travelling condition, make sure that it
is correctly clamped, checking that the “red
band” on the upper part of the handle (E)
is concealed. In fact, this “red band” indi-
cates that the seat back is not camped.
Also check that the seat is firmly locked on
the runners, trying to move it to and fro.
DRIVER’S SEAT
LUMBAR ADJUSTMENT
(fig. 10)
Turn the knob (D) until obtaining the most
comfortable position.
Any adjustments are to be
carried out only with the
vehicle stationary.
WARNING
After releasing the adjust-
ment lever, always check
that the seat is locked on the run-
ners, trying to move it to and fro.
The lack of this clamping action
could cause the seat to move un-
expectedly and cause loss of ve-
hicle control.
WARNING
Page 269 of 291
RIGHT HAND DRIVE VERSION
267
FRONT AND SIDE
AIR BAGS
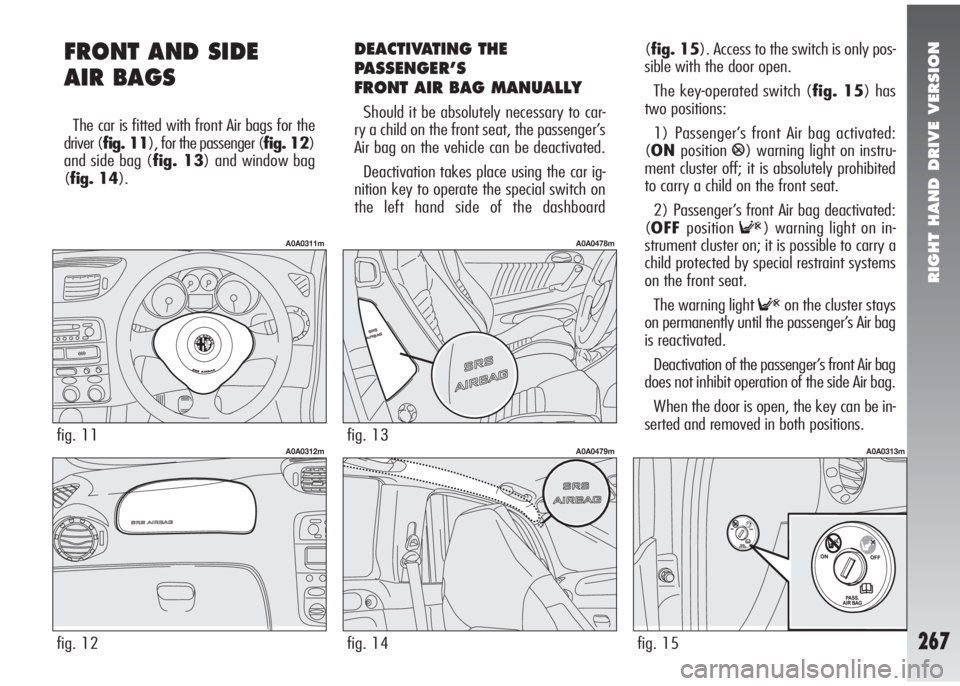
The car is fitted with front Air bags for the
driver (fig. 11), for the passenger (fig. 12)
and side bag (fig. 13) and window bag
(fig. 14).
fig. 11
A0A0311m
fig. 12
A0A0312m
DEACTIVATING THE
PASSENGER’S
FRONT AIR BAG MANUALLY
Should it be absolutely necessary to car-
ry a child on the front seat, the passenger’s
Air bag on the vehicle can be deactivated.
Deactivation takes place using the car ig-
nition key to operate the special switch on
the left hand side of the dashboard
fig. 13
A0A0478m
fig. 14
A0A0479m
(fig. 15). Access to the switch is only pos-
sible with the door open.
The key-operated switch (fig. 15) has
two positions:
1) Passenger’s front Air bag activated:
(ONposition
P) warning light on instru-
ment cluster off; it is absolutely prohibited
to carry a child on the front seat.
2) Passenger’s front Air bag deactivated:
(OFFposition
F) warning light on in-
strument cluster on; it is possible to carry a
child protected by special restraint systems
on the front seat.
The warning light
Fon the cluster stays
on permanently until the passenger’s Air bag
is reactivated.
Deactivation of the passenger’s front Air bag
does not inhibit operation of the side Air bag.
When the door is open, the key can be in-
serted and removed in both positions.
fig. 15
A0A0313m
Page 272 of 291
RIGHT HAND DRIVE VERSION
270
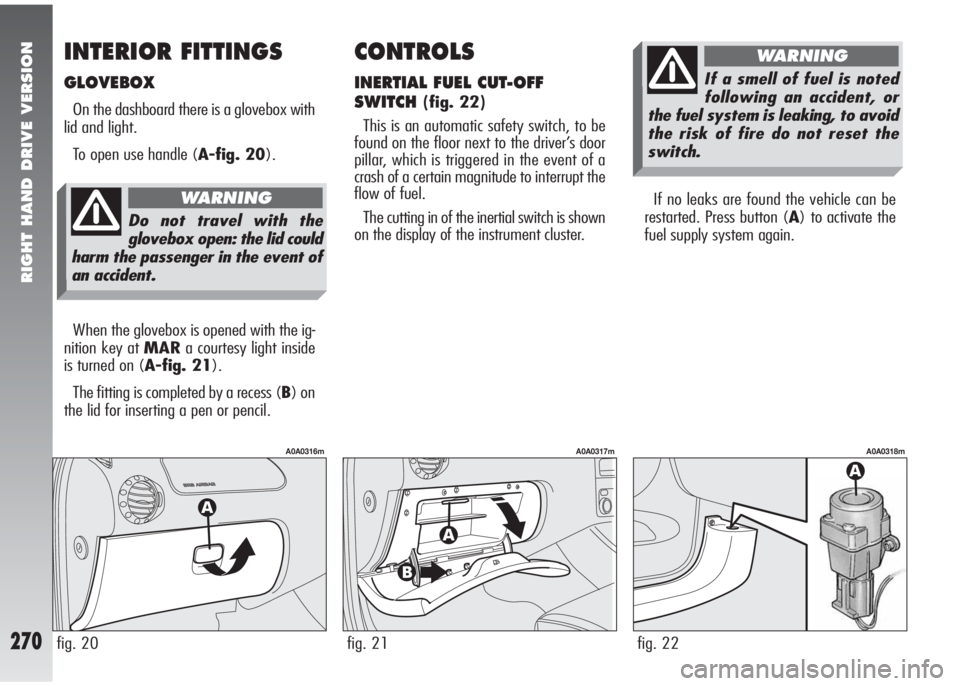
If no leaks are found the vehicle can be
restarted. Press button (A) to activate the
fuel supply system again.
fig. 22
A0A0318m
CONTROLS
INERTIAL FUEL CUT-OFF
SWITCH
(fig. 22)
This is an automatic safety switch, to be
found on the floor next to the driver’s door
pillar, which is triggered in the event of a
crash of a certain magnitude to interrupt the
flow of fuel.
The cutting in of the inertial switch is shown
on the display of the instrument cluster.
INTERIOR FITTINGS
GLOVEBOX
On the dashboard there is a glovebox with
lid and light.
To open use handle (A-fig. 20).
When the glovebox is opened with the ig-
nition key at MARa courtesy light inside
is turned on (A-fig. 21).
The fitting is completed by a recess (B) on
the lid for inserting a pen or pencil.
fig. 20
A0A0316m
fig. 21
A0A0317m
If a smell of fuel is noted
following an accident, or
the fuel system is leaking, to avoid
the risk of fire do not reset the
switch.
WARNING
Do not travel with the
glovebox open: the lid could
harm the passenger in the event of
an accident.
WARNING
Page 274 of 291
RIGHT HAND DRIVE VERSION
272
HEADLIGHTS
COMPENSATION FOR TILT
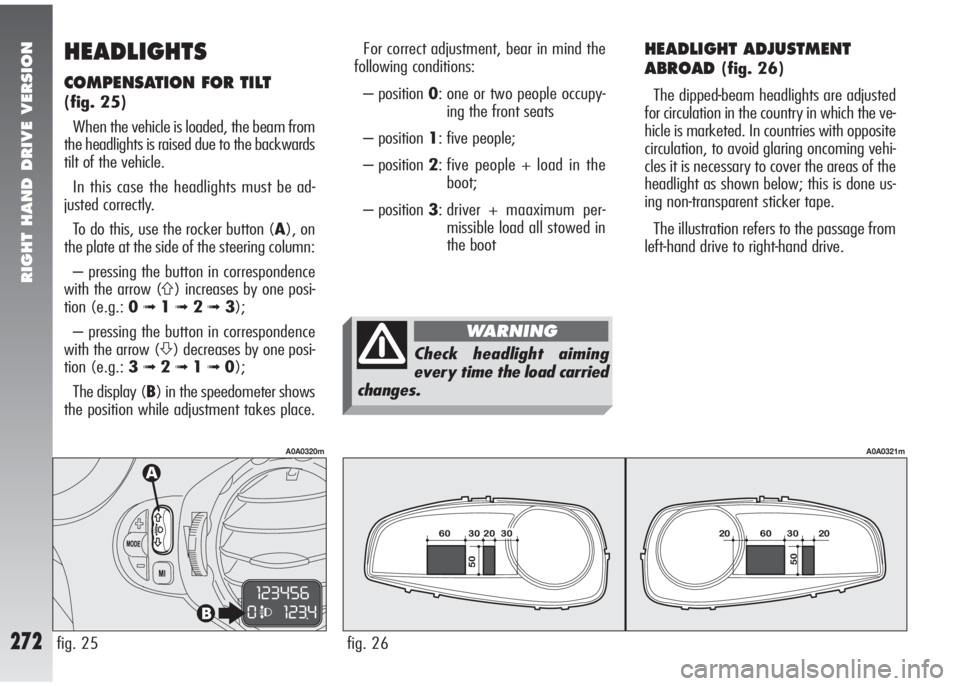
(fig. 25)
When the vehicle is loaded, the beam from
the headlights is raised due to the backwards
tilt of the vehicle.
In this case the headlights must be ad-
justed correctly.
To do this, use the rocker button (A), on
the plate at the side of the steering column:
– pressing the button in correspondence
with the arrow (
A) increases by one posi-
tion (e.g.: 0
➟1➟ 2➟3);
– pressing the button in correspondence
with the arrow (
S) decreases by one posi-
tion (e.g.: 3
➟2➟1➟0);
The display (B) in the speedometer shows
the position while adjustment takes place.
fig. 25
A0A0320m
HEADLIGHT ADJUSTMENT
ABROAD
(fig. 26)
The dipped-beam headlights are adjusted
for circulation in the country in which the ve-
hicle is marketed. In countries with opposite
circulation, to avoid glaring oncoming vehi-
cles it is necessary to cover the areas of the
headlight as shown below; this is done us-
ing non-transparent sticker tape.
The illustration refers to the passage from
left-hand drive to right-hand drive.
fig. 26
A0A0321m
For correct adjustment, bear in mind the
following conditions:
– position 0: one or two people occupy-
ing the front seats
– position 1: five people;
– position 2: five people + load in the
boot;
– position 3: driver + maaximum per-
missible load all stowed in
the boot
Check headlight aiming
every time the load carried
changes.
WARNING
Page 276 of 291
ALPHABETICAL INDEX
274
A A
L L
P P
H H
A A
B B
E E
T T
I I
C C
A A
L L
I I
N N
D D
E E
X X
ABS (Antilock braking system) ..... 134
Accessories purchased by the user... 125
Additional operations
(maintenance) .......................... 224
Additional stop light (third stop) ..... 205
Air bags, front and side ............ 35
- deactivating passenger’s
side air bags ...................... 37
- front air bags ..................... 36
- general cautions ...................... 40
- passenger’s front air bag........... 37
- right hand drive version ............ 259
- side air bags
(side bag - window bag)........... 38
Air cleaner................................... 232
Air re-circulation ........................... 102
Air vents ..................................... 90
Alfa Romeo CODE system .............. 6- operation................................ 9
Annual inspection programme
(maintenance) .......................... 224
Armrest (front) ........................... 18
Armrest (rear) ............................ 21
Ashtray
- front ...................................... 122
- rear ....................................... 123
ASR (system) .............................. 138
Battery ..................................... 233
- advice for preserving
the charge .............................. 235
- charging.......................... 216-234
- checking the charge ................. 234
- replacement............................ 235
- starting with an auxiliary
battery ................................... 216
Body (cleaning) ........................... 240Body marking.............................. 243
Body versions .............................. 244
Bonnet ................................ 130
Boot
- capacity ................................. 253
- extension ........................... 19-20
- lighting .................................. 129
- luggage net ............................ 21
- opening from inside ................. 128
- opening with remote
control ............................... 8-128
- restraining the load .................. 129
- tailgate closing ........................ 129
- warnings for carrying luggage.... 129
Boot light
- changing bulbs ........................ 208
Bose HI-FI system ........................ 172