dashboard warning lights Alfa Romeo 156 2006 Owner handbook (in English)
[x] Cancel search | Manufacturer: ALFA ROMEO, Model Year: 2006, Model line: 156, Model: Alfa Romeo 156 2006Pages: 357, PDF Size: 5.04 MB
Page 50 of 357
GETTING TO KNOW YOUR CAR48
fig. 70
A0B0373m
STEERING WHEEL
LEVERSThe devices and services controlled by the
levers on the steering wheel can only be ac-
tivated when the ignition key is in the MAR
position.LEFT-HAND LEVERThe left-hand lever controls the external
lights except the foglamps and the rear fog-
light.
When the external lights are switched on
the various controls located on the dash-
board are illuminated.
The sidelights will come on if the ignition
key is in the PARKposition, regardless of
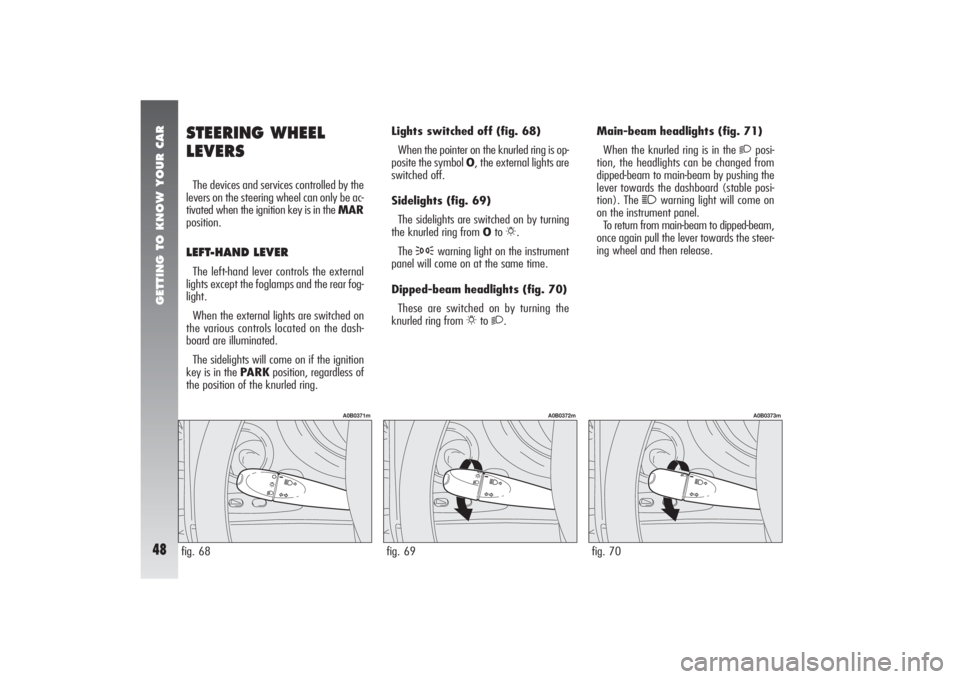
the position of the knurled ring.Lights switched off (fig. 68)
When the pointer on the knurled ring is op-
posite the symbol O, the external lights are
switched off.
Sidelights (fig. 69)
The sidelights are switched on by turning
the knurled ring from Oto
6.
The
3
warning light on the instrument
panel will come on at the same time.
Dipped-beam headlights (fig. 70)
These are switched on by turning the
knurled ring from
6
to 2
.Main-beam headlights (fig. 71)
When the knurled ring is in the
2
posi-
tion, the headlights can be changed from
dipped-beam to main-beam by pushing the
lever towards the dashboard (stable posi-
tion). The
1
warning light will come on
on the instrument panel.
To return from main-beam to dipped-beam,
once again pull the lever towards the steer-
ing wheel and then release.
fig. 68
A0B0371m
fig. 69
A0B0372m
Page 58 of 357
GETTING TO KNOW YOUR CAR56
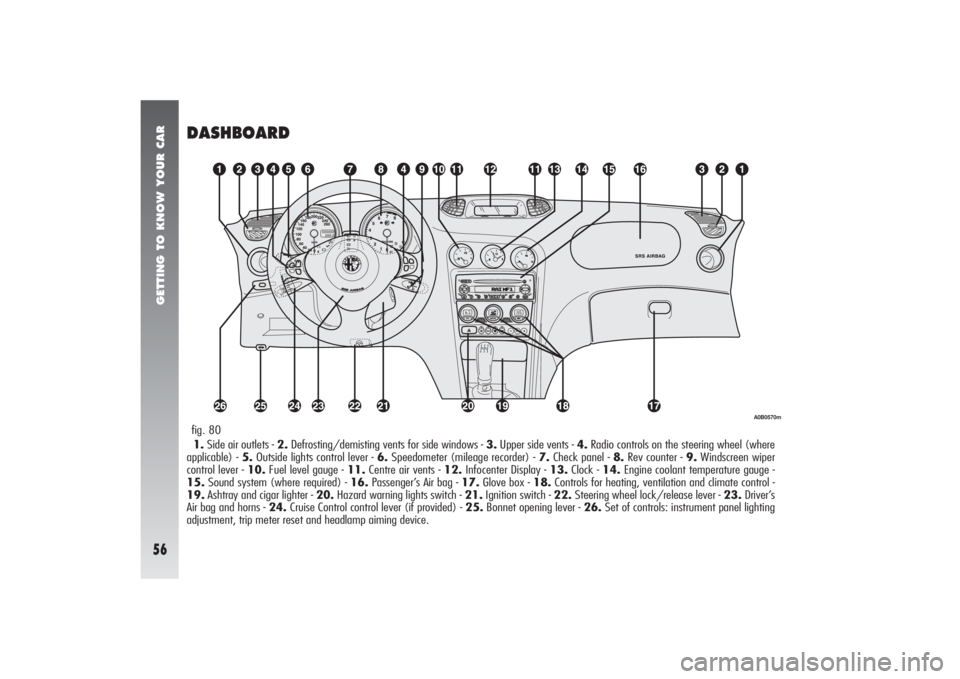
DASHBOARD1.Side air outlets - 2.Defrosting/demisting vents for side windows - 3.Upper side vents - 4.Radio controls on the steering wheel (where
applicable) - 5.Outside lights control lever - 6.Speedometer (mileage recorder) - 7.Check panel - 8.Rev counter - 9.Windscreen wiper
control lever - 10.Fuel level gauge - 11.Centre air vents - 12.Infocenter Display - 13.Clock - 14.Engine coolant temperature gauge -
15.Sound system (where required) - 16.Passenger’s Air bag - 17.Glove box - 18.Controls for heating, ventilation and climate control -
19.Ashtray and cigar lighter - 20.Hazard warning lights switch - 21.Ignition switch - 22.Steering wheel lock/release lever - 23.Driver’s
Air bag and horns - 24.Cruise Control control lever (if provided) - 25.Bonnet opening lever - 26.Set of controls: instrument panel lighting
adjustment, trip meter reset and headlamp aiming device.fig. 80
A0B0570m
Page 138 of 357
GETTING TO KNOW YOUR CAR
136
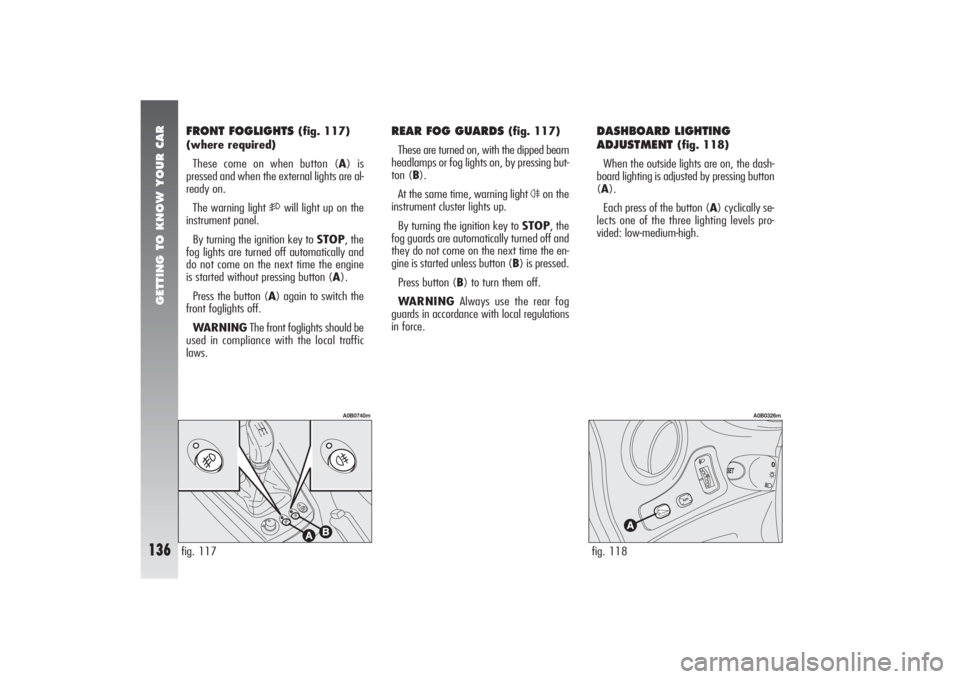
DASHBOARD LIGHTING
ADJUSTMENT
(fig. 118)
When the outside lights are on, the dash-
board lighting is adjusted by pressing button
(A).
Each press of the button (A) cyclically se-
lects one of the three lighting levels pro-
vided: low-medium-high.
FRONT FOGLIGHTS
(fig. 117)
(where required)
These come on when button (A) is
pressed and when the external lights are al-
ready on.
The warning light
5
will light up on the
instrument panel.
By turning the ignition key to STOP, the
fog lights are turned off automatically and
do not come on the next time the engine
is started without pressing button (A).
Press the button (A) again to switch the
front foglights off.
WARNINGThe front foglights should be
used in compliance with the local traffic
laws.
REAR FOG GUARDS
(fig. 117)
These are turned on, with the dipped beam
headlamps or fog lights on, by pressing but-
ton (B).
At the same time, warning light
4
on the
instrument cluster lights up.
By turning the ignition key to STOP, the
fog guards are automatically turned off and
they do not come on the next time the en-
gine is started unless button (B) is pressed.
Press button (B) to turn them off.
WARNINGAlways use the rear fog
guards in accordance with local regulations
in force.
fig. 117
A0B0740m
fig. 118
A0B0326m
Page 174 of 357
GETTING TO KNOW YOUR CAR
172
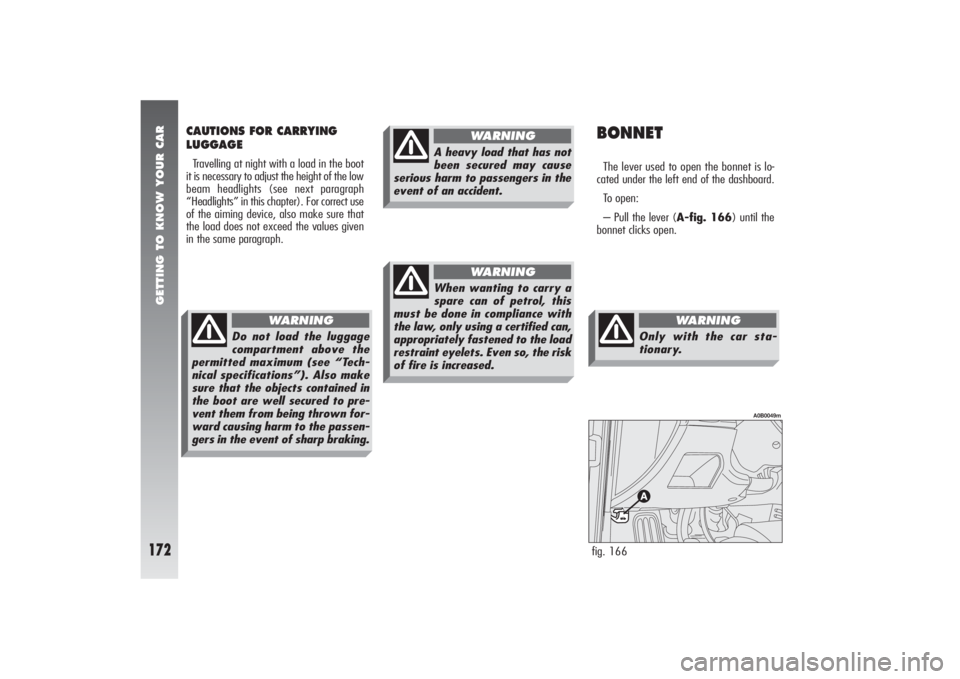
BONNETThe lever used to open the bonnet is lo-
cated under the left end of the dashboard.
To open:
– Pull the lever (A-fig. 166) until the
bonnet clicks open.
CAUTIONS FOR CARRYING
LUGGAGETravelling at night with a load in the boot
it is necessary to adjust the height of the low
beam headlights (see next paragraph
“Headlights” in this chapter). For correct use
of the aiming device, also make sure that
the load does not exceed the values given
in the same paragraph.
fig. 166
A0B0049m
Do not load the luggage
compartment above the
permitted maximum (see “Tech-
nical specifications”). Also make
sure that the objects contained in
the boot are well secured to pre-
vent them from being thrown for-
ward causing harm to the passen-
gers in the event of sharp braking.
WARNING
A heavy load that has not
been secured may cause
serious harm to passengers in the
event of an accident.
WARNING
When wanting to carry a
spare can of petrol, this
must be done in compliance with
the law, only using a certified can,
appropriately fastened to the load
restraint eyelets. Even so, the risk
of fire is increased.
WARNING
Only with the car sta-
tionary.
WARNING
Page 332 of 357
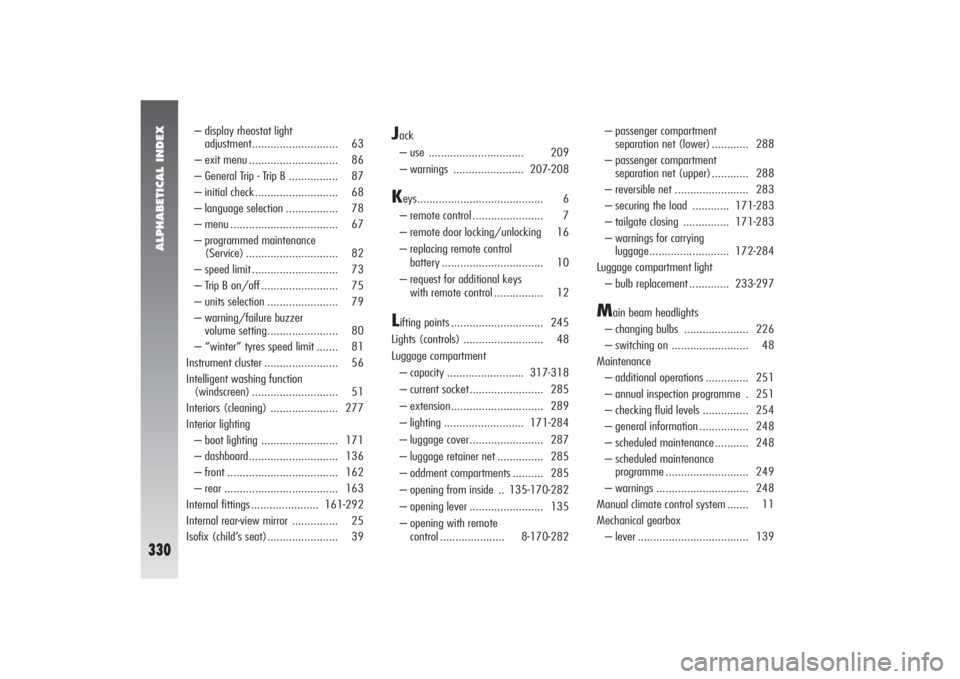
ALPHABETICAL INDEX
330
– display rheostat light
adjustment............................ 63
– exit menu ............................. 86
– General Trip - Trip B ................ 87
– initial check........................... 68
– language selection ................. 78
– menu ................................... 67
– programmed maintenance
(Service) .............................. 82
– speed limit ............................ 73
– Trip B on/off ......................... 75
– units selection ....................... 79
– warning/failure buzzer
volume setting....................... 80
– “winter” tyres speed limit ....... 81
Instrument cluster ........................ 56
Intelligent washing function
(windscreen) ............................ 51
Interiors (cleaning) ...................... 277
Interior lighting
– boot lighting ......................... 171
– dashboard............................. 136
– front .................................... 162
– rear ..................................... 163
Internal fittings ...................... 161-292
Internal rear-view mirror ............... 25
Isofix (child’s seat)....................... 39
Jack
– use ............................... 209
– warnings ....................... 207-208K
eys......................................... 6
– remote control ....................... 7
– remote door locking/unlocking 16
– replacing remote control
battery ................................. 10
– request for additional keys
with remote control ................ 12
Lifting points .............................. 245
Lights (controls) .......................... 48
Luggage compartment
– capacity ......................... 317-318
– current socket........................ 285
– extension.............................. 289
– lighting .......................... 171-284
– luggage cover........................ 287
– luggage retainer net ............... 285
– oddment compartments .......... 285
– opening from inside .. 135-170-282
– opening lever ........................ 135
– opening with remote
control ..................... 8-170-282– passenger compartment
separation net (lower) ............ 288
– passenger compartment
separation net (upper)............ 288
– reversible net ........................ 283
– securing the load ............ 171-283
– tailgate closing ............... 171-283
– warnings for carrying
luggage.......................... 172-284
Luggage compartment light
– bulb replacement ............. 233-297
M
ain beam headlights
– changing bulbs ..................... 226
– switching on ......................... 48
Maintenance
– additional operations .............. 251
– annual inspection programme . 251
– checking fluid levels ............... 254
– general information ................ 248
– scheduled maintenance ........... 248
– scheduled maintenance
programme ........................... 249
– warnings .............................. 248
Manual climate control system ....... 11
Mechanical gearbox
– lever .................................... 139
Page 333 of 357
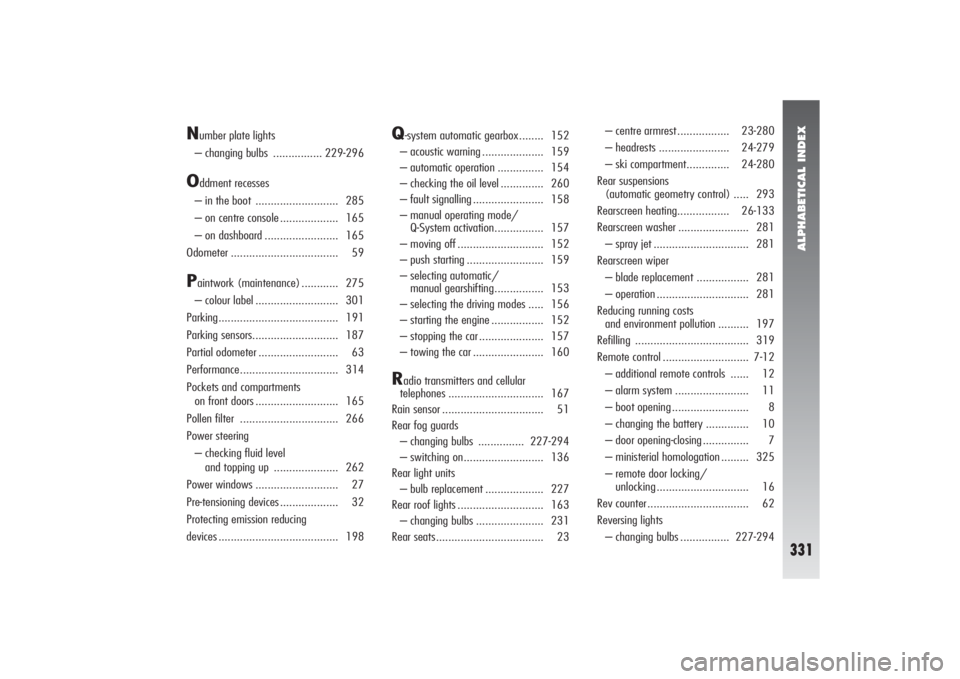
ALPHABETICAL INDEX
331
N
umber plate lights
– changing bulbs ................ 229-296
O
ddment recesses
– in the boot ........................... 285
– on centre console ................... 165
– on dashboard ........................ 165
Odometer ................................... 59
Paintwork (maintenance) ............ 275
– colour label ........................... 301
Parking....................................... 191
Parking sensors............................ 187
Partial odometer .......................... 63
Performance................................ 314
Pockets and compartments
on front doors ........................... 165
Pollen filter ................................ 266
Power steering
– checking fluid level
and topping up ..................... 262
Power windows ........................... 27
Pre-tensioning devices ................... 32
Protecting emission reducing
devices ....................................... 198
Q
-system automatic gearbox........ 152
– acoustic warning .................... 159
– automatic operation ............... 154
– checking the oil level .............. 260
– fault signalling ....................... 158
– manual operating mode/
Q-System activation................ 157
– moving off ............................ 152
– push starting ......................... 159
– selecting automatic/
manual gearshifting................ 153
– selecting the driving modes ..... 156
– starting the engine ................. 152
– stopping the car ..................... 157
– towing the car ....................... 160
R
adio transmitters and cellular
telephones ............................... 167
Rain sensor ................................. 51
Rear fog guards
– changing bulbs ............... 227-294
– switching on.......................... 136
Rear light units
– bulb replacement ................... 227
Rear roof lights ............................ 163
– changing bulbs ...................... 231
Rear seats................................... 23– centre armrest ................. 23-280
– headrests ....................... 24-279
– ski compartment.............. 24-280
Rear suspensions
(automatic geometry control) ..... 293
Rearscreen heating................. 26-133
Rearscreen washer ....................... 281
– spray jet ............................... 281
Rearscreen wiper
– blade replacement ................. 281
– operation .............................. 281
Reducing running costs
and environment pollution .......... 197
Refilling ..................................... 319
Remote control ............................ 7-12
– additional remote controls ...... 12
– alarm system ........................ 11
– boot opening ......................... 8
– changing the battery .............. 10
– door opening-closing ............... 7
– ministerial homologation ......... 325
– remote door locking/
unlocking .............................. 16
Rev counter................................. 62
Reversing lights
– changing bulbs ................ 227-294
Page 344 of 357

RIGHT HAND DRIVE VERSION
342
DASHBOARD1.Side air outlets - 2.Defrosting/demisting vents for side windows - 3.Upper side vents - 4.Passanger’s Air bag - 5.Sound system -
6.Engine coolant temperature gauge - 7.Clock - 8.Centre air vents - 9.Infocenter display - 10.Fuel level gauge - 11.Cruise control
lever (where fitted) - 12.Outside lights control lever - 13.Speedometer. - mileage recorder - 14.Check panel - 15.Rev counter -
16.Windscreen wiper control lever - 17.Bonnet opening lever - 18.Radio controls on the steering wheel (where applicable) -19.Igni-
tion switch - 20.Steering wheel lock/release lever - 21.Driver’s Air bag and horns - 22.Controls unit: instrument panel lighting adjust-
ment and healamp diming - 23.Controls for heating, ventilation and climate control - 24.Ashtray and cigar lighter - 25.Hazard warning
lights switch - 26.Glove box.fig. 1
A0B0611m
Page 347 of 357

RIGHT HAND DRIVE VERSION
345
MILEAGE RECORDER WITH
DOUBLE METER DISPLAY
(TOTAL AND TRIP)The display shows:
– the mileage on the first line (6 figures)
– the trip meter (4 figures).
To reset the trip meter, keep the button
(A) pressed for a few seconds.
WARNINGThe trip meter reading is not
stored if the battery is disconnected.
DASHBOARD LIGHTING
ADJUSTMENT (fig. 4)When the outside lights are on, the dash-
board lighting is adjusted pressing button
(B).
Each press of the button (B) cyclically se-
lects one of the three lighting levels pro-
vided: low-medium-high.
HEADLIGHT CORRECTOR
(fig. 4)The control (C) on the plate at the side
of the steering column can be moved to four
positions corresponding to various vehicle
loads given below.
Both headlights should be adjusted to com-
pensate for vehicle loading.
Position 0: 1 or 2 people occupying front
seats, full fuel tank, on-board equipment
present.
Position 1: 5 people on-board.
Position 2: 5 people on-board, luggage
compartment full (50 kg approximately).
Position 3: Driver and 300 kg in luggage
compartment.
fig. 4
A0B0418m