head lights Alfa Romeo 159 2006 Owner handbook (in English)
[x] Cancel search | Manufacturer: ALFA ROMEO, Model Year: 2006, Model line: 159, Model: Alfa Romeo 159 2006Pages: 299, PDF Size: 4.64 MB
Page 149 of 299

147
WARNING
LIGHTS AND
MESSAGES
IN AN
EMERGENCY
CAR
MAINTENANCE
TECHNICAL
SPECIFICATIONS
INDEX
CORRECT USE
OF THE CAR
DASHBOARD
AND
CONTROLS
SAFETY
DEVICES
SIDE WINDOW BAGS -
HEAD PROTECTION
They are “curtain” cushions located be-
hind the side coverings of the roof fig.
20and covered by proper finishing.
Window bags have been designed for
protecting the head of front and rear oc-
cupants in the event of side crash,
thanks to the wide cushion inflation sur-
face.
In minor side crashes (for which the re-
straining action of the seat belts is suf-
ficient), the air bags are not deployed.Also in this case it is of vital importance
to wear the seat belts since in case of
side crash they guarantee proper posi-
tioning of the occupant and prevent the
occupants to be pitched out of the car in
case of violent crashes.
IMPORTANTIn the event of side
crash, you can obtain the best protec-
tion by the system keeping a correct po-
sition on the seat, allowing thus a cor-
rect window bag unfolding.
IMPORTANTThe front air bags
and/or side bags may be deployed if
the car is subject to heavy knocks or
accidents involving the underbody area,
such as for example violent shocks,
against steps, kerbs or low obstacles,
falling of the car in big holes or sags in
the road.
FRONT SIDE BAGS - CHEST
AND PELVIS ZONE
PROTECTION
They are composed by two types of in-
stant inflation cushions and are housed
in the back rest of the front seats fig.
19. The task of the side air bags is to
increase protection of the occupants’
chest and pelvis zone in the event of a
side crash of medium-high severity.
A0E0093mfig. 19A0E0185mfig. 20
Page 150 of 299
148
WARNING
LIGHTS AND
MESSAGES
IN AN
EMERGENCY
CAR
MAINTENANCE
TECHNICAL
SPECIFICATIONS
INDEX
CORRECT USE
OF THE CAR
DASHBOARD
AND
CONTROLS
SAFETY
DEVICES
IMPORTANTWhen the airbag in-
flates it emits a small amount of dusts.
These dusts are harmless and is not the
beginning of a fire; then the unfold cush-
ion surface and the car interiors can be
covered by a dusty remains: this dust
can irritate skin and eyes. In case of con-
tact, wash yourself using neutral soap
and water.
Expiration dates of pyrotechnic charge
and coil contact are indicated on the la-
bel inside the glovebox. As this date ap-
proaches, contact Alfa Romeo Autho-
rized Services to have the device re-
placed.
IMPORTANTShould an accident oc-
cur in which any of the safety devices is
activated, take the car to Alfa Romeo
Authorized Services to have the devices
activated replaced and to have the sys-
tem checked.All control, repair and replacement op-
erations concerning the air bags must
only be carried out c/o Alfa Romeo Au-
thorized Services.
If you are having the car scrapped, have
the air bag system deactivated at Alfa
Romeo Authorized Services first. If the car
changes ownership, the new owner must
be informed of the method of use of air
bags and the above warnings and also
be given this “Owner’s Manual”.
IMPORTANTThe triggering of pre-
tensioners, front air bags and side bags
is decided in a differentiated manner ac-
cording to the type of impact. The fail-
ure to deploy one or more of them does
not mean that the system is not work-
ing properly.
Never rest head, arms
and elbows on the
door, on the windows and in
the window bag unfolding
area to prevent possible in-
juries during the inflation
phase.
WARNING
Never lean head, arms
and elbows out of the
window.
WARNING
Page 159 of 299
157
SAFETY
DEVICES
WARNING
LIGHTS AND
MESSAGES
IN AN
EMERGENCY
CAR
MAINTENANCE
TECHNICAL
SPECIFICATIONS
INDEX
DASHBOARD
AND
CONTROLS
CORRECT USE
OF THE CAR
Climate control
The air conditioner is an additional load
which greatly affects the engine leading
to higher consumption. When the tem-
perature outside the car permits it, use
the air vents where possible.
Spoilers
The use of aerodynamic optional extras
which are not certified for the specific
use on the vehicle, may reduce the aero-
dynamic penetration of the vehicle and
increase consumption. Unnecessary loads
Do not travel with too much luggage
stowed in the boot. The weight of the
car (especially when driving in town)
and its trim greatly affects consumption
and stability.
Roof rack/ski rack
Remove the roof rack or the ski rack
from the roof as soon as they are no
longer used. These accessories lower air
penetration and adversely affect con-
sumption levels. When needing to car-
ry particularly voluminous objects, prefer-
ably use a trailer.
Electric devices
Use electric devices only for the amount
of time needed. Rear heated window,
additional headlights, windscreen wipers
and heater fan need a considerable
amount of energy, therefore increasing
the requirement of current increases fu-
el consumption (up to +25% in the ur-
ban cycle).CONTAINING
RUNNING COSTS
Here are some suggestions which may
help you to keep the running costs of
your car down and lower the amount of
toxic emissions released into the at-
mosphere.
GENERAL CONSIDERATIONS
Car maintenance
Have checks and adjustments carried out
in accordance with the “Service sched-
ule”.
Tyres
Check the pressure of the tyres routine-
ly at an interval of no more than 4
weeks: if the pressure is too low, con-
sumption levels increase as resistance
to rolling is higher.
Page 167 of 299
165
SAFETY
DEVICES
IN AN
EMERGENCY
CAR
MAINTENANCE
TECHNICAL
SPECIFICATIONS
INDEX
CORRECT USE
OF THE CAR
DASHBOARD
AND
CONTROLS
WARNING
LIGHTS AND
MESSAGES
W W
A A
R R
N N
I I
N N
G G
L L
I I
G G
H H
T T
S S
A A
N N
D D
M M
E E
S S
S S
A A
G G
E E
S S
LOW BRAKE FLUID/HANDBRAKE ON ..................... 167
BRAKE PAD WEAR ............................................. 167
SEAT BELTS NOT FASTENED ................................. 167
AIR BAG FAILURE................................................ 168
FRONT AIR BAGS DEACTIVATED ............................ 168
ENGINE COOLANT
HIGH TEMPERATURE ........................................... 169
ENGINE OIL HIGH TEMPERATURE .......................... 170
LOW ENGINE OIL PRESSURE/
EXHAUST OIL..................................................... 170
LOW BATTERY CHARGE ....................................... 170
INCOMPLETE DOOR LOCKING ............................... 171
BONNET OPEN ................................................... 171
BOOT OPEN....................................................... 171
INJECTION SYSTEM FAILURE/
EOBD SYSTEM FAILURE....................................... 171
CAR PROTECTION SYSTEM FAILURE/
STEERING LOCK INHIBITION................................. 172
ALARM FAILURE/BREAK-IN ATTEMPT
ELECTRONIC KEY NOT RECOGNIZED ...................... 172
POSSIBLE PRESENCE OF ICE ON THE ROAD............ 173
PRE-HEATING GLOW PLUGS/
PRE-HEATING GLOW PLUG FAILURE ....................... 173
WATER IN DIESEL FUEL FILTER ............................. 174
INERTIAL FUEL CUT-OFF
SWITCHED ON .................................................. 174
ABS SYSTEM FAILURE......................................... 175
EBD SYSTEM FAILURE......................................... 175
VDC SYSTEM .................................................... 175HILL HOLDER FAILURE ........................................ 176
ASR SYSTEM (WHEEL ANTISKID SYSTEM) ............. 176
EXTERNAL LIGHTS FAILURE .................................. 176
BRAKE LIGHTS FAILURE ....................................... 177
REAR FOGLIGHTS ............................................... 177
FRONT FOG LIGHTS ............................................ 177
SIDE/TAILLIGHTS/FOLLOW ME HOME .................. 177
DIPPED BEAM HEADLIGHTS.................................. 177
MAIN BEAM HEADLIGHTS .................................... 177
LEFT-HAND DIRECTION INDICATOR ........................ 177
RIGHT-HAND DIRECTION INDICATOR ...................... 177
LIGHT SENSOR FAILURE........................................ 178
RAIN SENSOR FAILURE......................................... 178
PARKING SENSORS FAILURE ................................ 178
FUEL RESERVE – LIMITED CRUISING RANGE .......... 178
CRUISE CONTROL .............................................. 178
DIESEL PARTICULATE FILTER CLOGGED .................. 178
ANTIPINCH SYSTEM FAILURE ............................... 179
WINDSCREEN WASHER FLUID LOW LEVEL ............. 179
SPEED LIMIT EXCEEDED ..................................... 179
T.P.M.S. SYSTEM FAILURE ................................... 179
CHECK TYRE PRESSURE ...................................... 179
LOW INFLATION PRESSURE ................................. 180
TYRE PRESSURE UNSUITABLE FOR SPEED ............. 180
Page 179 of 299
177
SAFETY
DEVICES
IN AN
EMERGENCY
CAR
MAINTENANCE
TECHNICAL
SPECIFICATIONS
INDEX
CORRECT USE
OF THE CAR
DASHBOARD
AND
CONTROLS
WARNING
LIGHTS AND
MESSAGES
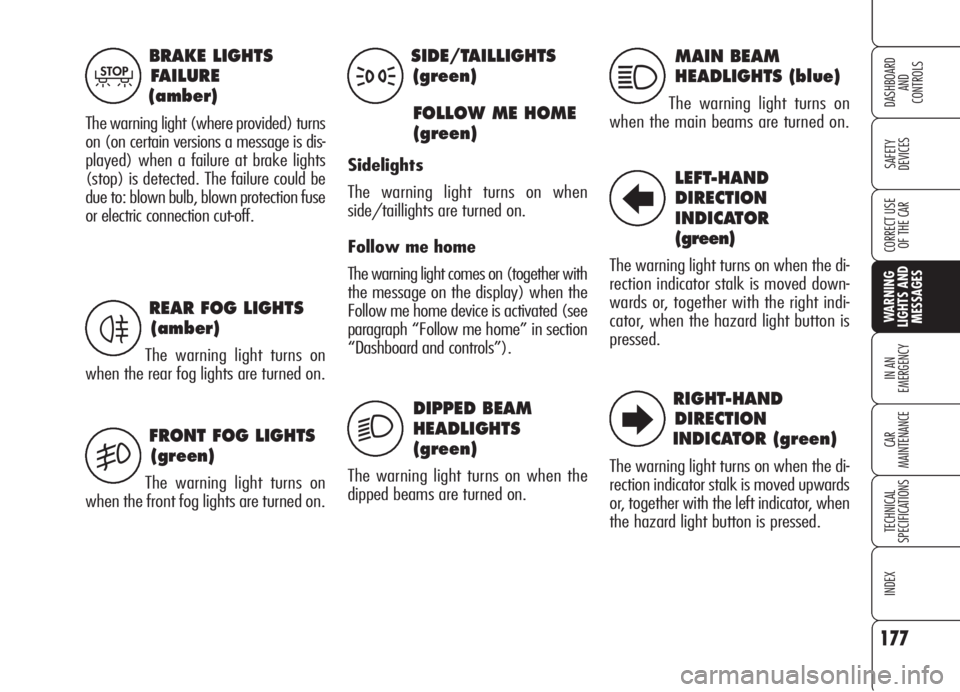
BRAKE LIGHTS
FAILURE
(amber)
The warning light (where provided) turns
on (on certain versions a message is dis-
played) when a failure at brake lights
(stop) is detected. The failure could be
due to: blown bulb, blown protection fuse
or electric connection cut-off.
T
REAR FOG LIGHTS
(amber)
The warning light turns on
when the rear fog lights are turned on.
FRONT FOG LIGHTS
(green)
The warning light turns on
when the front fog lights are turned on.
4
5
SIDE/TAILLIGHTS
(green)
FOLLOW ME HOME
(green)
Sidelights
The warning light turns on when
side/taillights are turned on.
Follow me home
The warning light comes on (together with
the message on the display) when the
Follow me home device is activated (see
paragraph “Follow me home” in section
“Dashboard and controls”).
3
2
DIPPED BEAM
HEADLIGHTS
(green)
The warning light turns on when the
dipped beams are turned on.
MAIN BEAM
HEADLIGHTS (blue)
The warning light turns on
when the main beams are turned on.
1
LEFT-HAND
DIRECTION
INDICATOR
(green)
The warning light turns on when the di-
rection indicator stalk is moved down-
wards or, together with the right indi-
cator, when the hazard light button is
pressed.
RIGHT-HAND
DIRECTION
INDICATOR (green)
The warning light turns on when the di-
rection indicator stalk is moved upwards
or, together with the left indicator, when
the hazard light button is pressed.
R
E
Page 198 of 299
196
SAFETY
DEVICES
WARNING
LIGHTS AND
MESSAGES
CAR
MAINTENANCE
TECHNICAL
SPECIFICATIONS
INDEX
CORRECT USE
OF THE CAR
DASHBOARD
AND
CONTROLS
IN AN
EMERGENCY
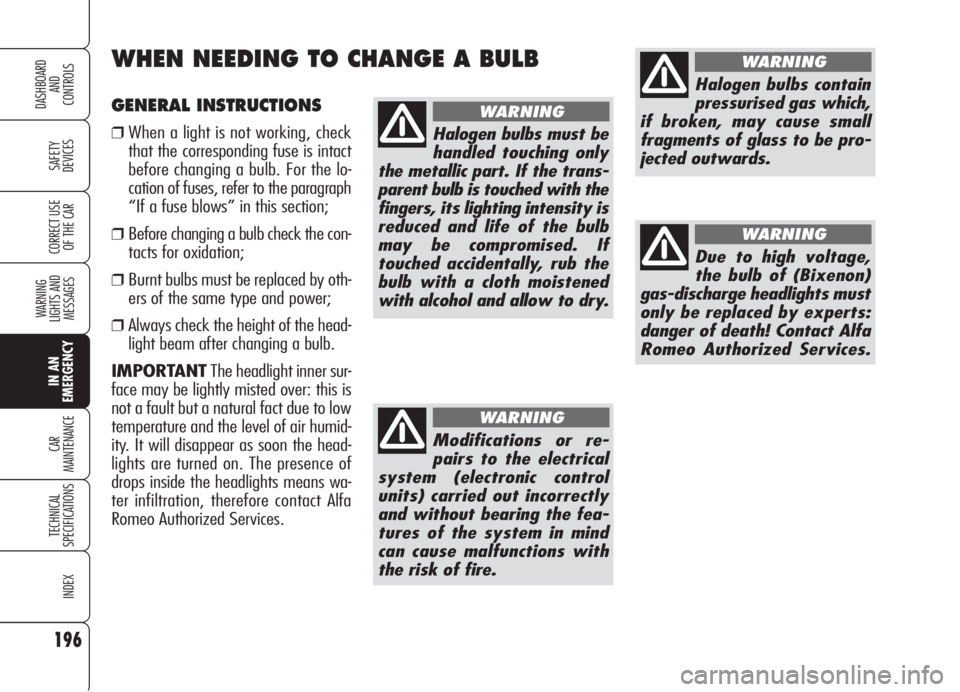
GENERAL INSTRUCTIONS
❒When a light is not working, check
that the corresponding fuse is intact
before changing a bulb. For the lo-
cation of fuses, refer to the paragraph
“If a fuse blows” in this section;
❒ Before changing a bulb check the con-
tacts for oxidation;
❒ Burnt bulbs must be replaced by oth-
ers of the same type and power;
❒Always check the height of the head-
light beam after changing a bulb.
IMPORTANTThe headlight inner sur-
face may be lightly misted over: this is
not a fault but a natural fact due to low
temperature and the level of air humid-
ity. It will disappear as soon the head-
lights are turned on. The presence of
drops inside the headlights means wa-
ter infiltration, therefore contact Alfa
Romeo Authorized Services.
WHEN NEEDING TO CHANGE A BULB
Modifications or re-
pairs to the electrical
system (electronic control
units) carried out incorrectly
and without bearing the fea-
tures of the system in mind
can cause malfunctions with
the risk of fire.
WARNING
Due to high voltage,
the bulb of (Bixenon)
gas-discharge headlights must
only be replaced by experts:
danger of death! Contact Alfa
Romeo Authorized Services.
WARNING
Halogen bulbs contain
pressurised gas which,
if broken, may cause small
fragments of glass to be pro-
jected outwards.
WARNING
Halogen bulbs must be
handled touching only
the metallic part. If the trans-
parent bulb is touched with the
fingers, its lighting intensity is
reduced and life of the bulb
may be compromised. If
touched accidentally, rub the
bulb with a cloth moistened
with alcohol and allow to dry.
WARNING
Page 200 of 299
198
SAFETY
DEVICES
WARNING
LIGHTS AND
MESSAGES
CAR
MAINTENANCE
TECHNICAL
SPECIFICATIONS
INDEX
CORRECT USE
OF THE CAR
DASHBOARD
AND
CONTROLS
IN AN
EMERGENCY
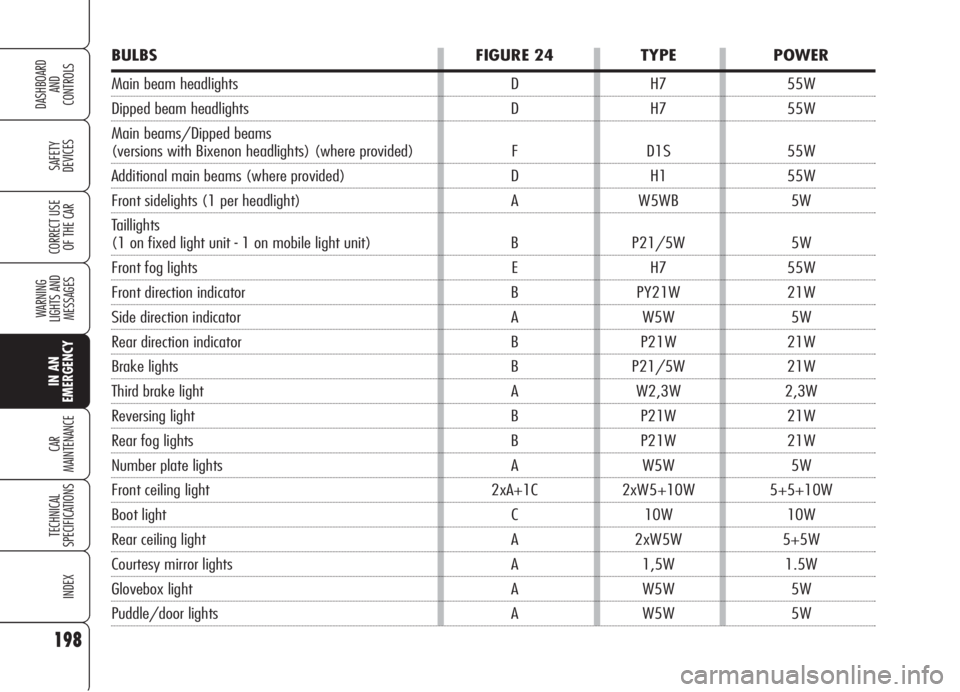
BULBS FIGURE 24 TYPE POWER
Main beam headlights D H7 55W
Dipped beam headlights D H7 55W
Main beams/Dipped beams
(versions with Bixenon headlights) (where provided) F D1S 55W
Additional main beams (where provided) D H1 55W
Front sidelights (1 per headlight) A W5WB 5W
Taillights
(1 on fixed light unit - 1 on mobile light unit) B P21/5W 5W
Front fog lights E H7 55W
Front direction indicator B PY21W 21W
Side direction indicator A W5W 5W
Rear direction indicator B P21W 21W
Brake lights B P21/5W 21W
Third brake light A W2,3W 2,3W
Reversing light B P21W 21W
Rear fog lights B P21W 21W
Number plate lights A W5W 5W
Front ceiling light 2xA+1C 2xW5+10W 5+5+10W
Boot light C 10W 10W
Rear ceiling light A 2xW5W 5+5W
Courtesy mirror lights A 1,5W 1.5W
Glovebox light A W5W 5W
Puddle/door lights A W5W 5W
Page 201 of 299
199
SAFETY
DEVICES
WARNING
LIGHTS AND
MESSAGES
CAR
MAINTENANCE
TECHNICAL
SPECIFICATIONS
INDEX
CORRECT USE
OF THE CAR
DASHBOARD
AND
CONTROLS
IN AN
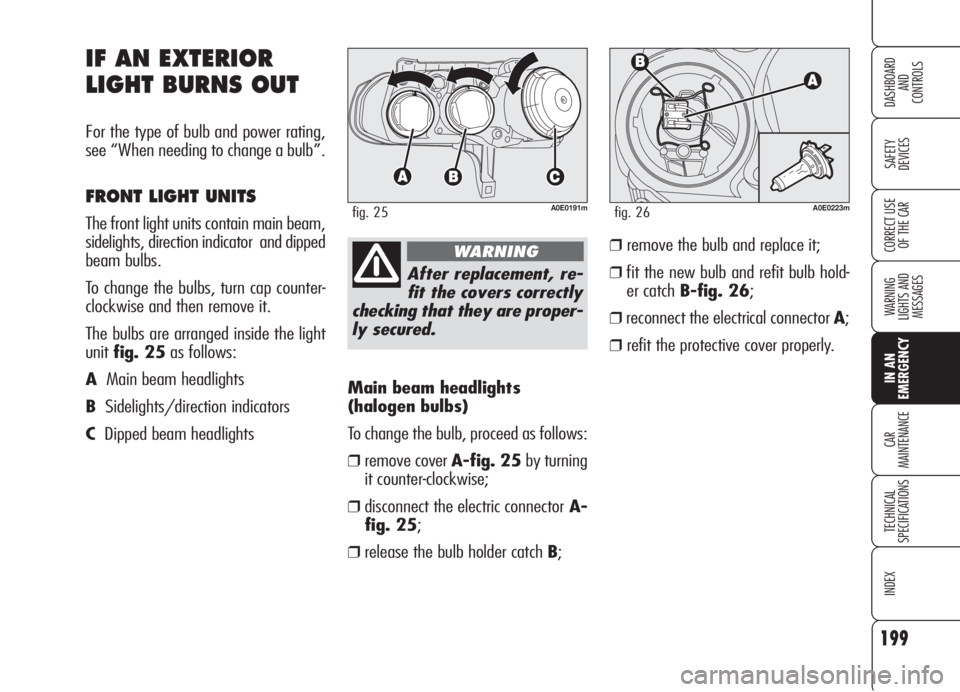
EMERGENCYMain beam headlights
(halogen bulbs)
To change the bulb, proceed as follows:
❒remove cover A-fig. 25by turning
it counter-clockwise;
❒disconnect the electric connectorA-
fig. 25;
❒release the bulb holder catch B;
IF AN EXTERIOR
LIGHT BURNS OUT
For the type of bulb and power rating,
see “When needing to change a bulb”.
FRONT LIGHT UNITS
The front light units contain main beam,
sidelights, direction indicator and dipped
beam bulbs.
To change the bulbs, turn cap counter-
clockwise and then remove it.
The bulbs are arranged inside the light
unitfig. 25as follows:
AMain beam headlights
BSidelights/direction indicators
CDipped beam headlights
A0E0191mfig. 25
After replacement, re-
fit the covers correctly
checking that they are proper-
ly secured.
WARNING
A0E0223mfig. 26
❒remove the bulb and replace it;
❒fit the new bulb and refit bulb hold-
er catch B-fig. 26;
❒reconnect the electrical connector A;
❒refit the protective cover properly.
Page 202 of 299
200
SAFETY
DEVICES
WARNING
LIGHTS AND
MESSAGES
CAR
MAINTENANCE
TECHNICAL
SPECIFICATIONS
INDEX
CORRECT USE
OF THE CAR
DASHBOARD
AND
CONTROLS
IN AN
EMERGENCY
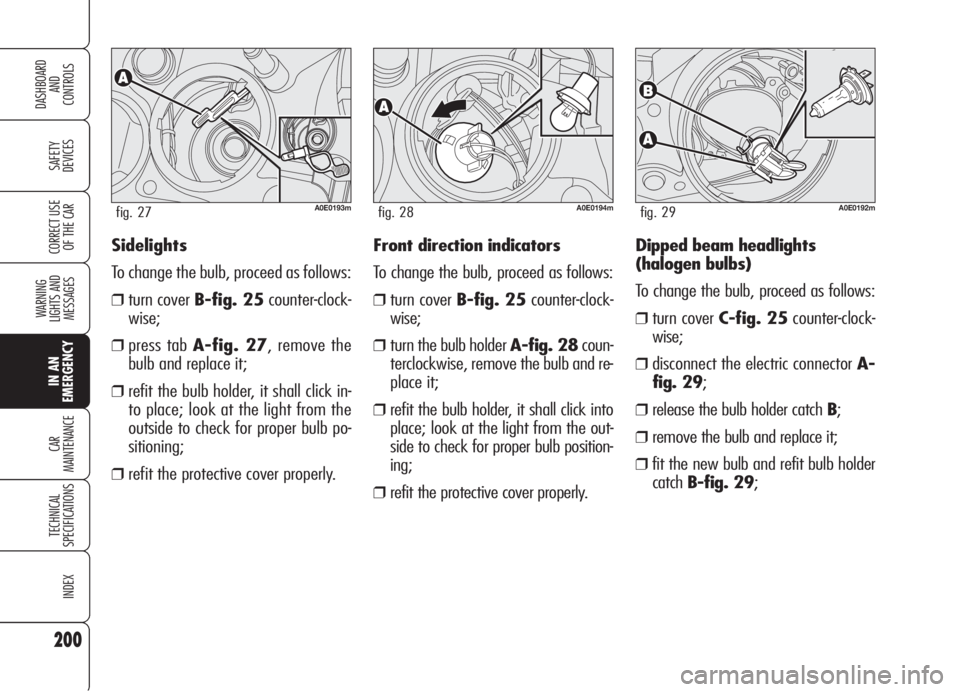
Sidelights
To change the bulb, proceed as follows:
❒turn cover B-fig. 25counter-clock-
wise;
❒press tab A-fig. 27, remove the
bulb and replace it;
❒refit the bulb holder, it shall click in-
to place; look at the light from the
outside to check for proper bulb po-
sitioning;
❒refit the protective cover properly.
A0E0193mfig. 27A0E0194mfig. 28A0E0192mfig. 29
Front direction indicators
To change the bulb, proceed as follows:
❒turn cover B-fig. 25counter-clock-
wise;
❒turn the bulb holder A-fig. 28coun-
terclockwise, remove the bulb and re-
place it;
❒refit the bulb holder, it shall click into
place; look at the light from the out-
side to check for proper bulb position-
ing;
❒refit the protective cover properly.Dipped beam headlights
(halogen bulbs)
To change the bulb, proceed as follows:
❒turn cover C-fig. 25counter-clock-
wise;
❒disconnect the electric connector A-
fig. 29;
❒release the bulb holder catch B;
❒remove the bulb and replace it;
❒fit the new bulb and refit bulb holder
catchB-fig. 29;
Page 203 of 299
201
SAFETY
DEVICES
WARNING
LIGHTS AND
MESSAGES
CAR
MAINTENANCE
TECHNICAL
SPECIFICATIONS
INDEX
CORRECT USE
OF THE CAR
DASHBOARD
AND
CONTROLS
IN AN
EMERGENCY
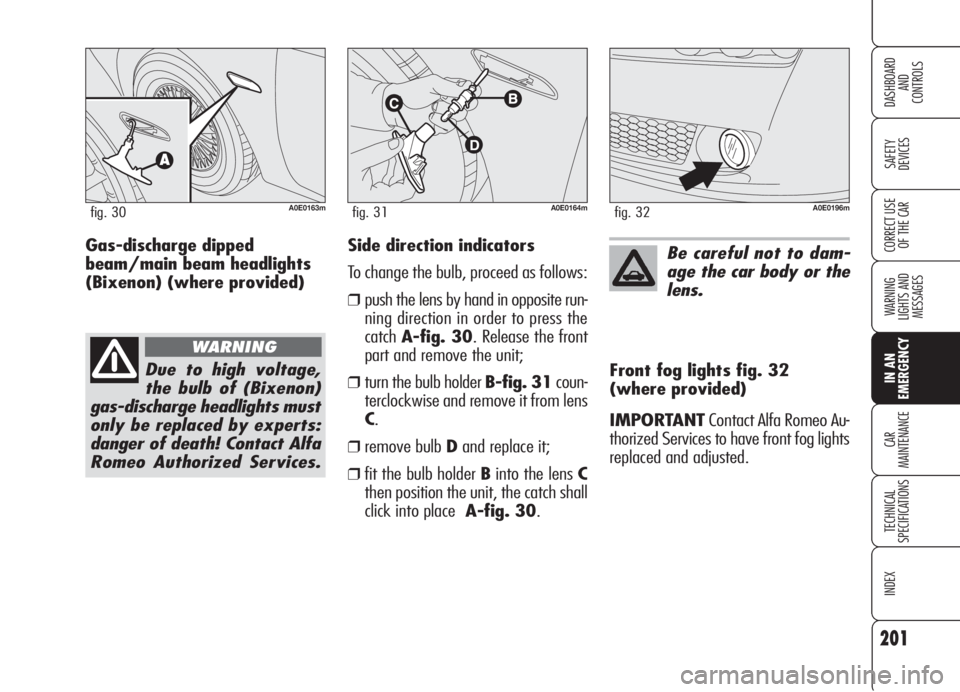
Side direction indicators
To change the bulb, proceed as follows:
❒push the lens by hand in opposite run-
ning direction in order to press the
catchA-fig. 30. Release the front
part and remove the unit;
❒turn the bulb holder B-fig. 31coun-
terclockwise and remove it from lens
C.
❒remove bulb Dand replace it;
❒fit the bulb holder Binto the lens C
then position the unit, the catch shall
click into place A-fig. 30.Front fog lights fig. 32
(where provided)
IMPORTANTContact Alfa Romeo Au-
thorized Services to have front fog lights
replaced and adjusted.
A0E0163mfig. 30A0E0164mfig. 31
Be careful not to dam-
age the car body or the
lens.
A0E0196mfig. 32
Due to high voltage,
the bulb of (Bixenon)
gas-discharge headlights must
only be replaced by experts:
danger of death! Contact Alfa
Romeo Authorized Services.
WARNING
Gas-discharge dipped
beam/main beam headlights
(Bixenon) (where provided)