service indicator Alfa Romeo 159 2006 Owner handbook (in English)
[x] Cancel search | Manufacturer: ALFA ROMEO, Model Year: 2006, Model line: 159, Model: Alfa Romeo 159 2006Pages: 299, PDF Size: 4.64 MB
Page 178 of 299
176
SAFETY
DEVICES
IN AN
EMERGENCY
CAR
MAINTENANCE
TECHNICAL
SPECIFICATIONS
INDEX
CORRECT USE
OF THE CAR
DASHBOARD
AND
CONTROLS
WARNING
LIGHTS AND
MESSAGES
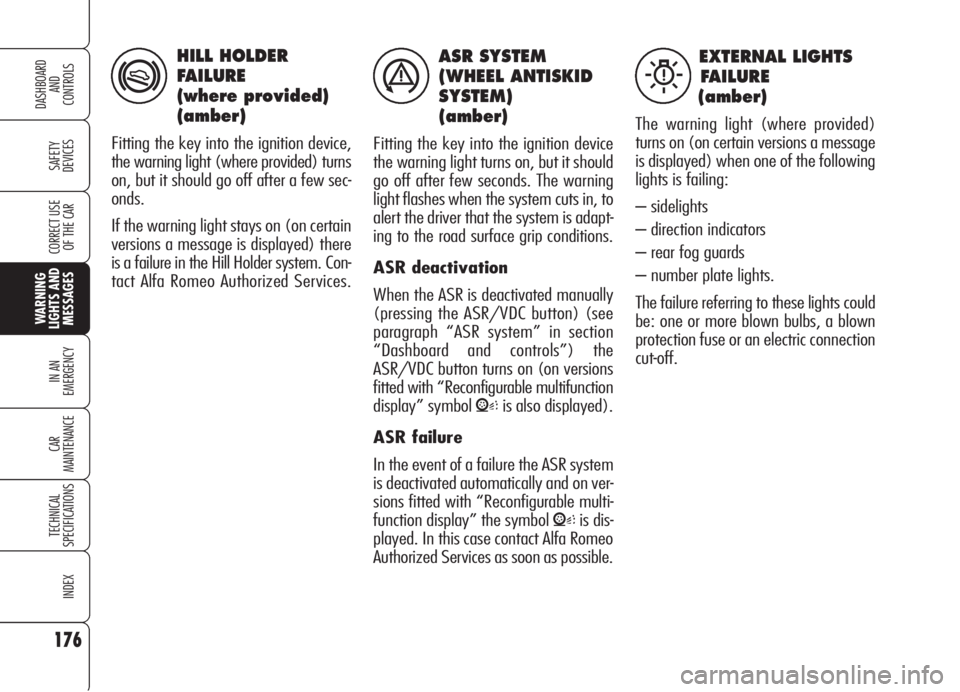
ASR SYSTEM
(WHEEL ANTISKID
SYSTEM)
(amber)
Fitting the key into the ignition device
the warning light turns on, but it should
go off after few seconds. The warning
light flashes when the system cuts in, to
alert the driver that the system is adapt-
ing to the road surface grip conditions.
ASR deactivation
When the ASR is deactivated manually
(pressing the ASR/VDC button) (see
paragraph “ASR system” in section
“Dashboard and controls”) the
ASR/VDC button turns on (on versions
fitted with “Reconfigurable multifunction
display” symbol
Vis also displayed).
ASR failure
In the event of a failure the ASR system
is deactivated automatically and on ver-
sions fitted with “Reconfigurable multi-
function display” the symbol
Vis dis-
played. In this case contact Alfa Romeo
Authorized Services as soon as possible.
á
EXTERNAL LIGHTS
FAILURE
(amber)
The warning light (where provided)
turns on (on certain versions a message
is displayed) when one of the following
lights is failing:
– sidelights
– direction indicators
– rear fog guards
– number plate lights.
The failure referring to these lights could
be: one or more blown bulbs, a blown
protection fuse or an electric connection
cut-off.
W
HILL HOLDER
FAILURE
(where provided)
(amber)
Fitting the key into the ignition device,
the warning light (where provided) turns
on, but it should go off after a few sec-
onds.
If the warning light stays on (on certain
versions a message is displayed) there
is a failure in the Hill Holder system. Con-
tact Alfa Romeo Authorized Services.
*
Page 203 of 299
201
SAFETY
DEVICES
WARNING
LIGHTS AND
MESSAGES
CAR
MAINTENANCE
TECHNICAL
SPECIFICATIONS
INDEX
CORRECT USE
OF THE CAR
DASHBOARD
AND
CONTROLS
IN AN
EMERGENCY
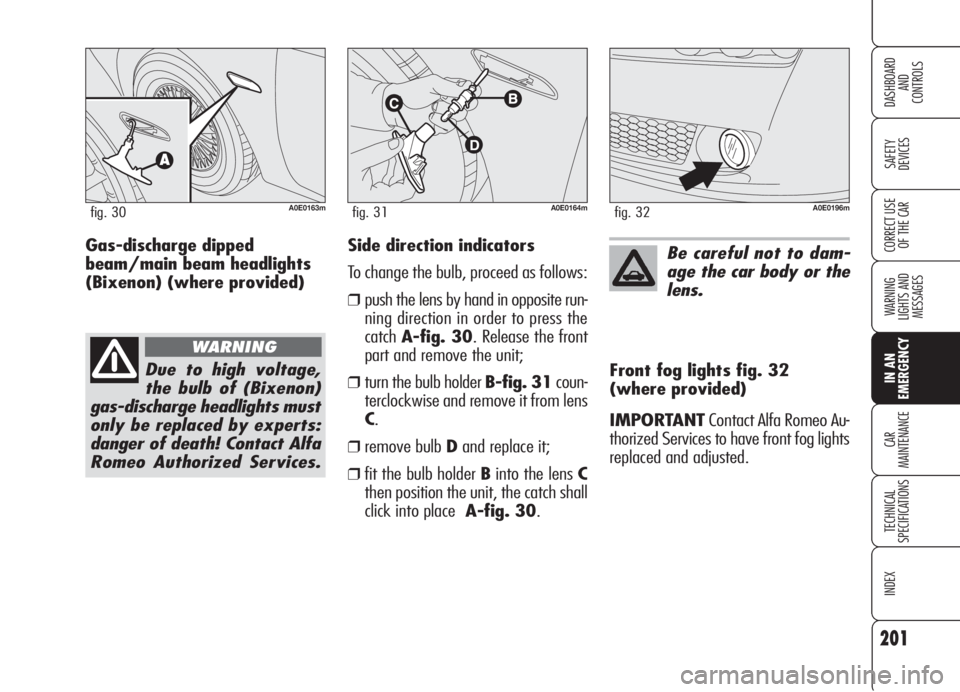
Side direction indicators
To change the bulb, proceed as follows:
❒push the lens by hand in opposite run-
ning direction in order to press the
catchA-fig. 30. Release the front
part and remove the unit;
❒turn the bulb holder B-fig. 31coun-
terclockwise and remove it from lens
C.
❒remove bulb Dand replace it;
❒fit the bulb holder Binto the lens C
then position the unit, the catch shall
click into place A-fig. 30.Front fog lights fig. 32
(where provided)
IMPORTANTContact Alfa Romeo Au-
thorized Services to have front fog lights
replaced and adjusted.
A0E0163mfig. 30A0E0164mfig. 31
Be careful not to dam-
age the car body or the
lens.
A0E0196mfig. 32
Due to high voltage,
the bulb of (Bixenon)
gas-discharge headlights must
only be replaced by experts:
danger of death! Contact Alfa
Romeo Authorized Services.
WARNING
Gas-discharge dipped
beam/main beam headlights
(Bixenon) (where provided)
Page 206 of 299
204
SAFETY
DEVICES
WARNING
LIGHTS AND
MESSAGES
CAR
MAINTENANCE
TECHNICAL
SPECIFICATIONS
INDEX
CORRECT USE
OF THE CAR
DASHBOARD
AND
CONTROLS
IN AN
EMERGENCY
Additional brake light
(third stop)
Contact Alfa Romeo Authorized Services
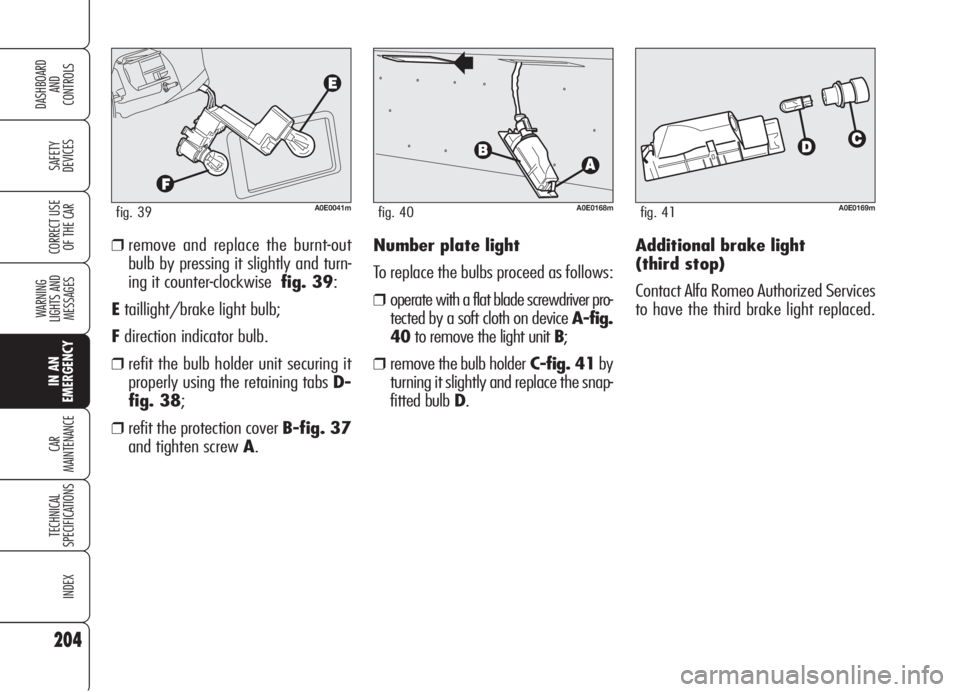
to have the third brake light replaced. ❒remove and replace the burnt-out
bulb by pressing it slightly and turn-
ing it counter-clockwisefig. 39:
Etaillight/brake light bulb;
Fdirection indicator bulb.
❒refit the bulb holder unit securing it
properly using the retaining tabs D-
fig. 38;
❒refit the protection cover B-fig. 37
and tighten screw A.Number plate light
To replace the bulbs proceed as follows:
❒operate with a flat blade screwdriver pro-
tected by a soft cloth on device A-fig.
40to remove the light unit B;
❒remove the bulb holderC-fig. 41by
turning it slightly and replace the snap-
fitted bulb D.
A0E0041mfig. 39A0E0168mfig. 40A0E0169mfig. 41
Page 227 of 299
225
SAFETY
DEVICES
WARNING
LIGHTS AND
MESSAGES
IN AN
EMERGENCY
TECHNICAL
SPECIFICATIONS
INDEX
CORRECT USE
OF THE CAR
DASHBOARD
AND
CONTROLS
CAR
MAINTENANCE
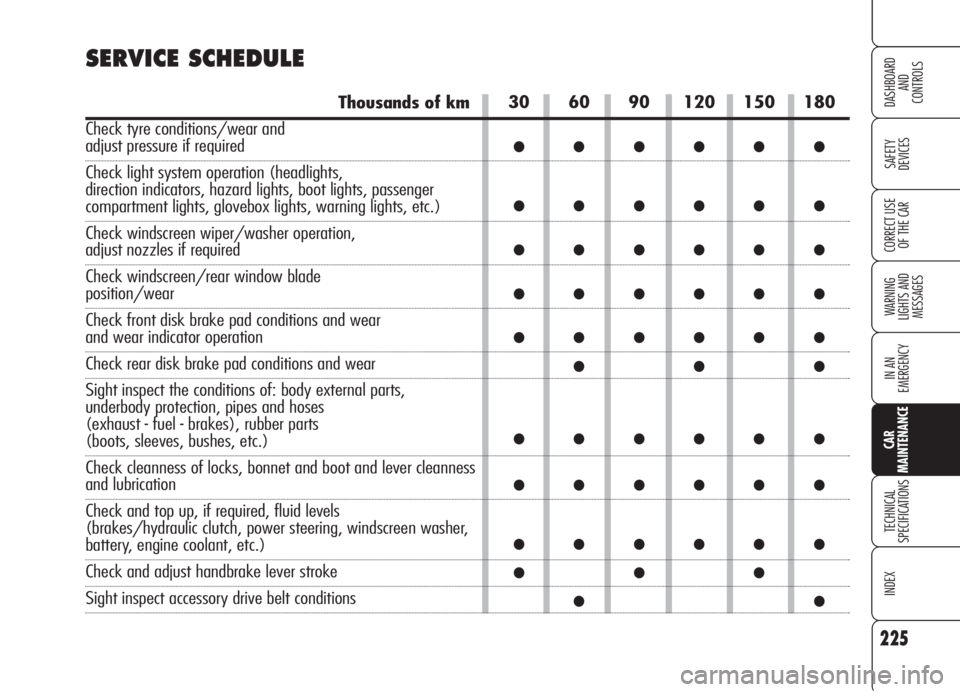
30 60 90 120 150 180
●●●●●●
●●●●●●
●●●●●●
●●●●●●
●●●●●●
●●●
●●●●●●
●●●●●●
●●●●●●
●●●
●●
SERVICE SCHEDULE
Thousands of km
Check tyre conditions/wear and
adjust pressure if required
Check light system operation (headlights,
direction indicators, hazard lights, boot lights, passenger
compartment lights, glovebox lights, warning lights, etc.)
Check windscreen wiper/washer operation,
adjust nozzles if required
Check windscreen/rear window blade
position/wear
Check front disk brake pad conditions and wear
and wear indicator operation
Check rear disk brake pad conditions and wear
Sight inspect the conditions of: body external parts,
underbody protection, pipes and hoses
(exhaust - fuel - brakes), rubber parts
(boots, sleeves, bushes, etc.)
Check cleanness of locks, bonnet and boot and lever cleanness
and lubrication
Check and top up, if required, fluid levels
(brakes/hydraulic clutch, power steering, windscreen washer,
battery, engine coolant, etc.)
Check and adjust handbrake lever stroke
Sight inspect accessory drive belt conditions
Page 229 of 299
227
SAFETY
DEVICES
WARNING
LIGHTS AND
MESSAGES
IN AN
EMERGENCY
TECHNICAL
SPECIFICATIONS
INDEX
CORRECT USE
OF THE CAR
DASHBOARD
AND
CONTROLS
CAR
MAINTENANCE
USE OF THE CAR
UNDER HEAVY
CONDITIONS
Should prevailing use of the car be un-
der one of the following specially heavy
conditions:
❒ trailer or caravan towing;
❒ dusty roads;
❒ short distances (less than 7-8 km)
and repeated with external temper-
atures below zero;
❒ frequently idling engines or long dis-
tance low speed driving (e.g.: door-
to-door deliveries) or in case of a long
term inactivity;
❒ urban routes;
carry out checks more frequently than
required on Service Schedule:
❒ check front disk brake pad conditions
and wear;
❒ check cleanness of bonnet and boot
locks and lever cleanness and lubri-
cation;
❒ sight inspect the conditions of: en-
gine, gearbox, transmission, pipes
and hoses (exhaust - fuel - brakes),
rubber parts (boots, sleeves, bushes,
etc.);
❒ check battery charge and fluid level
(electrolyte);
❒ visual check on various drive belt con-
ditions;
❒ change engine oil and oil filter, if re-
quired;
❒ check and replace pollen filter, if re-
quired;
❒ check and replace air cleaner, if re-
quired.
PERIODICAL CHECKS
Every 1,000 km or before long jour-
neys, check and top up if required:
❒engine coolant fluid level;
❒brake fluid level;
❒windscreen washer fluid level;
❒ tyre pressure and conditions.
❒ check light system operation (head-
lights, direction indicators, hazard
lights, etc.);
❒ check windscreen wiper/washer op-
eration and windscreen/rear window
blade position/wear;
Every 3,000 km check and top up if re-
quired: engine oil level.
You are recommended to use FL Se-
leniaproducts, designed and produced
specifically for Alfa Romeo cars (see
table “Capacities” in section “Techni-
cal specifications”).
Page 239 of 299

237
SAFETY
DEVICES
WARNING
LIGHTS AND
MESSAGES
IN AN
EMERGENCY
TECHNICAL
SPECIFICATIONS
INDEX
CORRECT USE
OF THE CAR
DASHBOARD
AND
CONTROLS
CAR
MAINTENANCE
BATTERY
The battery is of the “Limited mainte-
nance” type: under normal conditions
of use the electrolyte does not need top-
ping up with distilled water.
CHECKING THE CHARGE
The battery charge may be checked sat-
isfactorily through the indicatorA-fig.
14and acting according to the colour
the indicator shows.
Refer to the table below.
A0E0127mfig. 14
Bright white colourTop up electrolyte Contact Alfa Romeo
Authorized Services
Dark colour withoutLow charge level Charge the battery
green area in the centre(advisable to contact Alfa
Romeo Authorized Services)
Dark colour withElectrolyte level and charge No action
green area in the centresufficient
IMPORTANTThe charge in the bat-
tery should be checked at the start of
winter to limit the risk of electrolyte
freezing. This check should be carried
out more frequently if the car is used
mainly for short trips, or if it is fitted with
accessories that permanently absorb
electricity also with the ignition key re-
moved, especially in the case of after
market accessories.
Page 286 of 299

284
ALFA 159 SPORTWAGON
Direction indicators/
Taillights/Brake lights
To replace the bulbs proceed as follows:
❒open the tailgate;
❒on certain versions, open the side lid;
❒remove the protection cover by op-
erating device A-fig. 34;
A0E0296mfig. 35A0E0297mfig. 36
A0E0298mfig. 37
❒remove the bulb holder unit by press-
ing the retaining tabs B-fig. 35;
❒remove and replace the burnt-out
bulb by pressing it slightly and turn-
ing it counterclockwise fig. 36:
E:taillight/brake light bulb;
F:direction indicator bulb
❒refit the bulb holder unit securing it
properly using the retaining tabs B-
fig. 35;
❒refit the protection cover.
A0E0295mfig. 34
ADDITIONAL BRAKE LIGHT
(THIRD STOP)
The additional brake light is made up of
LEDs and it is built into the rear spoiler
fig. 37.
Contact Alfa Romeo Authorized Services
to have the third brake light replaced.