service Alfa Romeo 159 2008 Owner handbook (in English)
[x] Cancel search | Manufacturer: ALFA ROMEO, Model Year: 2008, Model line: 159, Model: Alfa Romeo 159 2008Pages: 303, PDF Size: 5.18 MB
Page 25 of 303
23
SAFETY
DEVICES
WARNING LIGHTS
AND MESSAGES
IN AN
EMERGENCY
CAR
MAINTENANCE
TECHNICAL
SPECIFICATIONS
INDEX
DASHBOARD
AND
CONTROLS
CORRECT USE
OF THE CAR
The turning on of the warning light `
when travelling (on certain versions to-
gether with a message on the display)
indicates that the oil temperature is too
high; in this case, stop the engine and
contact Alfa Romeo Authorized Services.
IMPORTANTThe pointer can reach
the red area also for a sum of un-
favourable conditions, i.e.: slow speed,
uphill, fully laden or towing a trailer with
hot outside temperature.
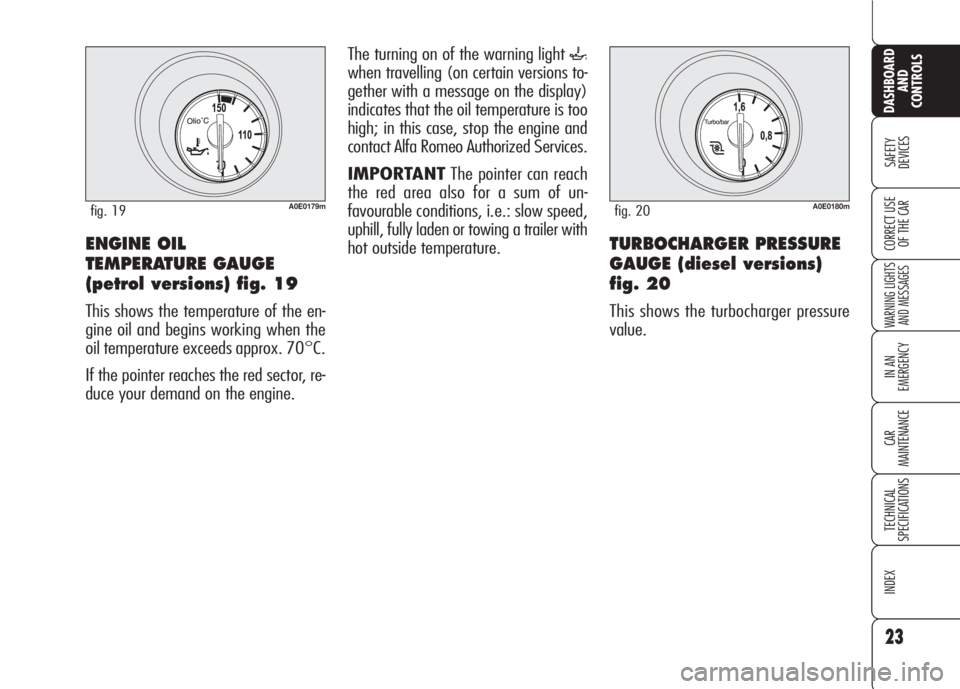
ENGINE OIL
TEMPERATURE GAUGE
(petrol versions) fig. 19
This shows the temperature of the en-
gine oil and begins working when the
oil temperature exceeds approx. 70°C.
If the pointer reaches the red sector, re-
duce your demand on the engine.
A0E0179mfig. 19A0E0180mfig. 20
TURBOCHARGER PRESSURE
GAUGE (diesel versions)
fig. 20
This shows the turbocharger pressure
value.
Page 30 of 303
ENGINE OIL LEVEL
INDICATION
Fitting the electronic key into the igni-
tion device, the display will show for a
few seconds the engine oil level. At this
stage, to clear this indication and to go
to next screen, press button MENU.
Low oil level will be indicated by a ded-
icated warning message on the display.
IMPORTANT Check the proper en-
gine oil level on the dipstick (see para-
graph “Checking levels” in section “Car
maintenance”).
IMPORTANTProper engine oil level
shall be checked with the car on level
ground.
IMPORTANT To read the correct oil
level after fitting the electronic key, wait
for about 2 seconds before starting the
engine.
IMPORTANT Engine oil level could in-
crease after a long stop. Scheduled servicing
IMPORTANTThe Service schedule in-
cludes car maintenance every 30,000
km (or 18,000 mi); this is shown au-
tomatically, with the electronic key in-
to the ignition device starting from
2,000 km (or 1,240 mi) from this
deadline and it will be displayed in km
or miles according to the unit set. When
a scheduled service interval (“coupon”)
is near to come, fitting the electronic key
into the ignition device will display a
message followed by the number of
km/mi to go before car servicing. Con-
tact Alfa Romeo Authorized Services to
carry out any service operation provid-
ed by the Service schedule or by the An-
nual inspection plan, and to reset the
display.
28
SAFETY
DEVICES
WARNING LIGHTS
AND MESSAGES
IN AN
EMERGENCY
CAR
MAINTENANCE
TECHNICAL
SPECIFICATIONS
INDEX
CORRECT USE
OF THE CAR
DASHBOARD
AND
CONTROLS
Distance unit (UNIT)
With this function it is possible to set the
required distance unit (km or mi).
To set the distance unit, proceed as fol-
lows:
❒press button MENUuntil selecting
UNIT: the display will show UNIT
and “km” or “mi”;
❒press again button MENU: “km”
(or “mi”) will flash;
❒press buttons +/–to set the re-
quired distance unit.
Page 35 of 303
33
SAFETY
DEVICES
WARNING LIGHTS
AND MESSAGES
IN AN
EMERGENCY
CAR
MAINTENANCE
TECHNICAL
SPECIFICATIONS
INDEX
DASHBOARD
AND
CONTROLS
CORRECT USE
OF THE CAR
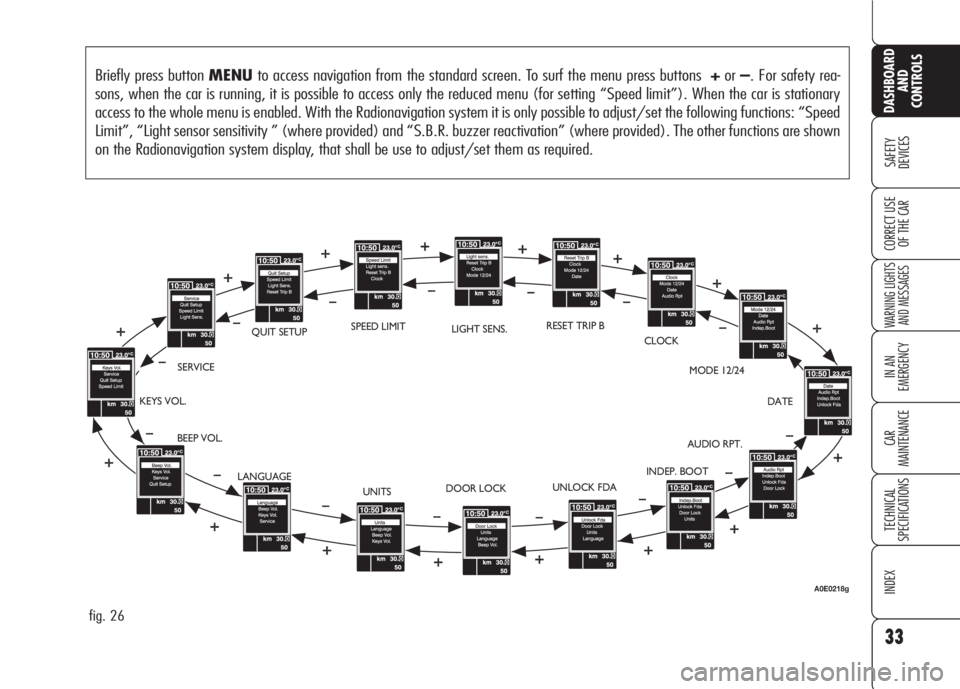
Briefly press button MENUto access navigation from the standard screen. To surf the menu press buttons +or–. For safety rea-
sons, when the car is running, it is possible to access only the reduced menu (for setting “Speed limit”). When the car is stationary
access to the whole menu is enabled. With the Radionavigation system it is only possible to adjust/set the following functions: “Speed
Limit”, “Light sensor sensitivity ” (where provided) and “S.B.R. buzzer reactivation” (where provided). The other functions are shown
on the Radionavigation system display, that shall be use to adjust/set them as required.
fig. 26
BEEP VOL.SERVICEQUIT SETUPLIGHT SENS.RESET TRIP B
CLOCK
MODE 12/24
DATE
AUDIO RPT.
INDEP. BOOT
UNLOCK FDA
DOOR LOCK
UNITS KEYS VOL.
LANGUAGESPEED LIMIT
A0E0218g
Page 42 of 303
Reactivating the S.B.R.
(Seat Belt Reminder) buzzer
(Beep Seatb.) (where provided)
This function is displayed only after the
system has been deactivated by Alfa
Romeo Authorized Services.
Exit Menu (Quit setup)
Selecting this option will bring back to
standard screen.
ILLUMINATION OF REV
COUNTER/INSTRUMENTS
(NIGHT PANEL)
This function enables to turn on/off
(ON/OFF) the lights of the rev counter
and instruments. This function can be ac-
tivated (only with electronic key fitted in-
to ignition device, external lights on, and
speedometer built-in sensor in poor out-
side light setting), by pressing for long but-
ton–. When this function is on, the dis-
play will show a warning message. Once
on, the NIGHT PANELfunction can be
deactivated as follows:
❒by long press on button +(also with
external lights off);
❒removing the electronic key from the
ignition device.
When function is off the display will show
a warning message.
Messages stay on the display for a few
seconds, then they will go off. To stop
displaying before time, briefly press but-
tonMENU. Scheduled Servicing (Service)
Through this function it is possible to dis-
play information connected to proper car
servicing.
Proceed as follows:
❒briefly press button MENU: service
in km or mi, according to previous
setting, will be displayed (see para-
graph “Units”);
❒briefly press buttonMENUto go
back to the menu screen or press the
button for long to go back to the stan-
dard screen.
IMPORTANTThe Service schedule in-
cludes car maintenance every 30,000 km
(or 18,000 mi); this is shown automat-
ically, with the electronic key into the ig-
nition device starting from 2,000 km (or
1,240 mi) from this deadline and it will
be displayed in km or miles according to
the unit set. When a scheduled service in-
terval (“coupon”) is near to come, fitting
the electronic key into the ignition device
will display a message followed by the
number of km/mi to go before car ser-
vicing. Contact Alfa Romeo Authorized Ser-
vices to carry out any service operation
provided by the Service schedule or by the
Annual inspection plan, and to reset the
display.
40
SAFETY
DEVICES
WARNING LIGHTS
AND MESSAGES
IN AN
EMERGENCY
CAR
MAINTENANCE
TECHNICAL
SPECIFICATIONS
INDEX
DASHBOARD
AND
CONTROLS
CORRECT USE
OF THE CAR
Page 70 of 303
68
SAFETY
DEVICES
WARNING
LIGHTS AND
MESSAGES
IN AN
EMERGENCY
CAR
MAINTENANCE
TECHNICAL
SPECIFICATIONS
INDEX
CORRECT USE
OF THE CAR
DASHBOARD
AND
CONTROLS
POLLEN FILTER/ ACTIVATED
CARBON POLLEN FILTER
According to versions, the car can be fit-
ted with pollen filter or activated carbon
pollen filter (where provided). The filter
has the specific capability of admitting to
the passenger compartment purified air,
free from particles such as dust, pollen,
etc. The filtering action takes place un-
der all air inlet conditions and it is clear-
ly most effective with the windows shut.
Have the conditions of the filter checked
by Alfa Romeo Authorized Services at
least once a year, preferably at the on-
set of summer. If the car is used main-
ly in polluted or dusty areas it should be
checked and if necessary replaced at
shorter intervals than specified in the
Service Schedule (see section “Car
Maintenance”). AQS function (Air Quality
System) (where provided)
The AQS function turns on automatical-
ly air recirculation when it detects the
presence of polluted air (e.g. in queues
and tunnels).
IMPORTANTWith AQS function on,
after a preset time with recirculation on,
the compressor will enable outside air
inlet (for about 1 minute) to change air
inside the passenger compartment, re-
gardless of outside air pollution level.
IMPORTANTThe AQS function is dis-
abled when the outside temperature is
cold to prevent window misting up. To
reactivate this function, press button
v. Led “A” on button vwill
turn on to indicate that the function is
on.
Failure to replace the fil-
ter may considerably re-
duce the effectiveness of
the climate control system up to
blocking the air flow from the
outlets and vents.
In certain weather con-
ditions (e.g. outside
temperature around
0°C) and with automatic air re-
circulation control on, mist may
form on the windows. In this
case press button vto
switch off recirculation and if
necessary press button + to in-
crease the flow of air to the
windscreen.
With the outside tem-
perature below -1°C the
climate control compres-
sor is unable to work. It is
therefore inadvisable to use the
inside air recirculation function
with low outside temperature
as windows may mist over
quickly.
Page 79 of 303
77
SAFETY
DEVICES
WARNING
LIGHTS AND
MESSAGES
IN AN
EMERGENCY
CAR
MAINTENANCE
TECHNICAL
SPECIFICATIONS
INDEX
CORRECT USE
OF THE CAR
DASHBOARD
AND
CONTROLS
❒pressing the brake pedal, pressing the
clutch pedal (in these cases the last
stored speed will stay memorised, to
resume it press button RES);
❒pressing the accelerator pedal; in this
case the system is disengaged only
temporarily; device operation will be
resumed automatically when releas-
ing the pedal;
❒with car speed below the preset lim-
it (in these cases the last stored
speed will stay memorised, to resume
it press button RES);
Automatic Cruise Control
deactivation
The Cruise Control is temporarily deac-
tivated when the ABS or VDC systems
come into operation (above a max. pre-
set time): in this case the last set speed
will stay memorised, to recall it press
buttonRES.
In the event of Cruise Control or engine
control system failure, the device is de-
activated until removing the electronic
key from the ignition device. In this
event contact Alfa Romeo Authorized
Services.
❒engage the gear selected at the time
of speed memorising (4th or 5th
gear);
❒press the RESbutton (set at stalk
end).
TO INCREASE THE
MEMORISED SPEED
The speed memorised can be increased
in two ways:
❒pressing the accelerator and then
memorising the new speed reached;
or
❒moving the stalk upwards (+).
Each operation of the stalk will corre-
spond to a slight increase in speed
(about 1.5 km/h), while keeping the
stalk upwards will correspond to a con-
tinuous speed increase.
TO REDUCE MEMORISED
SPEED
The speed memorised can be increased
in two ways:
❒disengaging the device and then
memorising the new speed;
or
❒moving the stalk downwards (–) un-
til reaching the new speed which will
be memorised automatically.
Each operation of the stalk will corre-
spond to a slight decrease in speed
(about 1.5 km/h), while keeping the
stalk downwards will correspond to a
continuous speed decrease.
DEVICE DISENGAGEMENT
The device is disengaged in one of the
following cases:
❒turning the knurled ring A-fig. 57
toO;
❒turning the engine off or removing
the electronic key from the ignition
device;
Page 80 of 303
78
SAFETY
DEVICES
WARNING
LIGHTS AND
MESSAGES
IN AN
EMERGENCY
CAR
MAINTENANCE
TECHNICAL
SPECIFICATIONS
INDEX
CORRECT USE
OF THE CAR
DASHBOARD
AND
CONTROLS
The device is automatically deactivated
when operating accidentally or incor-
rectly the stalk, the knurled ring Aor
buttonRES: in this event to reactivate
the device: bring the car to the required
speed and then move the stalk upwards
(+) or downwards (–).CEILING LIGHTS
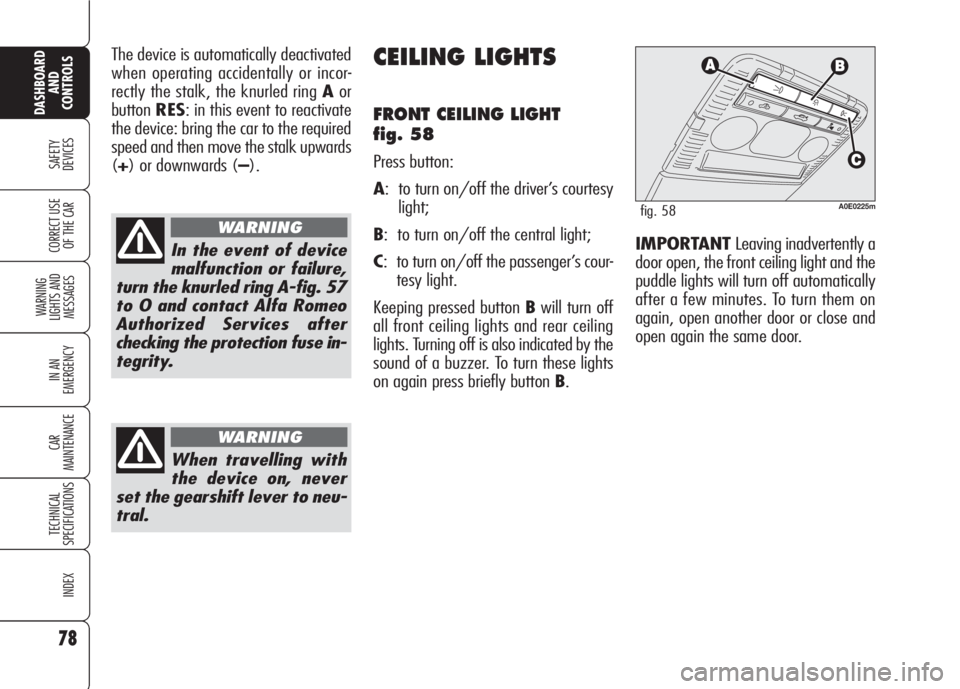
FRONT CEILING LIGHT
fig. 58
Press button:
A: to turn on/off the driver’s courtesy
light;
B: to turn on/off the central light;
C: to turn on/off the passenger’s cour-
tesy light.
Keeping pressed button Bwill turn off
all front ceiling lights and rear ceiling
lights. Turning off is also indicated by the
sound of a buzzer. To turn these lights
on again press briefly button B.
In the event of device
malfunction or failure,
turn the knurled ring A-fig. 57
to O and contact Alfa Romeo
Authorized Services after
checking the protection fuse in-
tegrity.
WARNING
When travelling with
the device on, never
set the gearshift lever to neu-
tral.
WARNING
A0E0225mfig. 58
IMPORTANT Leaving inadvertently a
door open, the front ceiling light and the
puddle lights will turn off automatically
after a few minutes. To turn them on
again, open another door or close and
open again the same door.
Page 94 of 303

CLEARING THE
PROGRAMMED BUTTONS
You are recommended to clear the
HomeLink programming before selling
the car.
Programming is cleared on all the three
buttons at the same time.
Proceed as follows:
❒press and keep pressed the outer
buttons (AandC): 20 seconds af-
ter led Dwill start flashing.
❒Release both buttons.
TECHNICAL DATA FOR THE
ASSISTANCE SERVICE
If after following the previous instruc-
tions you are still unable to set the
HomeLink system, contact the Assis-
tance Service (HomeLink toll free num-
ber 00800046635465) and commu-
nicate the following data:
❒make and model of your car, in-
cluding the date of manufacture and
the country where you bought it;
❒make, model, date of manufacture
and operating frequency of the orig-
inal portable remote control (if
known).
IMPORTANTCertain phone carriers
do not permit the use of the toll-free
number. It is therefore required to dial
the alternative pay-number, +49 6838
907-277 (dialling this number will start
an international call). The distance required between the
portable remote control and the Home-
Link depends on the system to be pro-
grammed (type of frequency of main
door, gate or other system).
IfDdoes not start to flash quickly try
again changing the distance between
HomeLink and portable remote control
(move them away slightly). If 20 sec-
onds later the led is still flashing slow-
ing, repeat the operation changing again
the distance between Homelink and re-
mote control.
3) the HomeLink led Dwill start blink-
ing, first slowly and then quickly. When
it starts flashing quickly, release both
buttons (HomeLink and portable remote
control).
In this way the system previously pro-
grammed on HomeLink is cleared and
the new system is ready for use. This
operation has no effect on the other two
HomeLink buttons.
92
SAFETY
DEVICES
WARNING
LIGHTS AND
MESSAGES
IN AN
EMERGENCY
CAR
MAINTENANCE
TECHNICAL
SPECIFICATIONS
INDEX
CORRECT USE
OF THE CAR
DASHBOARD
AND
CONTROLS
Page 108 of 303
106
SAFETY
DEVICES
WARNING
LIGHTS AND
MESSAGES
IN AN
EMERGENCY
CAR
MAINTENANCE
TECHNICAL
SPECIFICATIONS
INDEX
CORRECT USE
OF THE CAR
DASHBOARD
AND
CONTROLS
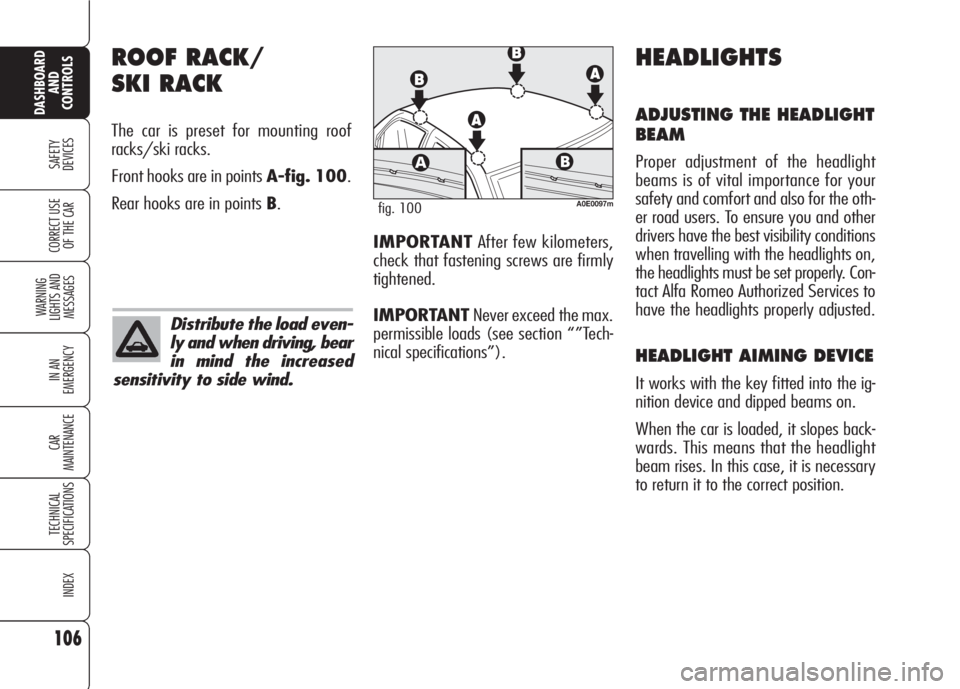
ROOF RACK/
SKI RACK
The car is preset for mounting roof
racks/ski racks.
Front hooks are in points A-fig. 100.
Rear hooks are in points B.
A0E0097mfig. 100
HEADLIGHTS
ADJUSTING THE HEADLIGHT
BEAM
Proper adjustment of the headlight
beams is of vital importance for your
safety and comfort and also for the oth-
er road users. To ensure you and other
drivers have the best visibility conditions
when travelling with the headlights on,
the headlights must be set properly. Con-
tact Alfa Romeo Authorized Services to
have the headlights properly adjusted.
HEADLIGHT AIMING DEVICE
It works with the key fitted into the ig-
nition device and dipped beams on.
When the car is loaded, it slopes back-
wards. This means that the headlight
beam rises. In this case, it is necessary
to return it to the correct position.
Distribute the load even-
ly and when driving, bear
in mind the increased
sensitivity to side wind.
IMPORTANTAfter few kilometers,
check that fastening screws are firmly
tightened.
IMPORTANTNever exceed the max.
permissible loads (see section “”Tech-
nical specifications”).
Page 109 of 303
107
SAFETY
DEVICES
WARNING
LIGHTS AND
MESSAGES
IN AN
EMERGENCY
CAR
MAINTENANCE
TECHNICAL
SPECIFICATIONS
INDEX
CORRECT USE
OF THE CAR
DASHBOARD
AND
CONTROLS
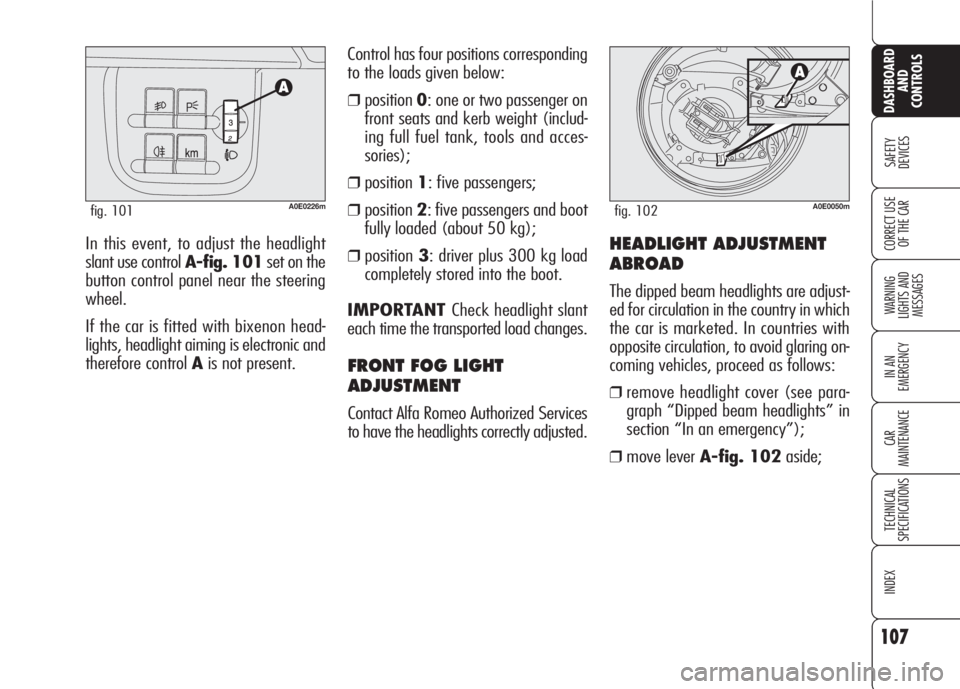
In this event, to adjust the headlight
slant use control A-fig. 101set on the
button control panel near the steering
wheel.
If the car is fitted with bixenon head-
lights, headlight aiming is electronic and
therefore control Ais not present.Control has four positions corresponding
to the loads given below:
❒position0: one or two passenger on
front seats and kerb weight (includ-
ing full fuel tank, tools and acces-
sories);
❒position1: five passengers;
❒position2: five passengers and boot
fully loaded (about 50 kg);
❒position3: driver plus 300 kg load
completely stored into the boot.
IMPORTANT Check headlight slant
each time the transported load changes.
FRONT FOG LIGHT
ADJUSTMENT
Contact Alfa Romeo Authorized Services
to have the headlights correctly adjusted.
A0E0226mfig. 101
HEADLIGHT ADJUSTMENT
ABROAD
The dipped beam headlights are adjust-
ed for circulation in the country in which
the car is marketed. In countries with
opposite circulation, to avoid glaring on-
coming vehicles, proceed as follows:
❒remove headlight cover (see para-
graph “Dipped beam headlights” in
section “In an emergency”);
❒move lever A-fig. 102aside;
A0E0050mfig. 102