tailgate Alfa Romeo 159 2011 Owner handbook (in English)
[x] Cancel search | Manufacturer: ALFA ROMEO, Model Year: 2011, Model line: 159, Model: Alfa Romeo 159 2011Pages: 331, PDF Size: 4.84 MB
Page 210 of 331

208
SAFETY
DEVICES
WARNING
LIGHTS AND
MESSAGES
CAR
MAINTENANCE
TECHNICAL
SPECIFICATIONS
INDEX
CORRECT USE
OF THE CAR
DASHBOARD
AND
CONTROLS
IN AN
EMERGENCY
BOOT LIGHT
To change the bulb, proceed as follows:
❒open the tailgate;
❒remove the light unit A-fig. 50lev-
ering in the point shown by the ar-
row;
❒open the protection cover B-fig. 51
and replace the bulb releasing it from
the side contacts making sure that
the new bulb is correctly clamped be-
tween the contacts;
❒re-close the protective cover B;
❒refit the light unit inserting first one
side and then the other one until
hearing the locking click.
❒close protection B-fig. 53on light
unitA-fig. 52;
❒refit the light unit inserting first one
side and then the other one until
hearing the locking click.
A0E0205mfig. 50A0E0075mfig. 52A0E0204mfig. 51
PUDDLE LIGHT
To change the bulb, proceed as follows:
❒open the door and remove lens A-
fig. 52levering in the point shown
by the arrow;
❒raise protectionB-fig. 53and re-
place the snap-fitted bulb;
A0E0235mfig. 53
181-222 Alfa 159 GB 3-12-2009 14:10 Pagina 208
Page 241 of 331
USEFUL ADVICE FOR
LENGTHENING THE LIFE
OF YOUR BATTERY
To avoid draining your battery and
lengthen its life, observe the following
indications:
❒ when you park the car, ensure the
doors, tailgate and bonnet are closed
properly;
❒ the ceiling lights must be off. The car
is however provided with an auto-
matic system for switching off inter-
nal lights;
❒do not keep accessories (e.g.: sound
system, hazard lights, etc.) switched
on for a long time when the engine
is not running;
❒before performing any operation on
the electrical system, disconnect the
battery negative terminal cable;
❒battery terminals shall always be per-
fectly tightened.IMPORTANTA battery which is kept
at a charge of less than 50% for any
length of time will be damaged by sul-
phation leading to a reduction in crank-
ing power.
Moreover, this might lead to a higher
risk of the battery electrolyte freezing
(this may even occur at –10°C). If the
car is inactive for a long period of time,
refer to “Car inactivity”, in section “Cor-
rect use of the car”.
If after buying the car, you want to in-
stall electric accessories which require
permanent electric supply (alarm, etc.)
contact Alfa Romeo Authorized Services
whose qualified personnel, in addition
to suggesting the most suitable devices
available at Lineaccessori Alfa Romeo,
will evaluate the overall electric ab-
sorption, checking whether the car’s
electric system is capable of withstand-
ing the load required, or whether it
should be integrated with a more pow-
erful battery.In fact, since these devices continue ab-
sorbing energy even when the ignition
key is off, they gradually run down the
battery.
The total intake of these systems (fac-
tory and after-market) must be less than
0.6 mA x Ah (of the battery) as shown
in the following table:
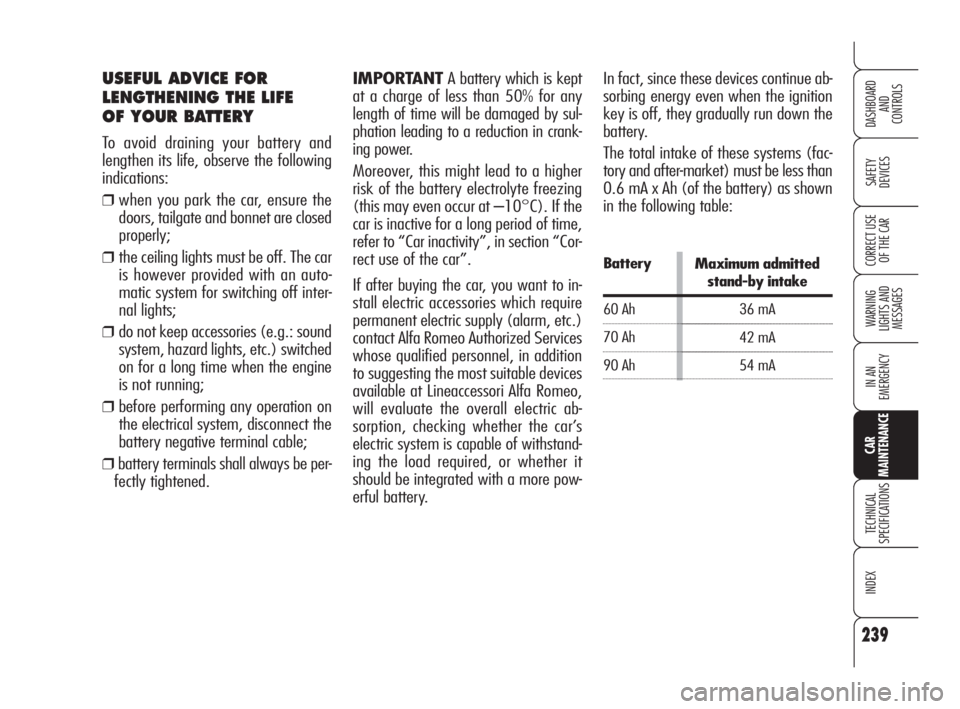
Battery
60 Ah
70 Ah
90 AhMaximum admitted
stand-by intake
36 mA
42 mA
54 mA
CAR
MAINTENANCE
DASHBOARD
AND
CONTROLS
CORRECT USE
OF THE CAR
INDEX
TECHNICAL
SPECIFICATIONS
IN AN
EMERGENCY
WARNING
LIGHTS AND
MESSAGES
SAFETY
DEVICES
239
223-248 Alfa 159 GB 3-12-2009 14:11 Pagina 239
Page 253 of 331

BODYWORK PAINT
IDENTIFICATION LABEL
This is located in the inner side of the
tailgate fig. 4and it includes:
A. Paint manufacturer
B. Name of colour
C. Colour code.
D.Colour code for touching up and re-
spraying.
ENGINE MARKING
Engine marking is stamped on the gear-
box side, on the rear left side.
BODYWORK LABEL
This is located on the passenger com-
partment floor near the front passen-
ger’s seat.
It can be reached by raising cover
A-fig. 3and it includes:
❒type of vehicle (ZAR 939000);
❒Manufacturer’s serial number (chas-
sis number).
251
SAFETY
DEVICES
WARNING
LIGHTS AND
MESSAGES
IN AN
EMERGENCY
CAR
MAINTENANCE
INDEX
CORRECT USE
OF THE CAR
DASHBOARD
AND
CONTROLS
TECHNICAL SPECIFICATIONS
A0A0222mfig. 4A0A0175mfig. 3
249-270 Alfa 159 GB 3-12-2009 15:51 Pagina 251
Page 279 of 331
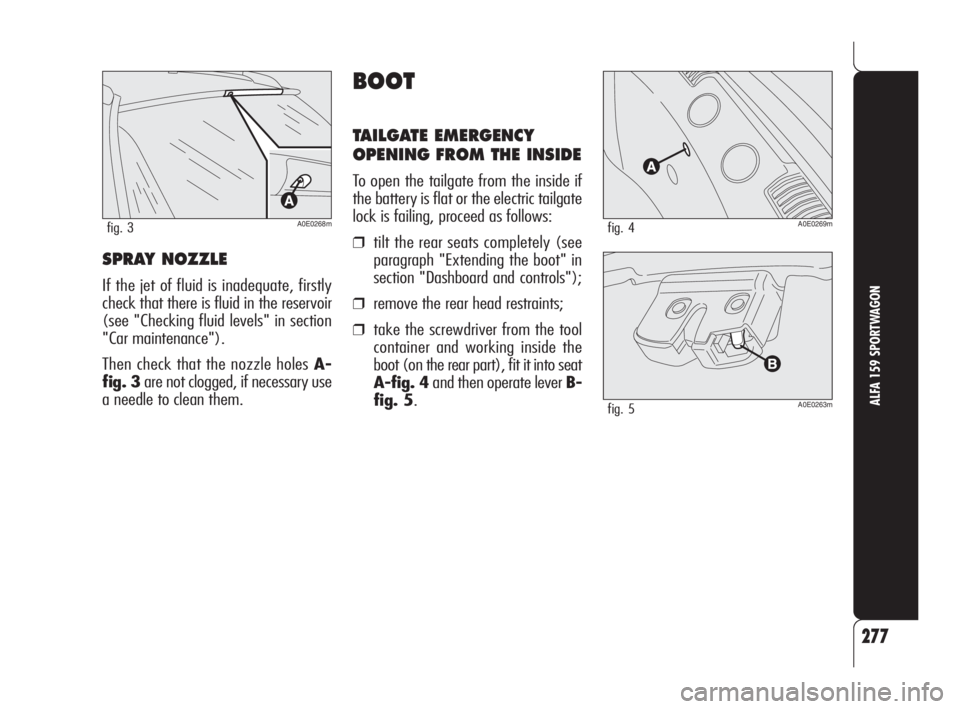
SPRAY NOZZLE
If the jet of fluid is inadequate, firstly
check that there is fluid in the reservoir
(see "Checking fluid levels" in section
"Car maintenance").
Then check that the nozzle holes A-
fig. 3are not clogged, if necessary use
a needle to clean them.
277
ALFA 159 SPORTWAGON
A0E0269mfig. 4
A0E0263mfig. 5
A0E0268mfig. 3
BOOT
TAILGATE EMERGENCY
OPENING FROM THE INSIDE
To open the tailgate from the inside if
the battery is flat or the electric tailgate
lock is failing, proceed as follows:
❒tilt the rear seats completely (see
paragraph "Extending the boot" in
section "Dashboard and controls");
❒remove the rear head restraints;
❒take the screwdriver from the tool
container and working inside the
boot (on the rear part), fit it into seat
A-fig. 4and then operate lever B-
fig. 5.
271-292 Alfa 159 GB 8-04-2009 10:55 Pagina 277
Page 290 of 331
288
ALFA 159 SPORTWAGON
IF AN EXTERIOR
LIGHT BURNS OUT
For the type of bulb and power rating,
see paragraph “When needing to
change a bulb" in section "In an emer-
gency".
IMPORTANTBefore changing a bulb,
read carefully the instructions given in
section "In an emergency".
REAR LIGHT UNITS
Reversing light/
rear fog lights
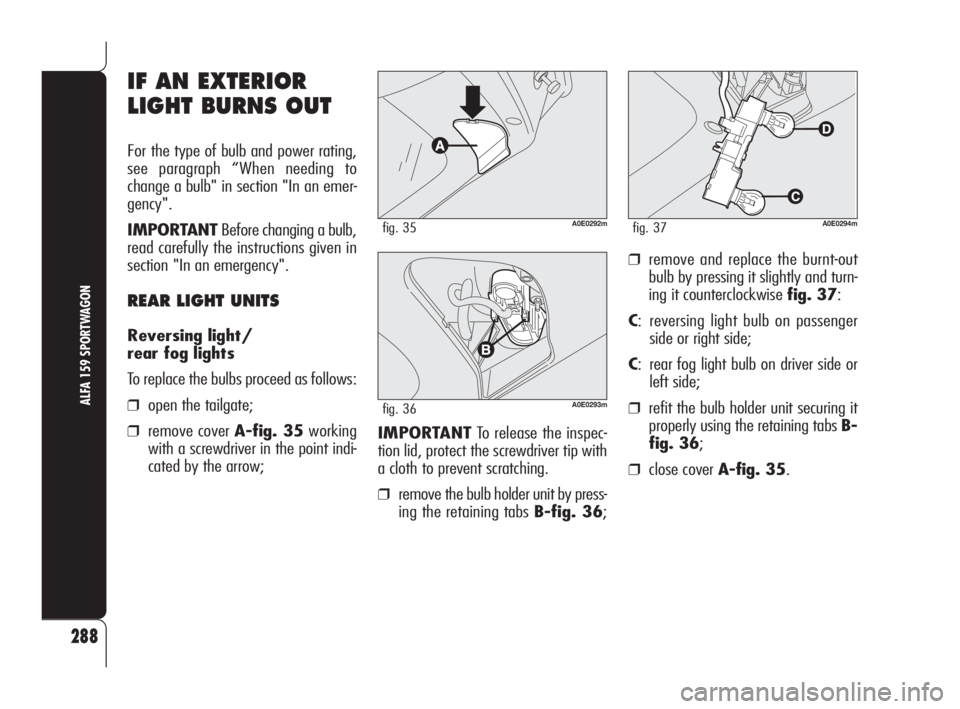
To replace the bulbs proceed as follows:
❒open the tailgate;
❒remove cover A-fig. 35working
with a screwdriver in the point indi-
cated by the arrow;
❒remove and replace the burnt-out
bulb by pressing it slightly and turn-
ing it counterclockwise fig. 37:
C: reversing light bulb on passenger
side or right side;
C: rear fog light bulb on driver side or
left side;
❒refit the bulb holder unit securing it
properly using the retaining tabs B-
fig. 36;
❒close cover A-fig. 35.
A0E0292mfig. 35
A0E0293mfig. 36
IMPORTANTTo release the inspec-
tion lid, protect the screwdriver tip with
a cloth to prevent scratching.
❒remove the bulb holder unit by press-
ing the retaining tabs B-fig. 36;
A0E0294mfig. 37
271-292 Alfa 159 GB 8-04-2009 10:56 Pagina 288
Page 291 of 331
289
ALFA 159 SPORTWAGON
Taillight bulb on tailgate
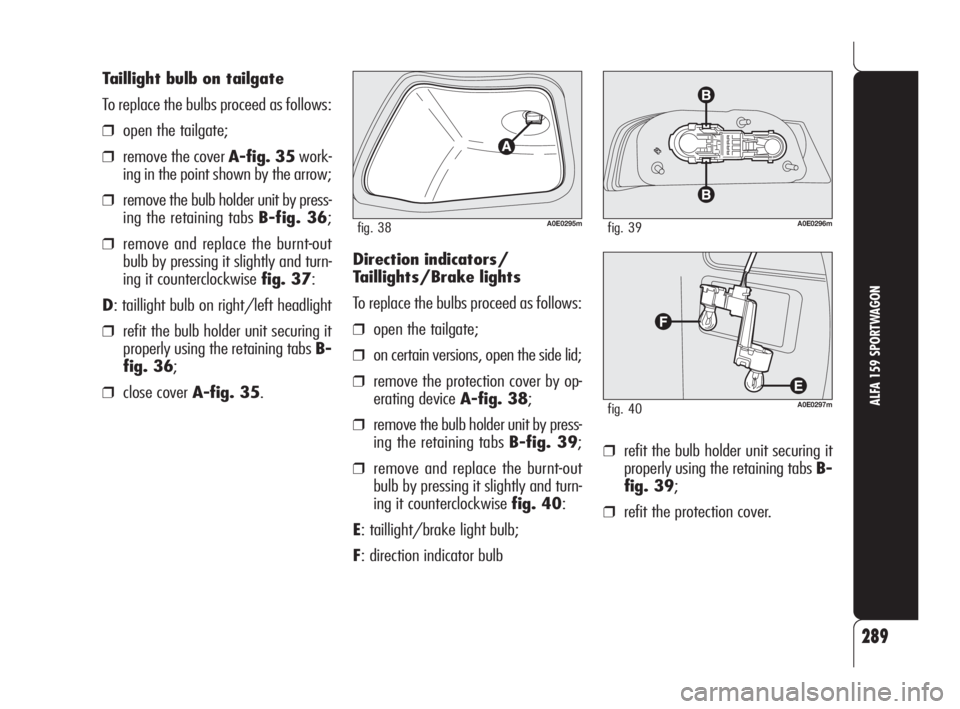
To replace the bulbs proceed as follows:
❒open the tailgate;
❒remove the cover A-fig. 35work-
ing in the point shown by the arrow;
❒remove the bulb holder unit by press-
ing the retaining tabs B-fig. 36;
❒remove and replace the burnt-out
bulb by pressing it slightly and turn-
ing it counterclockwise fig. 37:
D: taillight bulb on right/left headlight
❒refit the bulb holder unit securing it
properly using the retaining tabs B-
fig. 36;
❒close cover A-fig. 35.Direction indicators/
Taillights/Brake lights
To replace the bulbs proceed as follows:
❒open the tailgate;
❒on certain versions, open the side lid;
❒remove the protection cover by op-
erating device A-fig. 38;
❒remove the bulb holder unit by press-
ing the retaining tabs B-fig. 39;
❒remove and replace the burnt-out
bulb by pressing it slightly and turn-
ing it counterclockwise fig. 40:
E: taillight/brake light bulb;
F: direction indicator bulb
A0E0295mfig. 38A0E0296mfig. 39
A0E0297mfig. 40
❒refit the bulb holder unit securing it
properly using the retaining tabs B-
fig. 39;
❒refit the protection cover.
271-292 Alfa 159 GB 8-04-2009 10:56 Pagina 289
Page 292 of 331
290
ALFA 159 SPORTWAGON
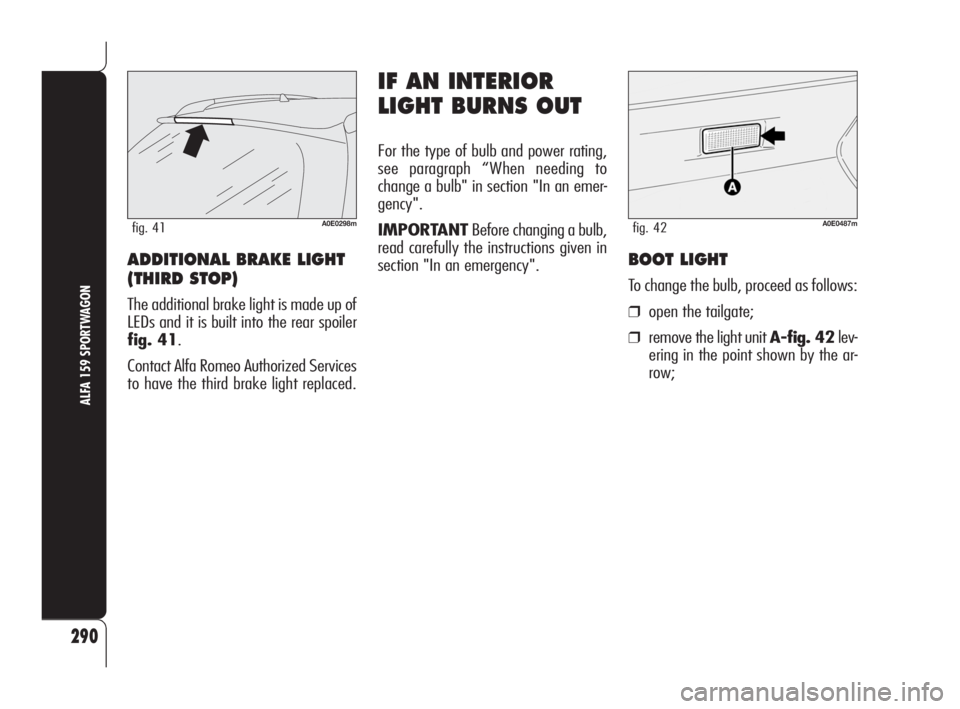
ADDITIONAL BRAKE LIGHT
(THIRD STOP)
The additional brake light is made up of
LEDs and it is built into the rear spoiler
fig. 41.
Contact Alfa Romeo Authorized Services
to have the third brake light replaced.
IF AN INTERIOR
LIGHT BURNS OUT
For the type of bulb and power rating,
see paragraph “When needing to
change a bulb" in section "In an emer-
gency".
IMPORTANTBefore changing a bulb,
read carefully the instructions given in
section "In an emergency".
A0E0298mfig. 41A0E0487mfig. 42
BOOT LIGHT
To change the bulb, proceed as follows:
❒open the tailgate;
❒remove the light unit A-fig. 42lev-
ering in the point shown by the ar-
row;
271-292 Alfa 159 GB 8-04-2009 10:56 Pagina 290
Page 293 of 331
291
ALFA 159 SPORTWAGON
A0E0488mfig. 43A0E0301mfig. 44A0E0302mfig. 45
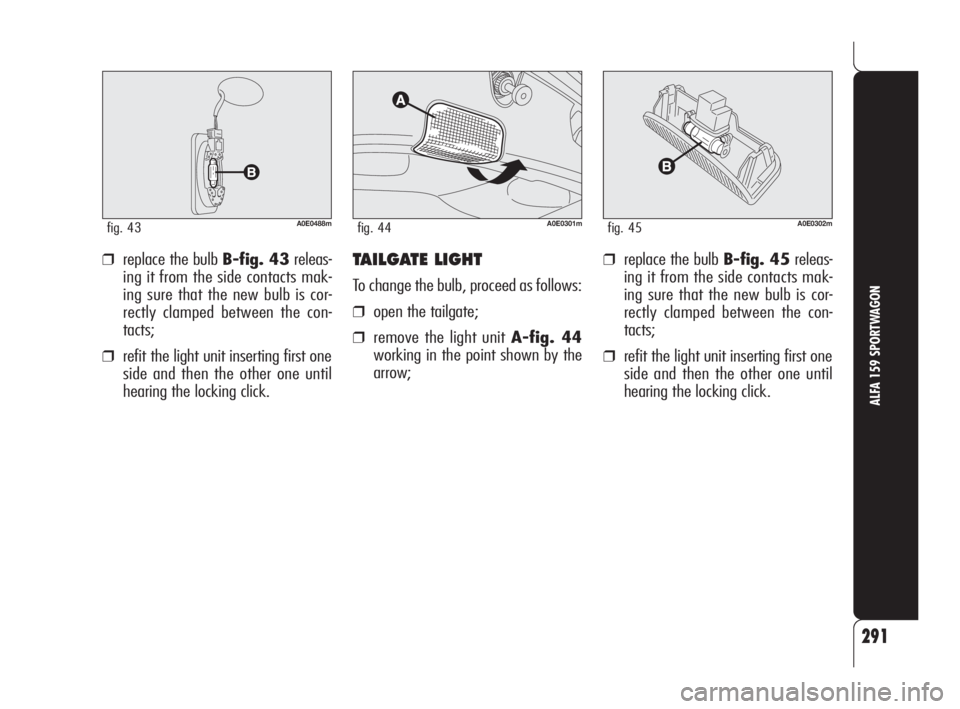
❒replace the bulb B-fig. 43releas-
ing it from the side contacts mak-
ing sure that the new bulb is cor-
rectly clamped between the con-
tacts;
❒refit the light unit inserting first one
side and then the other one until
hearing the locking click.
TAILGATE LIGHT
To change the bulb, proceed as follows:
❒open the tailgate;
❒remove the light unit A-fig. 44
working in the point shown by the
arrow;
❒replace the bulb B-fig. 45releas-
ing it from the side contacts mak-
ing sure that the new bulb is cor-
rectly clamped between the con-
tacts;
❒refit the light unit inserting first one
side and then the other one until
hearing the locking click.
271-292 Alfa 159 GB 8-04-2009 10:56 Pagina 291