engine Alfa Romeo 4C 2015 Owner handbook (in English)
[x] Cancel search | Manufacturer: ALFA ROMEO, Model Year: 2015, Model line: 4C, Model: Alfa Romeo 4C 2015Pages: 199, PDF Size: 7.67 MB
Page 115 of 199
❒If it is necessary to proceed downhill
with transmission in neutral (N) for
unexpected reasons, bearing in mind
that this practice is highly inadvisable,
remember that when gear
engagement is requested, the
system will automatically engage the
best gear to permit the correct
transmission of drive torque to the
wheels, according to the speed
of the car.
❒When necessary, it is possible to
engage 1st gear, reverse (R)or
neutral (N) with the engine off, the
key at MAR-ON and the brake
pressed. In this case, change gear
leaving at least 5 seconds between
one gear change and the next, in
order to safeguard the operation of
the hydraulic system, and the pump
in particular.
❒For uphill departures, it is advisable
to accelerate gradually but fully
immediately after releasing the
handbrake or the brake pedal; this
allows the engine to temporarily
increase the number of revs and
tackle the steepest gradients with
more torque at the wheels.
WARNING
89) The Launch control function is
only available in Race mode.
Regardless of what is explicitly
indicated in the description of this
mode, the ESC and ASR systems
are deactivated during operation
of the Launch Control function.
This means that vehicle dynamic
control is the sole responsibility of
the driver. Therefore pay the
utmost attention when using the
Launch Control. Take into account
traffic and road surface conditions
and during manoeuvres make
sure there is enough room in the
area concerned.
SAVING FUEL
Alfa Romeo has designed and built the
vehicle using technologies, materials
and devices able to reduce negative
environmental impact. Here are some
suggestions to further contribute to
environmental protection.
GENERAL
CONSIDERATIONS
Car maintenance
Have checks and adjustments carried
out in accordance with the “Scheduled
Servicing Plan”.
Tyres
Check the tyre pressures at least once
every four weeks: if the pressure is
too low, consumption levels increase as
resistance to rolling is higher.
Climate control system
The use of the climate control system
leads to higher fuel consumption. If the
temperature outside permits, try to
use ventilation only.
111
Page 116 of 199
DRIVING STYLE
Starting
Do not warm the engine with the car at
a standstill or at idle or high speed:
under these conditions the engine
warms up much more slowly, increasing
consumption and emissions. It is
therefore advisable to move off
immediately, slowly, avoiding high
speeds: in this way the engine will
warm up more quickly.
Unnecessary actions
Avoid accelerating when stopped at
traffic lights or before switching off the
engine. This action is absolutely
pointless and only increases
consumption and pollution.
Gear selection
Using a low gear for faster acceleration
increases consumption.
In the same way, improper use of a high
gear increases consumption,
emissions and engine wear.Max. speed
Fuel consumption increases
considerably with speed. Maintain a
constant speed, avoiding unnecessary
braking and acceleration, which cost
in terms of both fuel consumption and
emissions.
Acceleration
Accelerating violently will greatly affect
consumption and emissions: avoid
frequent and strong accelerations.
CONDITIONS OF USE
Cold starting
Short journeys and frequent cold starts
do not allow the engine to reach
optimum operating temperature.
This results in a significant increase in
consumption levels (from +15 to +30%
on the urban cycle) and emissions.
Traffic and road
conditions
Rather high consumption levels are
linked to situations with heavy traffic, for
instance when travelling in queues
with frequent use of the lower gears or
in cities with many traffic lights.Stops in traffic
During prolonged hold-ups (e.g. level
crossings) the engine should be
switched off.
112
STARTING AND DRIVING
Page 118 of 199
IMPORTANT
11) Keep your speed down when
snow chains are fitted; do not
exceed 50 km/h. Avoid potholes,
steps and pavements and avoid
driving for long distances on
roads not covered with snow to
prevent damaging the car and the
road surface.
CAR INACTIVITY
If the vehicle is to be left inactive for
longer than a month, observe the
following precautions:
❒park the car in covered, dry and if
possible well-ventilated premises and
slightly open the windows;
❒check that the handbrake is not
engaged;
❒disconnect the negative battery
terminal and check the battery
charge. Repeat this check once
every three months during storage.
For optimum preservation of the
battery charge, it is advisable to use
the charge-holder (for versions/
markets, where provided, or
alternatively, available from
Lineaccessori). For more details on
its operation, refer to the attached
Supplement;
❒if the battery is not disconnected
from the electrical system, checks its
state of charge every thirty days;
❒clean and protect the painted parts
using protective wax;❒sprinkle talcum powder on the rubber
blade of the windscreen wiper and lift
it off the glass (for the correct lifting
procedure, refer to the "Windscreen
wiper" paragraph in the
"Maintenance and care" chapter);
❒cover the car with a cloth or
perforated plastic sheet. Do not use
sheets of non-perforated plastic
as they do not allow moisture on the
car body to evaporate;
❒inflate tyres to +0.5 bar above the
standard prescribed pressure and
check it periodically;
❒do not drain the engine cooling
system;
❒every time the car is left inactive for
two weeks or longer, run the air
conditioning system for about
5 minutes, set to outside air and with
fan set to maximum, with the engine
idling; this operation will ensure
adequate lubrication to minimise the
possibility of damage to the
compressor when the system is put
back into operation;
114
STARTING AND DRIVING
Page 121 of 199
IN AN EMERGENCY
A punctured tyre or a burnt-out bulb?
At times, a problem may interfere
with our journey.
The pages on emergencies can help
you to deal with critical situations
independently and with calm.
In an emergency we recommend that
you call the freephone number found in
the Warranty Booklet.
You can also use the freephone number
00 800 2532 4200 to find your nearest
dedicated Alfa Romeo Dealership.STARTING THE ENGINE .................118
REPAIRING A WHEEL .....................119
REPLACING A WHEEL ...................122
CHANGING A BULB .......................126
REPLACING EXTERIOR BULBS......129
INTERIOR BULB REPLACEMENT ...132
REPLACING FUSES........................133
RECHARGING THE BATTERY ........136
RAISING THE CAR..........................136
TOWING THE CAR .........................137
117
Page 122 of 199
STARTING THE
ENGINE
Contact the dedicated Alfa Romeo
Dealership immediately if
warning
light stays on constantly on the
instrument panel.
JUMP STARTING
If the battery is flat, start the engine
using an auxiliary battery with the same
capacity or a little higher than the flat
one.
12)91)
Proceed as follows to start the car:
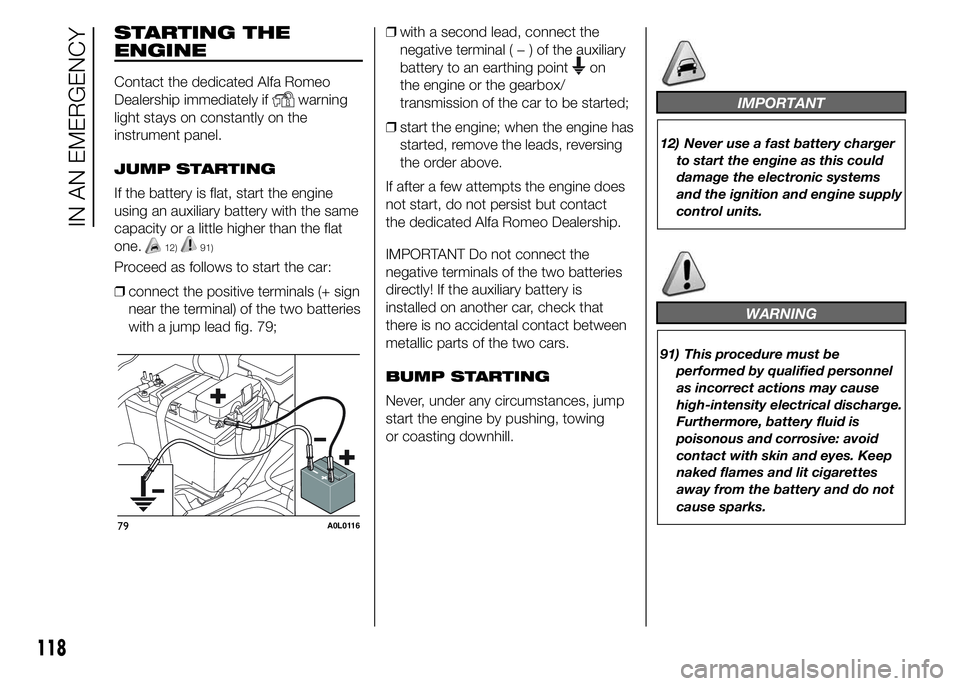
❒connect the positive terminals (+ sign
near the terminal) of the two batteries
with a jump lead fig. 79;❒with a second lead, connect the
negative terminal(−)oftheauxiliary
battery to an earthing point
on
the engine or the gearbox/
transmission of the car to be started;
❒start the engine; when the engine has
started, remove the leads, reversing
the order above.
If after a few attempts the engine does
not start, do not persist but contact
the dedicated Alfa Romeo Dealership.
IMPORTANT Do not connect the
negative terminals of the two batteries
directly! If the auxiliary battery is
installed on another car, check that
there is no accidental contact between
metallic parts of the two cars.
BUMP STARTING
Never, under any circumstances, jump
start the engine by pushing, towing
or coasting downhill.
IMPORTANT
12) Never use a fast battery charger
to start the engine as this could
damage the electronic systems
and the ignition and engine supply
control units.
WARNING
91) This procedure must be
performed by qualified personnel
as incorrect actions may cause
high-intensity electrical discharge.
Furthermore, battery fluid is
poisonous and corrosive: avoid
contact with skin and eyes. Keep
naked flames and lit cigarettes
away from the battery and do not
cause sparks.
79A0L0116
118
IN AN EMERGENCY
Page 123 of 199

REPAIRING A WHEEL
GENERAL
INSTRUCTIONS
The car is equipped with a quick tyre
repair device called the "Fix&Go
automatic" kit.
92) 94)
To use it, follow the instructions below.
93) 95) 96)13)2)
"Fix&Go automatic" KIT
It is located in the luggage
compartment.
The kit includes:
❒bottle A fig. 80 containing sealant
and fitted with: filling tube B and
adhesive label C with the wording
“max. 80 km/h” to be placed in
a clearly visible position (e.g. on the
dashboard) after repairing the tyre;
❒compressor D complete with
pressure gauge and connectors;
❒an information leaflet fig. 81,
providing instructions for using the kit
correctly. This booklet should be
given to the persons charged with
handling the tyre treated with this kit;
❒a pair of gloves located in the side
compartment of the compressor;
❒adaptors for inflating different
elements.IMPORTANT The sealant is suitable for
use at temperatures in the range from
−20°C to +50°C. The sealant has an
expiry date.INFLATION PROCEDURE
Proceed as follows:
97)
❒engage the handbrake, unscrew the
tyre valve cap, take out filler hose A
fig. 82 and tighten ring nut B on
the tyre valve;
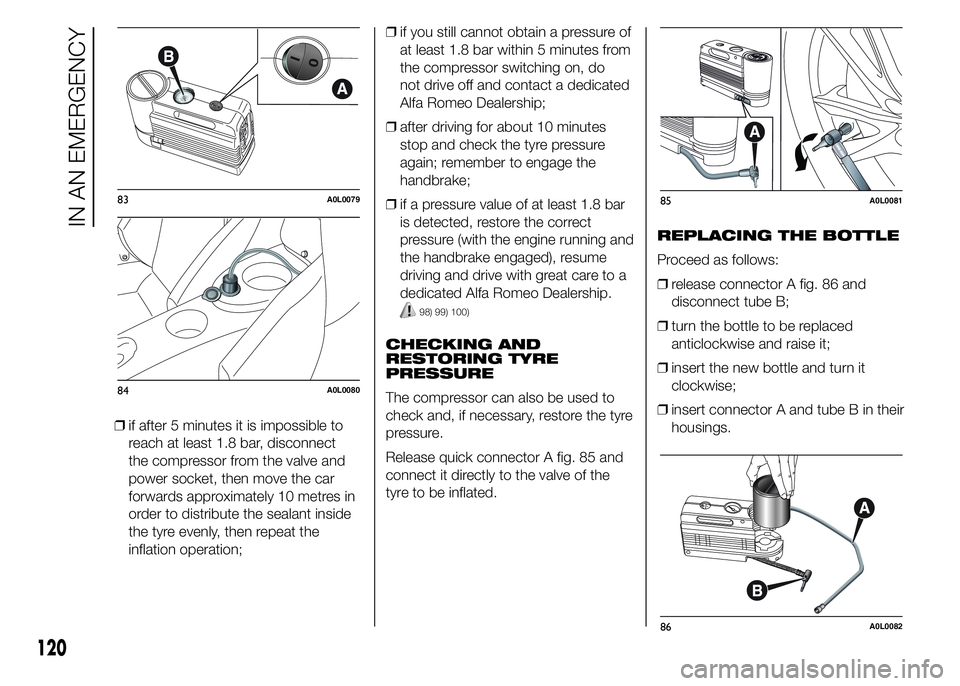
❒make sure that switch A fig. 83 for
the compressor is in position 0 (off),
start the engine, insert the plug
into the cigar lighter socket on the
central tunnel (see fig. 84) and switch
on the compressor by bringing
switch A fig. 83 to I (on);
❒inflate the tyre to the pressure
indicated in the “Wheels” paragraph
in the “Technical data” chapter. In
order to obtain a more precise
reading, check the pressure value on
pressure gauge B fig. 83 with the
compressor off;
80A0L0076
81A0L0077
82A0L0078
119
Page 124 of 199
❒if after 5 minutes it is impossible to
reach at least 1.8 bar, disconnect
the compressor from the valve and
power socket, then move the car
forwards approximately 10 metres in
order to distribute the sealant inside
the tyre evenly, then repeat the
inflation operation;❒if you still cannot obtain a pressure of
at least 1.8 bar within 5 minutes from
the compressor switching on, do
not drive off and contact a dedicated
Alfa Romeo Dealership;
❒after driving for about 10 minutes
stop and check the tyre pressure
again; remember to engage the
handbrake;
❒if a pressure value of at least 1.8 bar
is detected, restore the correct
pressure (with the engine running and
the handbrake engaged), resume
driving and drive with great care to a
dedicated Alfa Romeo Dealership.
98) 99) 100)
CHECKING AND
RESTORING TYRE
PRESSURE
The compressor can also be used to
check and, if necessary, restore the tyre
pressure.
Release quick connector A fig. 85 and
connect it directly to the valve of the
tyre to be inflated.REPLACING THE BOTTLE
Proceed as follows:
❒release connector A fig. 86 and
disconnect tube B;
❒turn the bottle to be replaced
anticlockwise and raise it;
❒insert the new bottle and turn it
clockwise;
❒insert connector A and tube B in their
housings.
83A0L0079
84A0L0080
85A0L0081
86A0L0082
120
IN AN EMERGENCY
Page 126 of 199
IMPORTANT
13) Punctures caused by foreign
bodies can be repaired if the
damage does not exceed 4 mm on
the tread and on the shoulder of
the tyre. Do not use the repair
kit if the tyre was damaged as a
result of being used when
underinflated.
IMPORTANT
2) Dispose of the bottle and the
sealant properly. Dispose of the
components in compliance with
national and local regulations.
REPLACING A
WHEEL
(for versions/markets, where provided)
GENERAL
INSTRUCTIONS
In some specific markets, the car may
be equipped with a space-saver wheel:
see the instructions on the following
pages for changing the tyre.
101) 102) 103) 104) 105)
JACK
Please note that:
❒the jack weight is 1.7 kg;
❒the jack requires no adjustment;
❒the jack cannot be repaired and in
the event of a fault it must be
replaced by another original one;
❒no tool other than its operating rod
may be fitted on the jack.
To change a wheel, proceed as follows:
❒stop the car in a position that is not
dangerous for oncoming traffic
where you can change the wheel
safely. The ground should be flat
if possible, and sufficiently firm;❒switch off the engine, pull up the
handbrake and engage the 1
stgear
or reverse. Wear the reflective safety
jacket (compulsory by law) before
getting out of the car;
❒take the space-saver wheel;
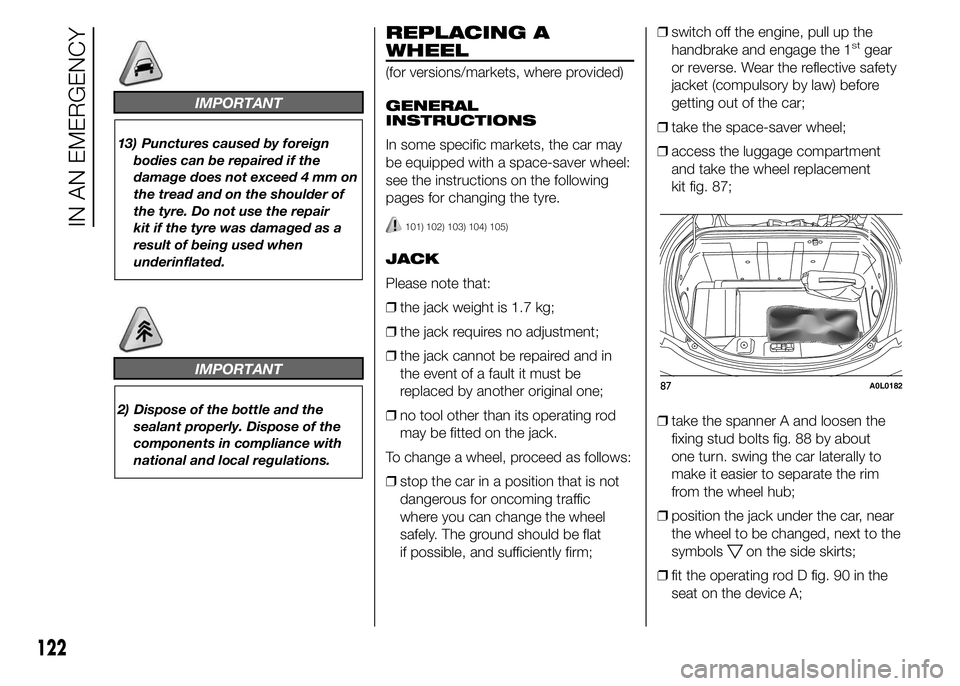
❒access the luggage compartment
and take the wheel replacement
kit fig. 87;
❒take the spanner A and loosen the
fixing stud bolts fig. 88 by about
one turn. swing the car laterally to
make it easier to separate the rim
from the wheel hub;
❒position the jack under the car, near
the wheel to be changed, next to the
symbols
on the side skirts;
❒fit the operating rod D fig. 90 in the
seat on the device A;
87A0L0182
122
IN AN EMERGENCY
Page 137 of 199
REPLACING FUSES
GENERAL INFORMATION
Fuses protect the electrical system:
they intervene (blow) in the event of a
fault or improper action on the system.
When a device does not work, check
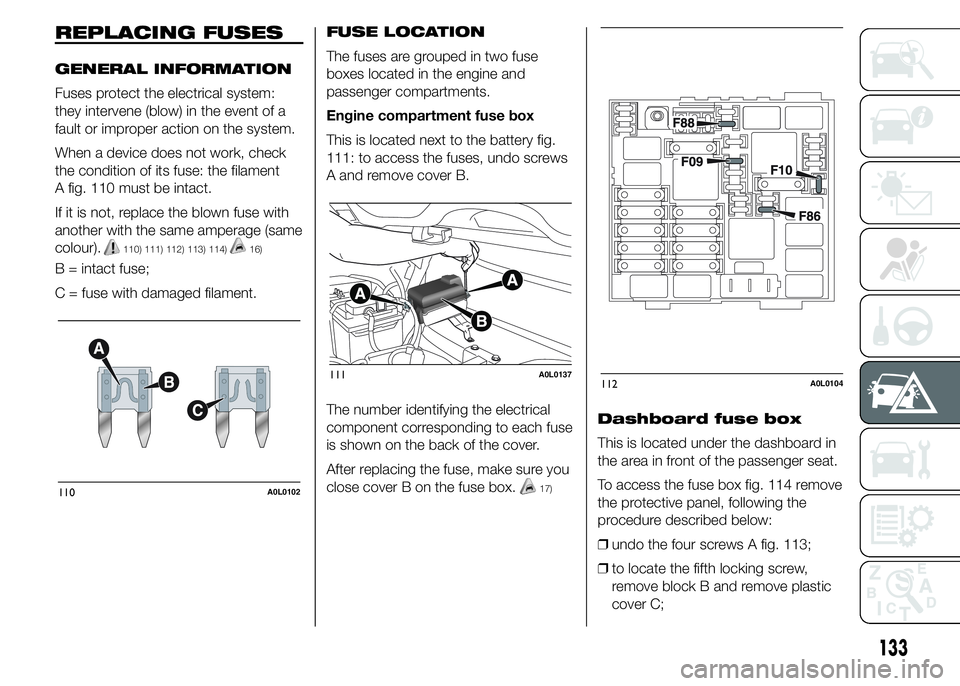
the condition of its fuse: the filament
A fig. 110 must be intact.
If it is not, replace the blown fuse with
another with the same amperage (same
colour).
110) 111) 112) 113) 114)16)
B = intact fuse;
C = fuse with damaged filament.FUSE LOCATION
The fuses are grouped in two fuse
boxes located in the engine and
passenger compartments.
Engine compartment fuse box
This is located next to the battery fig.
111: to access the fuses, undo screws
A and remove cover B.
The number identifying the electrical
component corresponding to each fuse
is shown on the back of the cover.
After replacing the fuse, make sure you
close cover B on the fuse box.
17)
Dashboard fuse box
This is located under the dashboard in
the area in front of the passenger seat.
To access the fuse box fig. 114 remove
the protective panel, following the
procedure described below:
❒undo the four screws A fig. 113;
❒to locate the fifth locking screw,
remove block B and remove plastic
cover C;
110A0L0102
111A0L0137112A0L0104
133
Page 138 of 199
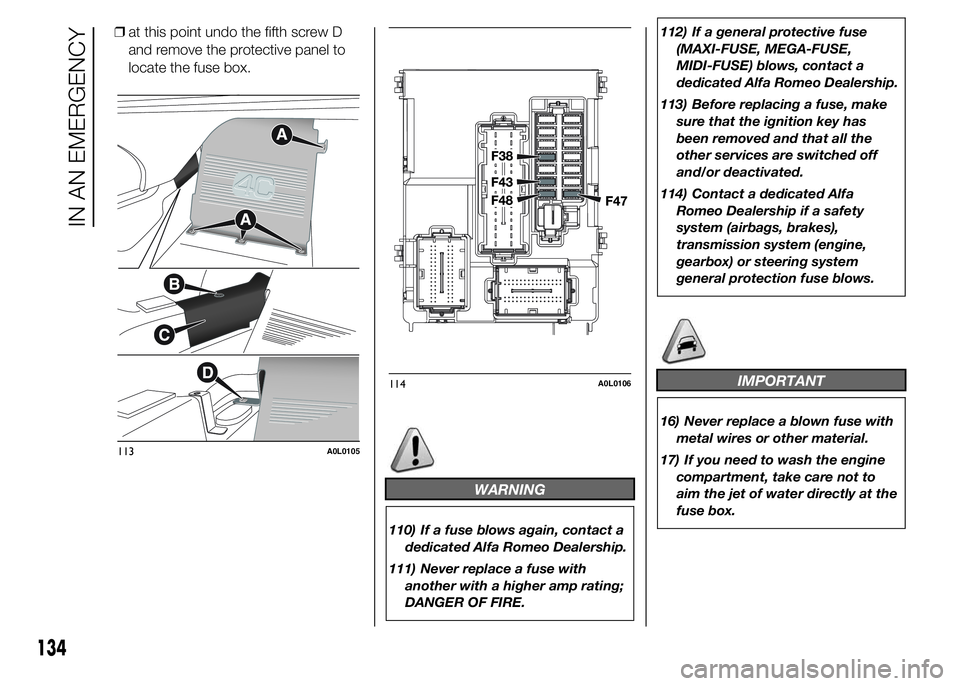
❒at this point undo the fifth screw D
and remove the protective panel to
locate the fuse box.
WARNING
110) If a fuse blows again, contact a
dedicated Alfa Romeo Dealership.
111) Never replace a fuse with
another with a higher amp rating;
DANGER OF FIRE.112) If a general protective fuse
(MAXI-FUSE, MEGA-FUSE,
MIDI-FUSE) blows, contact a
dedicated Alfa Romeo Dealership.
113) Before replacing a fuse, make
sure that the ignition key has
been removed and that all the
other services are switched off
and/or deactivated.
114) Contact a dedicated Alfa
Romeo Dealership if a safety
system (airbags, brakes),
transmission system (engine,
gearbox) or steering system
general protection fuse blows.
IMPORTANT
16) Never replace a blown fuse with
metal wires or other material.
17) If you need to wash the engine
compartment, take care not to
aim the jet of water directly at the
fuse box.
113A0L0105
114A0L0106
134
IN AN EMERGENCY