lights Alfa Romeo 4C 2015 Owner handbook (in English)
[x] Cancel search | Manufacturer: ALFA ROMEO, Model Year: 2015, Model line: 4C, Model: Alfa Romeo 4C 2015Pages: 199, PDF Size: 7.67 MB
Page 9 of 199

GRAPHICAL INDEX
.
HEADLIGHTS
❒Bulb types ..........................................127
❒Daytime running lights ......................... 28
❒Side lights/dipped headlights .............. 28
❒Main beam headlights ......................... 28
❒Bulb replacement ................................126
WHEELS
❒Rims and tyres ....................................171
❒Tyre pressure ......................................174
❒Wheel repair .......................................119
DOOR MIRRORS
❒Adjustment ......................................... 18
❒Folding ............................................... 18
DOORS
❒Central opening/closing ...................... 37
SCREEN WASHER / BRAKE FLUID
❒Checking levels ...................................145
WINDSCREEN WIPERS
❒Operation ........................................... 29
❒Blade replacement ..............................154
TOW HOOK
❒Attachment .........................................137
1A0L0120
5
Page 10 of 199

.
REAR LIGHTS
❒Bulb types ..........................................127
❒Bulb replacement ................................126
LUGGAGE COMPARTMENT /
ENGINE COVER
❒Opening/closing .................................. 39
ENGINE
❒Checking levels ...................................145
❒Technical data .....................................165
FUEL CAP
❒Opening/closing .................................. 58
2A0L0121
6
GRAPHICAL INDEX
Page 11 of 199
.
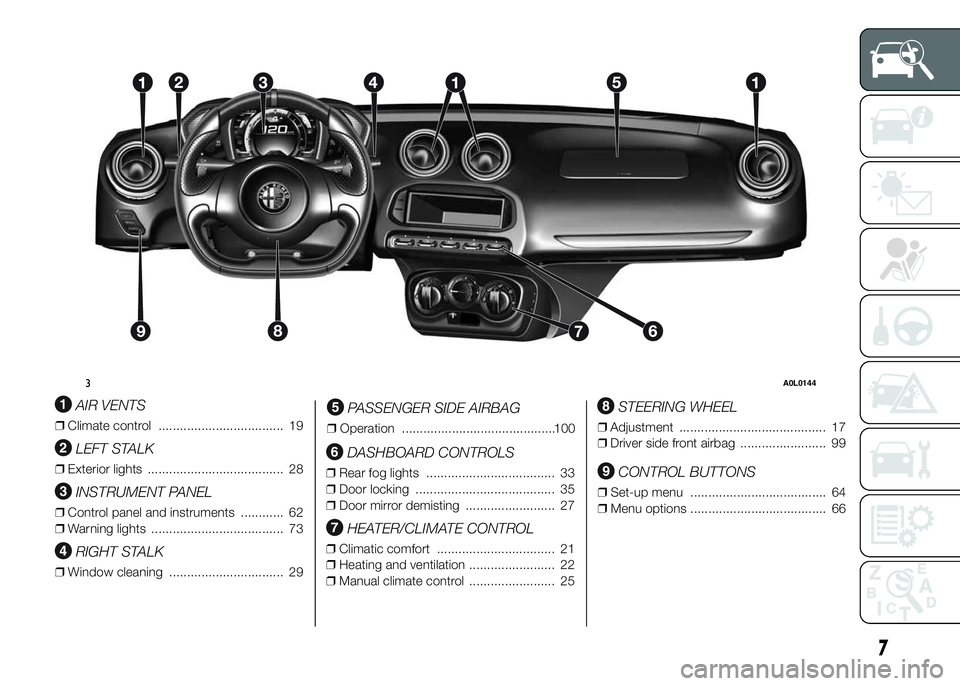
AIR VENTS
❒Climate control ................................... 19
LEFT STALK
❒Exterior lights ...................................... 28
INSTRUMENT PANEL
❒Control panel and instruments ............ 62
❒Warning lights ..................................... 73
RIGHT STALK
❒Window cleaning ................................ 29
PASSENGER SIDE AIRBAG
❒Operation ...........................................100
DASHBOARD CONTROLS
❒Rear fog lights .................................... 33
❒Door locking ....................................... 35
❒Door mirror demisting ......................... 27
HEATER/CLIMATE CONTROL
❒Climatic comfort ................................. 21
❒Heating and ventilation ........................ 22
❒Manual climate control ........................ 25
STEERING WHEEL
❒Adjustment ......................................... 17
❒Driver side front airbag ........................ 99
CONTROL BUTTONS
❒Set-up menu ...................................... 64
❒Menu options ...................................... 66
3A0L0144
7
Page 12 of 199
.
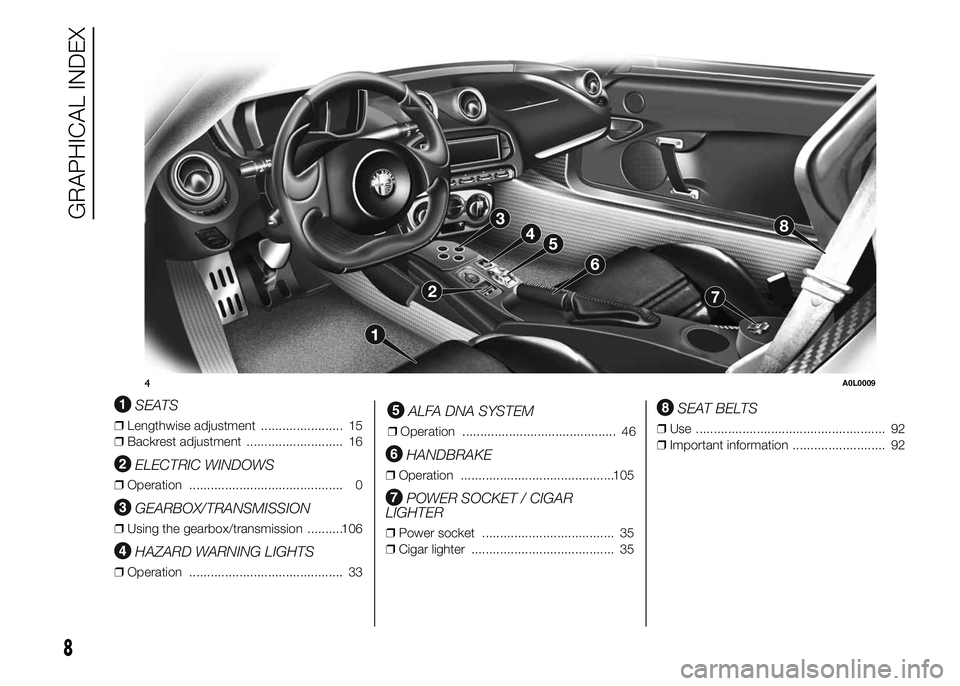
SEATS
❒Lengthwise adjustment ....................... 15
❒Backrest adjustment ........................... 16
ELECTRIC WINDOWS
❒Operation ........................................... 0
GEARBOX/TRANSMISSION
❒Using the gearbox/transmission ..........106
HAZARD WARNING LIGHTS
❒Operation ........................................... 33
ALFA DNA SYSTEM
❒Operation ........................................... 46
HANDBRAKE
❒Operation ...........................................105
POWER SOCKET / CIGAR
LIGHTER
❒Power socket ..................................... 35
❒Cigar lighter ........................................ 35
SEAT BELTS
❒Use ..................................................... 92
❒Important information .......................... 92
4A0L0009
8
GRAPHICAL INDEX
Page 13 of 199

GETTING TO KNOW YOUR CAR
In-depth knowledge of your new car
starts here.
The booklet that you are reading simply
and directly explains how it is made
and how it works.
That’s why we advise you to read it
seated comfortably on board, so that
you can see what is described here for
yourself.SYMBOLS ...................................... 10
ALFA ROMEO CODE SYSTEM ....... 10
THE KEYS....................................... 11
ALARM ........................................... 13
IGNITION SWITCH .......................... 14
SEATS ............................................ 15
STEERING WHEEL ......................... 17
REAR VIEW MIRRORS .................... 18
CLIMATE CONTROL ....................... 20
CLIMATIC COMFORT ..................... 20
HEATING AND VENTILATION.......... 22
MANUAL CLIMATE CONTROL........ 25
EXTERIOR LIGHTS ......................... 28
WINDOW CLEANING ...................... 29
CRUISE CONTROL ......................... 30
ROOF LIGHT................................... 32
CONTROLS .................................... 33
INTERIOR FITTINGS ....................... 34
DOORS ........................................... 37
ELECTRIC WINDOWS .................... 38
LUGGAGE COMPARTMENT /
ENGINE COVER.............................. 39
HEADLIGHTS.................................. 41
ESC (ELECTRONIC STABILITY
CONTROL) SYSTEM ....................... 42
“ALFA DNA” SYSTEM (DYNAMIC
CAR CONTROL SYSTEM)............... 46EOBD SYSTEM (EUROPEAN ON
BOARD DIAGNOSIS) ...................... 49
RADIO SYSTEM .............................. 50
ACCESSORIES PURCHASED BY
THE OWNER .................................. 50
PARKING SENSORS....................... 51
TPMS (TYRE PRESSURE
MONITORING SYSTEM) ................. 54
REFUELLING THE CAR .................. 58
PROTECTING THE
ENVIRONMENT .............................. 59
9
Page 32 of 199
EXTERIOR LIGHTS
IN BRIEF
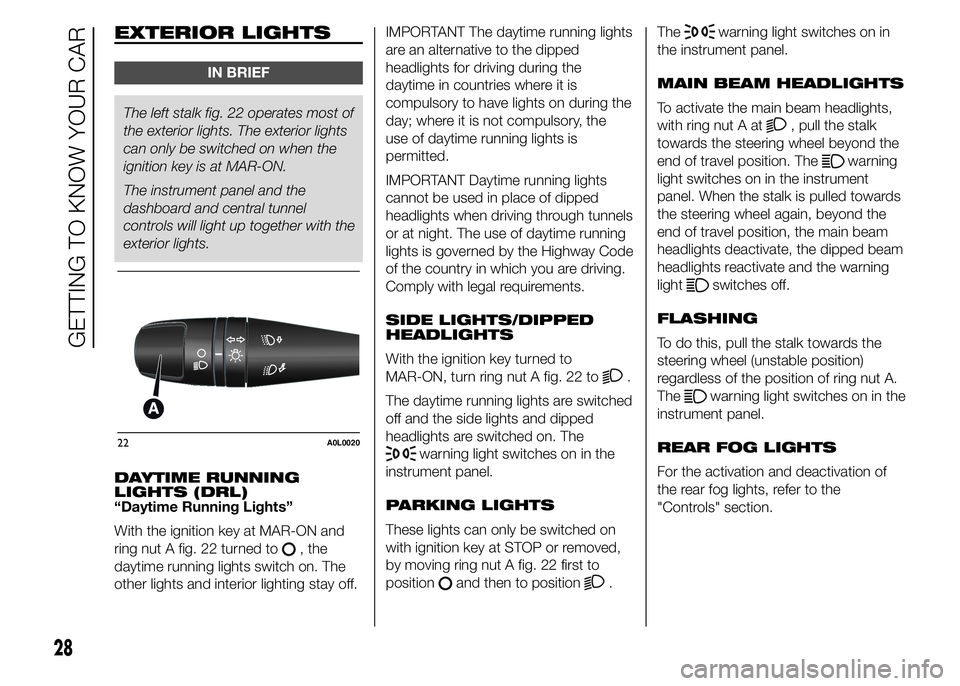
The left stalk fig. 22 operates most of
the exterior lights. The exterior lights
can only be switched on when the
ignition key is at MAR-ON.
The instrument panel and the
dashboard and central tunnel
controls will light up together with the
exterior lights.
DAYTIME RUNNING
LIGHTS (DRL)
“Daytime Running Lights”
With the ignition key at MAR-ON and
ring nut A fig. 22 turned to
, the
daytime running lights switch on. The
other lights and interior lighting stay off.IMPORTANT The daytime running lights
are an alternative to the dipped
headlights for driving during the
daytime in countries where it is
compulsory to have lights on during the
day; where it is not compulsory, the
use of daytime running lights is
permitted.
IMPORTANT Daytime running lights
cannot be used in place of dipped
headlights when driving through tunnels
or at night. The use of daytime running
lights is governed by the Highway Code
of the country in which you are driving.
Comply with legal requirements.
SIDE LIGHTS/DIPPED
HEADLIGHTS
With the ignition key turned to
MAR-ON, turn ring nut A fig. 22 to
.
The daytime running lights are switched
off and the side lights and dipped
headlights are switched on. The
warning light switches on in the
instrument panel.
PARKING LIGHTS
These lights can only be switched on
with ignition key at STOP or removed,
by moving ring nut A fig. 22 first to
position
and then to position.The
warning light switches on in
the instrument panel.
MAIN BEAM HEADLIGHTS
To activate the main beam headlights,
with ring nut A at
, pull the stalk
towards the steering wheel beyond the
end of travel position. The
warning
light switches on in the instrument
panel. When the stalk is pulled towards
the steering wheel again, beyond the
end of travel position, the main beam
headlights deactivate, the dipped beam
headlights reactivate and the warning
light
switches off.
FLASHING
To do this, pull the stalk towards the
steering wheel (unstable position)
regardless of the position of ring nut A.
The
warning light switches on in the
instrument panel.
REAR FOG LIGHTS
For the activation and deactivation of
the rear fog lights, refer to the
"Controls" section.
22A0L0020
28
GETTING TO KNOW YOUR CAR
Page 33 of 199
DIRECTION INDICATORS
Bring the stalk to the (stable) position:
❒upwards: activates right direction
indicator;
❒downwards: activates left direction
indicator.
Warning light
orwill blink on the
instrument panel.
The direction indicators are switched off
automatically when the steering wheel
is straightened.
"Lane change" function
If you wish to signal a lane change,
place the left stalk in the unstable
position for less than half a second. The
direction indicator on the side selected
will flash five times and then switch
off automatically.
"FOLLOW ME HOME"
DEVICE
This device allows you to illuminate the
area in front of the car for a certain
amount of time.Activation
With the key turned to STOP or
removed, pull stalk A towards the
steering wheel within 2 minutes from
when the engine is turned off.
Each time the stalk is moved, the lights
stay on for an extra 30 seconds up to
a maximum of 210 seconds; then
the lights are switched off automatically.
Also, each time the stalk is operated,
the
warning light on the
instrument panel switches on. The
display shows the time set for the
function and the corresponding
graphics.
The warning light comes on when the
lever is operated and stays on until
the function is automatically
deactivated. Each movement of the
stalk only increases the amount of time
the lights stay on.
Deactivation
Keep the stalk pulled towards the
steering wheel for more than 2
seconds.
WINDOW CLEANING
IN BRIEF
The right stalk controls screen
wiper/washer operation.
This operates only with the ignition
key at MAR-ON.
SCREEN WIPER/WASHER
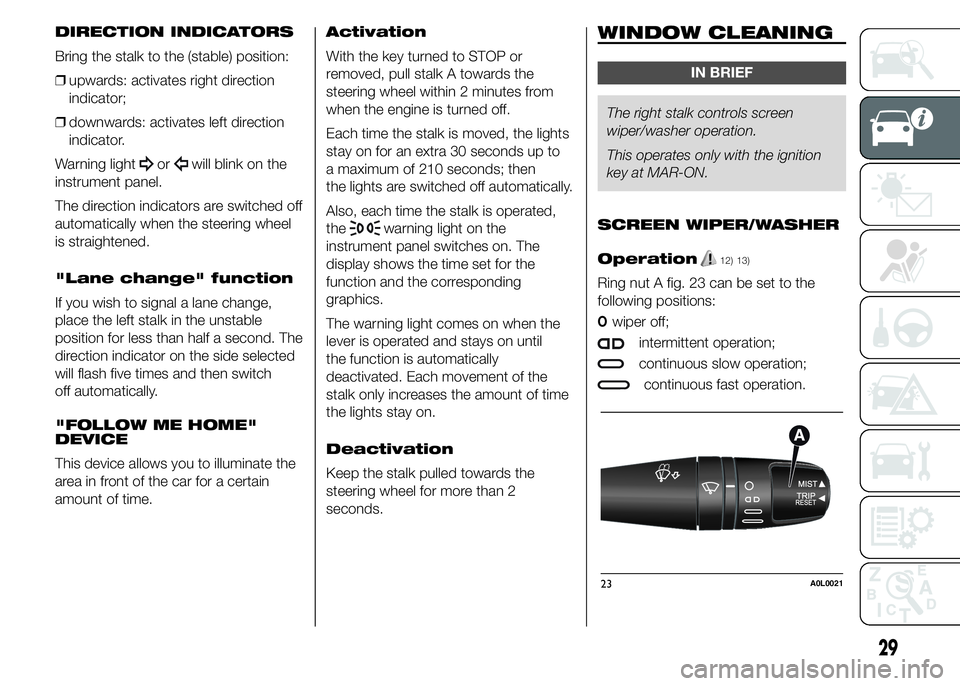
Operation
12) 13)
Ring nut A fig. 23 can be set to the
following positions:
Owiper off;
intermittent operation;
continuous slow operation;
continuous fast operation.
23A0L0021
29
Page 37 of 199

CONTROLS
HAZARD WARNING
LIGHTS
Operation
Press switch A fig. 26 to switch the
lights on/off.
Warning lights
andon the panel
are lit up when the hazard warning
lights are on.
16)
REAR FOG LIGHT
Operation
Press the
fig. 27 button to switch
the light on/off.The LED on the button lights up to
indicate the activation of the rear fog
light. The rear fog light switches on only
when the dipped headlights are on.
CENTRAL LOCKING
Operation
Press the
fig. 28 button to lock all
doors at the same time. When the
doors are locked, the LED on the
button lights up.
Locking takes place irrespective of the
position of the ignition key.FUEL CUT-OFF SYSTEM
Operation
This intervenes in the event of impact,
causing:
❒fuel supply cut-off with the engine
consequently switching off;
❒the automatic unlocking of the doors;
❒the switching on of the interior lights;
❒the switching on of the hazard
warning lights.
The digital
warning light and the
dedicated message on the display
indicate the intervention of the system.
Carefully check the car for fuel leaks, for
instance in the engine compartment,
under the car or near the tank area.
17)
26A0L0023
27A0L002428A0L0026
33
Page 38 of 199

After a collision, turn the ignition key to
STOP to prevent the battery from
running down.
To restore the correct operation of the
car, proceed as follows:
❒bring the left exterior light control
stalk to central position (neutral);
❒turn the ignition key to the MAR-ON
position;
❒activate the right direction indicator;
❒deactivate the right direction
indicator;
❒activate the left direction indicator;
❒deactivate the left direction indicator;
❒activate the right direction indicator;
❒deactivate the right direction
indicator;
❒activate the left direction indicator;
❒deactivate the left direction indicator;
❒turn the ignition key to the STOP
position;
❒turn the ignition key to the MAR-ON
position.
WARNING
16) The use of hazard warning lights
is governed by the Highway Code
of the country you are driving in:
comply with legal requirements.
17) If, after an impact, you smell fuel
or notice leaks from the fuel
system, do not reactivate the
system to avoid the risk of fire.
INTERIOR FITTINGS
STORAGE
COMPARTMENTS
Front
For versions/markets, where provided,
the car features a storage compartment
A fig. 29 on the dashboard.
Rear
This is located at the centre of the rear
partition, easily accessible from the 2
seats. To access it, press button A fig.
30 and release clasp B. There is a
lock in button A, permitting the storage
compartment to be locked using a
specific key.
On some versions, the storage
compartment is replaced with a mesh
pocket fig. 31.
29A0L0159
34
GETTING TO KNOW YOUR CAR
Page 45 of 199

HEADLIGHTS
LIGHT BEAM DIRECTION
The correct orientation of the headlights
is important for the driver's comfort
and safety as well as for all other road
users. This is also covered by a specific
rule of the highway code.
The headlights must be correctly
directed to ensure the best visibility
conditions for all drivers. Contact a
dedicated Alfa Romeo Dealership to
have the headlights checked and
adjusted.
ADJUSTING THE
HEADLIGHTS ABROAD
The dipped beam headlights are
aligned to comply with the regulations
of the country of purchase. When in
countries where you drive on the other
side of the road, you need to alter
the beam direction in order not
to dazzle the vehicles travelling in the
opposite direction, proceeding as
follows:
❒open the protective flap A fig. 44 on
the inner wheel arch; it can be
located by steering the wheel
completely;❒introducing the hand in the opening
cleared by the flap, find out the
pressure-fit protective cap B fig. 45
and remove it;
❒in the luggage compartment find the
supplied screwdriver and insert it in
the operating hole;
❒rotate the screw as shown in fig. 45
until you hear the lock click;
❒refit the protective cap B.
The procedure must be carried out on
both headlights.
In the right-hand drive versions the
operating hole for the above procedure
is located in the opposite side than
the one shown in fig. 45.
For versions with Bi-LED headlights (for
versions/markets, where provided) to
avoid dazzling the drivers on the other
side of the road, you need to cover
areas of the headlight according to the
Highway Code of the country you are
travelling in. Adjust both headlights
according to fig. 46.
44A0L0142
45 - Left-hand drive versionsA0L0141
41