ECU Alfa Romeo 4C 2016 Owner handbook (in English)
[x] Cancel search | Manufacturer: ALFA ROMEO, Model Year: 2016, Model line: 4C, Model: Alfa Romeo 4C 2016Pages: 182, PDF Size: 9.49 MB
Page 19 of 182
taking an ID document and the car
ownership documents.
REPLACING THE
BATTERY IN THE KEY
WITH REMOTE CONTROL
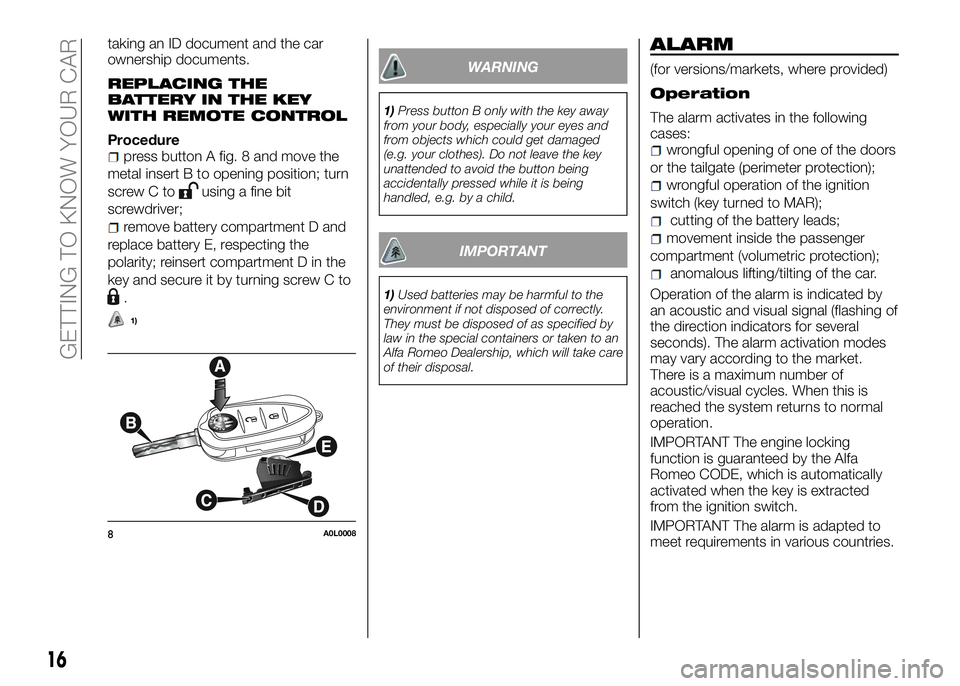
Procedurepress button A fig. 8 and move the
metal insert B to opening position; turn
screw C to
using a fine bit
screwdriver;
remove battery compartment D and
replace battery E, respecting the
polarity; reinsert compartment D in the
key and secure it by turning screw C to
.
1)
WARNING
1)Press button B only with the key away
from your body, especially your eyes and
from objects which could get damaged
(e.g. your clothes). Do not leave the key
unattended to avoid the button being
accidentally pressed while it is being
handled, e.g. by a child.
IMPORTANT
1)Used batteries may be harmful to the
environment if not disposed of correctly.
They must be disposed of as specified by
law in the special containers or taken to an
Alfa Romeo Dealership, which will take care
of their disposal.
ALARM
(for versions/markets, where provided)
Operation
The alarm activates in the following
cases:
wrongful opening of one of the doors
or the tailgate (perimeter protection);
wrongful operation of the ignition
switch (key turned to MAR);
cutting of the battery leads;
movement inside the passenger
compartment (volumetric protection);
anomalous lifting/tilting of the car.
Operation of the alarm is indicated by
an acoustic and visual signal (flashing of
the direction indicators for several
seconds). The alarm activation modes
may vary according to the market.
There is a maximum number of
acoustic/visual cycles. When this is
reached the system returns to normal
operation.
IMPORTANT The engine locking
function is guaranteed by the Alfa
Romeo CODE, which is automatically
activated when the key is extracted
from the ignition switch.
IMPORTANT The alarm is adapted to
meet requirements in various countries.
8A0L0008
16
GETTING TO KNOW YOUR CAR
Page 42 of 182
the tailgate when raising, in order to
prevent any external occurrence (e.g. a
gust of wind) from suddenly opening
the tailgate to end of travel. Additionally,
in order to prevent any damage to the
car or broken windows, do not force
the tailgate beyond the opening
position necessary to secure the
supporting rod B in the hole of the
retaining clip.
CLOSING
Procedure25)
hold the tailgate up with one hand
and use the other to remove rod B
fig. 42 from housing D fig. 43 and
reinsert it in its locking device C fig. 42;
lower the engine cover to
approximately 20 centimetres from the
engine compartment and let it drop.
Make sure that the engine cover is
completely closed and not only
fastened in safety position by trying to
open it. If it is not completely closed, do
not press the engine cover down, but
raise it and repeat the procedure.
IMPORTANT Always check that the
tailgate is closed correctly to prevent it
from opening while the car is travelling.
WARNING
21)The maximum permitted load in the
luggage compartment, in addition to the
kits provided, is 15 kg.
22)When accessing the rear luggage
compartment, take care with parts that
may be hot, owing to the adjacent engine
compartment. Danger of serious burns.
23)Perform these operations only when
the car is stationary.
24)The tailgate may drop suddenly if the
supporting rod is not positioned correctly.
25)For safety reasons, the tailgate must
always be closed properly while the car is
travelling. Therefore, always make sure that
the tailgate is closed properly and that the
lock is engaged. If you realise during travel
that the lock is not fully engaged, stop
immediately and close the tailgate in the
correct manner.
HEADLIGHTS
LIGHT BEAM DIRECTION
The correct orientation of the headlights
is important for the driver's comfort and
safety as well as for all other road users.
This is also covered by a specific rule of
the highway code.
The headlights must be correctly
directed to ensure the best visibility
conditions for all drivers. Contact a
dedicated Alfa Romeo Dealership to
have the headlights checked and
adjusted.
ADJUSTING THE
HEADLIGHTS ABROAD
The dipped beam headlights are
aligned to comply with the regulations
of the country of purchase. When in
countries where you drive on the other
side of the road, you need to alter the
beam direction in order not to dazzle
the vehicles travelling in the opposite
direction, proceeding as follows:
39
IMPORTANT Maintain a tight grip on
Page 53 of 182
non-existent obstacle ("echo
interference");
the presence of ultrasonic systems
(e.g. pneumatic brake systems of
trucks or pneumatic drills) near the car
could alter the signals sent by the
sensor;
the variation in sensor position,
caused by variation in ride (due to
suspension component wear),
changing tyres, overloaded car, or
tuning that lowers the car, for example,
may affect parking sensor system
performance.
WARNING
45)Parking manoeuvres, however, are
always the driver’s responsibility. While
carrying out these manoeuvres, always
make sure that no people (especially
children) or animals are in the area
concerned. The parking sensors are used
to assist the driver, who must never allow
his attention to lapse during potentially
dangerous manoeuvres, even those
executed at low speeds.
IMPORTANT
4)For correct operation of the system,
sensors must always be clean from mud,
dirt, snow or ice. Be careful not to scratch
or damage the sensors while cleaning
them. Avoid using dry, rough or hard
cloths. The sensors must be washed using
clean water, with the addition of vehicle
shampoo if necessary. When using special
washing equipment such as high pressure
jets or steam cleaning, clean the sensors
very quickly keeping the jet more than 10
cm away. Also, do not apply stickers to the
sensors.
TPMS (Tyre
Pressure
Monitoring System)
(for versions/markets, where provided)
DESCRIPTION
The tyre pressure monitoring system
(TPMS) warns the driver of low tyre
pressure on the basis of the cold
inflation pressure prescribed for the car.
Changes in outside temperature may
cause tyre pressure to vary. This means
that a decrease in the outside
temperature corresponds to a decrease
in the tyre pressure.
Tyre pressure must always be adjusted
according to the cold inflation pressure.
Cold tyre inflation pressure is the tyre
pressure after letting the car at a
standstill for at least three hours or a
travel shorter than 1.6 km after an
interval of three hours.
The cold tyre inflation pressure must not
exceed the maximum inflation pressure
value printed on the side of the tyre.
The tyre pressure also increases while
driving the car: this is a normal
condition and does not require any
adjustment of the pressure.
The TPMS continues to advise the
driver of the low tyre pressure condition
until this is corrected; the warning
continues until the pressure
corresponds or exceeds the pressure
prescribed for the cold tyres. When the
50
GETTING TO KNOW YOUR CAR
Page 92 of 182
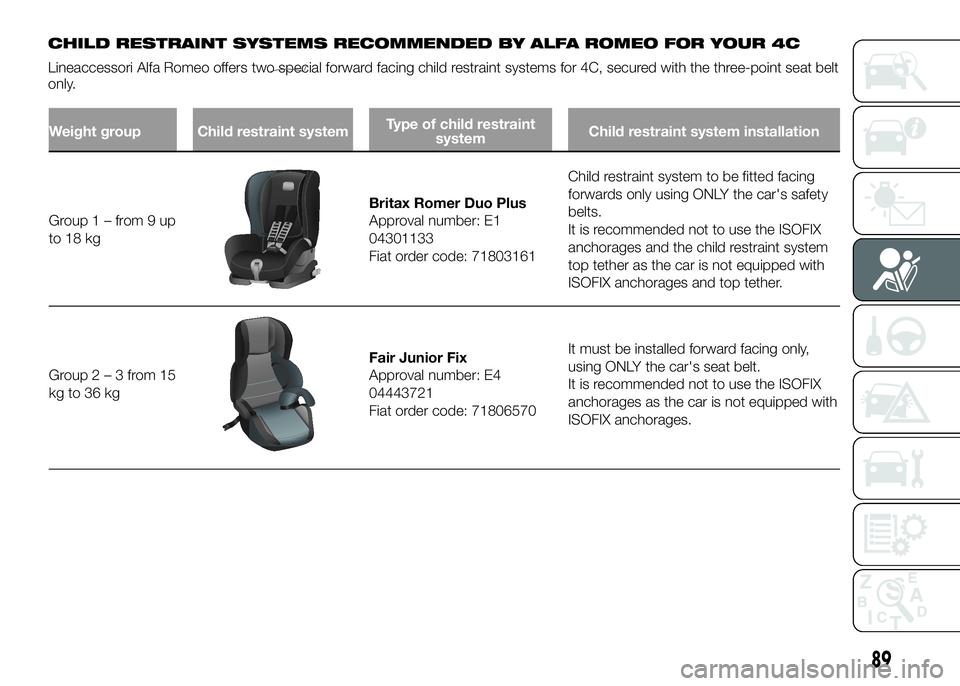
CHILD RESTRAINT SYSTEMS RECOMMENDED BY ALFA ROMEO FOR YOUR 4C
Lineaccessori Alfa Romeo offers two special forward facing child restraint systems for 4C, secured with the three-point seat belt
only.
89
Weight group Child restraint systemType of child restraint
systemChild restraint system installation
Group1–from9up
to 18 kg
Britax Romer Duo Plus
Approval number: E1
04301133
Fiat order code: 71803161Child restraint system to be fitted facing
forwards only using ONLY the car's safety
belts.
It is recommended not to use the ISOFIX
anchorages and the child restraint system
top tether as the car is not equipped with
ISOFIX anchorages and top tether.
Group2–3from15
kg to 36 kg
Fair Junior Fix
Approval number: E4
04443721
Fiat order code: 71806570It must be installed forward facing only,
using ONLY the car's seat belt.
It is recommended not to use the ISOFIX
anchorages as the car is not equipped with
ISOFIX anchorages.
Page 99 of 182
PARKING
Always remove the ignition key when
leaving the car.
When parking and leaving the car,
proceed as follows:
engage a gear (first gear if parked
uphill or reverse if facing downhill) and
leave the wheels turned;
stop the engine and engage the
handbrake.
Block the wheels with a wedge or a
stone if the car is parked on a steep
slope.
Wait until the indication of the gear
engaged disappears on the display
before releasing the brake pedal.
87)
IMPORTANT:NEVERleave the car with
the gearbox in neutral.
HANDBRAKE
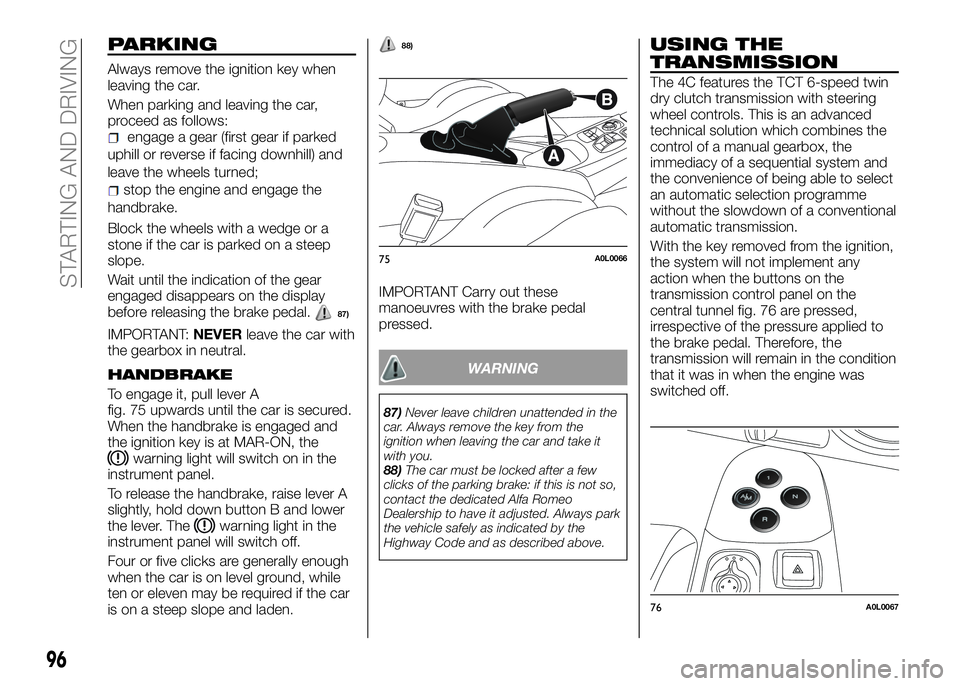
To engage it, pull lever A
fig. 75 upwards until the car is secured.
When the handbrake is engaged and
the ignition key is at MAR-ON, the
warning light will switch on in the
instrument panel.
To release the handbrake, raise lever A
slightly, hold down button B and lower
the lever. The
warning light in the
instrument panel will switch off.
Four or five clicks are generally enough
when the car is on level ground, while
ten or eleven may be required if the car
is on a steep slope and laden.
88)
IMPORTANT Carry out these
manoeuvres with the brake pedal
pressed.
WARNING
87)Never leave children unattended in the
car. Always remove the key from the
ignition when leaving the car and take it
with you.
88)The car must be locked after a few
clicks of the parking brake: if this is not so,
contact the dedicated Alfa Romeo
Dealership to have it adjusted. Always park
the vehicle safely as indicated by the
Highway Code and as described above.
USING THE
TRANSMISSION
The 4C features the TCT 6-speed twin
dry clutch transmission with steering
wheel controls. This is an advanced
technical solution which combines the
control of a manual gearbox, the
immediacy of a sequential system and
the convenience of being able to select
an automatic selection programme
without the slowdown of a conventional
automatic transmission.
With the key removed from the ignition,
the system will not implement any
action when the buttons on the
transmission control panel on the
central tunnel fig. 76 are pressed,
irrespective of the pressure applied to
the brake pedal. Therefore, the
transmission will remain in the condition
that it was in when the engine was
switched off.
75A0L0066
76A0L0067
96
STARTING AND DRIVING
Page 102 of 182
When setting off on a medium-steep
incline, it is advisable to engage the
handbrake.
Engaging 1st gear
Proceed as follows:
press the brake pedal;
press the1button on the
transmission control panel;
release the brake pedal and press
the accelerator pedal.
Engaging reverse (R)
Reverse (R) can only be engaged with
car stationary and brake pedal pressed.
Proceed as follows:
press the brake pedal (car
completely stationary);
press the R button on the
transmission control panel;
release the brake pedal and press
the accelerator pedal. When reverse is
engaged, the system emits an acoustic
signal (for versions/markets, where
provided).
If the brake pedal is not depressed (and
the car is stationary), the display will
show a dedicated message and the
system will automatically engage
neutral (N).
IMPORTANT With the car running, the
request is accepted and executed if the
car speed drops below 3 km/h within 3
seconds from the request: if the request
is not executed, the system will
maintain the gear engaged or, if thespeed of the car drops below 10 km/h,
will put the transmission in neutral (N)
and the manoeuvre will have to be
repeated.
ENGAGING NEUTRAL (N)
With car stationary and ignition key at
MAR-ON (irrespective of the condition
of the engine), neutral (N) can only be
engaged with the brake pedal pressed.
If the car is in motion, neutral (N) can
always be engaged, irrespective of the
pressure applied to the brake and
accelerator pedals.
The display will show the letterN
together with the active operating
mode.
With car in motion, to engage a gear
from the neutral (N) position, press the
1button on the transmission control
panel (it is not necessary to press the
brake pedal): the transmission will
immediately engage the correct gear
according to the car’s speed.
With car stationary and ignition key at
MAR-ON (irrespective of the condition
of the engine), 1st gear can only be
engaged with the brake pedal pressed.
LAUNCH CONTROL
The "Launch Control" strategy permits
high-performance starting.
This strategy can be activated with
vehicle at a standstill, "Race" mode
selected and 1st gear engaged.The sequence of operations to perform
is as follows:
press the brake pedal and hold it
down;
press the accelerator pedal and hold
it down;
press the "–" stalk behind the
steering wheel;
When the brake pedal is released, the
car will start with maximum
acceleration. Keeping the accelerator
pressed, the system will automatically
upshift once the best engine speed has
been achieved for shifting gears.
................................. 0
To abandon the strategy, simply
interrupt the above sequence of
operations or release the accelerator
pedal.
DISPLAYED
INFORMATION
When the key is turned to MAR-ON,
after about 1 second, the display
shows the transmission in neutral
indication (N). When driving, the display
shows the gear engaged and the active
mode (AUTOorMANUAL). The
indications on the display have the
following meanings:
N = neutral;
1 = first gear;
2 = second gear
3 = third gear;
4 = fourth gear;
99
Page 111 of 182
WARNING
92)Indicate the presence of the stationary
car in accordance with current regulations:
hazard warning lights, warning triangle, etc.
Those on board should get out of the
vehicle and wait for the wheel to be
repaired away from the threat posed by the
traffic. If parked on a slope or rough
surface, chock the wheels with wedges or
other suitable devices (for the correct
procedure for parking the car safely, refer
to the "Parking" paragraph in the "Starting
and driving" chapter).
93)Give the booklet to the technicians who
will be handling the tyre that was treated
using the "Fix&Go Automatic" kit.
94)A repair is not possible if the wheel rim
is damaged (groove is deformed, causing
air to escape). Do not remove foreign
bodies (screws or nails) from the tyre.95)Never operate the compressor for
longer than 20 consecutive minutes. Risk
of overheating. The kit is not suitable for
definitive repairs, so the repaired tyres may
only be used temporarily.
96)As required by current regulations, the
information on chemical substances for the
protection of human health and the
environment and on the safe use of the
sealing fluid are on the packaging label.
Compliance with the indications on the
label is an essential condition to ensure the
safety and the effectiveness of the product.
Remember to carefully read the label
before use; the user of the product is
responsible for any damages caused by
improper use. The sealing fluid has an
expiry date. Replace the bottle if the
sealant has expired.
97)Wear the protective gloves provided
with the kit.
98)Apply the adhesive label where it can
be easily seen by the driver as a reminder
that the tyre has been treated with the
quick repair kit. Drive carefully, especially
on corners. Do not exceed 80 km/h. Avoid
sudden acceleration or braking.
99)If the pressure has fallen below 1.8 bar,
do not drive any further: the Fix&Go
Automatic quick tyre repair kit cannot
guarantee the correct hold because the
tyre is too damaged. Contact a dedicated
Alfa Romeo Dealership.
100)Always indicate that the tyre was
repaired using the quick tyre repair kit. Give
the leaflet to the personnel charged with
handling the tyre treated with the tyre
repair kit.
IMPORTANT
13)In the event of a puncture caused by
foreign bodies, the kit may be used to
repair tyres showing damage on the tread
or shoulder up to max. 4 mm diameter. Do
not use the repair kit if the tyre was
damaged as a result of being used when
underinflated.
IMPORTANT
2)Dispose of the bottle and the sealant
liquid properly. Have them disposed of in
compliance with national and local
regulations.
88A0L0082
108
IN AN EMERGENCY
Page 122 of 182

INTERIOR BULB
REPLACEMENT
ROOF LIGHT
To change the bulb, proceed as follows:remove roof light A fig. 109 working
at the points indicated by the arrows;
open protective flap B fig. 110 andreplace bulb C, releasing it from the
side contacts. Make sure that the new
bulb is correctly secured between the
contacts;
reclose protective flap B fig. 110 and
fix roof light A fig. 109 in its housing,
making sure that it is locked.
LUGGAGE
COMPARTMENT ROOF
LIGHT
To replace the bulb, proceed as follows:
open the luggage compartment and
extract roof light A fig. 111, working in
the point shown by the arrow;
open protection B and replace the
press-fitted bulb;
reclose protection B on the lens;
refit roof light A by inserting it in its
correct position, firstly on one side and
then pressing on the other side until it
clicks into place.
109A0L0100
110A0L0101
111A0L0140
119
Page 143 of 182
unknown origin;
if a tyre is changed, also change the
inflation valve.
WARNING
131)The road holding qualities of the car
also depend on the correct inflation
pressure of the tyres.
132)If tyre pressure is too low, the tyre
may overheat and be severely damaged as
a result.
133)Do not switch tyres from the left to
the right side and vice versa, in order to
prevent inversion of the rotation direction.
134)Do not repaint alloy wheel rims at
temperatures higher than 150°C. The
mechanical characteristics of the wheels
might be compromised.
135)The car is always equipped with front
and rear wheels of different dimensions. It
is not therefore possible to move the
wheels from the front to the back and vice
versa.
It is advisable to replace the blade
about once a year.
136)
A few simple precautions can reduce
the possibility of damage to the blade:
if the temperature falls below zero,
make sure that ice has not frozen the
rubber to the glass. Use an antifreeze
product to release it if required;
remove any snow from the glass;
do not operate the windscreen wiper
on dry glass.
IMPORTANT Do not lift the arm of the
windscreen wiper when it is in its initial
rest position. Refer to the following
instructions to lift the windscreen wiper
blade correctly.
Lifting blade
If it is necessary to lift the blade from
the windscreen (e.g. in the event of
snow or if the blade needs
replacement) proceed as follows:
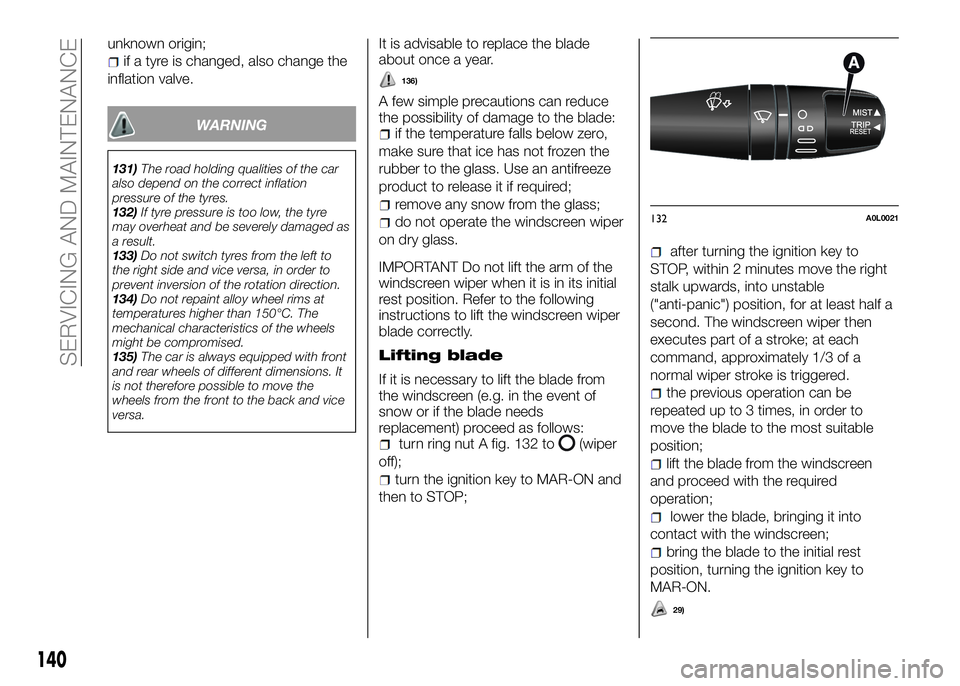
turn ring nut A fig. 132 to(wiper
off);
turn the ignition key to MAR-ON and
then to STOP;
after turning the ignition key to
STOP, within 2 minutes move the right
stalk upwards, into unstable
("anti-panic") position, for at least half a
second. The windscreen wiper then
executes part of a stroke; at each
command, approximately 1/3 of a
normal wiper stroke is triggered.
the previous operation can be
repeated up to 3 times, in order to
move the blade to the most suitable
position;
lift the blade from the windscreen
and proceed with the required
operation;
lower the blade, bringing it into
contact with the windscreen;
bring the blade to the initial rest
position, turning the ignition key to
MAR-ON.
29)
132A0L0021
140
SERVICING AND MAINTENANCE