lights Alfa Romeo 4C Spider 2018 Owner's Guide
[x] Cancel search | Manufacturer: ALFA ROMEO, Model Year: 2018, Model line: 4C Spider, Model: Alfa Romeo 4C Spider 2018Pages: 294, PDF Size: 3.31 MB
Page 137 of 294
WARNING!(Continued)
•NEVER place any objects under the floor mat
(e.g., towels, keys, etc.). These objects could
change the position of the floor mat and may
cause interference with the accelerator, brake, or
clutch pedals.
• If the vehicle carpet has been removed and re-
installed, always properly attach carpet to the
floor and check the floor mat fasteners are secure
to the vehicle carpet. Fully depress each pedal to
check for interference with the accelerator, brake,
or clutch pedals then re-install the floor mats.
• It is recommended to only use mild soap and
water to clean your floor mats. After cleaning,
always check your floor mat has been properly
installed and is secured to your vehicle using the
floor mat fasteners by lightly pulling mat.
Periodic Safety Checks You Should Make
Outside The Vehicle
Tires
Examine tires for excessive tread wear and uneven wear
patterns. Check for stones, nails, glass, or other objects
lodged in the tread or sidewall. Inspect the tread for cuts
and cracks. Inspect sidewalls for cuts, cracks, and bulges.
Check the wheel nuts for tightness. Check the tires (includ-
ing spare) for proper cold inflation pressure.
Lights
Have someone observe the operation of brake lights
and exterior lights while you work the controls. Check
turn signal and high beam indicator lights on the
instrument panel.
Door Latches
Check for proper closing, latching, and locking.
Fluid Leaks
Check area under the vehicle after overnight parking
for fuel, coolant, oil, or other fluid leaks. Also, if
gasoline fumes are detected or if fuel, or brake fluid
leaks are suspected. The cause should be located and
corrected immediately.
5
SAFETY 135
Page 151 of 294
This also acts on the dynamic vehicle control systems
(engine, gearbox/transmission, ESC system).
Driving Modes
The Alfa DNA system lever will always return to the
center position after use.
The selected driving mode is indicated by the corre-
sponding LED switching in the panel and by an indi-
cation on the display.
Dynamic Mode
Activation
Move the Alfa DNA system lever upwards (to the letter
“D”) and hold in this position for half a second, until
the corresponding LED lights up and the Dynamic
mode activation indicator appears on the display.
When Dynamic mode is activated, the turbocharger
pressure and engine oil temperature screen is displayed
automatically. When released, the Alfa DNA system
lever will return to the central position.
NOTE:Dynamic Mode will be inhibited until the
vehicle has accumulated 155 miles (250 km).
Electronic Stability Control (ESC) and Anti-Slip
Regulation (ASR) systems:
The ESC and ASR system ensures more enjoyable,
sportier driving while guaranteeing the stability of the
vehicle.
Electronic Q2 system:
The system increases vehicle stability while accelerating
on bends, improving the agility of the vehicle.
Alfa DNA Mode Selector
6
STARTING AND OPERATING 149
Page 153 of 294
In Race mode, the transmission only works in MANUAL
mode.
Deactivation
To deactivate Race mode and return to Dynamic mode,
move the Alfa DNA system lever downwards (to letter
“A”) and keep it in this position for half a second.
The LED corresponding to Dynamic mode will light up
and the Dynamic mode activation indication will ap-
pear on the display.
Natural Mode
Electronic Stability Control (ESC) and Anti-Slip
Regulation (ASR) systems:
ESC and ASR system thresholds are aimed at providing
comfort and safety in normal grip and driving condi-
tions.
Electronic Q2 system:
The system is calibrated to ensure the best driving
comfort.
Engine And Gearbox/Transmission:
Standard response shifting.
All Weather Mode
Activation
Move the Alfa DNA system lever downwards (to the
letter “A”) and hold in this position for half a second,
until the corresponding LED lights up and the All
Weather mode activation indicator appears on the dis-
play.
Electronic Stability Control (ESC) and Anti-Slip
Regulation (ASR) systems:
ESC and ASR system thresholds are aimed at ensuring
maximum safety in low-grip driving conditions. It is
advisable to select All Weather mode in the presence of
low-grip road surfaces.
Electronic Q2 System:
The system is deactivated.
Engine And Gearbox/Transmission:
Standard response shifting.
Deactivation
To deactivate All Weather mode and return to Natural
mode, move the Alfa DNA system lever upwards (to
letter “D”) and keep it in this position for half a second.
6
STARTING AND OPERATING 151
Page 168 of 294
HAZARD WARNING FLASHER
The Hazard Warning flasher switch is located on the
center console.Push the switch to turn on the Hazard Warn-
ing flasher. When the switch is activated, all
directional turn signals will flash on and off to
warn oncoming traffic of an emergency. Push
the switch a second time to turn off the Hazard Warning
flasher.
This is an emergency warning system and it should not
be used when the vehicle is in motion. Use it when your
vehicle is disabled and it is creating a safety hazard for
other motorists.
When you must leave the vehicle to seek assistance, the
Hazard Warning flasher will continue to operate even
though the ignition is placed in the OFF position.
NOTE: With extended use the Hazard Warning flasher
may wear down your battery.
BULB REPLACEMENT
Replacement Bulbs
Interior Bulbs
Bulb Number
Overhead Lamp C10W
Luggage Compartment W5W
Exterior Bulbs
Bulb Number
Parking Lights/Daytime
Running Lights (DRL) LED (See Authorized
Dealer)
Rear Tail Lights LED (See Authorized
Dealer)
Font and Rear Side
Lights W3W
Dipped/Main Beam
Headlights (Versions
With Bi-Halogen Head-
lights) — If Equipped HIR2
166 IN CASE OF EMERGENCY
Page 169 of 294
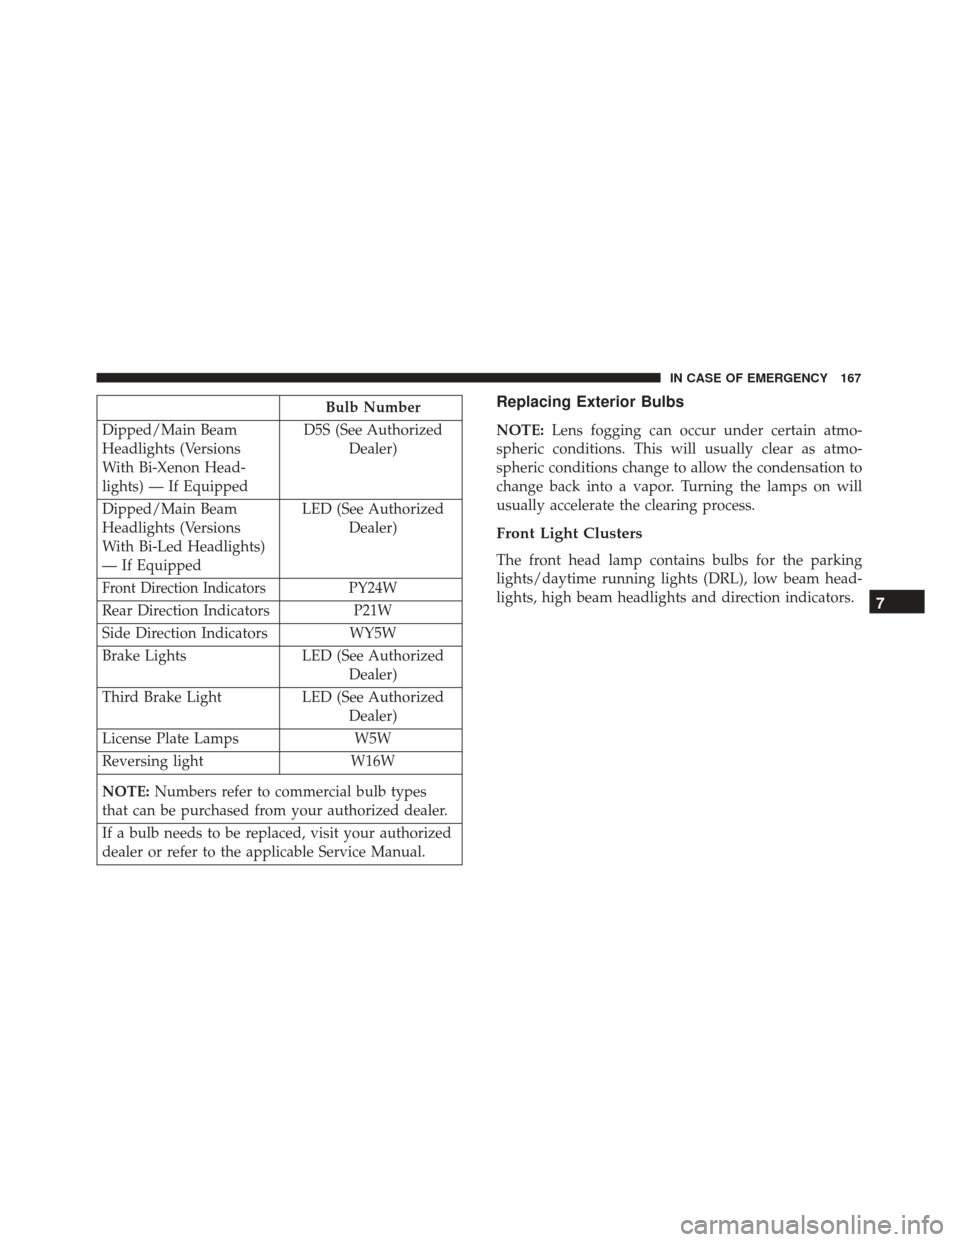
Bulb Number
Dipped/Main Beam
Headlights (Versions
With Bi-Xenon Head-
lights) — If Equipped D5S (See Authorized
Dealer)
Dipped/Main Beam
Headlights (Versions
With Bi-Led Headlights)
— If Equipped LED (See Authorized
Dealer)
Front Direction IndicatorsPY24W
Rear Direction Indicators P21W
Side Direction Indicators WY5W
Brake Lights LED (See Authorized
Dealer)
Third Brake Light LED (See Authorized
Dealer)
License Plate Lamps W5W
Reversing light W16W
NOTE: Numbers refer to commercial bulb types
that can be purchased from your authorized dealer.
If a bulb needs to be replaced, visit your authorized
dealer or refer to the applicable Service Manual.
Replacing Exterior Bulbs
NOTE: Lens fogging can occur under certain atmo-
spheric conditions. This will usually clear as atmo-
spheric conditions change to allow the condensation to
change back into a vapor. Turning the lamps on will
usually accelerate the clearing process.
Front Light Clusters
The front head lamp contains bulbs for the parking
lights/daytime running lights (DRL), low beam head-
lights, high beam headlights and direction indicators.
7
IN CASE OF EMERGENCY 167
Page 170 of 294
If bulb replacement is required, please see an autho-
rized dealer.
Side Lights/Daytime Running Lights (DRL)
These are LEDs. For the replacement, contact an autho-
rized dealer.Low/High Beam Bi-Halogen Headlights
To change the bulb, proceed as follows:
1. Turn the steering wheel completely.
2. Open the protective flap by rotating the screw.
Headlight
1 — Daytime Running Lights
2 — Direction Indicator
3 — High/Low Beam Lights
Front Fender Liner
1 — Direction Indicator Bulb Protective Flap
2 — Headlamp Bulb Protective Flap
168 IN CASE OF EMERGENCY
Page 172 of 294
Low/High Beam HID & LED Headlights
For the replacement, contact an authorized dealer.
Direction Indicators
Front:
1. Turn the steering wheel completely.
2. Open the protective flap by rotating the screw.3. Remove protective cover from headlamp assembly.
4. Rotate the bulb holder counterclockwise and remove
it.
5. Rotate the bulb assembly counter clockwise to re- move from bulb holder.
6. Install the new bulb, making sure that it is locked in correctly, and reinstall into headlamp assembly.
7. Reinstall protective cover in the headlamp assembly and close the protective flap.
Front Fender Liner
1 — Direction Indicator Bulb Protective Flap
2 — Headlamp Bulb Protective Flap
Protective Cover
170 IN CASE OF EMERGENCY
Page 174 of 294
3. Remove bulb from bulb housing then remove andreplace bulb and reinstall.
Rear Light Clusters
These contain the bulbs for the side lights, direction
indicators and brake lights.
Direction Indicators
To change the bulb, proceed as follows:
1. Remove the protective cap (one for each side) on theside cover of the luggage compartment.
Front Side Marker Bulb
First Protective Cap
172 IN CASE OF EMERGENCY
Page 175 of 294
2. Remove the second protective cap insert a handinside the opening.
3. Rotate clockwise to remove the bulb holder remove the bulb from the bulb holder.
4. Install the bulb by pressing it into bulb holder then turn install the bulb holder and turn it counterclock-
wise.
5. Install the previously removed protective caps.Tail Lights/Brake Lights
These are LEDs. For the replacement, contact an autho-
rized dealer.
Reversing Light
WARNING!
The reverse lights are located close to the exhaust
pipes; take the utmost care not to get burnt during
the bulb replacement.
To replace the reversing lights, turn the bulb holder
counterclockwise, remove the bulb and replace it.
Second Protective Cap
7
IN CASE OF EMERGENCY 173
Page 177 of 294
Third Brake Lights
These are LEDs. For the replacement, contact an autho-
rized dealer.
License Plate Lights
To replace the bulbs proceed as follows:
1. Compress the retaining clip, then pull the licenseplate light cluster out. 2. Turn bulb holder counterclockwise, remove bulb and
replace it.
License Plate Lamp Removal
1 — Bulb Holder
2 — Bulb
7
IN CASE OF EMERGENCY 175