dashboard Alfa Romeo Giulia 2016 Owner's Manual
[x] Cancel search | Manufacturer: ALFA ROMEO, Model Year: 2016, Model line: Giulia, Model: Alfa Romeo Giulia 2016Pages: 204, PDF Size: 4.95 MB
Page 21 of 204
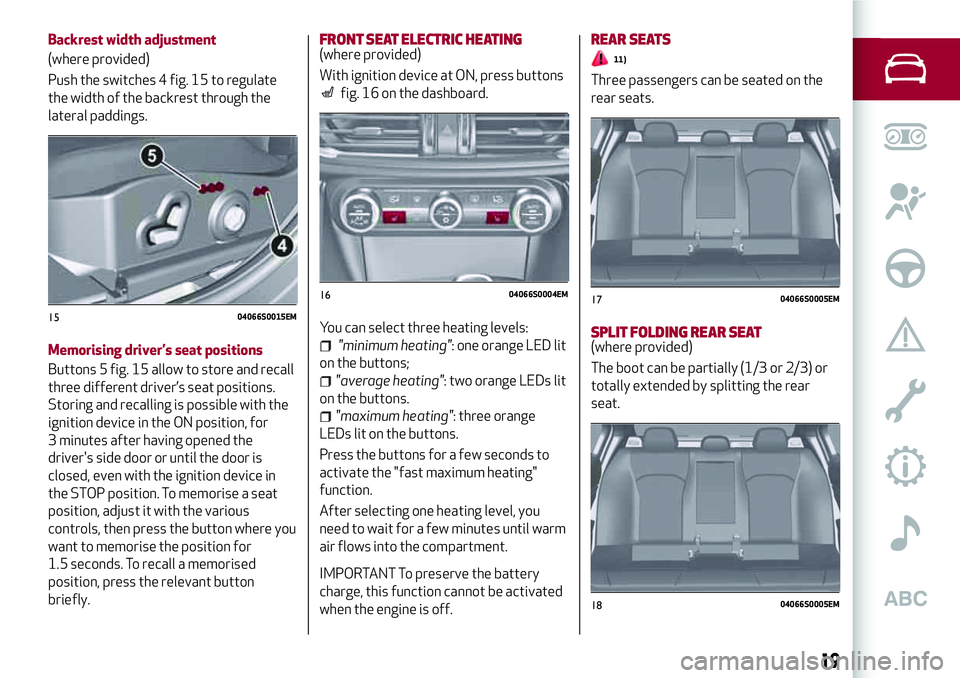
Backrest width adjustment
(where provided)
Push the switches 4 fig. 15 to regulate
the width of the backrest through the
lateral paddings.
Memorising driver’s seat positions
Buttons 5 fig. 15 allow to store and recall
three different driver’s seat positions.
Storing and recalling is possible with the
ignition device in the ON position, for
3 minutes after having opened the
driver's side door or until the door is
closed, even with the ignition device in
the STOP position. To memorise a seat
position, adjust it with the various
controls, then press the button where you
want to memorise the position for
1.5 seconds. To recall a memorised
position, press the relevant button
briefly.FRONT SEAT ELECTRIC HEATING(where provided)
With ignition device at ON, press buttons
fig. 16 on the dashboard.
You can select three heating levels:
"minimum heating": one orange LED lit
on the buttons;
"average heating": two orange LEDs lit
on the buttons.
"maximum heating": three orange
LEDs lit on the buttons.
Press the buttons for a few seconds to
activate the "fast maximum heating"
function.
After selecting one heating level, you
need to wait for a few minutes until warm
air flows into the compartment.
IMPORTANT To preserve the battery
charge, this function cannot be activated
when the engine is off.REAR SEATS
11)
Three passengers can be seated on the
rear seats.
SPLIT FOLDING REAR SEAT(where provided)
The boot can be partially (1/3 or 2/3) or
totally extended by splitting the rear
seat.
1504066S0015EM
1604066S0004EM1704066S0005EM
1804066S0005EM
19
Page 26 of 204
mirror folding (from closed to open
position and vice versa), their movement
direction is reversed.
Automatic activation
Activating the central door locking
system from outside the vehicle
automatically folds the mirrors, they
return to the driving position when the
ignition switch is turned to the ON
position.
If the door mirrors were folded in using
device 1, they can only be returned to the
driving position by means of a new
command on the same device.
IMPORTANT The mirrors must always be
open while driving and should never be
folded.
ELECTROCHROMIC EXTERIOR
MIRRORS
(where provided)
As well as an inside mirror, an
electrochromic mirror is also available on
some versions, which automatically
modifies its reflecting properties to
prevent dazzling the driver. The
dazzle-prevention electrochromic
enabling/disabling button fig. 26 is the
same for all rear view mirrors.
WARNING
16)As door mirrors are curved, and
therefore they may slightly alter the
perception of distance.
EXTERNAL LIGHTS
LIGHT SWITCH
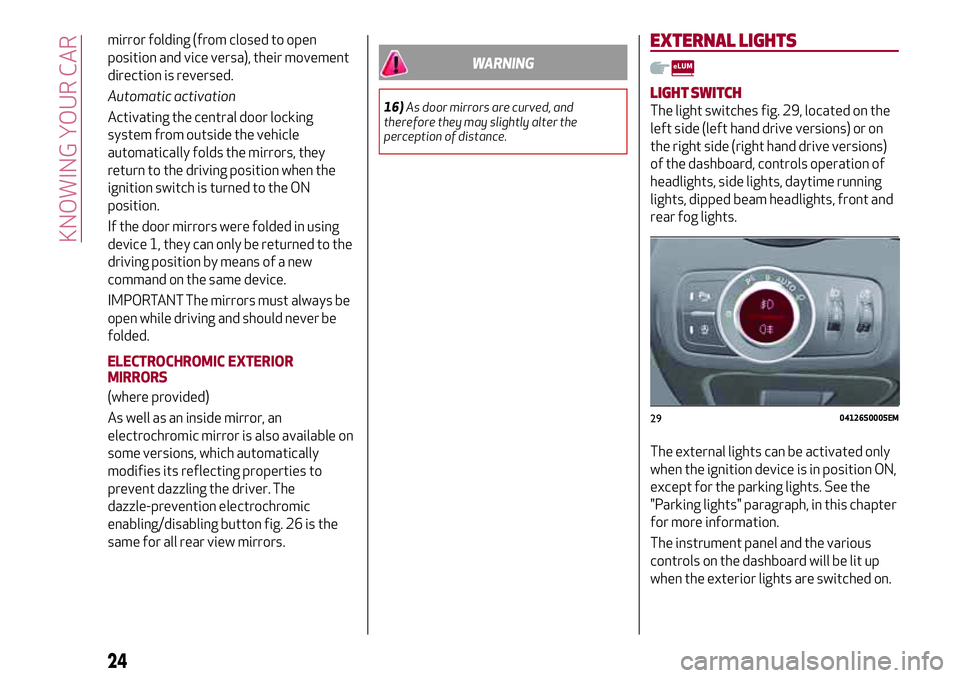
The light switches fig. 29, located on the
left side (left hand drive versions) or on
the right side (right hand drive versions)
of the dashboard, controls operation of
headlights, side lights, daytime running
lights, dipped beam headlights, front and
rear fog lights.
The external lights can be activated only
when the ignition device is in position ON,
except for the parking lights. See the
"Parking lights" paragraph, in this chapter
for more information.
The instrument panel and the various
controls on the dashboard will be lit up
when the exterior lights are switched on.
2904126S0005EM
24
KNOWING YOUR CAR
Page 33 of 204
Air flow to the windscreen and front
side window vents to
demist/defrost them.
Air flow at central and side
dashboard vents to ventilate the
chest and the face during the hot
season.
Air flow to the front and rear
footwell vents. This air distribution
setting heats the passenger
compartment most quickly, giving a
prompt sensation of warmth.
Air flow distributed between
footwell vents (hotter air) and
central and side dashboard vents
(cooler air). This air distribution
setting is useful in spring and
autumn on sunny days.
Air flow distributed between
footwell vents and windscreen and
front side window defrosting/
demisting vents. This distribution
setting allows the passenger
compartment to be warmed up
efficiently and prevents the
windows from misting up.
Air flow distribution between
windscreen demisting/defrosting
vents and side and central
dashboard vents. This allows air to
be sent to the windscreen in
conditions of strong sunlight.
Air flow distribution to all diffusers
on the vehicle.
In AUTO mode, the air conditioner
automatically manages the air
distribution. When set manually, the air
distribution is indicated by the respective
symbols on the Connect system display
switching on.
START & STOP EVO
The automatic dual zone climate control
system interacts with the Start & Stop
Evo system (engine off when vehicle
speed is 0 mph (0 km/h)) to ensure
adequate comfort inside the vehicle.
In particular, the climate control system
deactivates the Start & Stop Evo if:
the climate control system is in AUTO
mode (LED on the button switched on)
and the temperature conditions inside
the vehicle are far from a comfort
temperature;
the climate control system is in LO for
maximum cooling;
the climate control system is in the
MAX-DEF status.
With Start & Stop Evo system on (engineoff and vehicle speed equal to 0 mph
(0 km/h)), the flow is reduced as much as
possible, to keep the compartment
comfort conditions for longer.
IMPORTANT
2)The system uses R1234yf coolant gas,
which does not pollute the environment in the
event of accidental leakage. Under no
circumstances use R134a and R12 fluids,
which are incompatible with the components
of the system.
31
Page 37 of 204
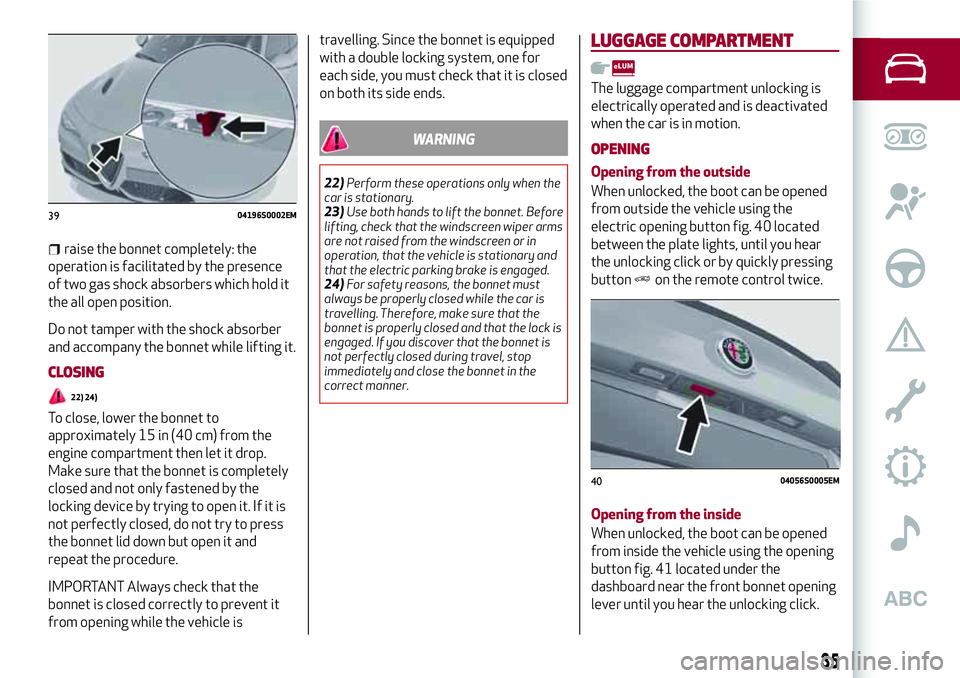
raise the bonnet completely: the
operation is facilitated by the presence
of two gas shock absorbers which hold it
the all open position.
Do not tamper with the shock absorber
and accompany the bonnet while lifting it.
CLOSING
22) 24)
To close, lower the bonnet to
approximately 15 in (40 cm) from the
engine compartment then let it drop.
Make sure that the bonnet is completely
closed and not only fastened by the
locking device by trying to open it. If it is
not perfectly closed, do not try to press
the bonnet lid down but open it and
repeat the procedure.
IMPORTANT Always check that the
bonnet is closed correctly to prevent it
from opening while the vehicle istravelling. Since the bonnet is equipped
with a double locking system, one for
each side, you must check that it is closed
on both its side ends.
WARNING
22)Perform these operations only when the
car is stationary.
23)Use both hands to lift the bonnet. Before
lifting, check that the windscreen wiper arms
are not raised from the windscreen or in
operation, that the vehicle is stationary and
that the electric parking brake is engaged.
24)For safety reasons, the bonnet must
always be properly closed while the car is
travelling. Therefore, make sure that the
bonnet is properly closed and that the lock is
engaged. If you discover that the bonnet is
not perfectly closed during travel, stop
immediately and close the bonnet in the
correct manner.
LUGGAGE COMPARTMENT
The luggage compartment unlocking is
electrically operated and is deactivated
when the car is in motion.
OPENING
Opening from the outside
When unlocked, the boot can be opened
from outside the vehicle using the
electric opening button fig. 40 located
between the plate lights, until you hear
the unlocking click or by quickly pressing
button
on the remote control twice.
Opening from the inside
When unlocked, the boot can be opened
from inside the vehicle using the opening
button fig. 41 located under the
dashboard near the front bonnet opening
lever until you hear the unlocking click.
3904196S0002EM
4004056S0005EM
35
Page 96 of 204
Main recommendations to carry
children safely
Install the child restraint systems on
the rear seat, which is the most protected
position in the event of an impact.
Keep children in rearward facing child
restraint systems for as long as possible,
until 3–4 years old if possible.
If a rear facing child restraint system is
installed on the front seat, passenger's
side, it is recommended to remove the
head restraint (refer to the procedure
described in "Head restraint" paragraph,
"Knowing your vehicle" chapter). The head
restraint must be repositioned properly if
no child restraint system is to be
transported.
If the passenger's front airbag is
deactivated always check the warning
light on the front dashboard to make sure
that it has actually been deactivated.
Carefully follow the instructions
supplied with the child restraint system.
Keep the instructions in the vehicle along
with the other documents and this
handbook. Do not use second-hand child
restraint systems without instructions.
Only one child is to be strapped into
each restraint system; never carry two
children using one child restraint system.
Always check that the seat belts do
not rest on the child’s neck.
Always check that the seat belt is well
fastened by pulling on it.
While travelling, do not let the child sit
incorrectly or unfasten the belts.
Never allow a child to put the belt's
diagonal section under an arm or behind
their back.
Never carry children on your lap, even
newborns. No one can hold a child in the
case of an accident.
In the event of an accident, replace the
child restraint system with a new one.
WARNING
73)SEVERE DANGER When a front
passenger airbag is fitted, do not install
rearward facing child restraint systems on
the front passenger seat. Deployment of the
airbag in an accident could cause fatal
injuries to the child regardless of the
severity of the collision. It is advisable to
always carry children in a child restraint
system on the rear seat, which is the most
protected position in the event of a collision.
74)On the sun visor there is a label with
suitable symbols reminding the user that it is
compulsory to deactivate the airbag if a
rearward facing child restraint system is
fitted. Always comply with the instructions
on the passenger side sun visor (see the
"Supplementary Restraint System (SRS) -
Airbag" paragraph).75)Should it be necessary to carry a child on
the passenger side front seat in a rear facing
child restraint system, the passenger side
front airbag and side bag must be
deactivated through the Connect system
main menu (see the Supplementary
Restraint System (SRS) - Airbag"
paragraph), verifying deactivation by
checking whether the
OFFLED has
illuminated on the front ceiling light. Move
the passenger's seat as far back as possible
to avoid contact between the child seat and
the dashboard.
76)Do not move the front or rear seat if a
child is seated on it or on the dedicated child
restraint system
77)Incorrect fitting of the child restraint
system may result in an inefficient
protection system. In the event of an
accident the child restraint system may
become loose and the child may be injured,
even fatally. When fitting a restraint system
for newborns or children, strictly comply
with the instructions provided by the
Manufacturer.
78)When the child restraint system is not
used, secure it with the seat belt or with the
ISOFIX anchorages, or remove it from the
vehicle. Do not leave it unsecured inside the
passenger compartment. In this way, in the
case of sudden braking or an accident, it will
not cause injuries to the occupants.
79)After installing a child restraint system,
do not move the seat: always remove the
child restraint system before making any
adjustment.
94
SAFETY
Page 97 of 204
80)Always make sure that the chest section
of the seat belt does not pass under the
arms or behind the back of the child. In the
event of an accident the seat belt will not be
able to secure the child, with the risk of
injury, including fatal injury. Therefore the
child must always wear the seat belt
correctly.
81)Do not use the same lower anchorage to
install more than one child restraint system.
82)If a Universal ISOFIX child restraint
system is not fixed to all three anchorages, it
will not be able to protect the child correctly.
In a crash, the child could be seriously or
fatally injured.
83)Fit the child restraint system when the
car is stationary. The child restraint system
is correctly fixed to the brackets when you
hear the click. Follow the instructions for
assembly, disassembly and positioning that
the Manufacturer must supply with the child
restraint system.
84)If the vehicle was involved in an accident
of a certain severity, have the ISOFIX
anchorages and the child restraint system
replaced.
85)If the vehicle was involved in an accident
of a certain severity, have both the child
restraint system and the seat belt it was
attached to replaced.SUPPLEMENTARY RESTRAINT
SYSTEM (SRS) - AIRBAG
The vehicle is equipped with:
front driver airbag;
front passenger airbag;
driver and passenger front side bags
for pelvis, chest and shoulder protection
(Side bags);
side bags for head protection of front
seat passengers and rear side seat
passengers (window bag).
The location of the airbags on the vehicle
is marked by the word "AIRBAG" in the
middle of the steering wheel below the
Alfa Romeo emblem, on the dashboard,
on the side trim or on a label placed next
to the airbag deployment area.
FRONT AIRBAGS
The front (driver and passenger) airbags
protect the front seat occupants in the
event of head-on crashes of medium-high
severity, by placing the cushion between
the occupant and the steering wheel or
dashboard.
Therefore non-activation of airbags in
other types of collisions (side impacts,
rear shunts, roll-overs, etc.) does not
indicate a system malfunction.
Driver and passenger front airbags are
not a replacement of but complementary
to the seat belts, which should always beworn, as specified by law in Europe and
most non-European countries.
In the event of impact, those not wearing
a seat belt are projected forwards and
may come into contact with the bag
which is still inflating. The protection
offered by the bag is compromised in
these circumstances.
Front airbags may not activate in the
following situations:
frontal impacts against highly
deformable objects not involving the
front surface of the vehicle (e.g. wing
collision against guard rail, etc.);
vehicle wedging under other vehicles
or protective barriers (e.g. trucks or
guard rails).
Failure to activate in the conditions
described above is due to the fact that
they may not provide any additional
protection compared with seat belts, so
their activation would be inappropriate.
In these cases, non-deployment does not
indicate a system malfunction.
Driver's side front airbag
This consists of an instantly inflating bag
contained in a special compartment in the
centre of the steering wheel fig. 93.
95
Page 98 of 204
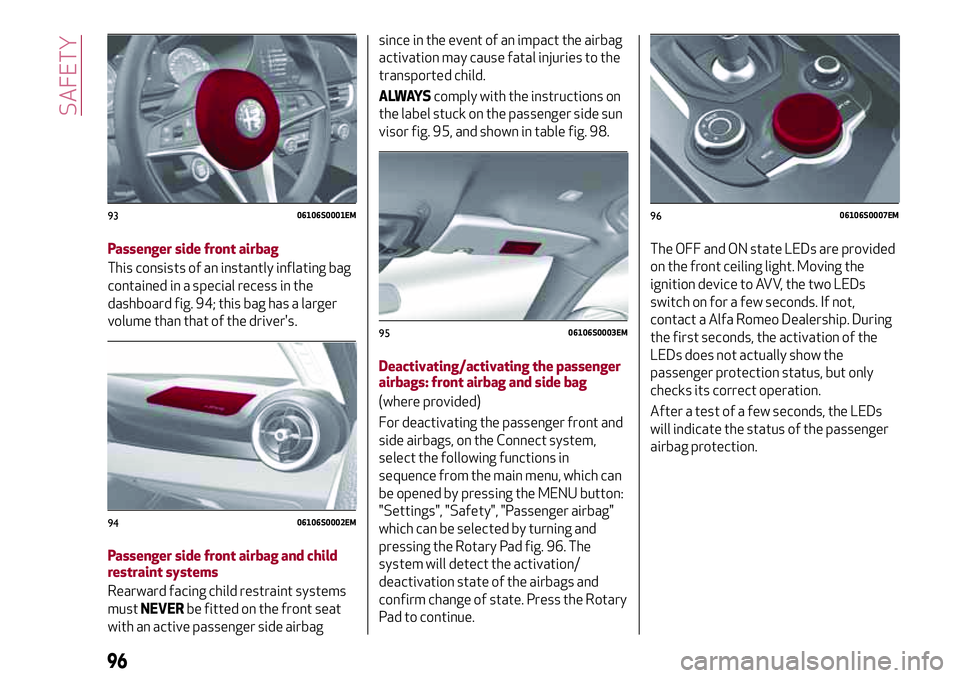
Passenger side front airbag
This consists of an instantly inflating bag
contained in a special recess in the
dashboard fig. 94; this bag has a larger
volume than that of the driver's.
Passenger side front airbag and child
restraint systems
Rearward facing child restraint systems
mustNEVERbe fitted on the front seat
with an active passenger side airbagsince in the event of an impact the airbag
activation may cause fatal injuries to the
transported child.
ALWAYScomply with the instructions on
the label stuck on the passenger side sun
visor fig. 95, and shown in table fig. 98.
Deactivating/activating the passenger
airbags: front airbag and side bag
(where provided)
For deactivating the passenger front and
side airbags, on the Connect system,
select the following functions in
sequence from the main menu, which can
be opened by pressing the MENU button:
"Settings", "Safety", "Passenger airbag"
which can be selected by turning and
pressing the Rotary Pad fig. 96. The
system will detect the activation/
deactivation state of the airbags and
confirm change of state. Press the Rotary
Pad to continue.The OFF and ON state LEDs are provided
on the front ceiling light. Moving the
ignition device to AVV, the two LEDs
switch on for a few seconds. If not,
contact a Alfa Romeo Dealership. During
the first seconds, the activation of the
LEDs does not actually show the
passenger protection status, but only
checks its correct operation.
After a test of a few seconds, the LEDs
will indicate the status of the passenger
airbag protection.
9306106S0001EM
9406106S0002EM
9506106S0003EM
9606106S0007EM
96
SAFETY
Page 101 of 204
SIDE AIRBAGS
To help increase occupants protection in
the event of side impact collisions, the
vehicle is equipped with front side bags
and window bags.
Side bag
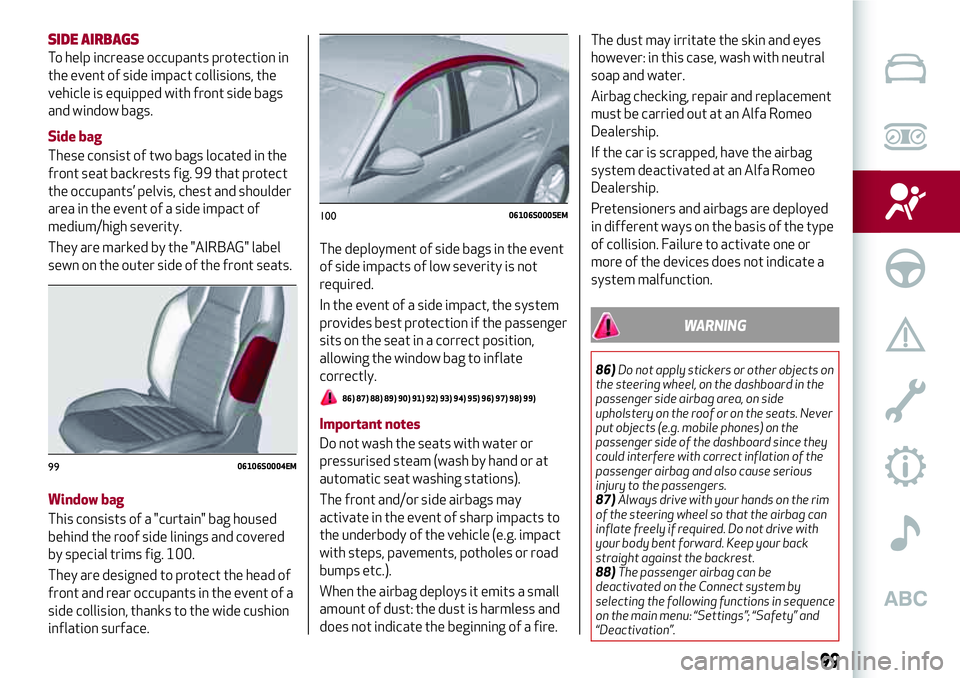
These consist of two bags located in the
front seat backrests fig. 99 that protect
the occupants’ pelvis, chest and shoulder
area in the event of a side impact of
medium/high severity.
They are marked by the "AIRBAG" label
sewn on the outer side of the front seats.
Window bag
This consists of a "curtain" bag housed
behind the roof side linings and covered
by special trims fig. 100.
They are designed to protect the head of
front and rear occupants in the event of a
side collision, thanks to the wide cushion
inflation surface.The deployment of side bags in the event
of side impacts of low severity is not
required.
In the event of a side impact, the system
provides best protection if the passenger
sits on the seat in a correct position,
allowing the window bag to inflate
correctly.
86) 87) 88) 89) 90) 91) 92) 93) 94) 95) 96) 97) 98) 99)
Important notes
Do not wash the seats with water or
pressurised steam (wash by hand or at
automatic seat washing stations).
The front and/or side airbags may
activate in the event of sharp impacts to
the underbody of the vehicle (e.g. impact
with steps, pavements, potholes or road
bumps etc.).
When the airbag deploys it emits a small
amount of dust: the dust is harmless and
does not indicate the beginning of a fire.The dust may irritate the skin and eyes
however: in this case, wash with neutral
soap and water.
Airbag checking, repair and replacement
must be carried out at an Alfa Romeo
Dealership.
If the car is scrapped, have the airbag
system deactivated at an Alfa Romeo
Dealership.
Pretensioners and airbags are deployed
in different ways on the basis of the type
of collision. Failure to activate one or
more of the devices does not indicate a
system malfunction.
WARNING
86)Do not apply stickers or other objects on
the steering wheel, on the dashboard in the
passenger side airbag area, on side
upholstery on the roof or on the seats. Never
put objects (e.g. mobile phones) on the
passenger side of the dashboard since they
could interfere with correct inflation of the
passenger airbag and also cause serious
injury to the passengers.
87)Always drive with your hands on the rim
of the steering wheel so that the airbag can
inflate freely if required. Do not drive with
your body bent forward. Keep your back
straight against the backrest.
88)The passenger airbag can be
deactivated on the Connect system by
selecting the following functions in sequence
on the main menu: “Settings”; “Safety” and
“Deactivation”.
9906106S0004EM
10006106S0005EM
99
Page 134 of 204
WARNING
122)Never replace a fuse with another with
a higher amp rating; DANGER OF FIRE.
123)Before replacing a fuse, make sure
that the ignition device is at STOP and that
all devices are switched off and/or
disconnected.
124)Contact an Alfa Romeo Dealership if a
safety system (airbags, brakes),
transmission system (engine, gearbox) or
steering system general protection fuse
blows.
125)If a fuse blows again, contact an Alfa
Romeo Dealership.
126)If a general protective fuse
(MAXI-FUSE, MEGA-FUSE, MIDI-FUSE)
blows, contact an Alfa Romeo Dealership.
IMPORTANT
50)Never replace a fuse with metal wires or
anything else.
51)If it is necessary to wash the engine
compartment, take care not to directly hit
the fuse box and the window wiper motors
with the water jet.
TIRE REPAIR KIT
DESCRIPTION
127) 128) 129) 130) 131) 132) 133) 134) 135)
52)
3)
The Tire Repair Kit is located in the boot,
inside a specific container.
To access the Tire Repair Kit, open the
boot, lift the load platform.
The Tire Repair Kit includes also:
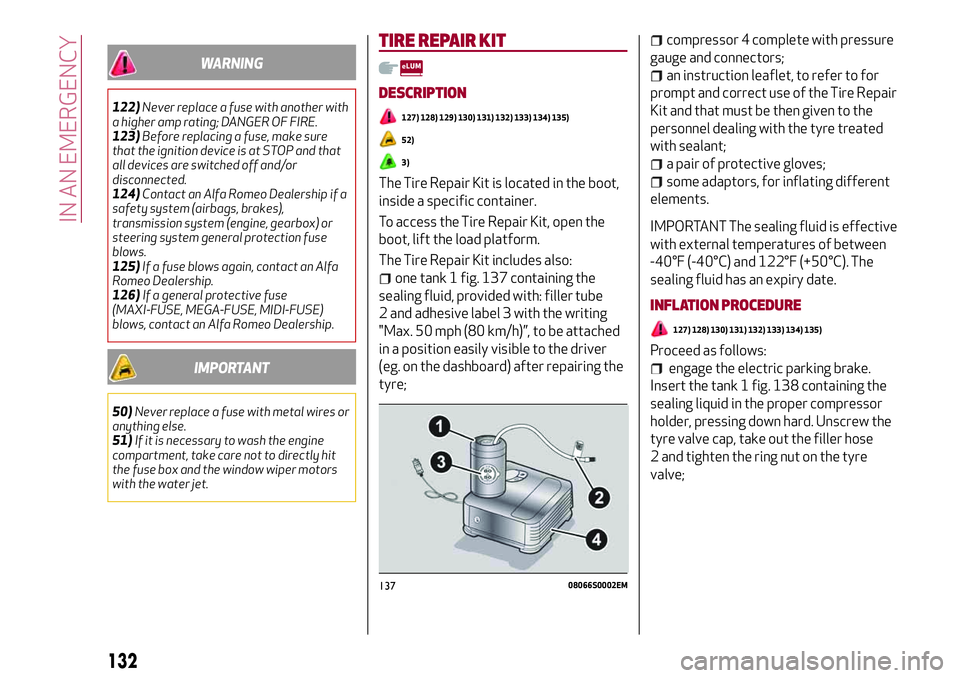
one tank 1 fig. 137 containing the
sealing fluid, provided with: filler tube
2 and adhesive label 3 with the writing
"Max. 50 mph (80 km/h)”, to be attached
in a position easily visible to the driver
(eg. on the dashboard) after repairing the
tyre;
compressor 4 complete with pressure
gauge and connectors;
an instruction leaflet, to refer to for
prompt and correct use of the Tire Repair
Kit and that must be then given to the
personnel dealing with the tyre treated
with sealant;
a pair of protective gloves;
some adaptors, for inflating different
elements.
IMPORTANT The sealing fluid is effective
with external temperatures of between
-40°F (-40°C) and 122°F (+50°C). The
sealing fluid has an expiry date.
INFLATION PROCEDURE
127) 128) 130) 131) 132) 133) 134) 135)
Proceed as follows:
engage the electric parking brake.
Insert the tank 1 fig. 138 containing the
sealing liquid in the proper compressor
holder, pressing down hard. Unscrew the
tyre valve cap, take out the filler hose
2 and tighten the ring nut on the tyre
valve;
13708066S0002EM
132
IN AN EMERGENCY
Page 160 of 204
IDENTIFICATION DATA
VEHICLE IDENTIFICATION NUMBER
The Vehicle Identification Number (VIN)
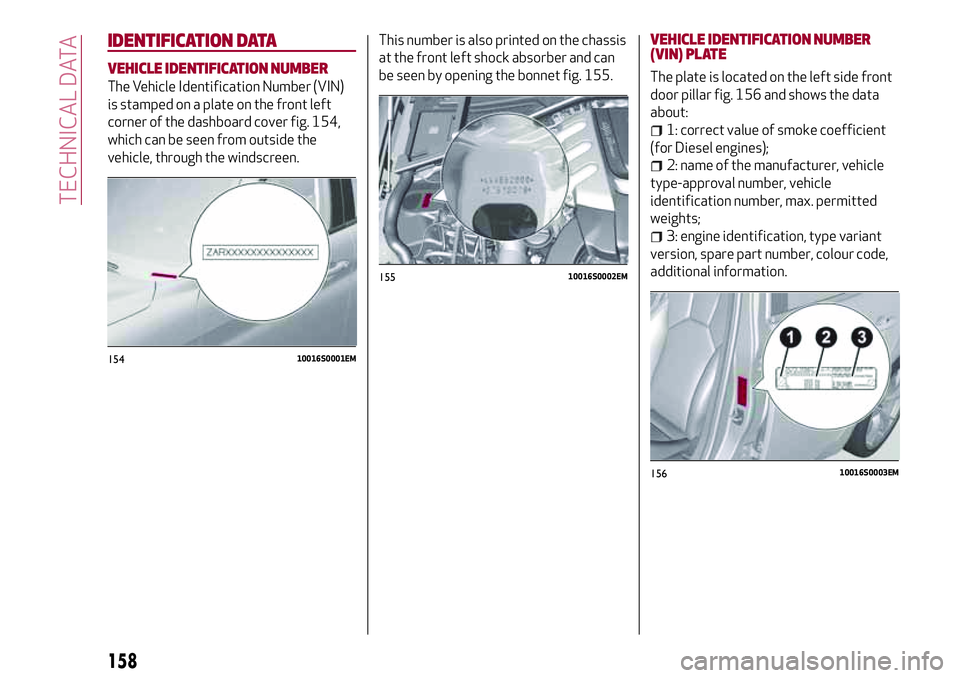
is stamped on a plate on the front left
corner of the dashboard cover fig. 154,
which can be seen from outside the
vehicle, through the windscreen.This number is also printed on the chassis
at the front left shock absorber and can
be seen by opening the bonnet fig. 155.
VEHICLE IDENTIFICATION NUMBER
(VIN) PLATE
The plate is located on the left side front
door pillar fig. 156 and shows the data
about:
1: correct value of smoke coefficient
(for Diesel engines);
2: name of the manufacturer, vehicle
type-approval number, vehicle
identification number, max. permitted
weights;
3: engine identification, type variant
version, spare part number, colour code,
additional information.
15410016S0001EM
15510016S0002EM
15610016S0003EM
158
TECHNICAL DATA