roof Alfa Romeo Giulia 2016 Owner's Manual
[x] Cancel search | Manufacturer: ALFA ROMEO, Model Year: 2016, Model line: Giulia, Model: Alfa Romeo Giulia 2016Pages: 204, PDF Size: 4.95 MB
Page 11 of 204
In-depth knowledge of your new vehicle starts here.
The handbook that you are reading simply and directly explains
how it is made and how it works.
That’s why we advise you to read it seated comfortably on board,
so that you can see immediately what is described here for
yourself.
KNOWING YOUR CAR
INSTRUMENT PANEL............................10
THEKEYS...................................11
IGNITION DEVICE..............................12
ENGINE IMMOBILIZER...........................13
ALARM SYSTEM ...............................14
DOORS.....................................14
SEATS.....................................18
HEADRESTS.................................21
STEERING WHEEL..............................22
REAR VIEW MIRRORS...........................23
EXTERNAL LIGHTS .............................24
INTERIOR LIGHTS..............................28
WINDSCREEN WIPER . ...........................28
CLIMATE CONTROL.............................30
WINDOW WINDERS.............................32
ELECTRIC SUNROOF............................33
BONNET....................................34
LUGGAGE COMPARTMENT........................35
Page 20 of 204
SEATS
FRONT SEATS WITH MANUAL
ADJUSTMENT
9)
4)
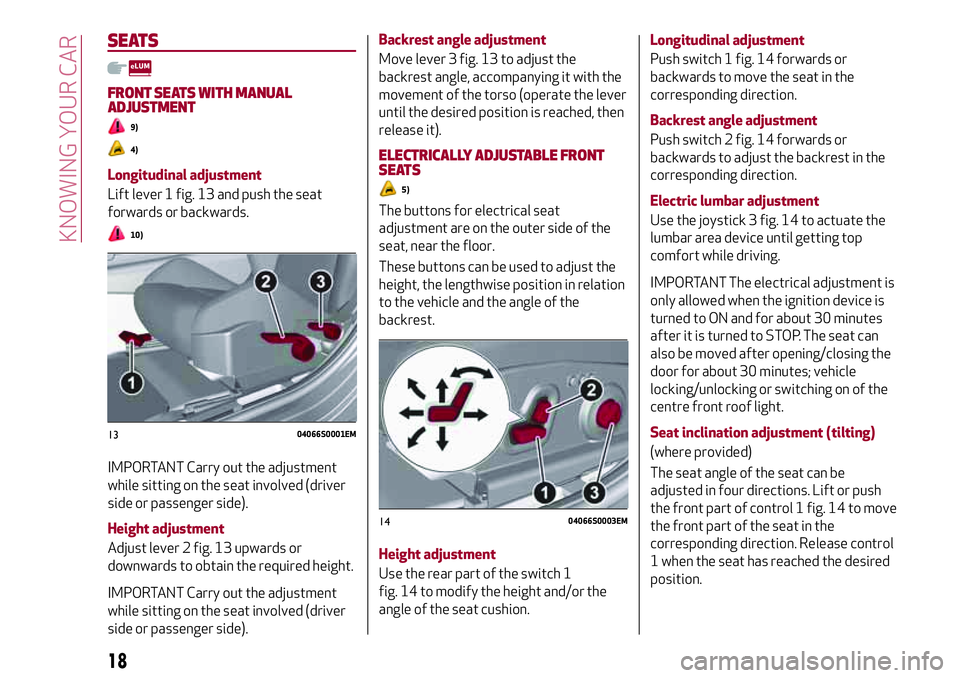
Longitudinal adjustment
Lift lever 1 fig. 13 and push the seat
forwards or backwards.
10)
IMPORTANT Carry out the adjustment
while sitting on the seat involved (driver
side or passenger side).
Height adjustment
Adjust lever 2 fig. 13 upwards or
downwards to obtain the required height.
IMPORTANT Carry out the adjustment
while sitting on the seat involved (driver
side or passenger side).
Backrest angle adjustment
Move lever 3 fig. 13 to adjust the
backrest angle, accompanying it with the
movement of the torso (operate the lever
until the desired position is reached, then
release it).
ELECTRICALLY ADJUSTABLE FRONT
SEATS
5)
The buttons for electrical seat
adjustment are on the outer side of the
seat, near the floor.
These buttons can be used to adjust the
height, the lengthwise position in relation
to the vehicle and the angle of the
backrest.
Height adjustment
Use the rear part of the switch 1
fig. 14 to modify the height and/or the
angle of the seat cushion.Longitudinal adjustment
Push switch 1 fig. 14 forwards or
backwards to move the seat in the
corresponding direction.
Backrest angle adjustment
Push switch 2 fig. 14 forwards or
backwards to adjust the backrest in the
corresponding direction.
Electric lumbar adjustment
Use the joystick 3 fig. 14 to actuate the
lumbar area device until getting top
comfort while driving.
IMPORTANT The electrical adjustment is
only allowed when the ignition device is
turned to ON and for about 30 minutes
after it is turned to STOP. The seat can
also be moved after opening/closing the
door for about 30 minutes; vehicle
locking/unlocking or switching on of the
centre front roof light.
Seat inclination adjustment (tilting)
(where provided)
The seat angle of the seat can be
adjusted in four directions. Lift or push
the front part of control 1 fig. 14 to move
the front part of the seat in the
corresponding direction. Release control
1 when the seat has reached the desired
position.1304066S0001EM
1404066S0003EM
18
KNOWING YOUR CAR
Page 35 of 204
WARNING
20)Incorrect use of the electric windows
may be dangerous. Before and during
operation, always check that nobody is
exposed to the risk of being injured either
directly by the moving window or through
objects getting caught or hit by it.
ELECTRIC SUNROOF
(where provided)
21)
The electric sunroof comprises two glass
panels (the front one is mobile and the
rear one fixed) and is fitted with two
electrically operated sun blinds.
Operation of the sunroof is only possible
with the ignition device at AVV.
OPENING
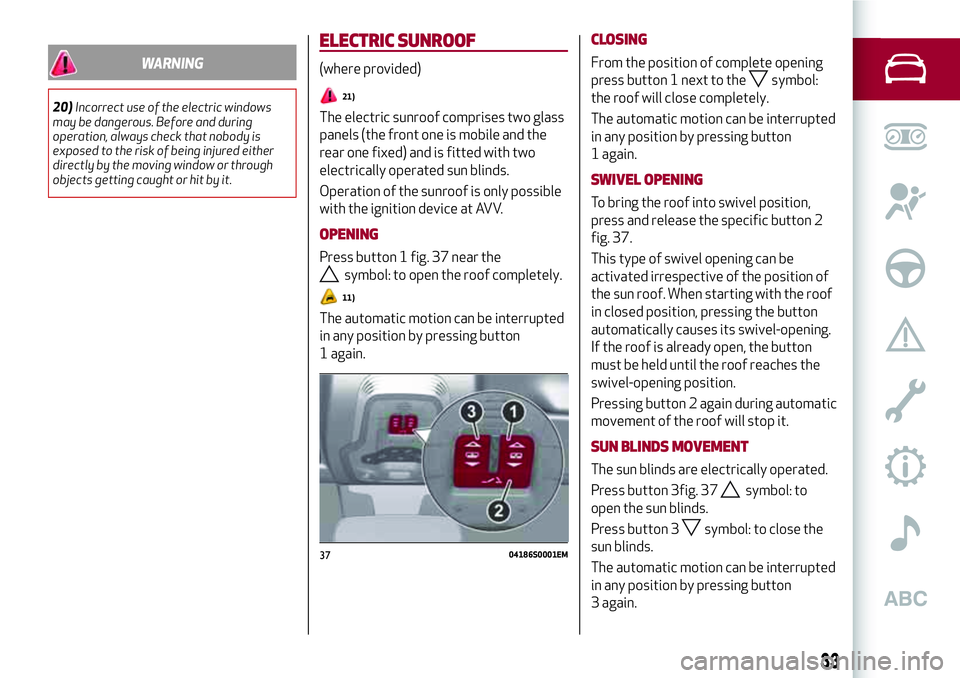
Press button 1 fig. 37 near the
symbol: to open the roof completely.
11)
The automatic motion can be interrupted
in any position by pressing button
1 again.
CLOSING
From the position of complete opening
press button 1 next to the
symbol:
the roof will close completely.
The automatic motion can be interrupted
in any position by pressing button
1 again.
SWIVEL OPENING
To bring the roof into swivel position,
press and release the specific button 2
fig. 37.
This type of swivel opening can be
activated irrespective of the position of
the sun roof. When starting with the roof
in closed position, pressing the button
automatically causes its swivel-opening.
If the roof is already open, the button
must be held until the roof reaches the
swivel-opening position.
Pressing button 2 again during automatic
movement of the roof will stop it.
SUN BLINDS MOVEMENT
The sun blinds are electrically operated.
Press button 3fig. 37
symbol: to
open the sun blinds.
Press button 3
symbol: to close the
sun blinds.
The automatic motion can be interrupted
in any position by pressing button
3 again.
3704186S0001EM
33
Page 36 of 204
ANTI-PINCH SAFETY DEVICE
The sun roof has an anti-pinch safety
system capable of detecting the
presence of an obstacle during the
closing movement: if this happens, the
system intervenes and the movement of
the roof is immediately reversed into
opening.
INITIALISATION PROCEDURE
Automatic operation of the sunroof must
be initialised again in case of faulty
sunroof operation.
Proceed as follows:
press button 1 next to thesymbol
to bring the roof into completely closed
position;
bring the ignition device to STOP and
wait at least 10 seconds;
set the ignition device to AVV;
hold button 1 down for at least
10 seconds, then you should hear the
mechanical stop of the roof motor;
within 5 seconds hold button 1 down:
the roof will perform a complete
automatic opening and closing cycle (to
indicate that the initialisation procedure
has been successful). If this does not
occur, the procedure must be restarted
from the beginning.
WARNING
21)When leaving the vehicle, make sure to
take the key with you to avoid the risk of
injury to those still inside the car due to
accidental operation of the sunroof.
Improper use of the roof can be dangerous.
Before and during operation, always check
that no-one is exposed to the risk of being
injured by the moving sunroof or by objects
getting caught or hit by it.
IMPORTANT
11)Do not open the sun roof if a roof rack or
crossbars are fitted. Do not open the sun
roof if there is snow or ice on it: you may
damage it.
BONNET
OPENING
22) 23)
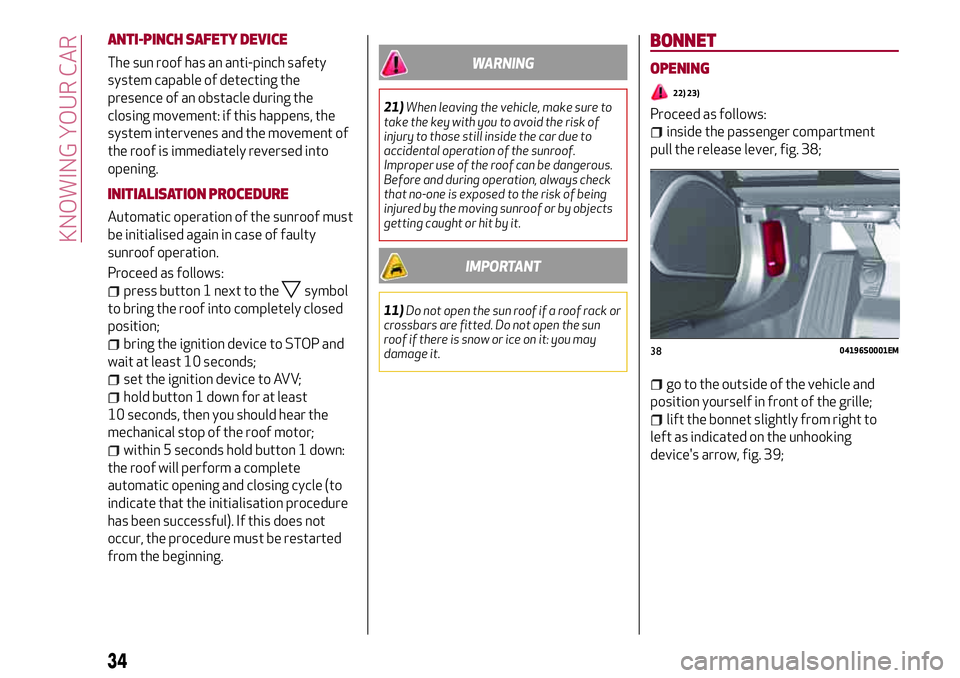
Proceed as follows:
inside the passenger compartment
pull the release lever, fig. 38;
go to the outside of the vehicle and
position yourself in front of the grille;
lift the bonnet slightly from right to
left as indicated on the unhooking
device's arrow, fig. 39;
3804196S0001EM
34
KNOWING YOUR CAR
Page 101 of 204
SIDE AIRBAGS
To help increase occupants protection in
the event of side impact collisions, the
vehicle is equipped with front side bags
and window bags.
Side bag
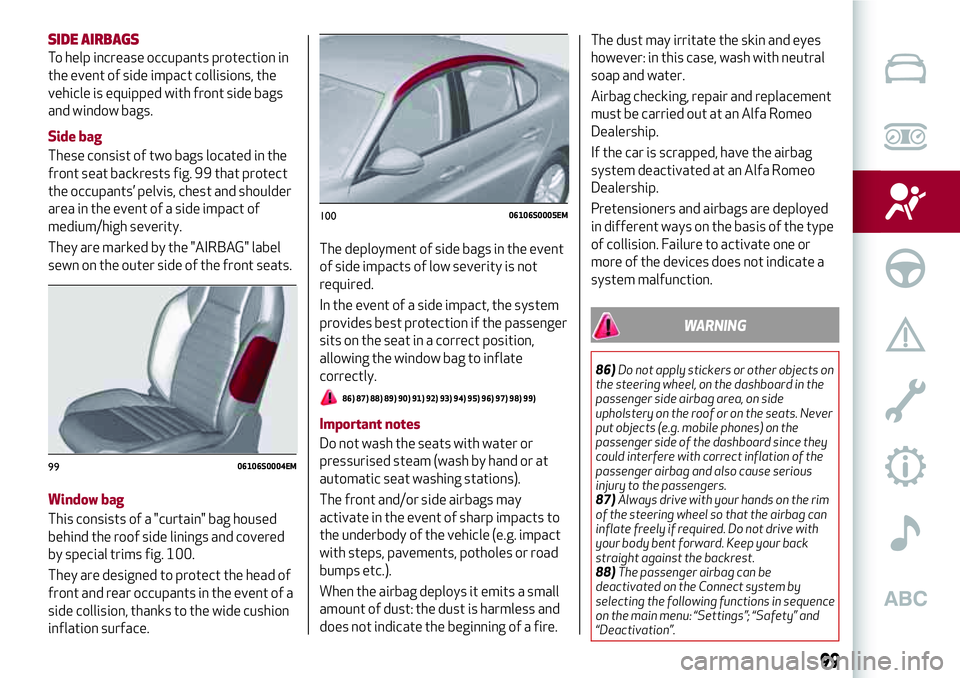
These consist of two bags located in the
front seat backrests fig. 99 that protect
the occupants’ pelvis, chest and shoulder
area in the event of a side impact of
medium/high severity.
They are marked by the "AIRBAG" label
sewn on the outer side of the front seats.
Window bag
This consists of a "curtain" bag housed
behind the roof side linings and covered
by special trims fig. 100.
They are designed to protect the head of
front and rear occupants in the event of a
side collision, thanks to the wide cushion
inflation surface.The deployment of side bags in the event
of side impacts of low severity is not
required.
In the event of a side impact, the system
provides best protection if the passenger
sits on the seat in a correct position,
allowing the window bag to inflate
correctly.
86) 87) 88) 89) 90) 91) 92) 93) 94) 95) 96) 97) 98) 99)
Important notes
Do not wash the seats with water or
pressurised steam (wash by hand or at
automatic seat washing stations).
The front and/or side airbags may
activate in the event of sharp impacts to
the underbody of the vehicle (e.g. impact
with steps, pavements, potholes or road
bumps etc.).
When the airbag deploys it emits a small
amount of dust: the dust is harmless and
does not indicate the beginning of a fire.The dust may irritate the skin and eyes
however: in this case, wash with neutral
soap and water.
Airbag checking, repair and replacement
must be carried out at an Alfa Romeo
Dealership.
If the car is scrapped, have the airbag
system deactivated at an Alfa Romeo
Dealership.
Pretensioners and airbags are deployed
in different ways on the basis of the type
of collision. Failure to activate one or
more of the devices does not indicate a
system malfunction.
WARNING
86)Do not apply stickers or other objects on
the steering wheel, on the dashboard in the
passenger side airbag area, on side
upholstery on the roof or on the seats. Never
put objects (e.g. mobile phones) on the
passenger side of the dashboard since they
could interfere with correct inflation of the
passenger airbag and also cause serious
injury to the passengers.
87)Always drive with your hands on the rim
of the steering wheel so that the airbag can
inflate freely if required. Do not drive with
your body bent forward. Keep your back
straight against the backrest.
88)The passenger airbag can be
deactivated on the Connect system by
selecting the following functions in sequence
on the main menu: “Settings”; “Safety” and
“Deactivation”.
9906106S0004EM
10006106S0005EM
99
Page 118 of 204
LANE DEPARTURE WARNING
(LDW) SYSTEM
DESCRIPTION
41) 42) 43) 44) 45) 46)
The Lane Departure Warning system
makes use of a camera located on the
windscreen to detect the lane limits and
calculate the position of the vehicle
within such limits, in order to make sure
that it remains inside the lane.
When one or both lane limits are
detected and the vehicle passes over one
without the driver's say-so (direction
indicator not turned on), the system
emits an acoustic signal.
If the vehicle continues to go beyond the
line of the lane without any intervention
from the driver, the surpassed line will
light up on the display (left or right) to
urge the driver to bring the vehicle back
into the limits of the lane.
SYSTEM ACTIVATION/DEACTIVATION
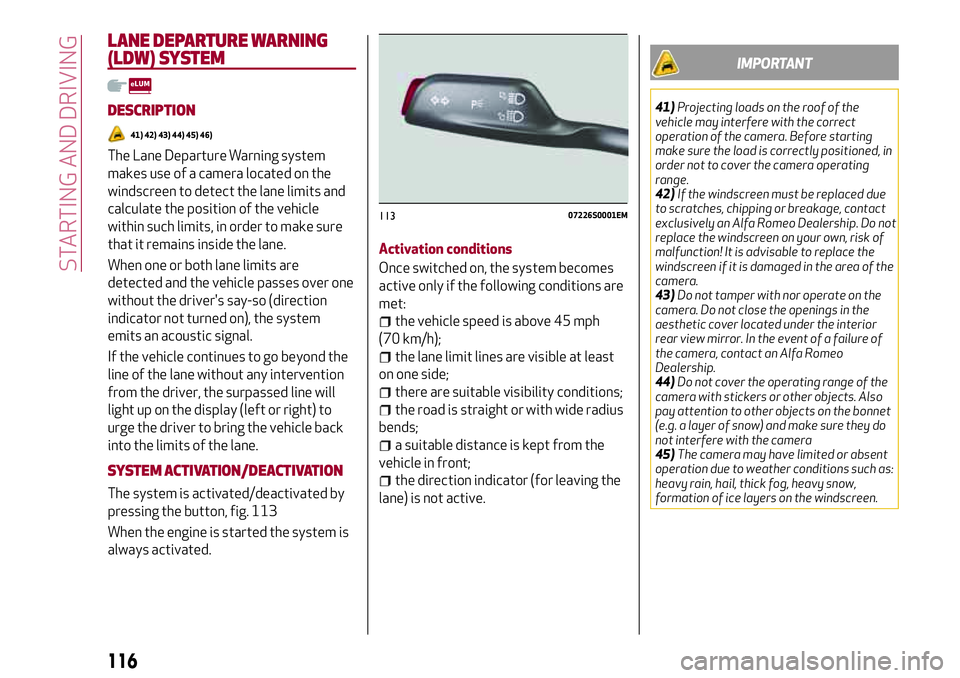
The system is activated/deactivated by
pressing the button, fig. 113
When the engine is started the system is
always activated.Activation conditions
Once switched on, the system becomes
active only if the following conditions are
met:
the vehicle speed is above 45 mph
(70 km/h);
the lane limit lines are visible at least
on one side;
there are suitable visibility conditions;
the road is straight or with wide radius
bends;
a suitable distance is kept from the
vehicle in front;
the direction indicator (for leaving the
lane) is not active.
IMPORTANT
41)Projecting loads on the roof of the
vehicle may interfere with the correct
operation of the camera. Before starting
make sure the load is correctly positioned, in
order not to cover the camera operating
range.
42)If the windscreen must be replaced due
to scratches, chipping or breakage, contact
exclusively an Alfa Romeo Dealership. Do not
replace the windscreen on your own, risk of
malfunction! It is advisable to replace the
windscreen if it is damaged in the area of the
camera.
43)Do not tamper with nor operate on the
camera. Do not close the openings in the
aesthetic cover located under the interior
rear view mirror. In the event of a failure of
the camera, contact an Alfa Romeo
Dealership.
44)Do not cover the operating range of the
camera with stickers or other objects. Also
pay attention to other objects on the bonnet
(e.g. a layer of snow) and make sure they do
not interfere with the camera
45)The camera may have limited or absent
operation due to weather conditions such as:
heavy rain, hail, thick fog, heavy snow,
formation of ice layers on the windscreen.
11307226S0001EM
116
STARTING AND DRIVING
Page 149 of 204
ENGINE OIL
144)
56)
The engine oil level can be seen on the
instrument panel display every time the
engine is started, or on the Connect
system display by activating on the main
menu (MENU button) the following
functions in sequence: “Apps”; “My Car”
and “Oil Level”.
The oil level can also be checked
manually.
Manual gearbox: checking oil level
2.2 JTD Engine
Have this operation performed at an Alfa
Romeo Dealership.
Engine oil consumption
57)
4)
The maximum engine oil consumption is
usually 0.55 pounds (250 grams) every
620 mi (1,000 km). When the vehicle is
new, the engine needs to be run in;
therefore the engine oil consumption can
only be considered stabilised after the
first 3,100 - 3,730 mi (5,000 -
6,000 km).
ENGINE COOLANT FLUID
145)
58)
If the level is too low, unscrew the cap of
reservoir 2 and add the fluid described in
the "Technical Specifications" chapter.
WASHER FLUID FOR WINDSCREEN/
HEADLIGHTS
146) 147)
The windscreen and headlights washer
fluid reservoir (where available) is
equipped with a telescopic filler.
If the level is too low, remove reservoir
cap 4 and lift the filler then add the fluid
described in the "Technical
Specifications" chapter.
IMPORTANT The headlight washing
system will not work if the liquid level is
low (situation indicated by the symbol on
the instrument panel display). The
windscreen washer will keep working. On
vehicles equipped with headlight
washers, Where provided, there is a
reference notch on the dipstick: ONLY
the windscreen/rear window washer
operates with the level below this
reference.
BRAKE FLUID
Check that the fluid is at the max. level. If
the liquid level in the tank is insufficient,
contact an Alfa Romeo Dealership to
have the system checked.
AUTOMATIC TRANSMISSION
ACTIVATIONSYSTEM OIL
4)
The transmission control oil level should
only be checked at an Alfa Romeo
Dealership.
USEFUL ADVICE FOR EXTENDING THE
LIFE OF YOUR BATTERY
Useful advice for extending the life of
your battery
To avoid draining your battery and make
it last longer, observe the following
instructions:
when you park the car, ensure that the
doors, tailgate and bonnet are closed
properly, to prevent any lights from
remaining on inside the passenger's
compartment;
switch off all roof lights inside the car:
the car is however equipped with a
system which switches all internal lights
off automatically;
do not keep accessories (e.g. radio,
hazard warning lights, etc.) switched on
for a long time when the engine is not
running;
before performing any operation on
the electrical system, disconnect the
negative battery cable.
If, after purchasing the car, you wish to
install electrical accessories which
require permanent electrical supply (e.g.
alarm, etc.) or accessories which
147
Page 172 of 204
FUEL CONSUMPTION
FUEL CONSUMPTION
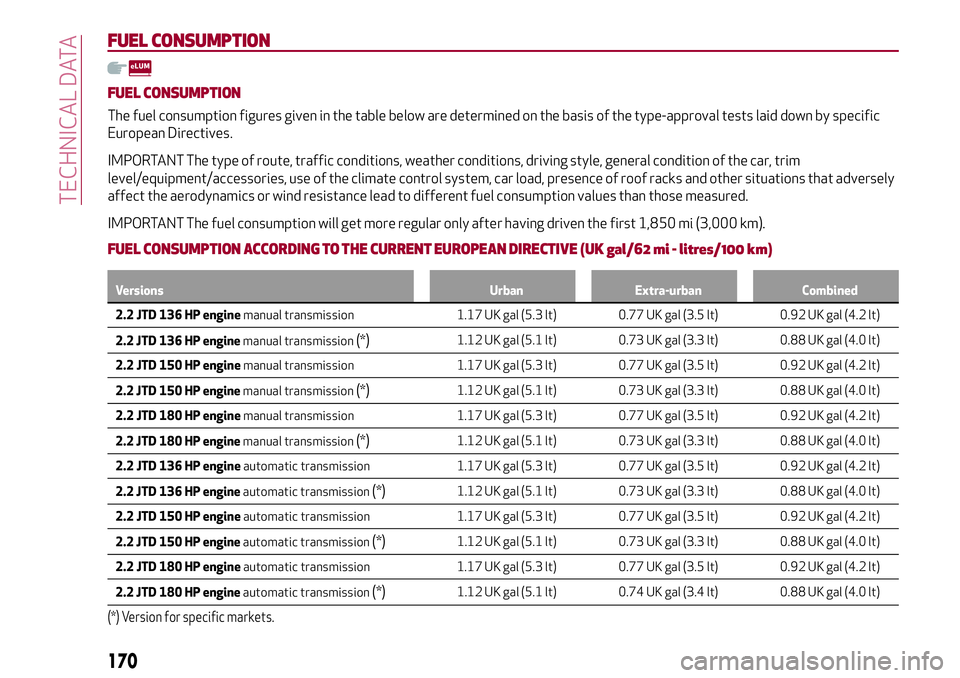
The fuel consumption figures given in the table below are determined on the basis of the type-approval tests laid down by specific
European Directives.
IMPORTANT The type of route, traffic conditions, weather conditions, driving style, general condition of the car, trim
level/equipment/accessories, use of the climate control system, car load, presence of roof racks and other situations that adversely
affect the aerodynamics or wind resistance lead to different fuel consumption values than those measured.
IMPORTANT The fuel consumption will get more regular only after having driven the first 1,850 mi (3,000 km).
FUEL CONSUMPTION ACCORDING TO THE CURRENT EUROPEAN DIRECTIVE (UK gal/62 mi - litres/100 km)
Versions Urban Extra-urban Combined
2.2 JTD 136 HP enginemanual transmission 1.17 UK gal (5.3 lt) 0.77 UK gal (3.5 lt) 0.92 UK gal (4.2 lt)
2.2 JTD 136 HP enginemanual transmission
(*)1.12 UK gal (5.1 lt) 0.73 UK gal (3.3 lt) 0.88 UK gal (4.0 lt)
2.2 JTD 150 HP enginemanual transmission 1.17 UK gal (5.3 lt) 0.77 UK gal (3.5 lt) 0.92 UK gal (4.2 lt)
2.2 JTD 150 HP enginemanual transmission
(*)1.12 UK gal (5.1 lt) 0.73 UK gal (3.3 lt) 0.88 UK gal (4.0 lt)
2.2 JTD 180 HP enginemanual transmission 1.17 UK gal (5.3 lt) 0.77 UK gal (3.5 lt) 0.92 UK gal (4.2 lt)
2.2 JTD 180 HP enginemanual transmission
(*)1.12 UK gal (5.1 lt) 0.73 UK gal (3.3 lt) 0.88 UK gal (4.0 lt)
2.2 JTD 136 HP engineautomatic transmission 1.17 UK gal (5.3 lt) 0.77 UK gal (3.5 lt) 0.92 UK gal (4.2 lt)
2.2 JTD 136 HP engineautomatic transmission
(*)1.12 UK gal (5.1 lt) 0.73 UK gal (3.3 lt) 0.88 UK gal (4.0 lt)
2.2 JTD 150 HP engineautomatic transmission 1.17 UK gal (5.3 lt) 0.77 UK gal (3.5 lt) 0.92 UK gal (4.2 lt)
2.2 JTD 150 HP engineautomatic transmission
(*)1.12 UK gal (5.1 lt) 0.73 UK gal (3.3 lt) 0.88 UK gal (4.0 lt)
2.2 JTD 180 HP engineautomatic transmission 1.17 UK gal (5.3 lt) 0.77 UK gal (3.5 lt) 0.92 UK gal (4.2 lt)
2.2 JTD 180 HP engineautomatic transmission
(*)1.12 UK gal (5.1 lt) 0.74 UK gal (3.4 lt) 0.88 UK gal (4.0 lt)
(*) Version for specific markets.
170
TECHNICAL DATA
Page 199 of 204
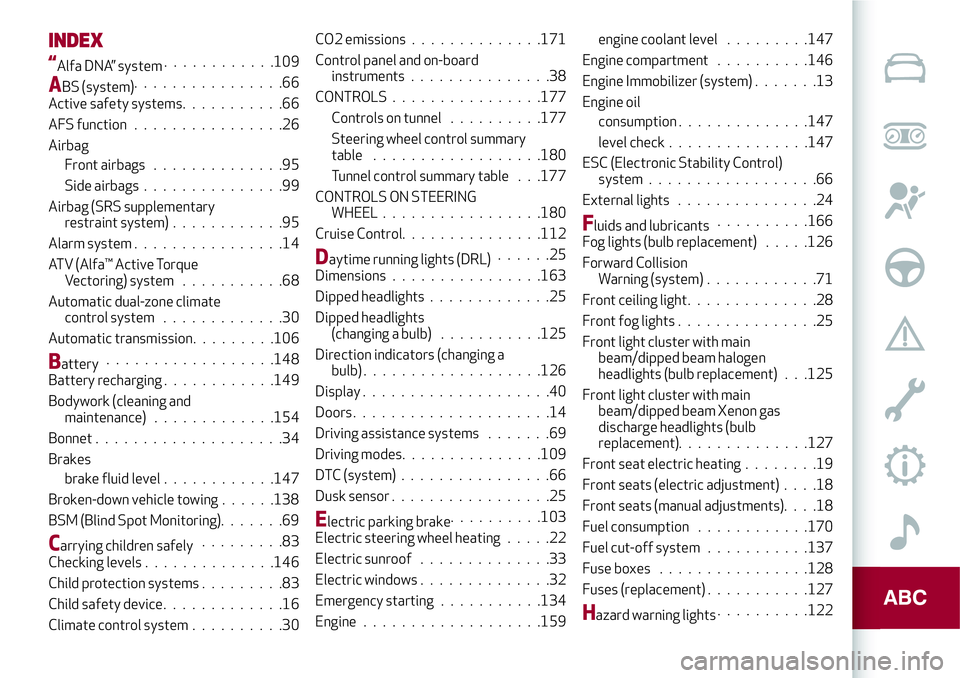
INDEX
“Alfa DNA” system............109
ABS (system)................66
Active safety systems...........66
AFS function................26
Airbag
Front airbags..............95
Side airbags...............99
Airbag (SRS supplementary
restraint system)............95
Alarm system................14
ATV (Alfa™ Active Torque
Vectoring) system...........68
Automatic dual-zone climate
control system.............30
Automatic transmission.........106
Battery..................148
Battery recharging............149
Bodywork (cleaning and
maintenance).............154
Bonnet . ...................34
Brakes
brake fluid level............147
Broken-down vehicle towing......138
BSM (Blind Spot Monitoring).......69
Carrying children safely.........83
Checking levels..............146
Child protection systems.........83
Child safety device.............16
Climate control system..........30CO2 emissions..............171
Control panel and on-board
instruments...............38
CONTROLS................177
Controls on tunnel..........177
Steering wheel control summary
table..................180
Tunnel control summary table . . .177
CONTROLS ON STEERING
WHEEL.................180
Cruise Control...............112
Daytime running lights (DRL)......25
Dimensions................163
Dipped headlights.............25
Dipped headlights
(changing a bulb)...........125
Direction indicators (changing a
bulb)...................126
Display....................40
Doors.....................14
Driving assistance systems.......69
Driving modes...............109
DTC (system)................66
Dusk sensor.................25
Electric parking brake..........103
Electric steering wheel heating.....22
Electric sunroof..............33
Electric windows..............32
Emergency starting...........134
Engine...................159engine coolant level .........147
Engine compartment..........146
Engine Immobilizer (system).......13
Engine oil
consumption . .............147
level check...............147
ESC (Electronic Stability Control)
system..................66
External lights...............24
Fluids and lubricants..........166
Fog lights (bulb replacement).....126
Forward Collision
Warning (system) . . ..........71
Front ceiling light..............28
Front fog lights . . .............25
Front light cluster with main
beam/dipped beam halogen
headlights (bulb replacement) . . .125
Front light cluster with main
beam/dipped beam Xenon gas
discharge headlights (bulb
replacement). .............127
Front seat electric heating........19
Front seats (electric adjustment)....18
Front seats (manual adjustments)....18
Fuel consumption............170
Fuel cut-off system...........137
Fuse boxes................128
Fuses (replacement)...........127
Hazard warning lights..........122