towing Alfa Romeo Giulia 2016 Owner's Manual
[x] Cancel search | Manufacturer: ALFA ROMEO, Model Year: 2016, Model line: Giulia, Model: Alfa Romeo Giulia 2016Pages: 204, PDF Size: 4.95 MB
Page 80 of 204
24)Do not tamper with nor carry out any
intervention on the radar sensor or on the
camera on the windscreen. In the event of a
sensor failure, contact an Alfa Romeo
Dealership.
25)Do not wash with high-pressure jets in
the bumper lower area: in particular do not
operate on the system's electrical connector.
26)Be careful in the case of repairs and new
paintings in the area around the sensor
(panel covering the sensor on the left side of
the bumper). In the event of a frontal impact
the sensor may automatically deactivate
and display a warning to indicate that the
sensor needs to be repaired. Even without a
malfunction warning, deactivate the system
operation if you think that the position of the
radar sensor has changed (e.g. due to
low-speed frontal impact as during parking
manoeuvres). In these cases, go to an Alfa
Romeo Dealership to have the radar sensor
realigned or replaced.
27)When towing a trailer, a vehicle or during
loading manoeuvres on a vehicle transporter
(or in vehicle for transport), the system must
be deactivated via the Connect system.
28)The Tire Repair Kit, provided with the
vehicle, is compatible with the TPMS
sensors. Using sealants different from that
in the original kit may compromise its
operation. If sealants not equivalent with the
original ones are used, it is recommended to
have the TPMS sensor operation checked by
a qualified repair centre.OCCUPANT PROTECTION
SYSTEMS
Some of the most important safety
equipment of the vehicle comprise the
following protection systems:
seat belts;
SBA (Seat Belt Alert) System;
head restraints;
child restraint systems;
Front airbags and side bags.
Read the information given the following
pages with the utmost care. It is of
fundamental importance that the
protection systems are used in the
correct way to guarantee the maximum
possible safety level for the driver and
the passengers.
For the description of the head restraint
adjustment see the "Head restraints"
paragraph in the "Knowing your vehicle"
chapter.
SEAT BELTS
All the seatbelts have three anchoring
points each with its own retractor.
The retractor mechanism operates
locking the belt in the event of sharp
braking or strong deceleration due to an
impact. This allows the belt strap to slide
freely and to adapt to the body of the
occupant. In the event of an accident, the
belt will lock reducing the risk of impact
inside the passenger compartment and
of being projected outside the vehicle.
The driver is responsible for respecting,
and ensuring that all the other occupants
of the vehicle also respect, the local laws
in force in relation to the use of the seat
belts.
Always fasten the seat belts before
setting off.
USING THE SEAT BELTS
The seat belt should be worn keeping the
chest straight and rested against the
backrest.
To fasten the seat belts, hold the tongue
1 fig. 76 and insert it into the buckle 2,
until it clicks into place.
78
SAFETY
Page 104 of 204
STARTING THE ENGINE
STARTING THE ENGINE
Before starting the engine, adjust the
seat, the interior rear view mirrors, the
door mirrors and fasten the seat belt
correctly.
Never press the accelerator pedal for
starting the engine.
If necessary, messages indicating the
starting procedure can be shown on the
display.
100) 101) 102)
30) 31) 32)
Versions with manual gearbox
Proceed as follows:
engage the parking brake and set the
gear in neutral, on diesel versions turn the
ignition switch to ON, the
symbol will
appear on the instrument panel: wait until
it goes off;
fully depress the clutch pedal, without
touching the accelerator;
briefly press the ignition button;
if the engine doesn't start within a few
seconds, you need to repeat the procedure.
if the problem persists, contact an Alfa
Romeo Dealership.Versions with automatic transmission
Proceed as follows:
engage the electric parking brake and
set the gear lever to P (Park) or N
(Neutral),
fully depress the brake pedal without
touching the accelerator;
briefly press the ignition button;
if the engine doesn't start within a few
seconds, you need to repeat the procedure.
if the problem persists, contact an Alfa
Romeo Dealership.
ENGINE STARTING FAILURE
Starting the engine with electronic key
battery (Keyless Start) run down or flat
If the ignition device does not respond
when the relevant button is pressed the
electronic key battery might be run down
or flat. Therefore, the system does not
detect the presence of the electronic key
on board the vehicle and displays a
dedicated message.
STOPPING THE ENGINE
33)
To stop the engine, proceed as follows:
park the vehicle in a position that is not
dangerous for oncoming traffic;
engage a gear (versions with manual
gearbox) or select P (Park) mode
(versions with automatic transmission);
with engine idling, press the start
button.Vehicles with electronic key (Keyless
Start)
If the vehicle speed is above 5 mph
(8 km/h), it is still possible to switch off
the engine by selecting an operating
mode other than P (Park). To switch off
the engine in this situation, hold down the
ignition device button for a while or press
it 3 times in a row within a few seconds.
WARNING
100)It is dangerous to run the engine in
enclosed areas. The engine takes in oxygen
and releases carbon dioxide, carbon
monoxide and other toxic gases.
101)The electro-hydraulic braking system
is not active until the engine starts running.
So, the brake pedal travel will be longer than
normal. This does not indicate a fault.
102)Do not start the engine by pushing,
towing or driving downhill. These
manoeuvres may damage the catalytic
converter.
IMPORTANT
30)We recommend that during the initial
period, or during the first 1600 km
(1000 miles), you do not drive to full car
performance (e.g. excessive acceleration,
long journeys at top speed, sharp braking,
etc.).
102
STARTING AND DRIVING
Page 109 of 204
It is not possible to select N (Neutral)
mode from P (Park) mode.
P (Park) mode is automatically activated
if the following conditions are met
simultaneously:
D (Drive) or R (Reverse) mode is active;
the car’s speed is close to 0;
the brake pedal is released;
the driver’s seat belt is not fastened;
the driver’s door is open.
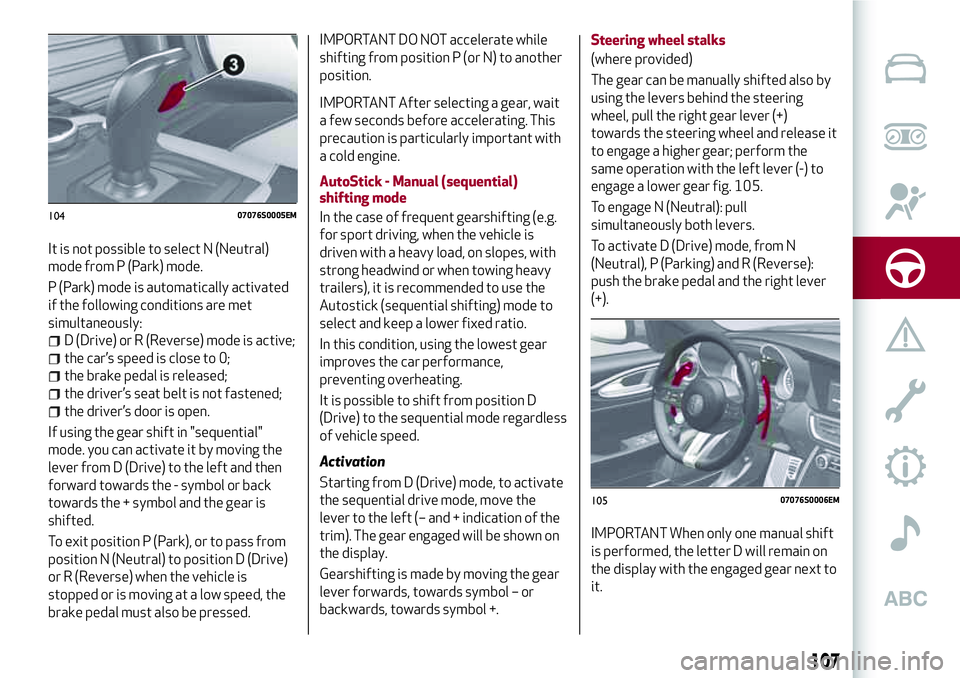
If using the gear shift in "sequential"
mode. you can activate it by moving the
lever from D (Drive) to the left and then
forward towards the - symbol or back
towards the + symbol and the gear is
shifted.
To exit position P (Park), or to pass from
position N (Neutral) to position D (Drive)
or R (Reverse) when the vehicle is
stopped or is moving at a low speed, the
brake pedal must also be pressed.
IMPORTANT DO NOT accelerate while
shifting from position P (or N) to another
position.
IMPORTANT After selecting a gear, wait
a few seconds before accelerating. This
precaution is particularly important with
a cold engine.
AutoStick - Manual (sequential)
shifting mode
In the case of frequent gearshifting (e.g.
for sport driving, when the vehicle is
driven with a heavy load, on slopes, with
strong headwind or when towing heavy
trailers), it is recommended to use the
Autostick (sequential shifting) mode to
select and keep a lower fixed ratio.
In this condition, using the lowest gear
improves the car performance,
preventing overheating.
It is possible to shift from position D
(Drive) to the sequential mode regardless
of vehicle speed.
Activation
Starting from D (Drive) mode, to activate
the sequential drive mode, move the
lever to the left (– and + indication of the
trim). The gear engaged will be shown on
the display.
Gearshifting is made by moving the gear
lever forwards, towards symbol – or
backwards, towards symbol +.Steering wheel stalks
(where provided)
The gear can be manually shifted also by
using the levers behind the steering
wheel, pull the right gear lever (+)
towards the steering wheel and release it
to engage a higher gear; perform the
same operation with the left lever (-) to
engage a lower gear fig. 105.
To engage N (Neutral): pull
simultaneously both levers.
To activate D (Drive) mode, from N
(Neutral), P (Parking) and R (Reverse):
push the brake pedal and the right lever
(+).
IMPORTANT When only one manual shift
is performed, the letter D will remain on
the display with the engaged gear next to
it.
10407076S0005EM
10507076S0006EM
107
Page 117 of 204
presence of: ice, snow, mud, thick paint,
on the surface of the sensor;
the sensor may detect a non-existent
obstacle ("echo interference") due to
mechanical interference, for example
when washing the vehicle, in rain (strong
wind), hail;
the signals sent by the sensor can also
be altered by the presence of ultrasonic
systems (e.g. pneumatic brake systems
of trucks or pneumatic drills) near the
vehicle;
parking assistance system
performance can also be influenced by
the position of the sensors, for example
due to a change in the ride setting
(caused by wear to the shock absorbers,
suspension), or by changing tyres,
overloading the vehicle or carrying out
specific tuning operations that require
the vehicle to be lowered;
the presence of a tow hook without
trailer, which may interfere with the
correct operation of the parking sensors.
Before using the Park Sensors system, it
is recommended to remove the
removable tow hook ball assembly and
the relevant attachment from the vehicle
when the latter is not used for towing
operations. Failure to comply with this
prescription may cause personal injuries
or damage to vehicles or obstacles since,
when the continuous acoustic signal is
emitted, the tow hook ball is already in aposition that is much closer to the
obstacle than the rear bumper. If you
wish to leave the tow hook fitted without
towing a trailer, it is advisable to contact
an Alfa Romeo Dealership for the Park
Sensors system update operations
because the tow hook could be detected
as an obstacle by the central sensors.
the presence of adhesives on the
sensors. Therefore, take care not to place
adhesives on the sensors.
WARNING
114)Parking and other potentially
dangerous manoeuvres are, however,
always the driver’s responsibility. When
performing these operations, always make
sure that there are no other people
(especially children) or animals on the route
you want to take. The parking sensors are an
aid for the driver, but the driver must never
allow their attention to lapse during
potentially dangerous manoeuvres, even
those executed at low speeds.
IMPORTANT
38)The sensors must be clean of mud, dirt,
snow or ice in order for the system to
operate correctly. Be careful not to scratch
or damage the sensors while cleaning them.
Avoid using dry, rough or hard cloths. The
sensors should be washed using clean water
with the addition of car shampoo if
necessary. When using special washing
equipment such as high pressure jets or
steam cleaning, clean the sensors very
quickly keeping the jet more than 10 cm
away.
39)Have interventions on the bumper in the
area of the sensors carried out only by an
Alfa Romeo Dealership. Interventions on the
bumper that are not carried out properly
may compromise the operation of the
parking sensors.
40)Only have the bumpers repainted or any
retouches to the paintwork in the area of the
sensors carried out by an Alfa Romeo
Dealership. Incorrect paint application could
affect the operation of the parking sensors.
115
Page 123 of 204
A punctured tyre or a burnt-out bulb?
At times, a problem may interfere with our journey.
The pages on emergencies can help you to deal with critical
situations independently and with calm.
In an emergency we recommend that you call the freephone
number found in the Warranty Booklet.
It is also possible to call the national or international universal
freephone number to search for the nearest Alfa Romeo
Dealership.
IN AN EMERGENCY
HAZARD WARNING LIGHTS.......................122
REPLACING A BULB............................122
REPLACING FUSES . ...........................127
TIRE REPAIR KIT . .............................132
EMERGENCY STARTING.........................134
FUEL CUT-OFF SYSTEM.........................137
BROKEN-DOWN VEHICLE TOWING . . ................138
TOWING THE VEHICLE ..........................138
Page 140 of 204
BROKEN-DOWN VEHICLE
TOWING
REAR WHEEL DRIVE (RWD) VERSIONS
It is recommended to tow the vehicle
with all four wheels lifted from the
ground on the platform of a roadside
assistance vehicle.
If a breakdown truck with platform is not
available, the vehicle must be towed with
the rear wheels LIFTED from the ground
(using a trailer or special equipment
allowing lifting of the rear wheels).
IMPORTANT Towing vehicles without
complying with the above mentioned
prescriptions can cause serious damage
to the vehicle.FOUR-WHEEL DRIVE (AWD) VERSIONS
It is recommended to tow the vehicle
with all four wheels lifted from the
ground on the platform of a roadside
assistance vehicle.
IMPORTANT Avoid lifting the front (or
rear) wheels only, using a trailer or
vehicle that allows lifting the wheels of
one axle only. Lifting the front (or rear)
wheels only while towing might damage
the transmission or the transfer unit.
IMPORTANT If a vehicle is towed without
complying with the above requirements,
the transmission and/or the transfer unit
might be seriously damaged. Damage due
to incorrect towing is not covered by
warranty.
TOWING THE VEHICLE
140) 141)
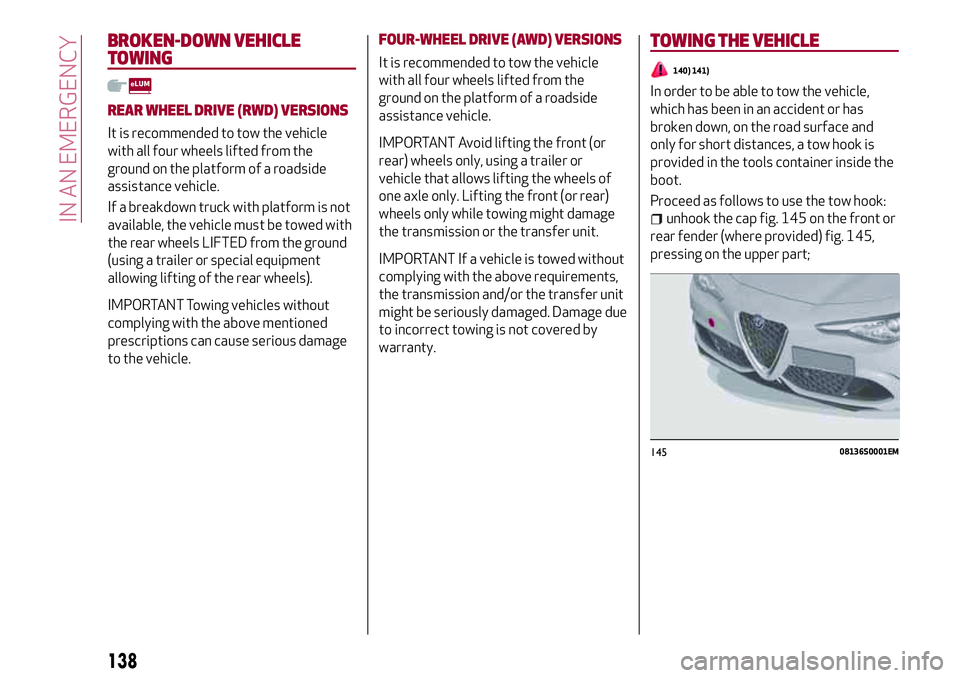
In order to be able to tow the vehicle,
which has been in an accident or has
broken down, on the road surface and
only for short distances, a tow hook is
provided in the tools container inside the
boot.
Proceed as follows to use the tow hook:
unhook the cap fig. 145 on the front or
rear fender (where provided) fig. 145,
pressing on the upper part;
14508136S0001EM
138
IN AN EMERGENCY
Page 141 of 204
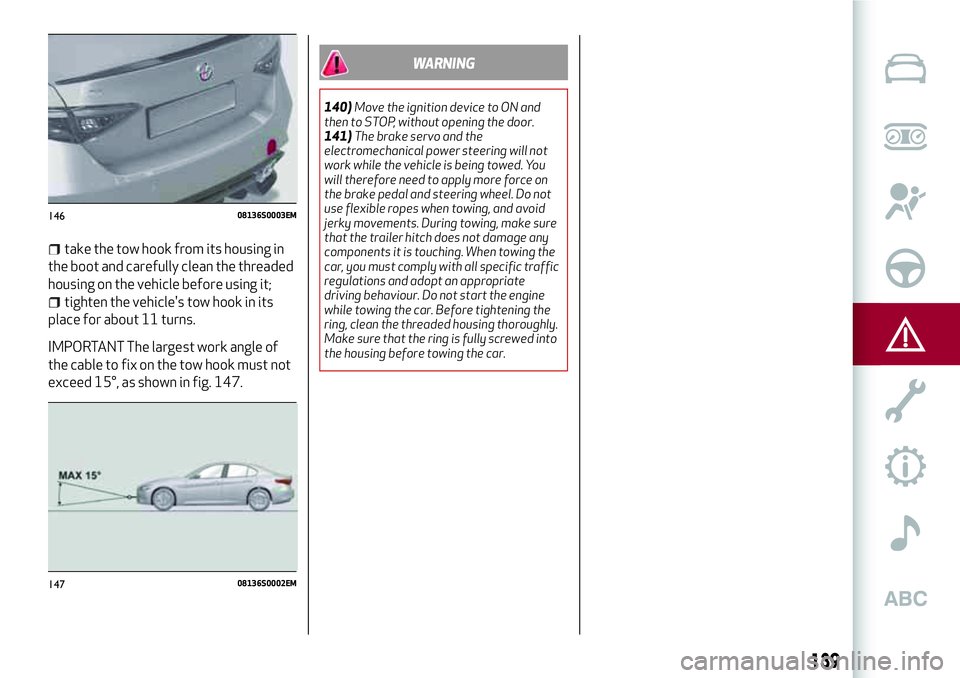
take the tow hook from its housing in
the boot and carefully clean the threaded
housing on the vehicle before using it;
tighten the vehicle's tow hook in its
place for about 11 turns.
IMPORTANT The largest work angle of
the cable to fix on the tow hook must not
exceed 15°, as shown in fig. 147.
WARNING
140)Move the ignition device to ON and
then to STOP, without opening the door.
141)The brake servo and the
electromechanical power steering will not
work while the vehicle is being towed. You
will therefore need to apply more force on
the brake pedal and steering wheel. Do not
use flexible ropes when towing, and avoid
jerky movements. During towing, make sure
that the trailer hitch does not damage any
components it is touching. When towing the
car, you must comply with all specific traffic
regulations and adopt an appropriate
driving behaviour. Do not start the engine
while towing the car. Before tightening the
ring, clean the threaded housing thoroughly.
Make sure that the ring is fully screwed into
the housing before towing the car.
14608136S0003EM
14708136S0002EM
139
Page 166 of 204
WEIGHTS
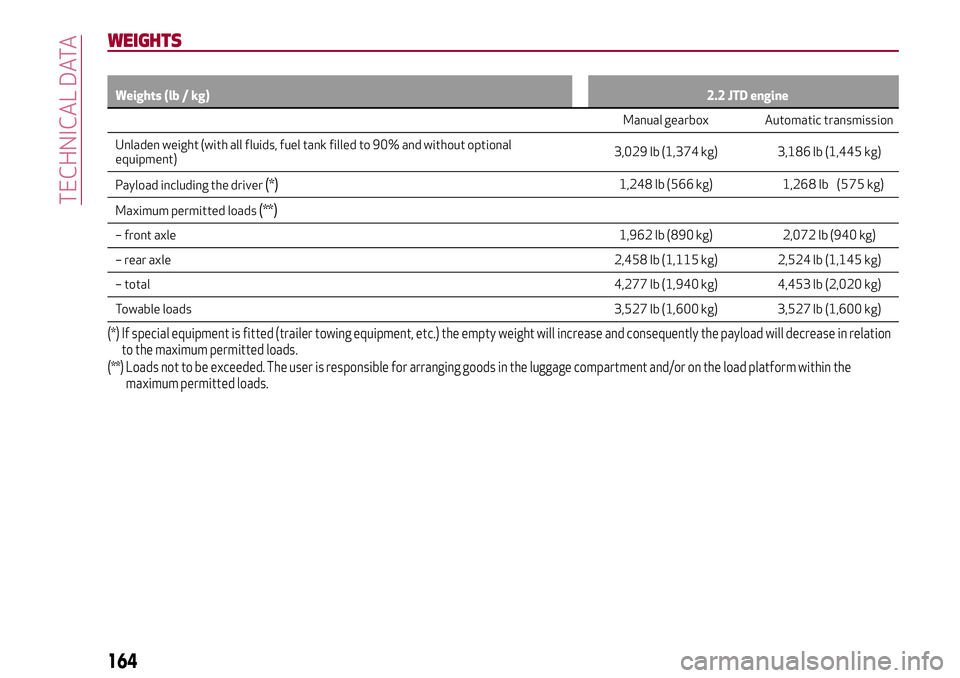
Weights (lb / kg)2.2 JTD engine
Manual gearbox Automatic transmission
Unladen weight (with all fluids, fuel tank filled to 90% and without optional equipment) 3,029 lb (1,374 kg) 3,186 lb (1,445 kg)
Payload including the driver(*)1,248lb(566kg)1,28lb
Maximum permitted loads(**)
– front axle 1,962 lb (890 kg) 2,072 lb (940 kg)
– rear axle 2,458 lb (1,115 kg) 2,524 lb (1,145 kg)
– total 4,277 lb (1,940 kg) 4,453 lb (2,020 kg)
Towable loads 3,527 lb (1,600 kg) 3,527 lb (1,600 kg)
(*) If special equipment is fitted (trailer towing equipment, etc.) the empty weight will increase and consequently the payload will decrease in relation to the maximum permitted loads.
(**) Loads not to be exceeded. The user is responsible for arranging goods in the luggage compartment and/or on the load platform within the maximum permitted loads.
164
TECHNICAL DATA
6(575
Page 199 of 204
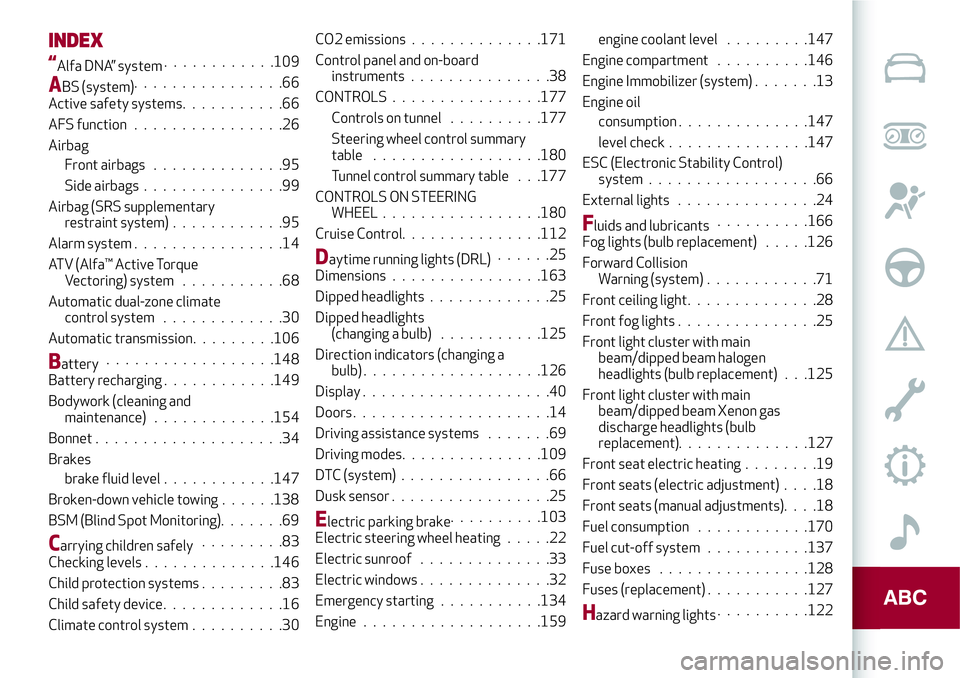
INDEX
“Alfa DNA” system............109
ABS (system)................66
Active safety systems...........66
AFS function................26
Airbag
Front airbags..............95
Side airbags...............99
Airbag (SRS supplementary
restraint system)............95
Alarm system................14
ATV (Alfa™ Active Torque
Vectoring) system...........68
Automatic dual-zone climate
control system.............30
Automatic transmission.........106
Battery..................148
Battery recharging............149
Bodywork (cleaning and
maintenance).............154
Bonnet . ...................34
Brakes
brake fluid level............147
Broken-down vehicle towing......138
BSM (Blind Spot Monitoring).......69
Carrying children safely.........83
Checking levels..............146
Child protection systems.........83
Child safety device.............16
Climate control system..........30CO2 emissions..............171
Control panel and on-board
instruments...............38
CONTROLS................177
Controls on tunnel..........177
Steering wheel control summary
table..................180
Tunnel control summary table . . .177
CONTROLS ON STEERING
WHEEL.................180
Cruise Control...............112
Daytime running lights (DRL)......25
Dimensions................163
Dipped headlights.............25
Dipped headlights
(changing a bulb)...........125
Direction indicators (changing a
bulb)...................126
Display....................40
Doors.....................14
Driving assistance systems.......69
Driving modes...............109
DTC (system)................66
Dusk sensor.................25
Electric parking brake..........103
Electric steering wheel heating.....22
Electric sunroof..............33
Electric windows..............32
Emergency starting...........134
Engine...................159engine coolant level .........147
Engine compartment..........146
Engine Immobilizer (system).......13
Engine oil
consumption . .............147
level check...............147
ESC (Electronic Stability Control)
system..................66
External lights...............24
Fluids and lubricants..........166
Fog lights (bulb replacement).....126
Forward Collision
Warning (system) . . ..........71
Front ceiling light..............28
Front fog lights . . .............25
Front light cluster with main
beam/dipped beam halogen
headlights (bulb replacement) . . .125
Front light cluster with main
beam/dipped beam Xenon gas
discharge headlights (bulb
replacement). .............127
Front seat electric heating........19
Front seats (electric adjustment)....18
Front seats (manual adjustments)....18
Fuel consumption............170
Fuel cut-off system...........137
Fuse boxes................128
Fuses (replacement)...........127
Hazard warning lights..........122
Page 200 of 204
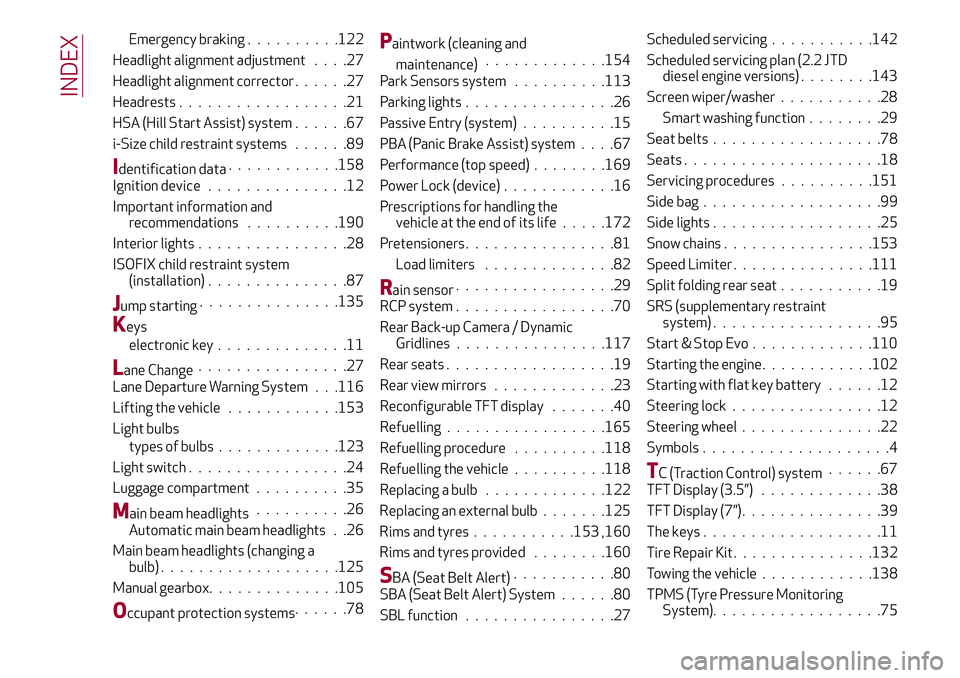
Emergency braking..........122
Headlight alignment adjustment....27
Headlight alignment corrector......27
Headrests..................21
HSA (Hill Start Assist) system......67
i-Size child restraint systems......89
Identification data............158
Ignition device...............12
Important information and
recommendations..........190
Interior lights................28
ISOFIX child restraint system
(installation)...............87
Jump starting...............135
Keys
electronic key..............11
Lane Change................27
Lane Departure Warning System . . .116
Lifting the vehicle............153
Light bulbs
types of bulbs.............123
Light switch.................24
Luggage compartment..........35
Main beam headlights..........26
Automatic main beam headlights . .26
Main beam headlights (changing a
bulb)...................125
Manual gearbox..............105
Occupant protection systems......78
Paintwork (cleaning and
maintenance).............154
Park Sensors system..........113
Parking lights................26
Passive Entry (system)..........15
PBA (Panic Brake Assist) system....67
Performance (top speed)........169
Power Lock (device)............16
Prescriptions for handling the
vehicle at the end of its life.....172
Pretensioners................81
Load limiters..............82
Rain sensor.................29
RCP system.................70
Rear Back-up Camera / Dynamic
Gridlines................117
Rear seats..................19
Rear view mirrors.............23
Reconfigurable TFT display.......40
Refuelling.................165
Refuelling procedure..........118
Refuelling the vehicle..........118
Replacing a bulb.............122
Replacing an external bulb.......125
Rims and tyres...........153 ,160
Rims and tyres provided........160
SBA (Seat Belt Alert)...........80
SBA (Seat Belt Alert) System......80
SBL function................27Scheduled servicing...........142
Scheduled servicing plan (2.2 JTD
diesel engine versions)........143
Screen wiper/washer...........28
Smart washing function........29
Seat belts..................78
Seats.....................18
Servicing procedures..........151
Side bag . . .................99
Side lights..................25
Snow chains................153
Speed Limiter...............111
Split folding rear seat...........19
SRS (supplementary restraint
system)..................95
Start & Stop Evo.............110
Starting the engine............102
Starting with flat key battery......12
Steering lock . . ..............12
Steering wheel...............22
Symbols....................4
TC (Traction Control) system......67
TFT Display (3.5”) . ............38
TFT Display (7”)...............39
The keys...................11
Tire Repair Kit...............132
Towing the vehicle . ...........138
TPMS (Tyre Pressure Monitoring
System)..................75
INDEX