window Alfa Romeo Giulia 2018 User Guide
[x] Cancel search | Manufacturer: ALFA ROMEO, Model Year: 2018, Model line: Giulia, Model: Alfa Romeo Giulia 2018Pages: 260, PDF Size: 6 MB
Page 48 of 260
A/C Compressor
Push the A/C button to activate or
deactivate the A/C compressor (indicator
illuminated when activated). The A/C
compressor will remain off even after the
engine has stopped.
When the A/C compressor is turned off,
the system deactivates air recirculation
to prevent the windows from fogging up.
If the climate control system can
maintain the temperature, with the A/C
turned off, the AUTO feature will remain
on and the AUTO button indicator light
will not switch off.
To restore automatic control of the A/C
compressor, push the A/C button or the
AUTO button. With the A/C compressor
off, the air speed can be set manually
using the Air Speed Adjustment Knob.
When the A/C compressor is on, and the
engine is running, air speed cannot be
lower than the minimum speed (only one
indicator light is lit).
Note:
When the A/C is off the Climate
Control system can not produce air that
is colder than the current outside
temperature. Under certain environmental
conditions, windows could fog up rapidly,
since the air is not dehumidified.
Front Defroster And MAX-DEF
Function
Push the Front Defroster button(indicator illuminated) to defrost the
windshield and side windows.
While in MAX-DEF function, the air
conditioner will:
Activate the air conditioner
compressor when the weather allows
Turn air recirculation off
Set the maximum air temperature (HI)
on both the driver and passenger side
Activate a blower speed based on the
temperature of the engine coolant
Adjust the air flow towards the
windshield and front side windows
Activate the Rear Window Defroster
Display the fan speed (indicators
illuminated) and current air distribution
setting
Note: The MAX-DEF function remains
active for approximately three minutes
once the engine coolant reaches the
proper temperature.
When the function is on, AUTO mode will
deactivate. The only manual operations
possible are adjusting blower speed and
turning off the Rear Window Defroster.
Pushing the
button switches off the
MAX-DEF function.
Rear Defroster
Push the Rear Defrosterbutton to
activate (indicators illuminated) the Rear
Defroster.
The Rear Defroster will turn off after
20 minutes or once the engine is turned
off. To reactive the Rear Defroster, push
the Rear Defroster
button.
Note: To avoid damage, do not apply
stickers over the interior heating
filaments of the Rear Defroster.
Humidity Sensor
The Humidity Sensor helps to prevent the
windows from fogging up. The AUTO
function (indicator illuminated) must be
on for the Humidity Sensor to function.
When outside temperature is low, the
system may turn the compressor on and
turn air recirculation off for safer driving.
Switching Off/On The Climate Control
System
Switching Off The Climate Control
System
Rotate the Air Speed Adjustment Knob
completely counterclockwise to turn off
the Climate Control System.
With the air conditioner off:
Air recirculation is on
The A/C compressor is off
The fan is off
The heated rear window can be
activated/deactivated
46
GETTING TO KNOW YOUR VEHICLE
Page 49 of 260
Note:The climate control system stores
the previously set temperatures and
resumes operation when any button on
the system is pushed.
Switching On The Climate Control
System
To switch the climate control system on
in automatic mode, push the AUTO
button.
Stop/Start
The climate control system manages the
Stop/Start system. Stop/Start has the
engine shut off when vehicle speed is
0 mph (0 km/h) to maintain comfort
within the vehicle.
Stop/Start will deactivate in the
following scenarios:
The climate control system is in AUTO
mode (indicator illuminated), and the
vehicle has yet to reach the set
temperature
The climate control system is in LO
maximum cooling
The climate control system is in HI
maximum heating
The climate control system is in the
MAX-DEF status
When the Stop/Start system is active,
the engine will restart if the inside
temperature changes significantly, or if
the LO setting, or MAX-DEF setting, is
activated. With Stop/Start system on, air flow is
reduced to keep the compartment
comfort conditions for longer.
Until the temperature drastically
changes within the cabin, the climate
control system will continue to maintain
the temperature while the engine is off.
By deactivating the Stop/Start system
with the
button located on the
dashboard, the climate control system
will take priority over the engine shutting
off.
Note:
In harsh climate conditions, limit the
use of the Stop/Start system to prevent
the compressor from continuously
switching on and off. This will cause
rapid misting of the windows and the
accumulation of humidity in the
passenger compartment.
When the Stop/Start system is on,
the climate control system will always
take air in from outside, reducing the
probability of the windows fogging up.
System Maintenance
In winter, the Climate Control System
must be turned on at least once a month
for approximately ten minutes.
Have the system inspected at an
authorized dealer before the summer.
POWER WINDOWS
Power Window Switches
The power window switches work with
the ignition in the ON position and for
three minutes after the ignition has been
placed in the STOP position. When one of
the front doors is opened, this operation
is disabled.
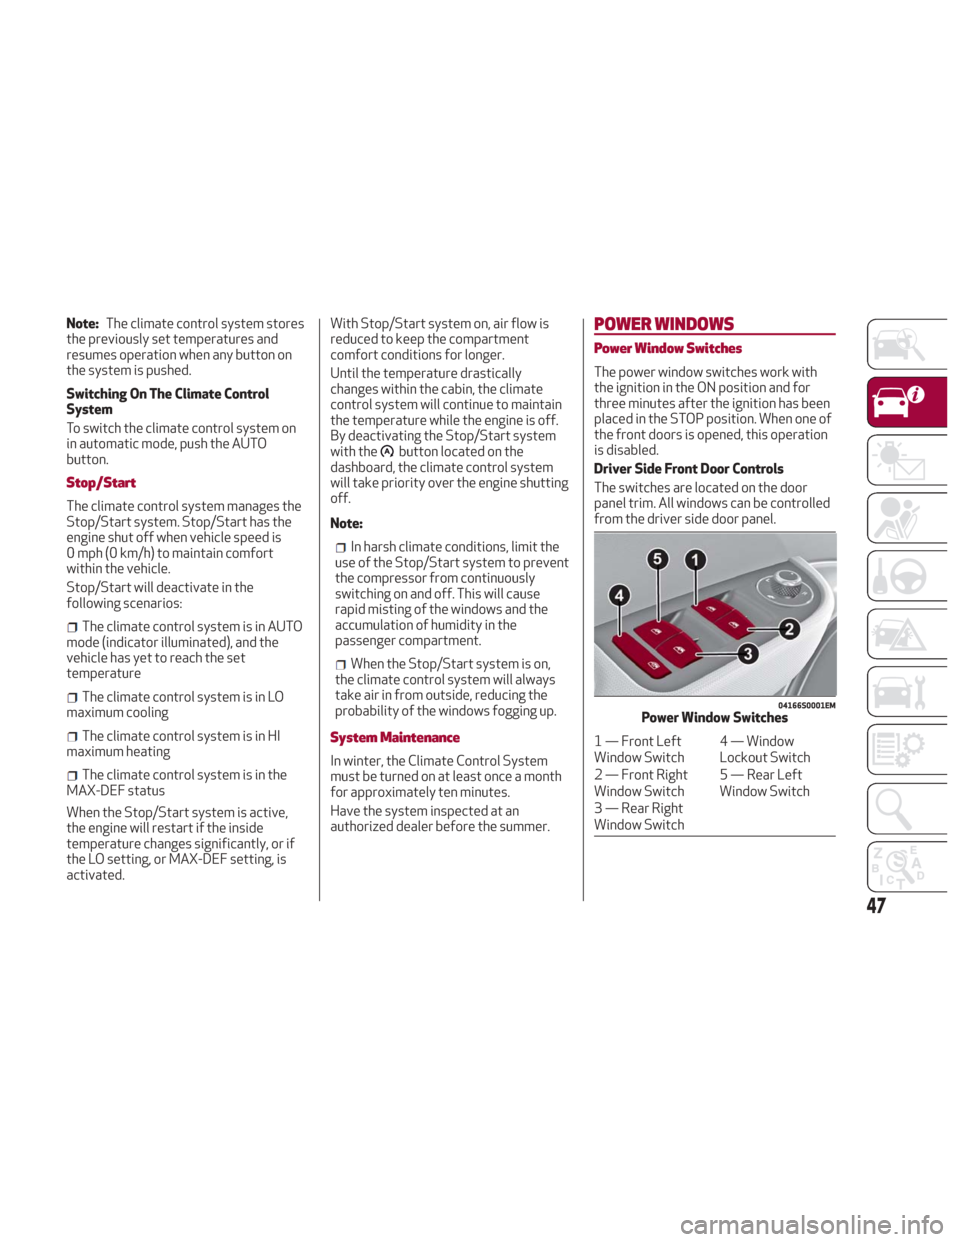
Driver Side Front Door Controls
The switches are located on the door
panel trim. All windows can be controlled
from the driver side door panel.
04166S0001EMPower Window Switches
1 — Front Left
Window Switch 4 — Window
Lockout Switch
2 — Front Right
Window Switch 5 — Rear Left
Window Switch
3 — Rear Right
Window Switch
47
Page 50 of 260
Window Opening
Push the buttons to open the desired
window.
Each button has two position steps. Push
gently (first position step) for manual
"burst" window travel, while pushing the
same button harder (second position
step) activates "continuous automatic"
operation.
If the button is pushed again, the window
will stop in the desired position.
Window Closing
Pull the window switch up to move the
window upward. Hold the switch for at
least half of a second and the window will
go up automatically.
To stop the window during Auto-Up
operation, push or pull the window switch
again.
Passenger Side Front Door/Rear Door
Controls
There are single window controls on the
passenger and rear door trim panels
which operate the door windows.
Auto-Up Feature With Anti-Pinch
Protection
The vehicle may be equipped with an
anti-pinch safety device for closing the
windows.
If the safety system senses any obstacle
while the window is closing, it will stop
the window’s movement and reverse it,
depending on its position.This device is also useful if the windows
are activated accidentally by children
inside the vehicle.
The anti-pinch safety function is
activated both during the manual and the
automatic operation of the window.
When the anti-pinch system is activated,
the window closing is immediately
interrupted. Then the window closing is
automatically reversed and the window
lowers by about eight inches (20 cm) in
relation to the first stop position. The
window cannot be operated during this
time.
Note:
In the event of an error, or if the
anti-pinch protection is activated three
consecutive times, the automatic closing
operation of the window will be
deactivated. In order to restore the
correct operation of the system, the
window must be lowered.
Power Window System Initialization
If power supply is interrupted, the
electric window automatic operation
must be reinitialized.
To perform the initialization procedure,
which must be done on each door with the
doors closed, manually fully close the
window to be initialized.HOOD
Opening
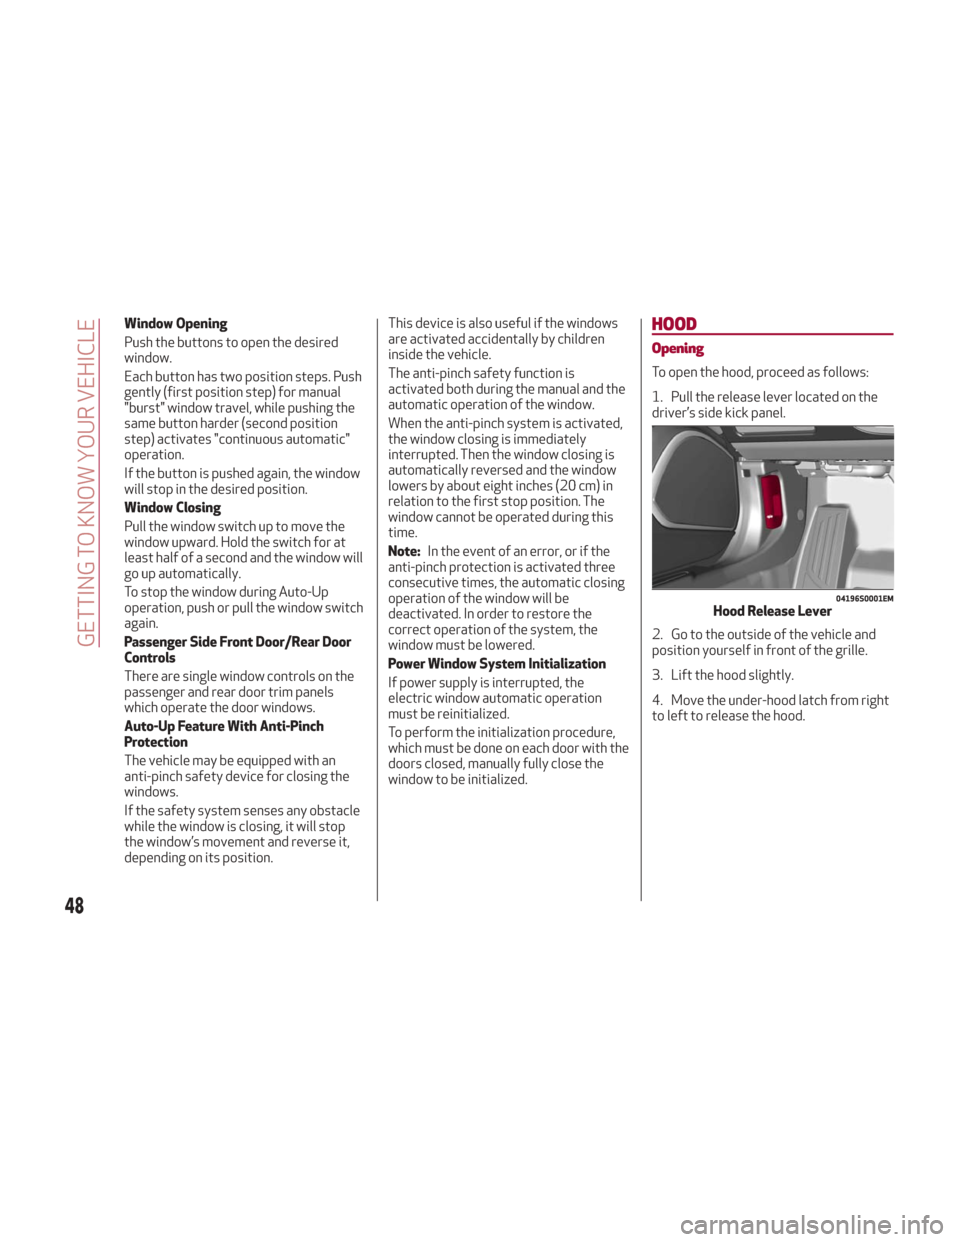
To open the hood, proceed as follows:
1. Pull the release lever located on the
driver’s side kick panel.
2. Go to the outside of the vehicle and
position yourself in front of the grille.
3. Lift the hood slightly.
4. Move the under-hood latch from right
to left to release the hood.
04196S0001EMHood Release Lever
48
GETTING TO KNOW YOUR VEHICLE
Page 53 of 260
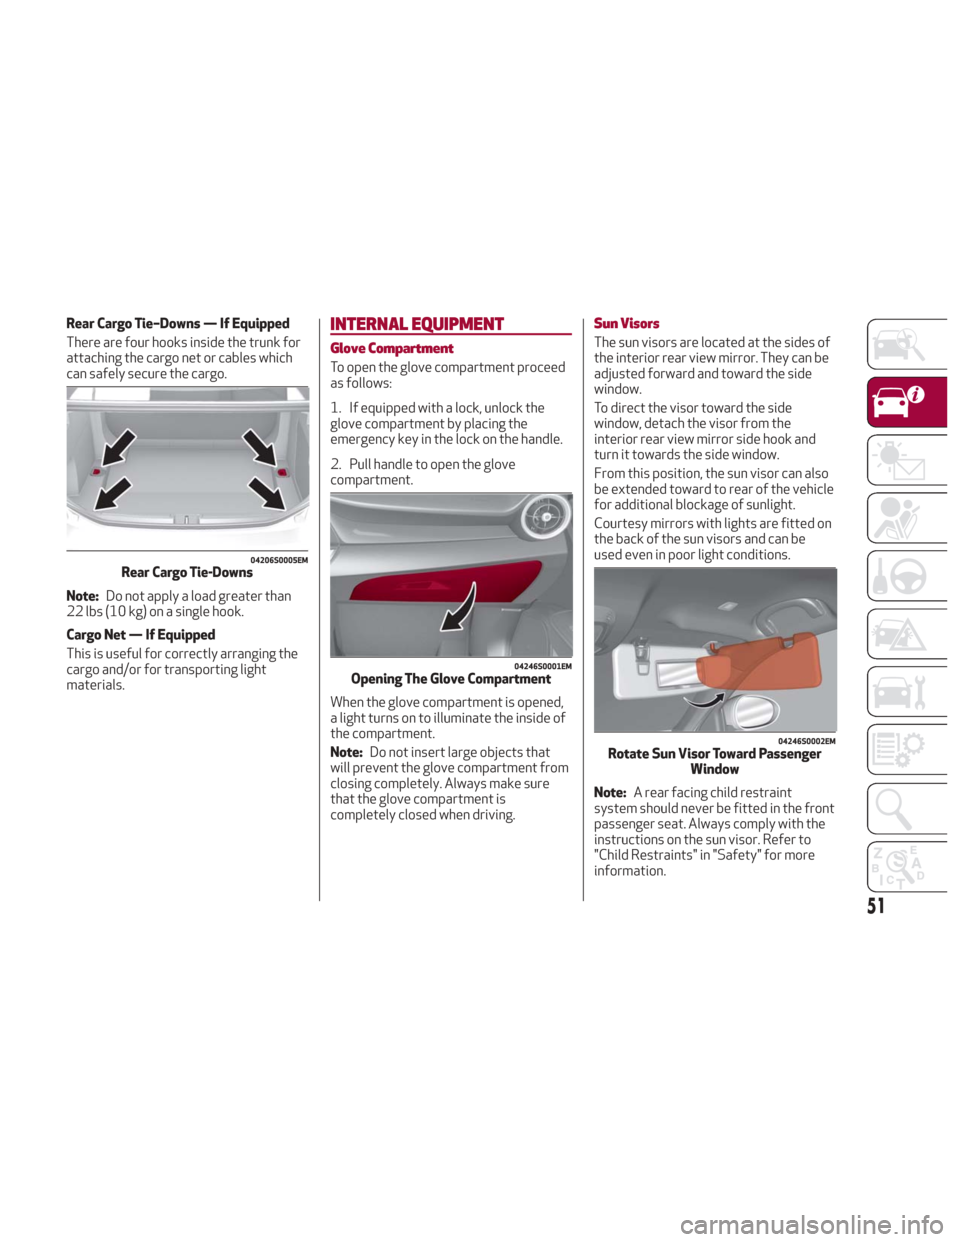
Rear Cargo Tie–Downs — If Equipped
There are four hooks inside the trunk for
attaching the cargo net or cables which
can safely secure the cargo.
Note:Do not apply a load greater than
22 lbs (10 kg) on a single hook.
Cargo Net — If Equipped
This is useful for correctly arranging the
cargo and/or for transporting light
materials.INTERNAL EQUIPMENT
Glove Compartment
To open the glove compartment proceed
as follows:
1. If equipped with a lock, unlock the
glove compartment by placing the
emergency key in the lock on the handle.
2. Pull handle to open the glove
compartment.
When the glove compartment is opened,
a light turns on to illuminate the inside of
the compartment.
Note: Do not insert large objects that
will prevent the glove compartment from
closing completely. Always make sure
that the glove compartment is
completely closed when driving.
Sun Visors
The sun visors are located at the sides of
the interior rear view mirror. They can be
adjusted forward and toward the side
window.
To direct the visor toward the side
window, detach the visor from the
interior rear view mirror side hook and
turn it towards the side window.
From this position, the sun visor can also
be extended toward to rear of the vehicle
for additional blockage of sunlight.
Courtesy mirrors with lights are fitted on
the back of the sun visors and can be
used even in poor light conditions.
Note: A rear facing child restraint
system should never be fitted in the front
passenger seat. Always comply with the
instructions on the sun visor. Refer to
"Child Restraints" in "Safety" for more
information.
04206S0005EMRear Cargo Tie-Downs
04246S0001EMOpening The Glove Compartment
04246S0002EMRotate Sun Visor Toward Passenger Window
51
Page 102 of 260
Operating Example
For example, your vehicle may have a
recommended cold (parked for more than
three hours) placard pressure of 33 psi
(227 kPa). If the ambient temperature is
68°F (20°C), and the measured tire
pressure is 28 psi (193 kPa), a
temperature drop to 20°F (-7°C) will
decrease the tire pressure to
approximately 24 psi (165 kPa). This tire
pressure is low enough to turn on the
“Tire Pressure Monitoring Warning Light.”
Driving the vehicle may cause the tire
pressure to rise to approximately 28 psi
(193 kPa), but the “Tire Pressure
Monitoring Telltale Light” will still be on.
In this situation, the “Tire Pressure
Monitoring Warning Light” will turn off
only after the tires are inflated to the
vehicle’s recommended cold placard
pressure value.
Caution!
The TPMS has been optimized for the
original equipment tires and wheels.
TPMS pressures and warning have been
established for the tire size equipped on
your vehicle. Undesirable system operation
or sensor damage may result when using
replacement equipment that is not of the
same size, type, and/or style. The TPM
sensor is not designed for use on
aftermarket wheels and may contribute to a
poor overall system performance or sensor damage. Customers are encouraged to use
OEM wheels to assure proper TPM feature
operation.
Using aftermarket tire sealants may
cause the Tire Pressure Monitoring System
(TPMS) sensor to become inoperable.
After using an aftermarket tire sealant it is
recommended that you take your vehicle to
your authorized dealer to have your sensor
function checked.
After inspecting or adjusting the tire
pressure always reinstall the valve stem
cap. This will prevent moisture and dirt from
entering the valve stem, which could
damage the TPMS sensor.
Insufficient Tire Pressure Indication
If an insufficient pressure value is
detected on one or more tires, the
warning light in the instrument cluster
will display alongside the dedicated
messages, the system will highlight the
tire or tires with insufficient pressure
graphically, and an acoustic signal will be
emitted.
In this case, stop the vehicle, check the
inflation pressure of each tire, and inflate
the necessary tire or tires to the correct
cold inflation pressure value, shown on
the display or in the dedicated TPMS
menu. TPMS Temporarily Disabled — TPMS
Check Message
When a system fault is detected, the “Tire
Pressure Monitoring Telltale Light” will
flash on and off for 75 seconds, and then
remain on solid. The system fault will also
sound a chime. If the ignition is cycled,
this sequence will repeat, provided that
the system fault still exists. The “Tire
Pressure Monitoring Telltale Light” will
turn off when the fault condition no
longer exists. A system fault can occur
due to any of the following:
Jamming due to electronic devices or
driving next to facilities emitting the
same radio frequencies as the TPMS
sensors.
Installing some form of aftermarket
window tinting that affects radio wave
signals.
Accumulation of snow or ice around
the wheels or wheel housings.
Using tire chains on the vehicle.
Using wheels/tires not equipped with
TPMS sensors.
After the punctured tire has been
repaired with the original tire sealant
contained in the Tire Repair Kit, the
previous condition must be restored so
that the
warning light is off during
normal driving.
100
SAFETY
Page 104 of 260
OCCUPANT RESTRAINT
SYSTEMS
Some of the most important safety
features in your vehicle are the restraint
systems:
Occupant Restraint Systems Features
Seat Belt Systems
Supplemental Restraint Systems
(SRS) Air Bags
Child Restraints
Some of the safety features described in
this section may be standard equipment
on some models, or may be optional
equipment on others. If you are not sure,
ask an authorized dealer.
Important Safety Precautions
Please pay close attention to the
information in this section. It tells you
how to use your restraint system
properly, to keep you and your
passengers as safe as possible.
Here are some simple steps you can take
to minimize the risk of harm from a
deploying air bag:
1. Children 12 years old and under
should always ride buckled up in the rear
seat of a vehicle with a rear seat. 2. If a child from 2 to 12 years old (not in
a rear-facing child restraint) must ride in
the front passenger seat, move the seat
as far back as possible and use the
proper child restraint (refer to “Child
Restraints” in this section for further
information).
3. Children that are not big enough to
wear the vehicle seat belt properly (refer
to “Child Restraints” in this section for
further information) should be secured in
the rear seat of a vehicle with a rear seat
in child restraints or belt-positioning
booster seats. Older children who do not
use child restraints or belt-positioning
booster seats should ride properly
buckled up in the rear seat of a vehicle
with a rear seat.
4. Never allow children to slide the
shoulder belt behind them or under their
arm.
5. You should read the instructions
provided with your child restraint to
make sure that you are using it properly.
6. All occupants should always wear
their lap and shoulder belts properly.
7. The driver and front passenger seats
should be moved back as far as practical
to allow the front air bags room to inflate.
8. Do not lean against the door or
window. If your vehicle has side air bags,
and deployment occurs, the side air bags
will inflate forcefully into the space
between occupants and the door and
occupants could be injured.
9. If the air bag system in this vehicle
needs to be modified to accommodate a
disabled person, refer to the “Customer
Assistance” section for customer service
contact information.
Warning!
Never place a rear-facing child restraint in
front of an air bag. A deploying passenger
front air bag can cause death or serious
injury to a child 12 years or younger,
including a child in a rear-facing child
restraint.
Only use a rear-facing child restraint in
the rear seat of a vehicle with a rear seat.
Seat Belt Systems
Buckle up even though you are an
excellent driver, even on short trips.
Someone on the road may be a poor
driver and could cause a collision that
includes you. This can happen far away
from home or on your own street.
102
SAFETY
Page 114 of 260
The SAB moves at a very high speed and
with such a high force that it could injure
occupants if they are not seated
properly, or if items are positioned in the
area where the SAB inflates. Children are
at an even greater risk of injury from a
deploying air bag.
Warning!
Do not use accessory seat covers or place
objects between you and the Side Air Bags;
the performance could be adversely
affected and/or objects could be pushed into
you, causing serious injury.
Supplemental Side Air Bag Inflatable
Curtains (SABICs)
This vehicle is equipped with
Supplemental Side Air Bag Inflatable
Curtains (SABICs).
Supplemental Side Air Bag Inflatable
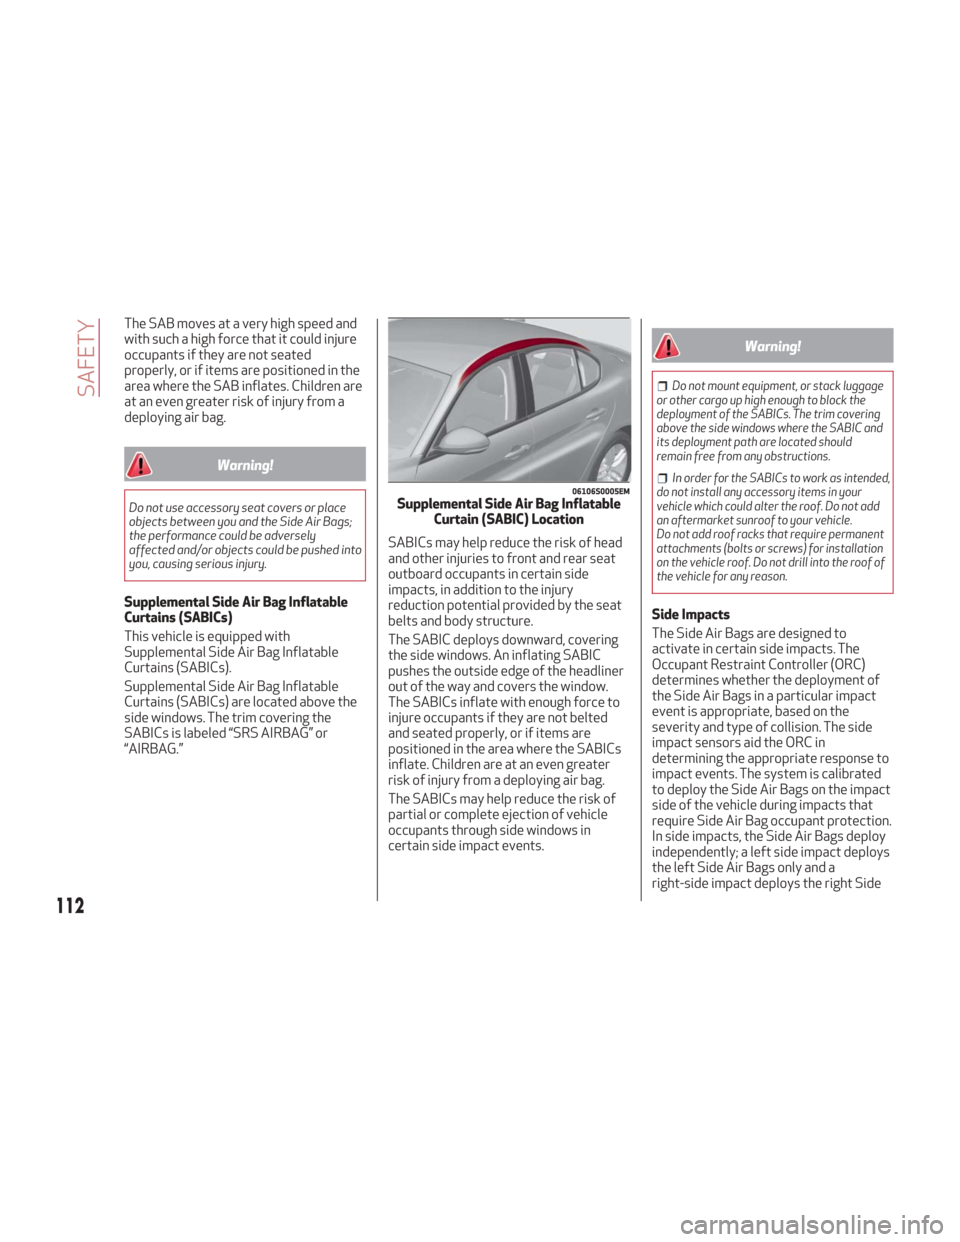
Curtains (SABICs) are located above the
side windows. The trim covering the
SABICs is labeled “SRS AIRBAG” or
“AIRBAG.”SABICs may help reduce the risk of head
and other injuries to front and rear seat
outboard occupants in certain side
impacts, in addition to the injury
reduction potential provided by the seat
belts and body structure.
The SABIC deploys downward, covering
the side windows. An inflating SABIC
pushes the outside edge of the headliner
out of the way and covers the window.
The SABICs inflate with enough force to
injure occupants if they are not belted
and seated properly, or if items are
positioned in the area where the SABICs
inflate. Children are at an even greater
risk of injury from a deploying air bag.
The SABICs may help reduce the risk of
partial or complete ejection of vehicle
occupants through side windows in
certain side impact events.
Warning!
Do not mount equipment, or stack luggage
or other cargo up high enough to block the
deployment of the SABICs. The trim covering
above the side windows where the SABIC and
its deployment path are located should
remain free from any obstructions.
Inorder for the SABICs to work as intended,
do not install any accessory items in your
vehicle which could alter the roof. Do not add
an aftermarket sunroof to your vehicle.
Do not add roof racks that require permanent
attachments (bolts or screws) for installation
on the vehicle roof. Do not drill into the roof of
the vehicle for any reason.
Side Impacts
The Side Air Bags are designed to
activate in certain side impacts. The
Occupant Restraint Controller (ORC)
determines whether the deployment of
the Side Air Bags in a particular impact
event is appropriate, based on the
severity and type of collision. The side
impact sensors aid the ORC in
determining the appropriate response to
impact events. The system is calibrated
to deploy the Side Air Bags on the impact
side of the vehicle during impacts that
require Side Air Bag occupant protection.
In side impacts, the Side Air Bags deploy
independently; a left side impact deploys
the left Side Air Bags only and a
right-side impact deploys the right Side
06106S0005EMSupplemental Side Air Bag Inflatable Curtain (SABIC) Location
112
SAFETY
Page 115 of 260
Air Bags only. Vehicle damage by itself is
not a good indicator of whether or not
Side Air Bags should have deployed.
The Side Air Bags will not deploy in all
side collisions, including some collisions
at certain angles, or some side collisions
that do not impact the area of the
passenger compartment. The Side Air
Bags may deploy during angled or offset
frontal collisions where the front air bags
deploy.
Side Air Bags are a supplement to the
seat belt restraint system. Side Air Bags
deploy in less time than it takes to blink
your eyes.
Warning!
Occupants, including children, who are up
against or very close to Side Air Bags can be
seriously injured or killed. Occupants,
including children, should never lean on or
sleep against the door, side windows, or
area where the side air bags inflate, even if
they are in an infant or child restraint.
Seat belts (and child restraints where
appropriate) are necessary for your
protection in all collisions. They also help
keep you in position, away from an inflating
Side Air Bag. To get the best protection
from the Side Air Bags, occupants must
wear their seat belts properly and sit
upright with their backs against the seats.
Children must be properly restrained in a
child restraint or booster seat that is
appropriate for the size of the child.
Warning!
Side Air Bags need room to inflate. Do not
lean against the door or window. Sit upright
in the center of the seat.
Being too close to the Side Air Bags
during deployment could cause you to be
severely injured or killed.
Relying on the Side Air Bags alone could
lead to more severe injuries in a collision.
The Side Air Bags work with your seat belt
to restrain you properly. In some collisions,
Side Air Bags won’t deploy at all. Always
wear your seat belt even though you have
Side Air Bags.
Note: Air bag covers may not be obvious
in the interior trim, but they will open
during air bag deployment.
Rollover Events
Side Air Bags are designed to activate in
certain rollover events. The ORC
determines whether the deployment of
the Side Air Bags in a particular rollover
event is appropriate, based on the
severity and type of collision. Vehicle
damage by itself is not a good indicator
of whether or not Side Air Bags should
have deployed.
The Side Air Bags will not deploy in all
rollover events. The rollover sensing
system determines if a rollover event
may be in progress and whether
deployment is appropriate. In the event the vehicle experiences a rollover or near
rollover event, and deployment of the
Side Air Bags is appropriate, the rollover
sensing system will also deploy the seat
belt pretensioners on both sides of the
vehicle.
The SABICs may help reduce the risk of
partial or complete ejection of vehicle
occupants through side windows in
certain rollover or side impact events.
Air Bag System Components
Note:
The Occupant Restraint Controller
(ORC) monitors the internal circuits and
interconnecting wiring associated with
electrical Air Bag System Components
listed below:
Occupant Restraint Controller (ORC)
Air Bag Warning Light
Steering Wheel and Column
Instrument Panel
Knee Impact Bolsters
Driver and Front Passenger Air Bags
Seat Belt Buckle Switch
Supplemental Side Air Bags
Supplemental Knee Air Bags
Front and Side Impact Sensors
Seat Belt Pretensioners
Seat Track Position Sensors
113
Page 124 of 260
Frequently Asked Questions About Installing Child Restraints With LATCH
Can a child seat be installed in the center position
using
the inner LATCH lower anchorage? NoUse the seat belt and tether anchor to install a
child seat in the center seating position.
Can two child restraints be attached using a
common lower LATCH anchorage? NoNever “share” a LATCH anchorage with two or
more child restraints. If the center position does
not have dedicated LATCH lower anchorages, use
the seat belt to install a child seat in the center
position next to a child seat using the LATCH
anchorages in an outboard position.
Can the rear-facing child restraint touch the back
of the front passenger seat? Ye sThe child seat may touch the back of the front
passenger seat if the child restraint manufacturer
also allows contact. See your child restraint
owner’s manual for more information.
Can the head restraints be removed? YesThe head restraints can be removed in each
seating position.
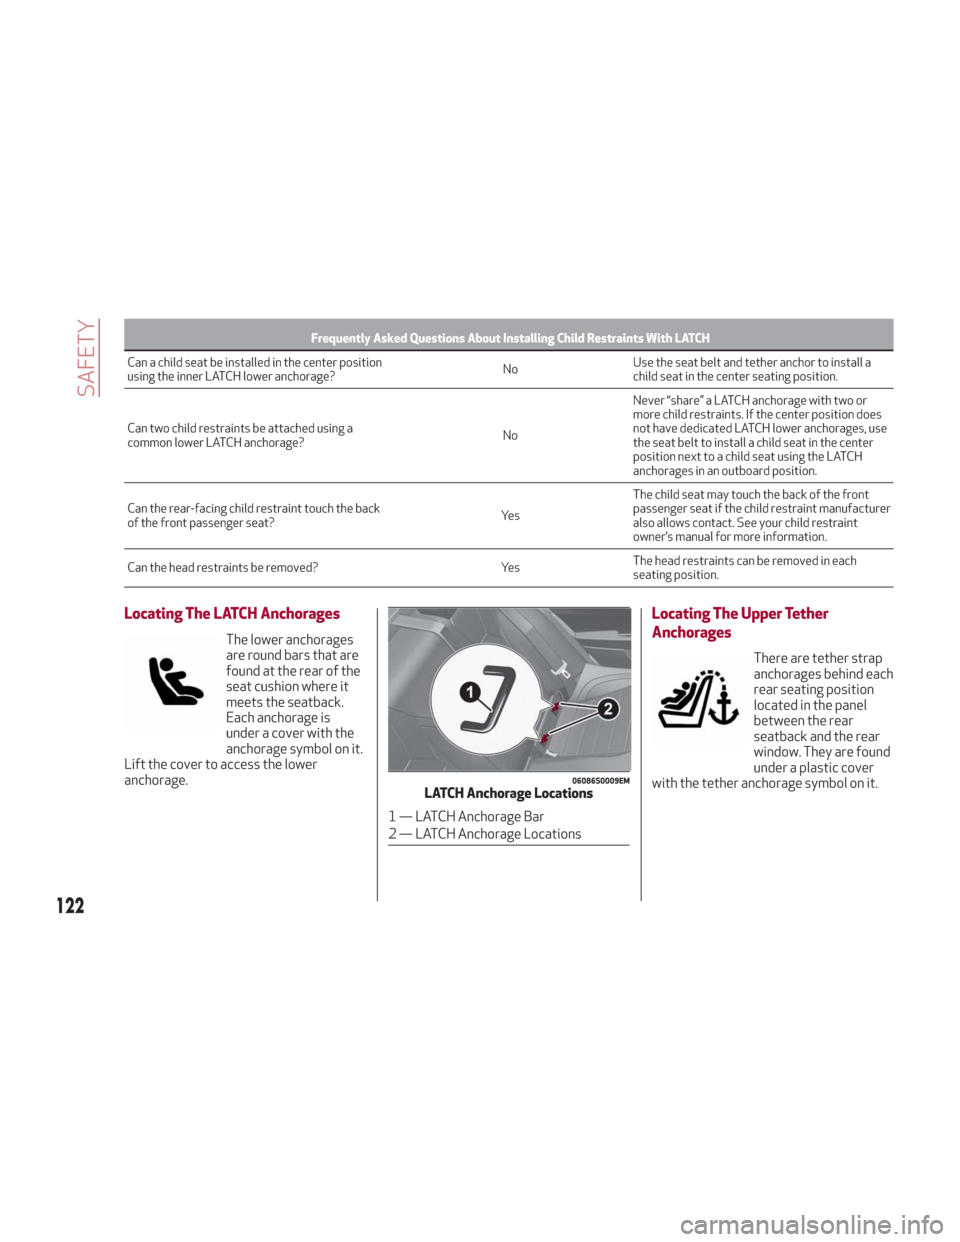
Locating The LATCH Anchorages
The lower anchorages
are round bars that are
found at the rear of the
seat cushion where it
meets the seatback.
Each anchorage is
under a cover with the
anchorage symbol on it.
Lift the cover to access the lower
anchorage.
Locating The Upper Tether
Anchorages
There are tether strap
anchorages behind each
rear seating position
located in the panel
between the rear
seatback and the rear
window. They are found
under a plastic cover
with the tether anchorage symbol on it.
06086S0009EMLATCH Anchorage Locations
1 — LATCH Anchorage Bar
2 — LATCH Anchorage Locations
122
SAFETY
Page 129 of 260
Warning!
An incorrectly anchored tether strap
could lead to increased head motion and
possible injury to the child. Use only the
anchorage position directly behind the child
seat to secure a child restraint top tether
strap.
If your vehicle is equipped with a split rear
seat, make sure the tether strap does not
slip into the opening between the seatbacks
as you remove slack in the strap.
Transporting Pets
Air Bags deploying in the front seat could
harm your pet. An unrestrained pet will be
thrown about and possibly injured, or
injure a passenger during panic braking or
in a collision.
Pets should be restrained in the rear seat
in pet harnesses or pet carriers that are
secured by seat belts.
SAFETY TIPS
Transporting Passengers
NEVER TRANSPORT PASSENGERS IN
THE CARGO AREA.
Warning!
Do not leave children or animals inside
parked vehicles in hot weather. Interior heat
build-up may cause serious injury or death.
It is extremely dangerous to ride in a
cargo area, inside or outside of a vehicle. In
a collision, people riding in these areas are
more likely to be seriously injured or killed.
Do not allow people to ride in any area of
your vehicle that is not equipped with seats
and seat belts.
Be sure everyone in your vehicle is in a
seat and using a seat belt properly.
Exhaust Gas
Warning!
Exhaust gases can injure or kill. They contain
carbon monoxide (CO), which is colorless and
odorless. Breathing it can make you
unconscious and can eventually poison you.
To avoid breathing (CO), follow these safety
tips:
Do not run the engine in a closed garage
or in confined areas any longer than needed
to move your vehicle in or out of the area.
If you are required to drive with the
trunk/liftgate/rear doors open, make sure
that all windows are closed and the climate
control BLOWER switch is set at high speed.
DO NOT use the recirculation mode.
If it is necessary to sit in a parked vehicle
with the engine running, adjust your heating
or cooling controls to force outside air into
the vehicle. Set the blower at high speed.
The best protection against carbon
monoxide entry into the vehicle body is a
properly maintained engine exhaust
system.
Whenever a change is noticed in the
sound of the exhaust system, when
exhaust fumes can be detected inside the
vehicle, or when the underside or rear of
the vehicle is damaged, have a competent
mechanic inspect the complete exhaust
system and adjacent body areas for
broken, damaged, deteriorated, or
mispositioned parts. Open seams or
loose connections could permit exhaust
fumes to seep into the passenger
compartment. In addition, inspect the
exhaust system each time the vehicle is
raised for lubrication or oil change.
Replace as required.
127