fuses Alfa Romeo Giulia 2018 Owner's Manual
[x] Cancel search | Manufacturer: ALFA ROMEO, Model Year: 2018, Model line: Giulia, Model: Alfa Romeo Giulia 2018Pages: 260, PDF Size: 6 MB
Page 173 of 260
IN CASE OF EMERGENCY
Have a flat tire or a burnt-out bulb?
At times, a problem such as these may
interfere with your driving experience.
The section on emergencies can help you
to deal with critical situations
independently.
In an emergency, we recommend that you
call the phone number found in the
Warranty Book.
You may also consider contacting an
authorized dealer.HAZARD WARNING LIGHTS.....172
BULB REPLACEMENT .........172
FUSES .................. .177
TIRE SERVICE KIT ............183
JUMP STARTING ............186
REFUELING IN EMERGENCY .....188
ENGINE OVERHEATING ........189
TOWING A DISABLED VEHICLE . . .190
TOW EYES ............... .191
ENHANCED ACCIDENT RESPONSE
SYSTEM (EARS) .............192
EVENT DATA RECORDER (EDR) . . .192
171
Page 174 of 260
HAZARD WARNING LIGHTS
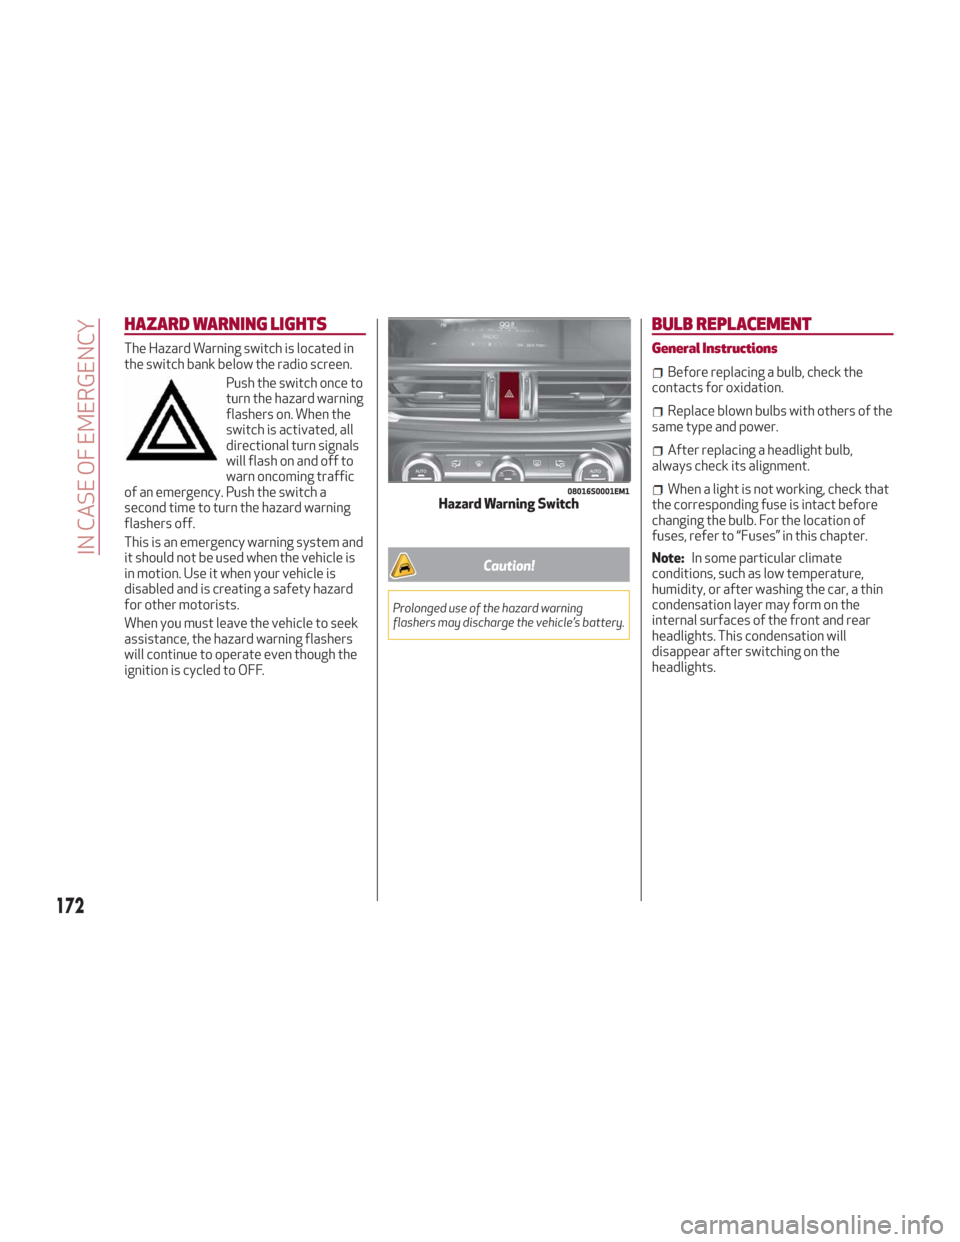
The Hazard Warning switch is located in
the switch bank below the radio screen.Push the switch once to
turn the hazard warning
flashers on. When the
switch is activated, all
directional turn signals
will flash on and off to
warn oncoming traffic
of an emergency. Push the switch a
second time to turn the hazard warning
flashers off.
This is an emergency warning system and
it should not be used when the vehicle is
in motion. Use it when your vehicle is
disabled and is creating a safety hazard
for other motorists.
When you must leave the vehicle to seek
assistance, the hazard warning flashers
will continue to operate even though the
ignition is cycled to OFF.
Caution!
Prolonged use of the hazard warning
flashers may discharge the vehicle’s battery.
BULB REPLACEMENT
General Instructions
Before replacing a bulb, check the
contacts for oxidation.
Replace blown bulbs with others of the
same type and power.
After replacing a headlight bulb,
always check its alignment.
When a light is not working, check that
the corresponding fuse is intact before
changing the bulb. For the location of
fuses, refer to “Fuses” in this chapter.
Note: In some particular climate
conditions, such as low temperature,
humidity, or after washing the car, a thin
condensation layer may form on the
internal surfaces of the front and rear
headlights. This condensation will
disappear after switching on the
headlights.08016S0001EM1Hazard Warning Switch
172
IN CASE OF EMERGENCY
Page 179 of 260
3. Install bulb, making sure that it is
correctly inserted fully.
4. Close the protective cover on the lens.
5. Install puddle light in the correct
position, inserting it firstly on one side
and then pressing on the other side until
it clicks into place.
FUSES
General Information
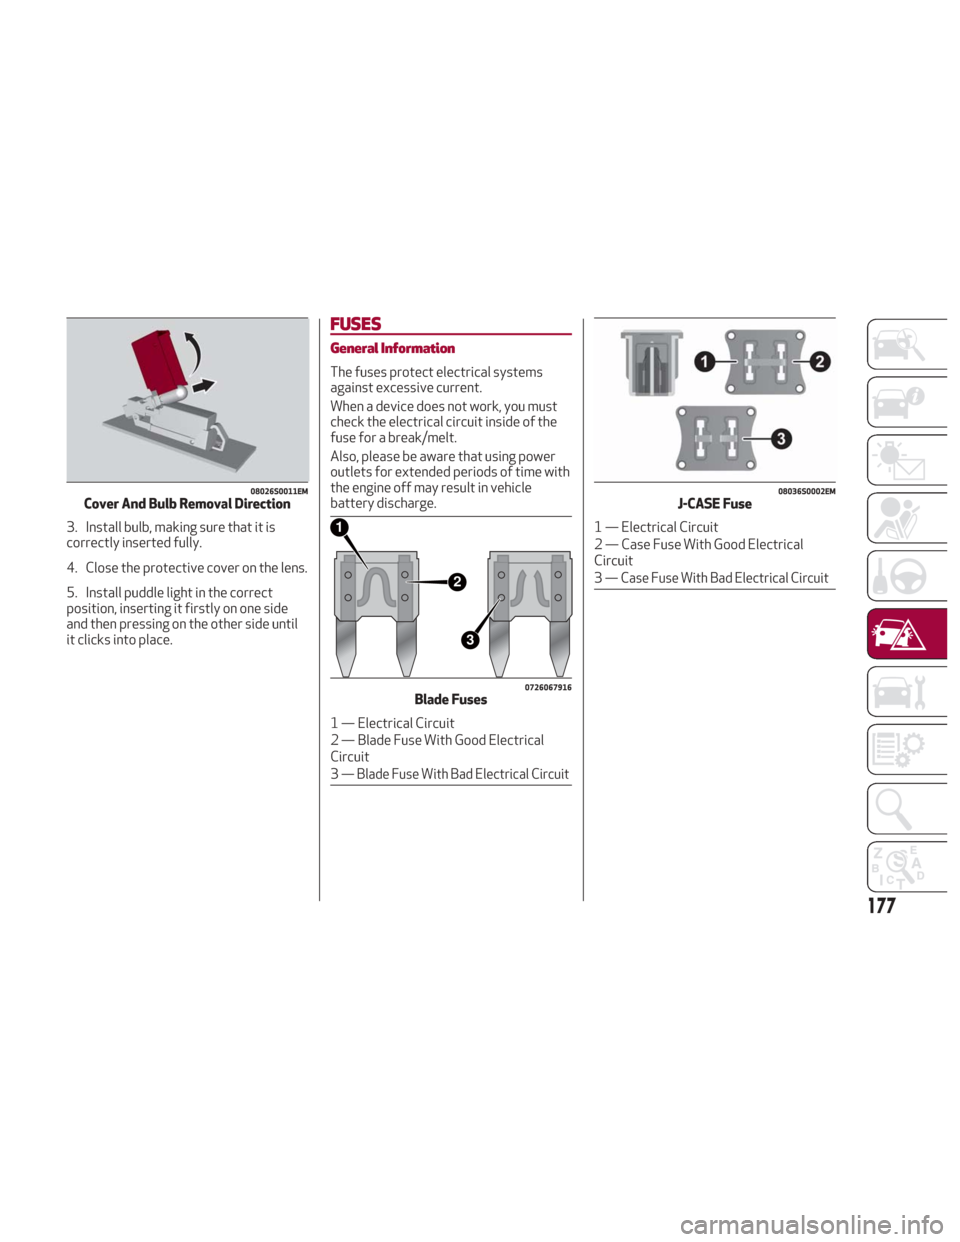
The fuses protect electrical systems
against excessive current.
When a device does not work, you must
check the electrical circuit inside of the
fuse for a break/melt.
Also, please be aware that using power
outlets for extended periods of time with
the engine off may result in vehicle
battery discharge.
08026S0011EMCover And Bulb Removal Direction
2
3
1
0726067916Blade Fuses
1 — Electrical Circuit
2 — Blade Fuse With Good Electrical
Circuit
3
— Blade Fuse With Bad Electrical Circuit
08036S0002EMJ-CASE Fuse
1 — Electrical Circuit
2 — Case Fuse With Good Electrical
Circuit
3
— Case Fuse With Bad Electrical Circuit
177
Page 180 of 260
Fuse Extracting Pliers
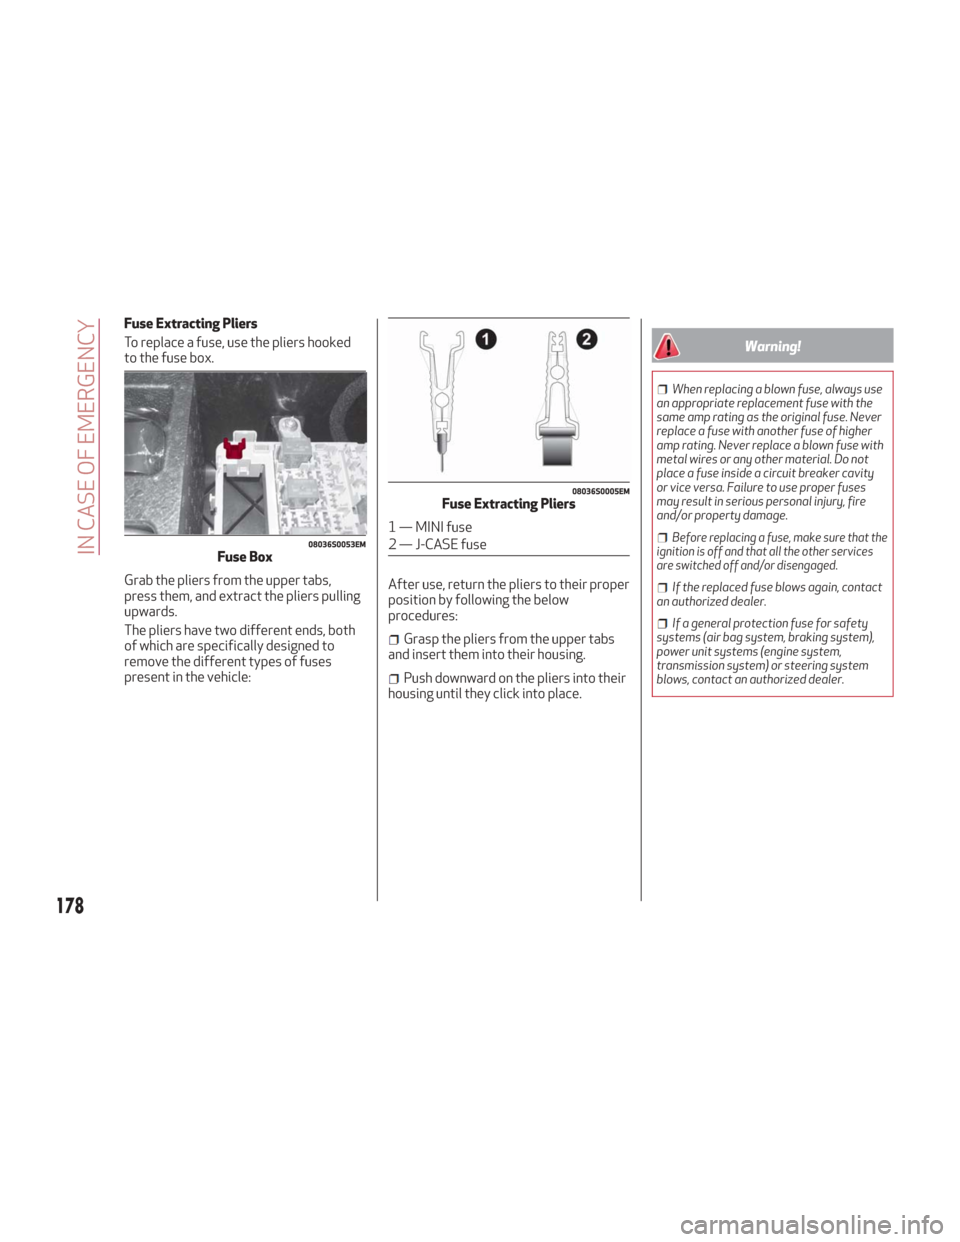
To replace a fuse, use the pliers hooked
to the fuse box.
Grab the pliers from the upper tabs,
press them, and extract the pliers pulling
upwards.
The pliers have two different ends, both
of which are specifically designed to
remove the different types of fuses
present in the vehicle:After use, return the pliers to their proper
position by following the below
procedures:
Grasp the pliers from the upper tabs
and insert them into their housing.
Push downward on the pliers into their
housing until they click into place.
Warning!
When replacing a blown fuse, always use
an appropriate replacement fuse with the
same amp rating as the original fuse. Never
replace a fuse with another fuse of higher
amp rating. Never replace a blown fuse with
metal wires or any other material. Do not
place a fuse inside a circuit breaker cavity
or vice versa. Failure to use proper fuses
may result in serious personal injury, fire
and/or property damage.
Before replacing a fuse, make sure that the
ignition is off and that all the other services
are switched off and/or disengaged.
If the replaced fuse blows again, contact
an authorized dealer.
If a general protection fuse for safety
systems (air bag system, braking system),
power unit systems (engine system,
transmission system) or steering system
blows, contact an authorized dealer.
08036S0053EMFuse Box
08036S0005EMFuse Extracting Pliers
1 — MINI fuse
2 — J-CASE fuse
178
IN CASE OF EMERGENCY
Page 181 of 260
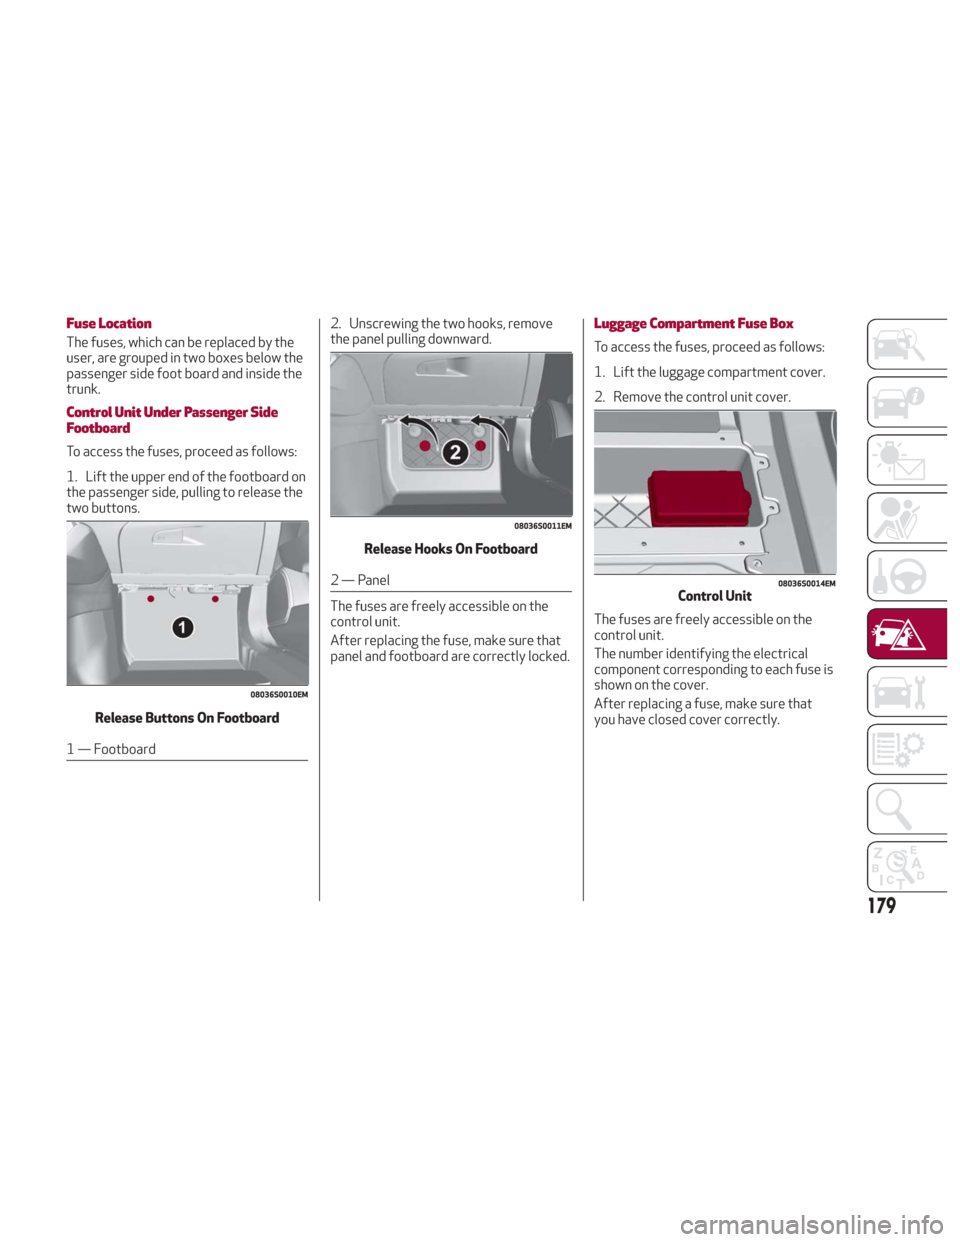
Fuse Location
The fuses, which can be replaced by the
user, are grouped in two boxes below the
passenger side foot board and inside the
trunk.
Control Unit Under Passenger Side
Footboard
To access the fuses, proceed as follows:
1. Lift the upper end of the footboard on
the passenger side, pulling to release the
two buttons.Release Buttons On Footboard
1 — Footboard 2. Unscrewing the two hooks, remove
the panel pulling downward.
Release Hooks On Footboard
2 — Panel
The fuses are freely accessible on the
control unit.
After replacing the fuse, make sure that
panel and footboard are correctly locked.
Luggage Compartment Fuse Box
To access the fuses, proceed as follows:
1. Lift the luggage compartment cover.
2. Remove the control unit cover.
The fuses are freely accessible on the
control unit.
The number identifying the electrical
component corresponding to each fuse is
shown on the cover.
After replacing a fuse, make sure that
you have closed cover correctly.
08036S0010EM
08036S0011EM
08036S0014EMControl Unit
179
Page 254 of 260
Courtesy Mirror Light(Bulb Replacement) ..........175
Cruise Control (Speed Control) .........149,151
Cupholder ..................55
Cupholders .................55
Customer Assistance ..........246
Daytime Running Lights ..........33
Daytime Running Lights (DRL) ......33
Defroster, Windshield ..........128
Dimensions ............... .237
Direction Indicators (Changing A Bulb) ...........174
Disabled Vehicle Towing .........190
Door Locks Child-Protection Door Lock —
Rear Doors ................24
Doors .....................20
Driving Modes ............. .143
Dynamic Steering Torque (DST) System ..................92
Electric Park Brake ............135
Electric Remote Mirrors .........31
Electric Steering Wheel Heating .....30
Electronic Speed Control (Cruise Control) .........149,151
Electronic Stability Control (ESC) System ..................90 Emergency Refuelling
..........188
Emergency, In Case Of ..........183
Hazard Warning Flasher .......172
Jacking ................ .208
Jump Starting ..........186,187
Overheating ............. .189
Tow Hooks .............. .191
Towing ................ .190
Emission Control System Maintenance ...............86
Engine .................. .231
Engine Coolant Level .........199
Exhaust Gas Caution .........127
Fuel Requirements ..........239
Jump Starting ..........186,187
Overheating .............
.189
Starting ............... .188
T
emperature Gauge ..........59
Engine Compartment ..........198
Engine Compartment (Washing) . . . .227
Engine Oil Level Check ............. .199
Engine Overheating ...........189
Enhanced Accident Response Feature ............. .114,192
Environmental Protection Systems . . .55
Ethanol .................. .239
Exhaust Gas Cautions ..........127
Exhaust System .............127 Exterior Lighting
............32,34
Exterior Lights ............32,129
External Lights ...............32
Flashers Hazard Warning ............172
Turn Signal ...............35
Turn Signals ..............129
Fluid Leaks ............... .129
Fluids And Lubricants ..........242
Forward Collision Warning ........95
Front Light Cluster With Main Beam Xenon Gas Discharge Headlights
(Bulb Replacement) ..........175
Front Mobile Spoiler (Alfa Active Aero) ...................55
Front Seat Electric Heating .......27
Front Seats (Power Seats) ........26
Front Wipers Wiper Operation ............39
Fuel Additives ............... .240
Clean Air ............... .239
Ethanol ................ .239
Gauge ..................59
Materials Added ...........240
Methanol ............... .239
Fuse Boxes ............... .179
Fuses (Replacement) ..........177
INDEX