hood release Alfa Romeo Giulia 2018 Owner's Manual
[x] Cancel search | Manufacturer: ALFA ROMEO, Model Year: 2018, Model line: Giulia, Model: Alfa Romeo Giulia 2018Pages: 260, PDF Size: 6 MB
Page 21 of 260
SECURITY ALARMSYSTEM
Alarm Activation
While armed, the alarm will sound in the
following scenarios:
Opening of doors/hood/trunk lid
(perimeter protection)
Operation of ignition with a key which
is not validated
Cutting of the battery cables
Movement inside the passenger
compartment (volumetric protection —
if equipped)
Unexpected lifting/tilting of the
vehicle (anti-lift protection — if
equipped)
Activation of the alarm triggers the
acoustic warning and the turn signals.
Note: The alarm system is activated by
the Engine Immobilizer system, which is
automatically activated when you get out
of the vehicle with the key fob and lock
the doors.
To Arm The Alarm
With the doors, hood, and trunk lid closed
and the keyless ignition system placed in
the STOP position, push and release the
lock button on the key fob. The alarm can
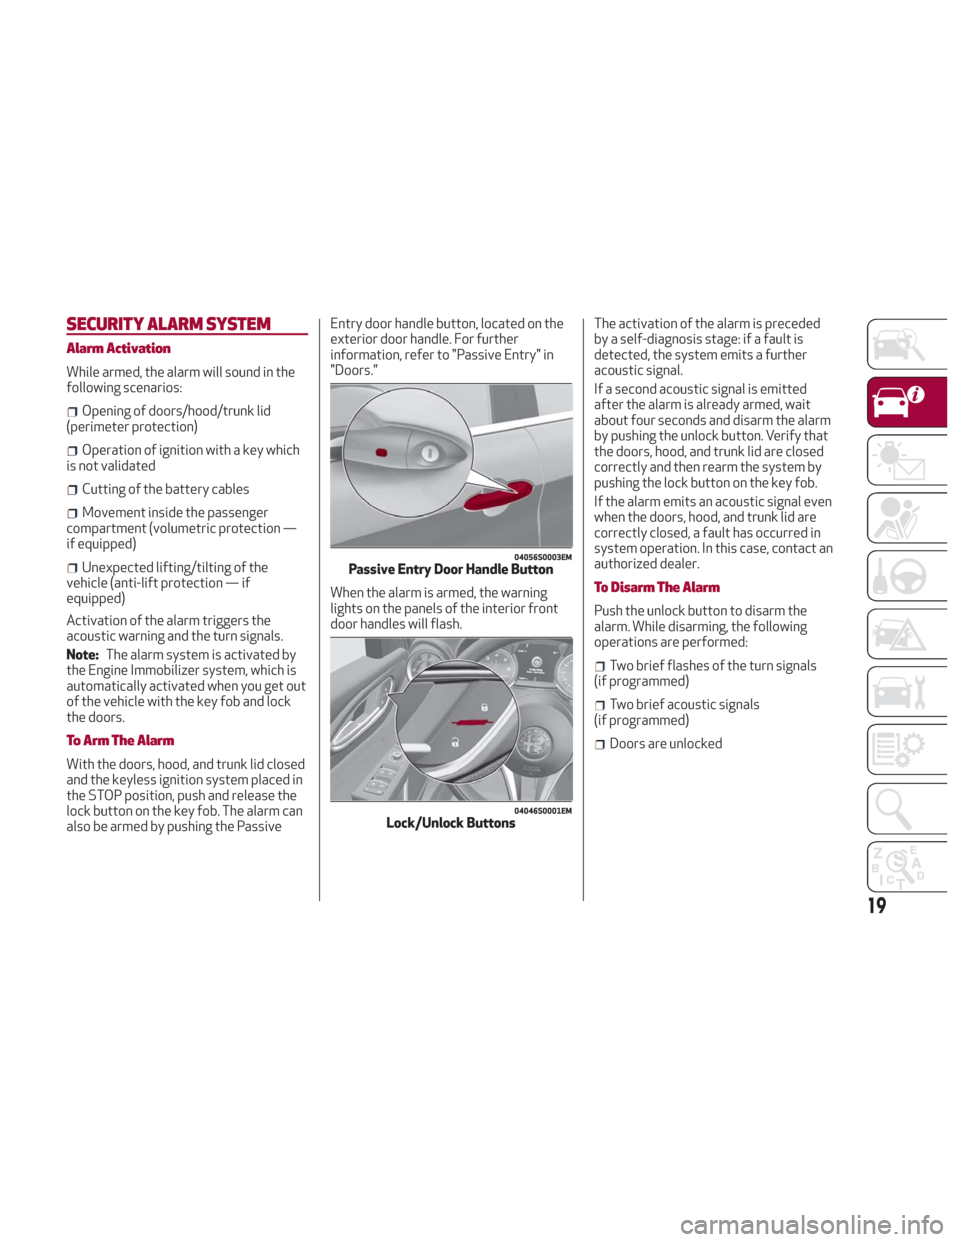
also be armed by pushing the Passive Entry door handle button, located on the
exterior door handle. For further
information, refer to "Passive Entry" in
"Doors.”
When the alarm is armed, the warning
lights on the panels of the interior front
door handles will flash.
The activation of the alarm is preceded
by a self-diagnosis stage: if a fault is
detected, the system emits a further
acoustic signal.
If a second acoustic signal is emitted
after the alarm is already armed, wait
about four seconds and disarm the alarm
by pushing the unlock button. Verify that
the doors, hood, and trunk lid are closed
correctly and then rearm the system by
pushing the lock button on the key fob.
If the alarm emits an acoustic signal even
when the doors, hood, and trunk lid are
correctly closed, a fault has occurred in
system operation. In this case, contact an
authorized dealer.
To Disarm The Alarm
Push the unlock button to disarm the
alarm. While disarming, the following
operations are performed:
Two brief flashes of the turn signals
(if programmed)
Two brief acoustic signals
(if programmed)
Doors are unlocked
04056S0003EMPassive Entry Door Handle Button
04046S0001EMLock/Unlock Buttons
19
Page 50 of 260
Window Opening
Push the buttons to open the desired
window.
Each button has two position steps. Push
gently (first position step) for manual
"burst" window travel, while pushing the
same button harder (second position
step) activates "continuous automatic"
operation.
If the button is pushed again, the window
will stop in the desired position.
Window Closing
Pull the window switch up to move the
window upward. Hold the switch for at
least half of a second and the window will
go up automatically.
To stop the window during Auto-Up
operation, push or pull the window switch
again.
Passenger Side Front Door/Rear Door
Controls
There are single window controls on the
passenger and rear door trim panels
which operate the door windows.
Auto-Up Feature With Anti-Pinch
Protection
The vehicle may be equipped with an
anti-pinch safety device for closing the
windows.
If the safety system senses any obstacle
while the window is closing, it will stop
the window’s movement and reverse it,
depending on its position.This device is also useful if the windows
are activated accidentally by children
inside the vehicle.
The anti-pinch safety function is
activated both during the manual and the
automatic operation of the window.
When the anti-pinch system is activated,
the window closing is immediately
interrupted. Then the window closing is
automatically reversed and the window
lowers by about eight inches (20 cm) in
relation to the first stop position. The
window cannot be operated during this
time.
Note:
In the event of an error, or if the
anti-pinch protection is activated three
consecutive times, the automatic closing
operation of the window will be
deactivated. In order to restore the
correct operation of the system, the
window must be lowered.
Power Window System Initialization
If power supply is interrupted, the
electric window automatic operation
must be reinitialized.
To perform the initialization procedure,
which must be done on each door with the
doors closed, manually fully close the
window to be initialized.HOOD
Opening
To open the hood, proceed as follows:
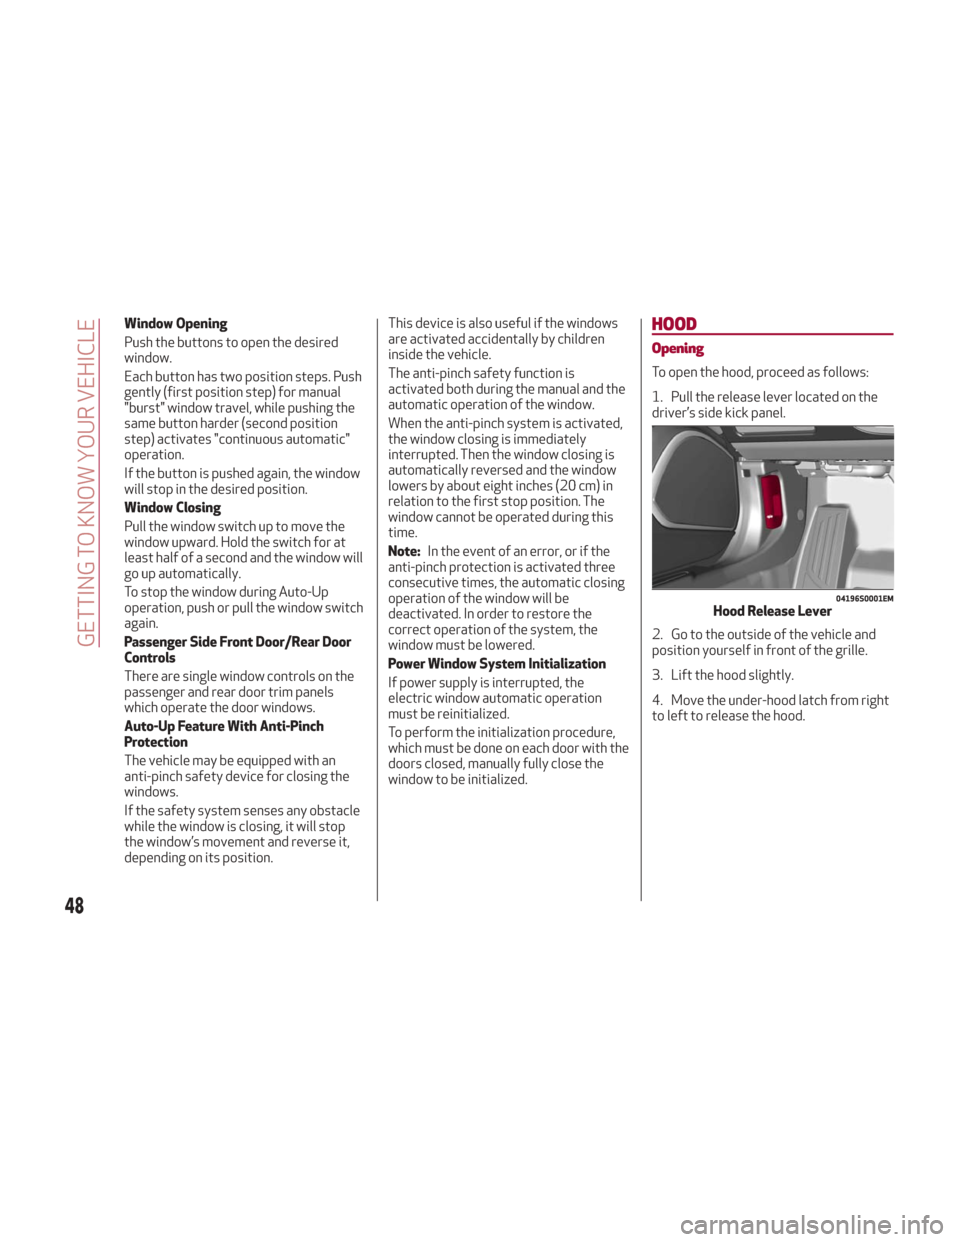
1. Pull the release lever located on the
driver’s side kick panel.
2. Go to the outside of the vehicle and
position yourself in front of the grille.
3. Lift the hood slightly.
4. Move the under-hood latch from right
to left to release the hood.
04196S0001EMHood Release Lever
48
GETTING TO KNOW YOUR VEHICLE
Page 51 of 260
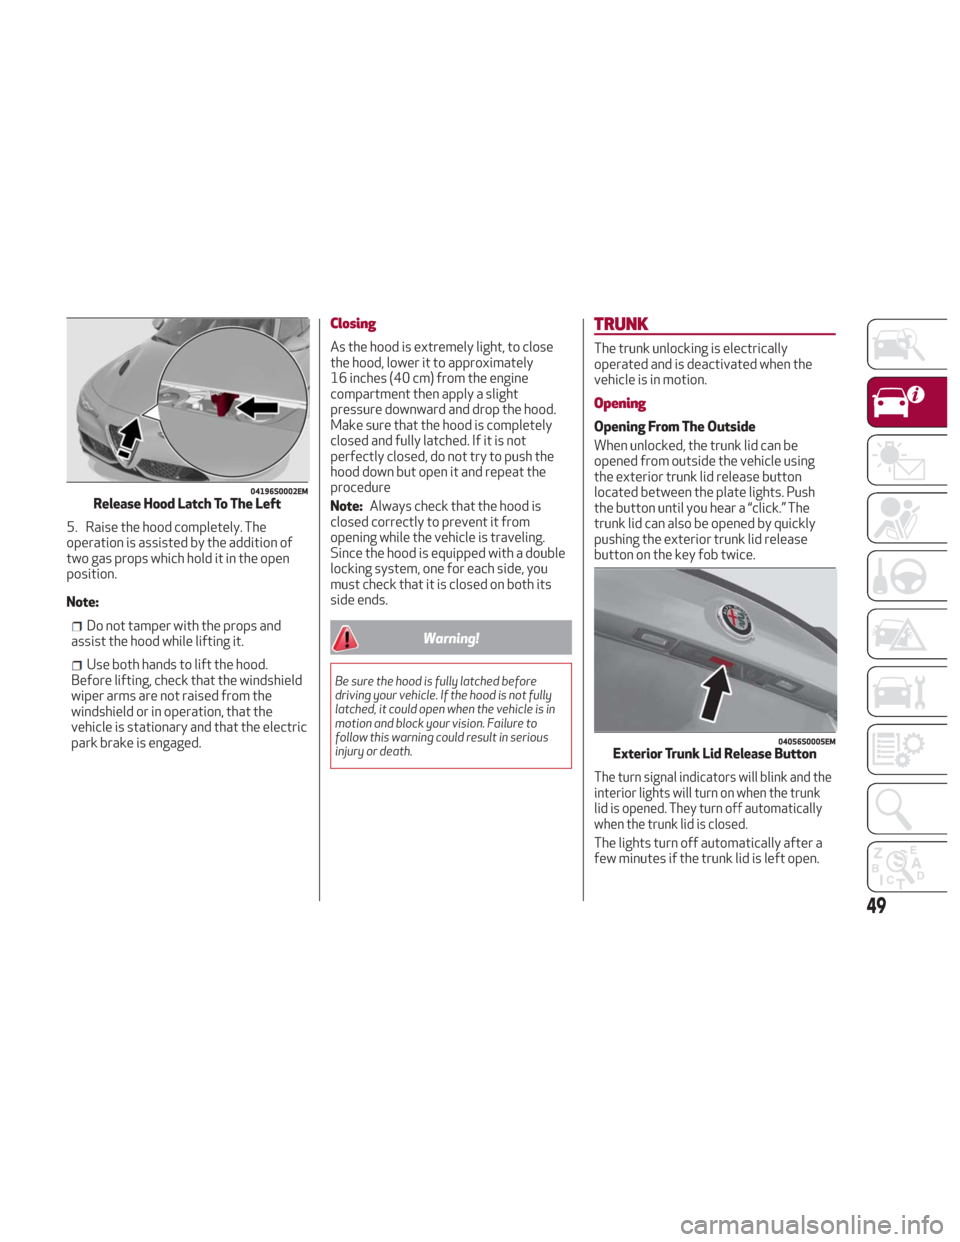
5. Raise the hood completely. The
operation is assisted by the addition of
two gas props which hold it in the open
position.
Note:
Do not tamper with the props and
assist the hood while lifting it.
Use both hands to lift the hood.
Before lifting, check that the windshield
wiper arms are not raised from the
windshield or in operation, that the
vehicle is stationary and that the electric
park brake is engaged.
Closing
As the hood is extremely light, to close
the hood, lower it to approximately
16 inches (40 cm) from the engine
compartment then apply a slight
pressure downward and drop the hood.
Make sure that the hood is completely
closed and fully latched. If it is not
perfectly closed, do not try to push the
hood down but open it and repeat the
procedure
Note: Always check that the hood is
closed correctly to prevent it from
opening while the vehicle is traveling.
Since the hood is equipped with a double
locking system, one for each side, you
must check that it is closed on both its
side ends.
Warning!
Be sure the hood is fully latched before
driving your vehicle. If the hood is not fully
latched, it could open when the vehicle is in
motion and block your vision. Failure to
follow this warning could result in serious
injury or death.
TRUNK
The trunk unlocking is electrically
operated and is deactivated when the
vehicle is in motion.
Opening
Opening From The Outside
When unlocked, the trunk lid can be
opened from outside the vehicle using
the exterior trunk lid release button
located between the plate lights. Push
the button until you hear a “click.” The
trunk lid can also be opened by quickly
pushing the exterior trunk lid release
button on the key fob twice.
The turn signal indicators will blink and the
interior lights will turn on when the trunk
lid is opened. They turn off automatically
when the trunk lid is closed.
The lights turn off automatically after a
few minutes if the trunk lid is left open.
04196S0002EMRelease Hood Latch To The Left
04056S0005EMExterior Trunk Lid Release Button
49
Page 52 of 260
Opening From The Inside
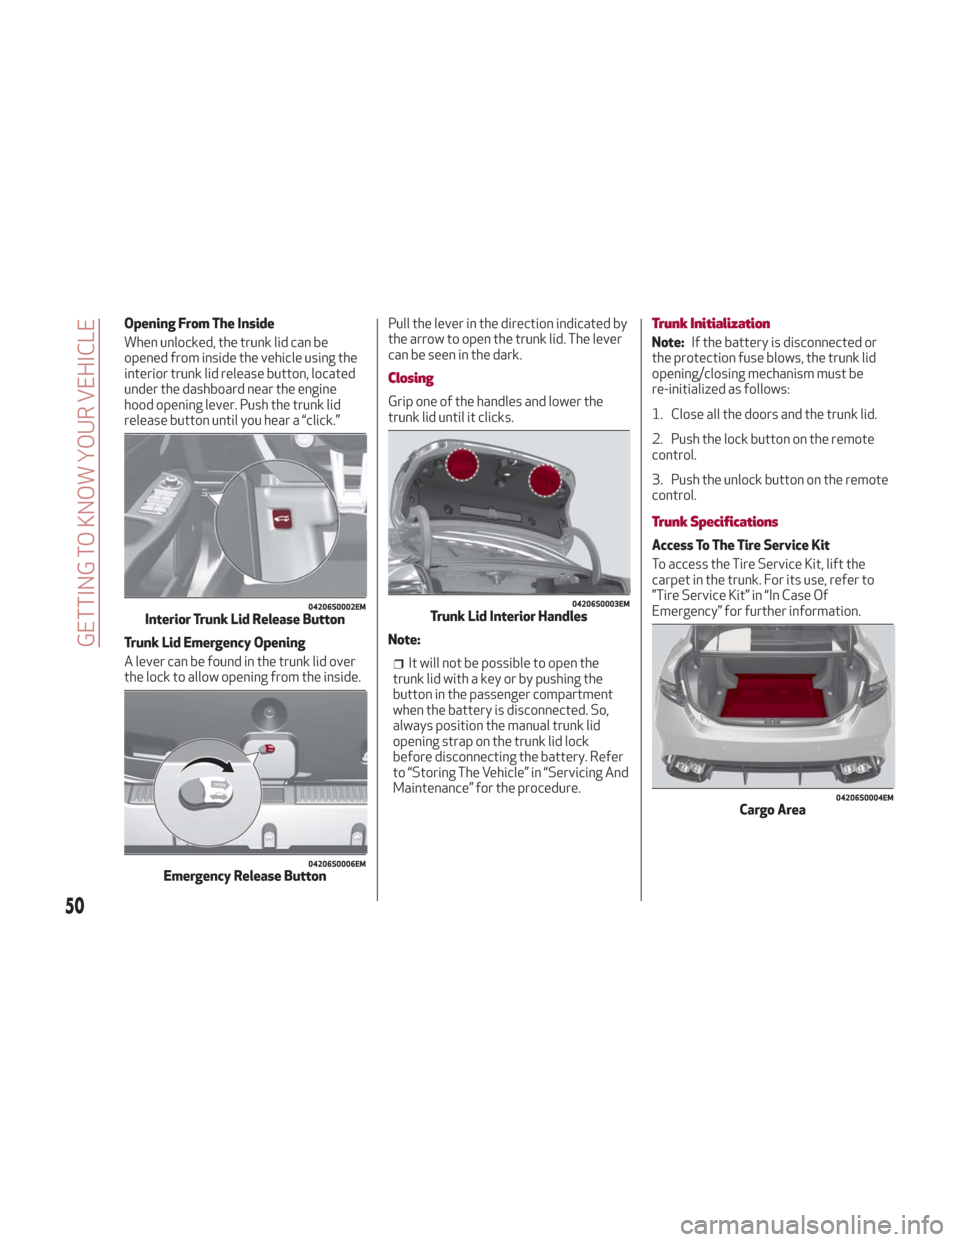
When unlocked, the trunk lid can be
opened from inside the vehicle using the
interior trunk lid release button, located
under the dashboard near the engine
hood opening lever. Push the trunk lid
release button until you hear a “click.”
Trunk Lid Emergency Opening
A lever can be found in the trunk lid over
the lock to allow opening from the inside.Pull the lever in the direction indicated by
the arrow to open the trunk lid. The lever
can be seen in the dark.
Closing
Grip one of the handles and lower the
trunk lid until it clicks.
Note:
It will not be possible to open the
trunk lid with a key or by pushing the
button in the passenger compartment
when the battery is disconnected. So,
always position the manual trunk lid
opening strap on the trunk lid lock
before disconnecting the battery. Refer
to “Storing The Vehicle” in “Servicing And
Maintenance” for the procedure.
Trunk Initialization
Note: If the battery is disconnected or
the protection fuse blows, the trunk lid
opening/closing mechanism must be
re-initialized as follows:
1. Close all the doors and the trunk lid.
2. Push the lock button on the remote
control.
3. Push the unlock button on the remote
control.
Trunk Specifications
Access To The Tire Service Kit
To access the Tire Service Kit, lift the
carpet in the trunk. For its use, refer to
”Tire Service Kit” in “In Case Of
Emergency” for further information.
04206S0002EMInterior Trunk Lid Release Button
04206S0006EMEmergency Release Button
04206S0003EMTrunk Lid Interior Handles
04206S0004EMCargo Area
50
GETTING TO KNOW YOUR VEHICLE
Page 149 of 260
System Activation
The activation of the system is indicated
by the
symbol lighting up on the
display. In this condition, the light on the
button is off.
System Deactivation
A message will appear on the display
when the system is deactivated. In this
condition, the light on the button is on.
Note: Each time the engine is started,
the system is activated regardless of
where was when it was previously
switched off.
Possible Reasons The Engine Does Not
Autostop
For higher comfort and increased safety,
and to reduce emissions, there are
certain conditions where the engine will
not autostop despite the system being
active, such as:
Engine still cold.
Especially cold outside temperature.
Battery not sufficiently charged.
Driver's door not shut.
Driver's seat belt not fastened.
Reverse gear engaged (e.g. for parking
maneuvers).
With the automatic climate control
active, an adequate cabin heating or
cooling comfort has not been reached or
with MAX-DEF function active.
During the first period of use, to
initialize the system.
Steering angle beyond threshold.
Engine Restarting Conditions
Due to comfort, emission control and
safety reasons, the engine can restart
automatically without any action by the
driver, under special conditions, such as:
Battery not sufficiently charged.
Reduced braking system vacuum (e.g.
if the brake pedal is pressed repeatedly).
Vehicle moving (e.g. when driving on
roads with a grade).
Engine stopping by the Stop/Start
system for more than approx. three
minutes.
With the automatic climate control
active, an adjustment in cabin heating or
cooling is made or with MAX-DEF
function active.
Safety Functions
When the engine is stopped through the
Stop/Start system, if the driver releases
their seat belt, opens the driver's or
passenger's door, or opens the hood from
inside the vehicle, the engine can be
restarted only by using the ignition.
This condition is indicated to the driver
both through a buzzer and a message on
the instrument cluster display.
Irregular Operation
In the event of malfunction, the
Stop/Start system is deactivated.
For failure indications, see the "Warning
Lights and Messages" paragraph,
"Getting To Know Your Instrument Panel"
chapter.
Vehicle Inactivity
In the event of vehicle inactivity (or if the
battery is replaced), special attention
must be paid to the disconnection of the
battery power supply.
Proceed as follows:
Remove connector from socket to
disconnect sensor (battery status
monitoring) installed on the negative pole
of the battery. This sensor should never
be disconnected from the pole except if
the battery is replaced.
147
Page 188 of 260
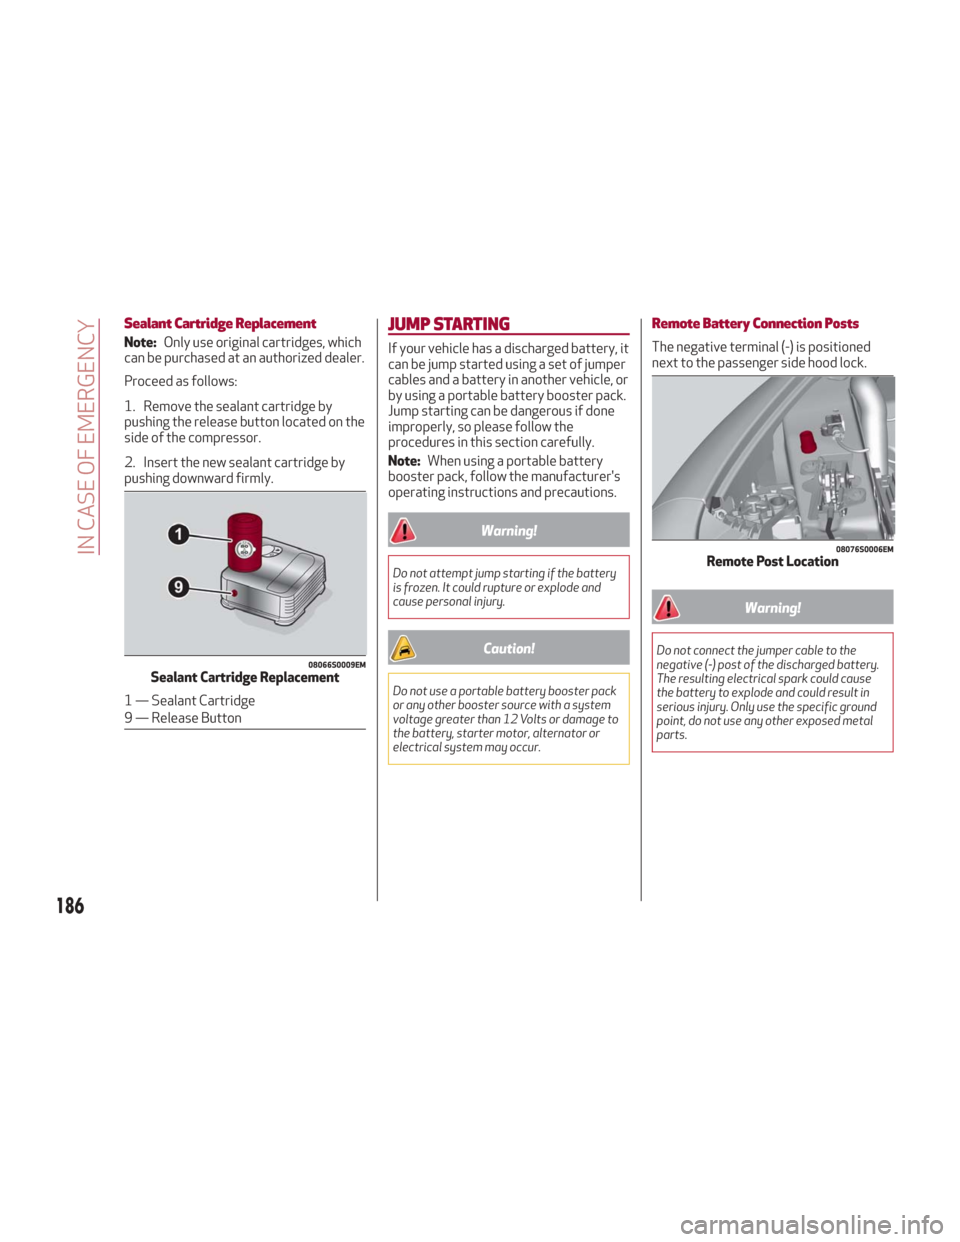
Sealant Cartridge Replacement
Note:Only use original cartridges, which
can be purchased at an authorized dealer.
Proceed as follows:
1. Remove the sealant cartridge by
pushing the release button located on the
side of the compressor.
2. Insert the new sealant cartridge by
pushing downward firmly.
JUMP STARTING
If your vehicle has a discharged battery, it
can be jump started using a set of jumper
cables and a battery in another vehicle, or
by using a portable battery booster pack.
Jump starting can be dangerous if done
improperly, so please follow the
procedures in this section carefully.
Note: When using a portable battery
booster pack, follow the manufacturer's
operating instructions and precautions.
Warning!
Do not attempt jump starting if the battery
is frozen. It could rupture or explode and
cause personal injury.
Caution!
Do not use a portable battery booster pack
or any other booster source with a system
voltage greater than 12 Volts or damage to
the battery, starter motor, alternator or
electrical system may occur.
Remote Battery Connection Posts
The negative terminal (-) is positioned
next to the passenger side hood lock.
Warning!
Do not connect the jumper cable to the
negative (-) post of the discharged battery.
The resulting electrical spark could cause
the battery to explode and could result in
serious injury. Only use the specific ground
point, do not use any other exposed metal
parts.08066S0009EMSealant Cartridge Replacement
1 — Sealant Cartridge
9 — Release Button
08076S0006EMRemote Post Location
186
IN CASE OF EMERGENCY
Page 205 of 260
Air Filter
Replacing The Air Cleaner
See the "Maintenance Plan" for the
correct servicing intervals. It is advised to
replace it with a genuine spare part,
specifically designed for this vehicle.
Air Conditioning System Maintenance
To ensure the best possible performance,
the air conditioning system must be
checked and undergo maintenance at an
authorized dealer at the beginning of the
summer.
Caution!
Do not use chemicals to clean the air
conditioning system, since the internal
components may be damaged. This kind of
damage is not covered by warranty.
Replace The Cabin Air Filter
See the "Maintenance Plan" for the
correct servicing intervals. For cleaner
replacement, contact an authorized
dealer.
Warning!
Use only refrigerants and compressor
lubricants approved by the manufacturer for
your air conditioning system. Some
unapproved refrigerants are flammable and
can explode, injuring you. Other unapproved
refrigerants or lubricants can cause the
system to fail, requiring costly repairs. Refer
to Warranty Information Book, located in
your owner’s information kit, for further
warranty information.
Lubricating Moving Parts Of The
Bodywork
Ensure that the locks and bodywork
junction points, including components
such as the seat guides, door hinges (and
rollers), trunk and hood are periodically
lubricated with lithium-based grease to
ensure correct, silent operation and to
protect them from rust and wear.
Thoroughly clean the components,
eliminating every trace of dirt and dust.
After lubricating, eliminate excess oil and
grease. Also pay particular attention to
the hood closing devices, to ensure
correct operation. During operations on
the hood, to be carried out with the
engine cold, also remember to check,
clean and lubricate the locking, release
and safety devices.Lubricate the external lock barrels twice
a year. Apply a small amount of
high-quality lubricant directly into the
lock barrel.
If necessary, contact your authorized
dealer as soon as possible.
Windshield Wiper
Periodically clean the windshield and rear
window and rubber profile of the
windshield wiper blades, using a sponge
or a soft cloth and a non-abrasive
detergent. This eliminates the salt or
impurities accumulated when driving.
Prolonged operation of the windshield
window wipers with dry glass may cause
the deterioration of the blades, in
addition to abrasion of the surface of the
glass. To eliminate the impurities on the
dry glass, always operate the windshield
washers.
In the event of very low outdoor
temperatures, below zero degrees,
ensure that the movement of the rubber
part in contact with the glass is not
obstructed. Use a suitable deicing
product to release it if required.
Avoid using the windshield wipers to
remove frost or ice.
Also avoid contact of the rubber profile
of the blades with petroleum derivatives
such as engine oil, gas, etc.
203
Page 255 of 260
Garage Door Opener (HomeLink)....52
Gasoline, Clean Air ............239
Gasoline, Reformulated .........239
Gauges Speedometer ..............59
Tachometer ...............59
General Information ...........158
Glove Compartment ............51
Glove Compartment Light ........36
Glove Compartment Light (Bulb Replacement) ..........175
GVWR .................. .166
Hazard Warning Flasher .........172
Head Restraints ..............28
Head Rests .................28
Headlights Switch ............... .32,34
Headlights (Cleaning) ..........227
Heated Mirrors ...............32
High Beam Headlights ...........34
Automatic High Beam
Headlights ................34
Hill Start Assist (HSA) System ......92
Hood .....................48
Hood Release ................48
Identification Data ............230
Ignition ....................16 Installing Electrical/Electronic
Devices ...................3
Instrument Cluster Display Instrument Cluster Display ......60
Reconfigurable Instrument
Cluster Display .............60
Instrument Panel Features Instrument Panel Features ......58
Interior Ambient Lighting .........37
Interior Lights ................35
Interiors (Cleaning) ............228
Internal Equipment ............51
Jack Operation ............. .208
Jump Starting ............186,187
Key Fob Remote Keyless Entry .........14
Keyless Entry System/Immobilizer System ..................18
Lane Change ................35
Lane Change And Turn Signals ......35
Lane Departure Warning System . . .161
LaneSense ................ .161
Lap/Shoulder Belts ...........103
Latches .................. .129
Leaks,
Fluid............... .129
Life Of Tires ............... .219Lifting The Vehicle
............208
Light Bulbs ................ .129
Types Of Bulbs ............173
Light Switch .................32
Lights ................... .129
AirBag ..............108,128
Automatic Headlights .........33
Courtesy/Reading .........35,37
Daytime Running ............33
Exterior ................ .129
Hazard Warning Flasher .......172
Headlight Switch ..........32,34
Headlights .............32,34
High Beam ................34
Instrument Cluster ........32,34
Intensity Control ............38
Interior ..................37
Map Reading ..............35
Park ...................33
Reading .................35
Turn Signal ...............35
Turn Signals ..............129
Loading Vehicle ..............166
Tires .................. .212
Luggage Compartment Light (Bulb Replacement) ..........176
Luggage/Cargo Capacity .........49