charging ALFA ROMEO GIULIA 2022 Owners Manual
[x] Cancel search | Manufacturer: ALFA ROMEO, Model Year: 2022, Model line: GIULIA, Model: ALFA ROMEO GIULIA 2022Pages: 248, PDF Size: 9.71 MB
Page 11 of 248
9
EXTERIOR LIGHTS ....................................42
Headlight Switch .................................... 42
Daytime Running Lights (DRLs) ............ 42
High Beam Headlights ........................... 42
Automatic Headlights ........................... 43
Flash-To-Pass ......................................... 43
Automatic High Beam Headlights —
If Equipped ............................................. 43 Parking Lights ........................................ 43
Headlight Off Delay ................................ 44
Rear Fog Light ........................................ 44
Adaptive Frontlight System
(AFS Function) — If Equipped ................ 44 Turn Signals ........................................... 44
Lane Change Assist ............................... 44
Static Bending Light Function
(SBL) — If Equipped ............................... 44
INTERIOR LIGHTS .....................................44
Front Map Reading Lights ..................... 45
Interior Ambient Lighting ....................... 45
Rear Overhead Light .............................. 45
Instrument Panel Dimmer Control ....... 46
WINDSHIELD WIPERS AND WASHERS....46
Windshield Wiper Operation ................. 46
Rain Sensing Wipers.............................. 47
Headlight Washers — If Equipped......... 48
CLIMATE CONTROL .................................48
Automatic Dual-Zone Climate Control
System ................................................... 49
INTERIOR STORAGE AND EQUIPMENT....55
Glove Compartment .............................. 55
Center Console ...................................... 55
Power Outlet........................................... 55 Cigar Lighter And Ash Tray —
If Equipped .............................................56 Wireless Charging Pad — If Equipped ...57
POWER WINDOWS................................... 57
Power Window Controls .........................57
Auto-Up Feature With Anti-Pinch
Protection ............................................... 58 Power Window System Initialization .....58
Wind Buffeting .......................................58
POWER SUNROOF — IF EQUIPPED ......... 58
Power Sunroof ........................................ 58
Opening And Closing The Sunroof ........59
Venting Sunroof......................................59
Sunshade Operation ..............................59
Pinch Protect Feature ............................59
Re-Initialization Procedure ....................59
Sunroof Maintenance ............................60
HOOD ...................................................... 60
Opening The Hood ................................. 60
Closing The Hood ...................................61
TRUNK ...................................................... 61
Opening...................................................61
Closing ....................................................62
Trunk Initialization..................................62
Trunk Specifications .............................62
ENVIRONMENTAL PROTECTION
SYSTEMS ................................................. 63
ACTIVE AERODYNAMIC SPOILER
(QUADRIFOGLIO VEHICLES) .................... 63
Carbon Fiber Active Aero Front
Spoiler .....................................................63
GETTING TO KNOW YOUR
INSTRUMENT PANEL
INSTRUMENT PANEL FEATURES ............ 64
Instrument Cluster ................................ 64
Tachometer............................................ 65
Engine Oil Temperature Gauge ............ 65
Fuel Level Gauge ................................... 66
Speedometer ......................................... 66
INSTRUMENT CLUSTER DISPLAY ........... 66
Instrument Cluster Display
Description ............................................. 66 Reconfigurable Instrument Cluster
Display .................................................... 66 Reconfigurable Display Items ............... 66
Customer Programmable Settings ....... 69
WARNING LIGHTS AND MESSAGES ON
THE INSTRUMENT PANEL ....................... 70
Red Warning Lights ............................... 70
Amber Warning Lights ........................... 72
Green Indicator Lights........................... 74
Blue Indicator Lights ............................. 74
Red Symbols .......................................... 74
Amber Symbols ...................................... 76
Green Symbols ...................................... 79
Blue Symbols ......................................... 79
ONBOARD DIAGNOSTIC SYSTEM ........... 79
Onboard Diagnostic System (OBD II)
Cybersecurity ......................................... 79
EMISSIONS INSPECTION AND
MAINTENANCE PROGRAMS .................... 80
22_GA_OM_EN_USC_t.book Page 9
Page 14 of 248

12
ENGINE COMPARTMENT....................... 187
Checking Levels — 2.0L Engine .......... 187
Checking Levels — 2.9L Engine .........188
Engine Oil ............................................. 188
Engine Coolant ..................................... 190
Washer Fluid For Windshield/
Headlights ............................................ 190 Brake Fluid ...........................................190
Automatic Transmission Activation
System Oil ............................................ 190 Useful Advice For Extending The Life
Of Your Battery ..................................... 190 Battery ..................................................190
Pressure Washing ................................ 191
BATTERY RECHARGING......................... 191
Important Notes ...................................191
VEHICLE MAINTENANCE ....................... 192
Engine Oil ............................................. 192
Engine Oil Filter ....................................192
Engine Air Cleaner ............................... 192
Air Conditioning System
Maintenance ........................................192 Lubricating Moving Parts Of The
Bodywork ..............................................193 Windshield Wiper .................................193
Exhaust System ...................................194
Engine Cooling System ........................ 195
Braking System ....................................196
Automatic Transmission ......................196
Replacing The Battery ......................... 197
Fuses ................................................... 197
Bulb Replacement ............................... 202
TIRES ..................................................... 206
Tire Safety Information ....................... 206
Tires — General Information .............. 212
Spare Tires — If Equipped ................... 216
Wheel And Wheel Trim Care ............... 217
Tire Types ............................................. 217
Snow Traction Devices ........................ 218
Tire Rotation Recommendations........ 219
DEPARTMENT OF TRANSPORTATION
UNIFORM TIRE QUALITY GRADES ........ 219
Treadwear ............................................ 219
Traction Grades ................................... 220
Temperature Grades ........................... 220
STORING THE VEHICLE ......................... 220
BODYWORK ............................................ 221
Protection Against Atmospheric
Agents .................................................. 221 Corrosion Warranty.............................. 221
Preserving The Bodywork.................... 222
INTERIORS.............................................. 222
Seats And Fabric Parts........................ 222
Leather Seats ...................................... 223
Plastic And Coated Parts .................... 223
Alcantara Parts — If Equipped ............ 223
Genuine Leather Surfaces —
If Equipped ........................................... 223 Carbon Fiber Parts .............................. 223
TECHNICAL SPECIFICATIONS
VEHICLE IDENTIFICATION NUMBER
(VIN) ........................................................ 224
Vehicle Identification Number (VIN)
Plate ..................................................... 224
ENGINE .................................................. 224
POWER SUPPLY ..................................... 225 TRANSMISSION ..................................... 225BRAKES.................................................. 226
SUSPENSION ......................................... 226
STEERING SYSTEM ............................... 226DIMENSIONS — 2.0L ENGINE ............... 227
DIMENSIONS — 2.9L Engine ................ 228
WEIGHTS — 2.0L ENGINE ..................... 229
WEIGHTS — 2.9L ENGINE ..................... 229
FUEL REQUIREMENTS .......................... 230
Reformulated Gasoline....................... 230
Gasoline/Oxygenate Blends ............... 230
CNG And LP Fuel System
Modifications ....................................... 230 Methylcyclopentadienyl Manganese
Tricarbonyl (MMT) In Gasoline ........... 230 Materials Added To Fuel ..................... 230
Fuel System Cautions ......................... 231
FLUID CAPACITIES ................................. 231
2.0L Engine ......................................... 231
2.9L V6 Engine .................................... 232
ENGINE FLUIDS AND LUBRICANTS ...... 233
2.0L Engine ......................................... 233
2.9L Engine ......................................... 233
CHASSIS FLUIDS AND LUBRICANTS..... 234
2.0L Engine ......................................... 234
2.9L Engine ......................................... 234
PERFORMANCE — 2.0L ENGINE........... 235 PERFORMANCE — 2.9L ENGINE........... 235
22_GA_OM_EN_USC_t.book Page 12
Page 59 of 248
57
WIRELESS CHARGING PAD —
I
F EQUIPPED
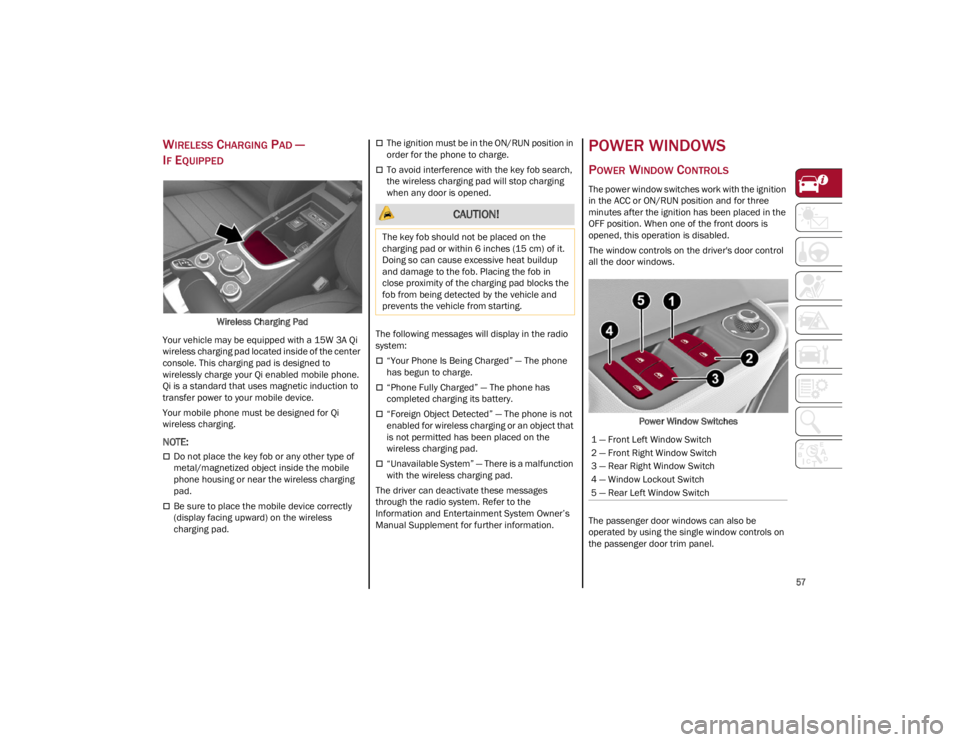
Wireless Charging Pad
Your vehicle may be equipped with a 15W 3A Qi
wireless charging pad located inside of the center
console. This charging pad is designed to
wirelessly charge your Qi enabled mobile phone.
Qi is a standard that uses magnetic induction to
transfer power to your mobile device.
Your mobile phone must be designed for Qi
wireless charging.
NOTE:
Do not place the key fob or any other type of
metal/magnetized object inside the mobile
phone housing or near the wireless charging
pad.
Be sure to place the mobile device correctly
(display facing upward) on the wireless
charging pad.
The ignition must be in the ON/RUN position in
order for the phone to charge.
To avoid interference with the key fob search,
the wireless charging pad will stop charging
when any door is opened.
The following messages will display in the radio
system:
“Your Phone Is Being Charged” — The phone
has begun to charge.
“Phone Fully Charged” — The phone has
completed charging its battery.
“Foreign Object Detected” — The phone is not
enabled for wireless charging or an object that
is not permitted has been placed on the
wireless charging pad.
“Unavailable System” — There is a malfunction
with the wireless charging pad.
The driver can deactivate these messages
through the radio system. Refer to the
Information and Entertainment System Owner’s
Manual Supplement for further information.
POWER WINDOWS
POWER WINDOW CONTROLS
The power window switches work with the ignition
in the ACC or ON/RUN position and for three
minutes after the ignition has been placed in the
OFF position. When one of the front doors is
opened, this operation is disabled.
The window controls on the driver's door control
all the door windows.
Power Window Switches
The passenger door windows can also be
operated by using the single window controls on
the passenger door trim panel.
CAUTION!
The key fob should not be placed on the
charging pad or within 6 inches (15 cm) of it.
Doing so can cause excessive heat buildup
and damage to the fob. Placing the fob in
close proximity of the charging pad blocks the
fob from being detected by the vehicle and
prevents the vehicle from starting.
1 — Front Left Window Switch
2 — Front Right Window Switch
3 — Rear Right Window Switch
4 — Window Lockout Switch
5 — Rear Left Window Switch
22_GA_OM_EN_USC_t.book Page 57
Page 179 of 248
177
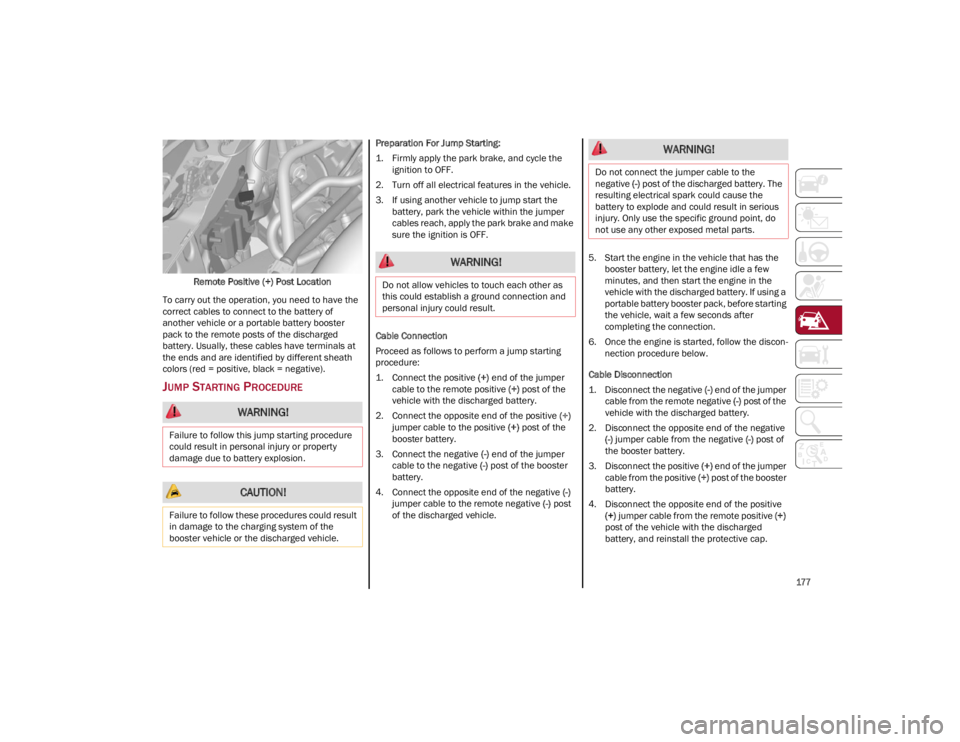
Remote Positive (+) Post Location
To carry out the operation, you need to have the
correct cables to connect to the battery of
another vehicle or a portable battery booster
pack to the remote posts of the discharged
battery. Usually, these cables have terminals at
the ends and are identified by different sheath
colors (red = positive, black = negative).
JUMP STARTING PROCEDURE
Preparation For Jump Starting:
1. Firmly apply the park brake, and cycle the ignition to OFF.
2. Turn off all electrical features in the vehicle.
3. If using another vehicle to jump start the battery, park the vehicle within the jumper
cables reach, apply the park brake and make
sure the ignition is OFF.
Cable Connection
Proceed as follows to perform a jump starting
procedure:
1. Connect the positive (+) end of the jumper
cable to the remote positive (+) post of the
vehicle with the discharged battery.
2. Connect the opposite end of the positive (+)
jumper cable to the positive (+) post of the
booster battery.
3. Connect the negative (-) end of the jumper
cable to the negative (-) post of the booster
battery.
4. Connect the opposite end of the negative (-)
jumper cable to the remote negative (-) post
of the discharged vehicle. 5. Start the engine in the vehicle that has the
booster battery, let the engine idle a few
minutes, and then start the engine in the
vehicle with the discharged battery. If using a
portable battery booster pack, before starting
the vehicle, wait a few seconds after
completing the connection.
6. Once the engine is started, follow the discon -
nection procedure below.
Cable Disconnection
1. Disconnect the negative (-) end of the jumper
cable from the remote negative (-) post of the
vehicle with the discharged battery.
2. Disconnect the opposite end of the negative (-) jumper cable from the negative (-) post of
the booster battery.
3. Disconnect the positive (+) end of the jumper
cable from the positive (+) post of the booster
battery.
4. Disconnect the opposite end of the positive (+) jumper cable from the remote positive (+)
post of the vehicle with the discharged
battery, and reinstall the protective cap.
WARNING!
Failure to follow this jump starting procedure
could result in personal injury or property
damage due to battery explosion.
CAUTION!
Failure to follow these procedures could result
in damage to the charging system of the
booster vehicle or the discharged vehicle.
WARNING!
Do not allow vehicles to touch each other as
this could establish a ground connection and
personal injury could result.
WARNING!
Do not connect the jumper cable to the
negative (-) post of the discharged battery. The
resulting electrical spark could cause the
battery to explode and could result in serious
injury. Only use the specific ground point, do
not use any other exposed metal parts.
22_GA_OM_EN_USC_t.book Page 177
Page 180 of 248
IN CASE OF EMERGENCY
178
If frequent jump starting is required to start your
vehicle, you should have the battery and charging
system inspected at an authorized dealer.
BUMP STARTING
Never jump start the engine by pushing, towing or
coasting downhill.
NOTE:
You cannot start a vehicle with an automatic
transmission by pushing it.
IF YOUR ENGINE
OVERHEATS
Engine overheating may occur in situations of
extreme environmental temperatures, frequent
engine stops/starts, or driving in heavy traffic. If
the engine becomes overheated, the Engine
Temperature Warning Light in the instrument
cluster will illuminate along with a dedicated
message
Ú
page 70.
If the vehicle is overheating, it will need to be
serviced by an authorized dealer. In any of the following situations, you can reduce
the potential for overheating by taking the
appropriate action.
On the highways — slow down.
In city traffic — while stopped, place the
transmission in NEUTRAL, but do not increase
engine idle speed.
NOTE:
There are steps that you can take to slow down
an impending overheat condition:
If your Air Conditioner (A/C) is on, turn it off.
The A/C system adds heat to the engine
cooling system and turning the A/C off can
help remove this heat.
You can also turn the temperature control to
maximum heat, the mode control to floor and
the blower control to high. This allows the
heater core to act as a supplement to the
radiator and aids in removing heat from the
engine cooling system.
If Steam Is Coming From The Engine
Compartment
Do not go near the front of the vehicle. Stop the
engine. Wait until the steam dissipates. Then,
open the hood and start the engine.
If Neither Coolant Nor Steam Is Escaping
Open the hood and idle the engine until it cools.
NOTE:
If the cooling fan does not operate while the
engine is running, the engine temperature will
increase. Stop the engine and contact an
authorized dealer.
If the engine continues to overheat or
frequently overheats, have the cooling system
inspected. The engine could be seriously
damaged unless repairs are made. Contact an
authorized dealer.
CAUTION!
Accessories plugged into the vehicle power
outlets draw power from the vehicle’s battery,
even when not in use (i.e., cellular phones,
etc.). Eventually, if plugged in long enough
without engine operation, the vehicle’s battery
will discharge sufficiently to degrade battery
life and/or prevent the engine from starting.
WARNING!
You or others can be badly burned by hot
engine coolant (antifreeze) or steam from your
radiator. If you see or hear steam coming from
under the hood, do not open the hood until
the radiator has had time to cool. Never try to
open a cooling system pressure cap when the
radiator or coolant bottle is hot.
CAUTION!
Driving with a hot cooling system could
damage your vehicle. If temperature gauge
reads “H”, pull over and stop the vehicle. Idle
the vehicle with the air conditioner turned off
until the pointer drops back into the normal
range. If the pointer remains on the “H”, turn
the engine off immediately, and call for
service.
22_GA_OM_EN_USC_t.book Page 178
Page 193 of 248
191
(Continued)
NOTE:
It will not be possible to open the trunk with a key
or by pushing the button in the passenger
compartment when the battery is disconnected.
So, always position the manual trunk opening
strap on the trunk lock before disconnecting the
battery
Ú
page 220.
PRESSURE WASHING
Cleaning the engine compartment with a high
pressure washer is not recommended.
BATTERY RECHARGING
IMPORTANT NOTES
NOTE:
Before using the charging device, always make
sure that it is appropriate for the installed
battery, with constant voltage (below 14.8
Volts) and low amperage (maximum 15 Amps).
Recharge the battery in a well ventilated
environment.
Before using any devices to charge or to
maintain the charge of the battery, carefully
follow the instructions provided with the device
in order to properly and safely connect it to the
car battery.
You can recharge the battery without discon -
necting the wires of the vehicle's electrical
system.
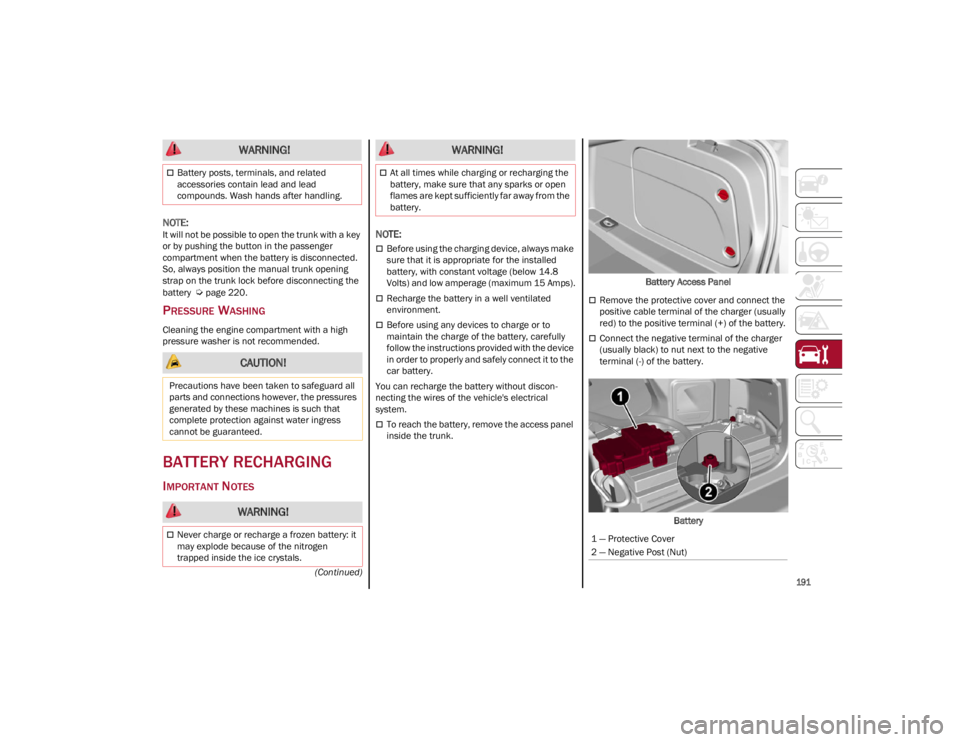
To reach the battery, remove the access panel
inside the trunk. Battery Access Panel
Remove the protective cover and connect the
positive cable terminal of the charger (usually
red) to the positive terminal (+) of the battery.
Connect the negative terminal of the charger
(usually black) to nut next to the negative
terminal (-) of the battery.
Battery
Battery posts, terminals, and related
accessories contain lead and lead
compounds. Wash hands after handling.
CAUTION!
Precautions have been taken to safeguard all
parts and connections however, the pressures
generated by these machines is such that
complete protection against water ingress
cannot be guaranteed.
WARNING!
Never charge or recharge a frozen battery: it
may explode because of the nitrogen
trapped inside the ice crystals.
WARNING!
At all times while charging or recharging the
battery, make sure that any sparks or open
flames are kept sufficiently far away from the
battery.
WARNING!
1 — Protective Cover
2 — Negative Post (Nut)
22_GA_OM_EN_USC_t.book Page 191
Page 241 of 248
239
INDEX
A
Accessories Purchased By The Owner.......... 3
Active Blind Spot Assist .............................134
Active Safety Systems ................................ 129
Active Torque Vectoring (ATV) System ......129
Adaptive Cruise Control (ACC)
(Cruise Control) ............................................ 97Off ........................................................... 101
On............................................................101
Additives, Fuel ............................................ 230
Adjust Forward.............................................. 31, 33
Rearward ........................................... 31, 33
Air Bag......................................................... 150 Air Bag Operation ...................................151Air Bag Warning Light ............................149
Driver Knee Air Bag................................ 152Enhanced Accident Response .....155, 181
Event Data Recorder (EDR) ...................181
Front Air Bag...........................................150
If Deployment Occurs ............................154
Knee Impact Bolsters ............................152
Maintaining Your Air Bag System.......... 157
Maintenance ..........................................157
Redundant Air Bag Warning Light.........150
Side Air Bags ..........................................152
Transporting Pets...................................166
Air Bag Light ......................................149, 166
Air Pressure Tires ........................................................212
Alarm Security Alarm .......................................... 24 Alfa Active Suspension (AAS) .......................94
Alfa DNA System ...........................................91
Anti-Lock Braking (ABS) System ............... 129
Anti-Lock Warning Light ...............................72
Automatic Door Locks ..................................27
Automatic Headlights ...................................43
Automatic Temperature Control (ATC) ........49
Automatic Transmission ..............................86
Auxiliary Driving Systems .......................... 132
B
Back-Up Camera ........................................ 122
Battery ..................................................74, 190 Charging System Light .............................74
Battery Recharging .................................... 191
Belts, Seat .................................................. 166
Blind Spot Monitoring ............................... 132
Bodywork (Cleaning And Maintenance) ... 221
B-Pillar Location......................................... 209
Brake System Warning Light .................................... 70, 72
Brakes ........................................................ 226 Brake Fluid Level................................... 190
Bulbs, Light ................................................ 167
C
Camera, Rear ............................................. 122
Carbon Monoxide Warning .............. 167, 168
Cargo Tie-Downs ...........................................62
Certification Label ..................................... 125
Chart, Tire Sizing........................................ 207 Check Engine Light (Malfunction
Indicator Light) ............................................. 80
Checking Levels ................................ 187, 188
Checking Your Vehicle For Safety ............. 165
Checks, Safety ........................................... 165
Child Restraint ........................................... 157
Child Restraints
Booster Seats ........................................ 159
Child Seat Installation ........................... 164
How To Stow An unused ALR SeatBelt ..................................................... 163
Infant And Child Restraints ................... 158
LATCH Positions ..................................... 160
Lower Anchors And Tethers For Children .............................................. 160
Older Children And Child Restraints ..... 159
Seating Positions ................................... 160
Using The Top Tether Anchorage.......... 165
Clean Air Gasoline ..................................... 230
Cleaning Wheels.................................................... 217
Climate Control ......................................48, 54
Compact Spare Tire ................................... 216
Contract, Service........................................ 236
Cruise Control (Speed Control) ................... 97
Customer Assistance ................................. 236
D
Daytime Running Lights .............................. 42
Deck Lid Power Release ......................................... 61
Defroster, Windshield ................................ 166
22_GA_OM_EN_USC_t.book Page 239