sport mode ALFA ROMEO GIULIA 2022 Owners Manual
[x] Cancel search | Manufacturer: ALFA ROMEO, Model Year: 2022, Model line: GIULIA, Model: ALFA ROMEO GIULIA 2022Pages: 248, PDF Size: 9.71 MB
Page 13 of 248
11
LANE KEEPING ASSIST (LKA)
SYSTEM — IF EQUIPPED........................ 119
Turning Lane Keeping Assist On Or
Off ......................................................... 120 Lane Keeping Assist Warning
Message ...............................................120
REAR BACK UP CAMERA / DYNAMIC
GRIDLINES ............................................. 122 REFUELING THE VEHICLE ..................... 123
Refueling Procedure ...........................124
VEHICLE LOADING ................................. 125
Certification Label................................ 125
TRAILER TOWING................................... 125
SUGGESTIONS FOR DRIVING................ 126
Saving Fuel ...........................................126
Driving Style .........................................126
Conditions Of Use ................................ 126
Transporting Passengers ....................126
Transporting Animals...........................127
Exhaust Gas .........................................127
Performance — Quadrifoglio ...............127
SAFETY
ACTIVE SAFETY SYSTEMS ..................... 129
Anti-Lock Brake System (ABS) ........... 129
Active Torque Vectoring (ATV) —
If Equipped ...........................................129 Dynamic Steering Torque (DST) .........130
Drive Train Control (DTC) System —
If Equipped ...........................................130 Electronic Stability Control (ESC) ....... 130
Hill Start Assist (HSA) .......................... 131
Panic Brake Assist (PBA) .................... 131
Traction Control System (TCS)............ 131
AUXILIARY DRIVING SYSTEMS .............. 132
Blind Spot Monitoring (BSM)
System — If Equipped ........................ 132 Active Blind Spot Assist (ABSA)
System — If Equipped ........................ 134 Driver Attention Assist (DAA)
System — If Equipped ......................... 136 Forward Collision Warning (FCW)
System ................................................. 138 Tire Pressure Monitoring System
(TPMS).................................................. 142
OCCUPANT RESTRAINT SYSTEMS ....... 143
Occupant Restraint Systems
Features .............................................. 143 Important Safety Precautions ............ 144
Seat Belt Systems .............................. 144
Supplemental Restraint Systems
(SRS) .................................................... 149 Child Restraints ................................... 157
SAFETY TIPS........................................... 165
Transporting Passengers .................... 165
Transporting Pets ................................ 166
Connected Vehicles ............................ 166
Safety Checks You Should Make
Inside The Vehicle .............................. 166 Periodic Safety Checks You Should
Make Outside The Vehicle .................. 167 Exhaust Gas ........................................ 167
Carbon Monoxide Warnings ............... 168
IN CASE OF EMERGENCY
HAZARD WARNING FLASHERS ............ 169
SOS — EMERGENCY CALL ..................... 169TIRE SERVICE KIT .................................. 171
Description ........................................... 171
Inflation Procedure .............................. 172
Checking And Restoring Tire
Pressure ............................................... 174 Sealant Cartridge Replacement ......... 174
Run Flat Tires — If Equipped ................. 174
JUMP STARTING ................................... 175
Remote Battery Connection Posts ..... 175
Jump Starting Procedure .................... 177
Bump Starting...................................... 178
IF YOUR ENGINE OVERHEATS ............... 178
MANUAL PARK RELEASE....................... 179
TOWING A DISABLED VEHICLE ............. 179
Rear Wheel Drive (RWD) Models ........ 179
All Wheel Drive (AWD) Models ............ 180
TOW EYES ............................................. 180
ENHANCED ACCIDENT RESPONSE
SYSTEM (EARS) .................................... 181 EVENT DATA RECORDER (EDR) ............ 181
SERVICING AND MAINTENANCE
SCHEDULED SERVICING ....................... 182
Periodic Checks ................................... 182
Heavy Usage Of The Vehicle ............... 182
Maintenance Plan — 2.0L Engine ...... 183
Maintenance Plan — 2.9L Engine ...... 185
22_GA_OM_EN_USC_t.book Page 11
Page 64 of 248
GETTING TO KNOW YOUR VEHICLE
62
CLOSING
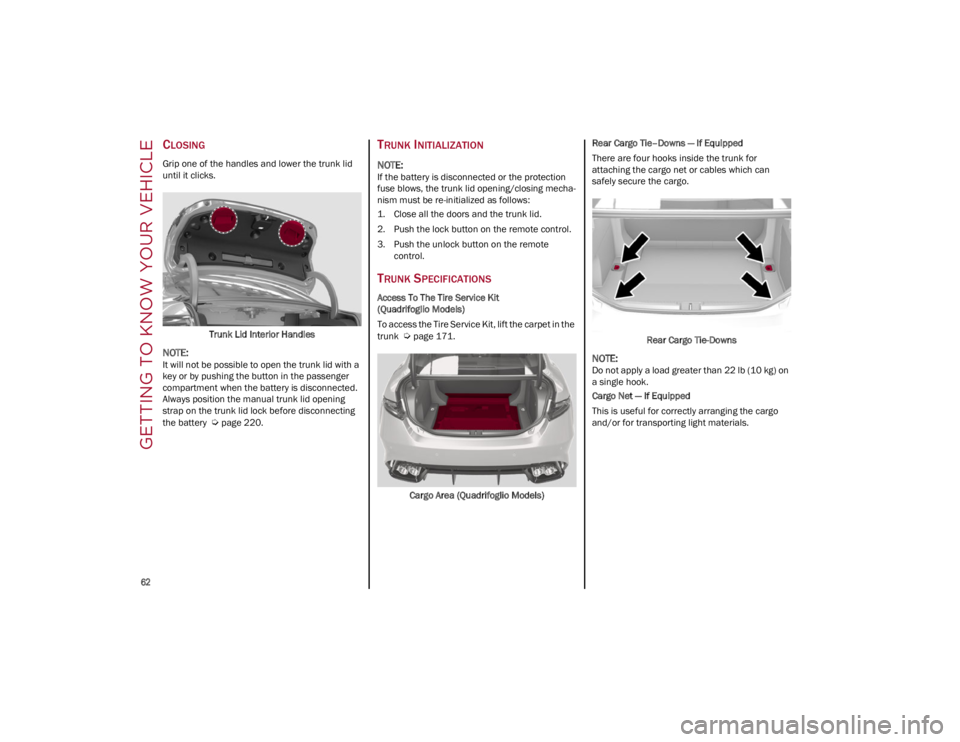
Grip one of the handles and lower the trunk lid
until it clicks.Trunk Lid Interior Handles
NOTE:
It will not be possible to open the trunk lid with a
key or by pushing the button in the passenger
compartment when the battery is disconnected.
Always position the manual trunk lid opening
strap on the trunk lid lock before disconnecting
the battery
Ú
page 220.
TRUNK INITIALIZATION
NOTE:
If the battery is disconnected or the protection
fuse blows, the trunk lid opening/closing mecha -
nism must be re-initialized as follows:
1. Close all the doors and the trunk lid.
2. Push the lock button on the remote control.
3. Push the unlock button on the remote control.
TRUNK SPECIFICATIONS
Access To The Tire Service Kit
(Quadrifoglio Models)
To access the Tire Service Kit, lift the carpet in the
trunk
Ú
page 171.
Cargo Area (Quadrifoglio Models) Rear Cargo Tie–Downs — If Equipped
There are four hooks inside the trunk for
attaching the cargo net or cables which can
safely secure the cargo.
Rear Cargo Tie-Downs
NOTE:
Do not apply a load greater than 22 lb (10 kg) on
a single hook.
Cargo Net — If Equipped
This is useful for correctly arranging the cargo
and/or for transporting light materials.
22_GA_OM_EN_USC_t.book Page 62
Page 69 of 248
67
8. Time
9. External Temperature
10. Main Display: Vehicle Speed Display, Trip Computer Information, etc.
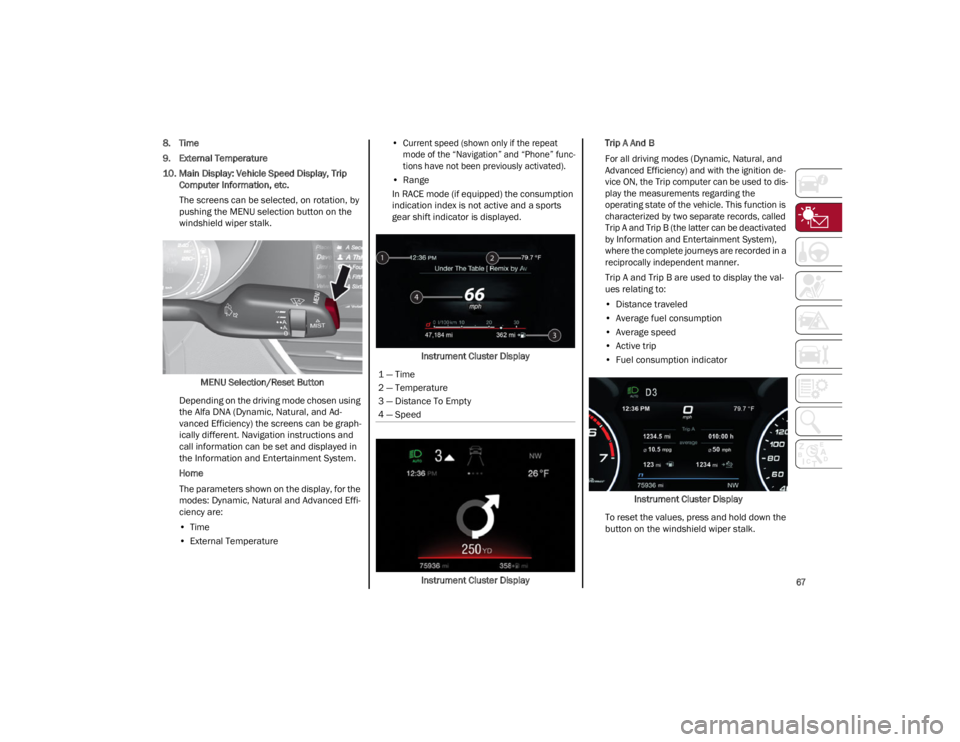
The screens can be selected, on rotation, by
pushing the MENU selection button on the
windshield wiper stalk.
MENU Selection/Reset Button
Depending on the driving mode chosen using
the Alfa DNA (Dynamic, Natural, and Ad -
vanced Efficiency) the screens can be graph -
ically different. Navigation instructions and
call information can be set and displayed in
the Information and Entertainment System.
Home
The parameters shown on the display, for the
modes: Dynamic, Natural and Advanced Effi -
ciency are:
• Time
• External Temperature
•
Current speed (shown only if the repeat
mode of the “Navigation” and “Phone” func -
tions have not been previously activated).
• Range
In RACE mode (if equipped) the consumption
indication index is not active and a sports
gear shift indicator is displayed.
Instrument Cluster Display
Instrument Cluster Display Trip A And B
For all driving modes (Dynamic, Natural, and
Advanced Efficiency) and with the ignition de
-
vice ON, the Trip computer can be used to dis -
play the measurements regarding the
operating state of the vehicle. This function is
characterized by two separate records, called
Trip A and Trip B (the latter can be deactivated
by Information and Entertainment System),
where the complete journeys are recorded in a
reciprocally independent manner.
Trip A and Trip B are used to display the val -
ues relating to:
• Distance traveled
• Average fuel consumption
• Average speed
• Active trip
• Fuel consumption indicator
Instrument Cluster Display
To reset the values, press and hold down the
button on the windshield wiper stalk.
1 — Time
2 — Temperature
3 — Distance To Empty
4 — Speed
22_GA_OM_EN_USC_t.book Page 67
Page 91 of 248
89
REVERSE (R)
Select this mode only with the vehicle at a
standstill.
NEUTRAL (N)
Use this range when the vehicle is standing for
prolonged periods with the engine running. The
engine may be started in this range. Apply the Electric Park Brake and shift the transmission
into PARK (P) if you must leave the vehicle.
DRIVE (D)
Use this mode in normal driving conditions.
Shifting from DRIVE (D) to PARK (P) or REVERSE
(R) modes must take place only after releasing
the accelerator pedal, with vehicle at a standstill
and brake pedal pressed.
This mode ensures automatic engagement of the
most suitable gears for driving needs and
maximum fuel economy in terms of consumption.
In this position, the transmission shifts the gears
automatically, selecting the most suitable for
forward driving among those available as you go.
This ensures the vehicle's optimal driving charac
-
teristics are provided for all conditions.
AutoStick
In the case of frequent shifting (e.g. for sport
driving, when the vehicle is driven with a heavy
load or on slopes), it is recommended to use the
AutoStick (sequential shifting) mode to select and
keep a lower fixed ratio.
In these conditions, the use of a lower gear
improves vehicle performance, preventing
overheating. It is possible to shift from DRIVE (D) mode to
sequential mode regardless of vehicle speed.
Activation
Starting from DRIVE (D), move the selector to the
left (– and + indication of the trim) to activate the
sequential drive mode. The gear engaged will be
shown on the display.
Shifting is made by moving the gear selector
forwards, towards symbol – or backwards,
towards symbol +.
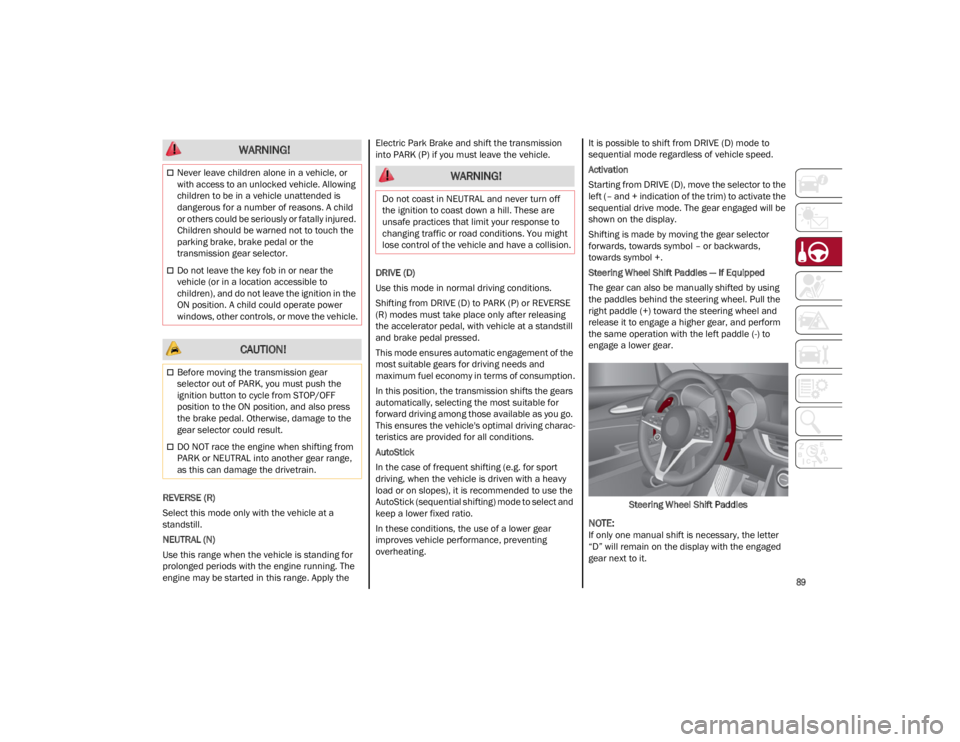
Steering Wheel Shift Paddles — If Equipped
The gear can also be manually shifted by using
the paddles behind the steering wheel. Pull the
right paddle (+) toward the steering wheel and
release it to engage a higher gear, and perform
the same operation with the left paddle (-) to
engage a lower gear.
Steering Wheel Shift Paddles
NOTE:
If only one manual shift is necessary, the letter
“D” will remain on the display with the engaged
gear next to it.
Never leave children alone in a vehicle, or
with access to an unlocked vehicle. Allowing
children to be in a vehicle unattended is
dangerous for a number of reasons. A child
or others could be seriously or fatally injured.
Children should be warned not to touch the
parking brake, brake pedal or the
transmission gear selector.
Do not leave the key fob in or near the
vehicle (or in a location accessible to
children), and do not leave the ignition in the
ON position. A child could operate power
windows, other controls, or move the vehicle.
CAUTION!
Before moving the transmission gear
selector out of PARK, you must push the
ignition button to cycle from STOP/OFF
position to the ON position, and also press
the brake pedal. Otherwise, damage to the
gear selector could result.
DO NOT race the engine when shifting from
PARK or NEUTRAL into another gear range,
as this can damage the drivetrain.
WARNING!
WARNING!
Do not coast in NEUTRAL and never turn off
the ignition to coast down a hill. These are
unsafe practices that limit your response to
changing traffic or road conditions. You might
lose control of the vehicle and have a collision.
22_GA_OM_EN_USC_t.book Page 89
Page 94 of 248
STARTING AND OPERATING
92
d = Dynamic (sports driving mode).
n = Natural (mode for driving in normal
conditions).
a = Advanced Efficiency (ECO driving mode for
maximum fuel savings).
RACE = track race driving mode (if equipped).
= Adjusts the calibration of the active
suspension (Quadrifoglio only).
When the engine is stopped, the selector returns
to “n” (Natural) mode.
The symbol of the active mode lights up in red on
the selector.
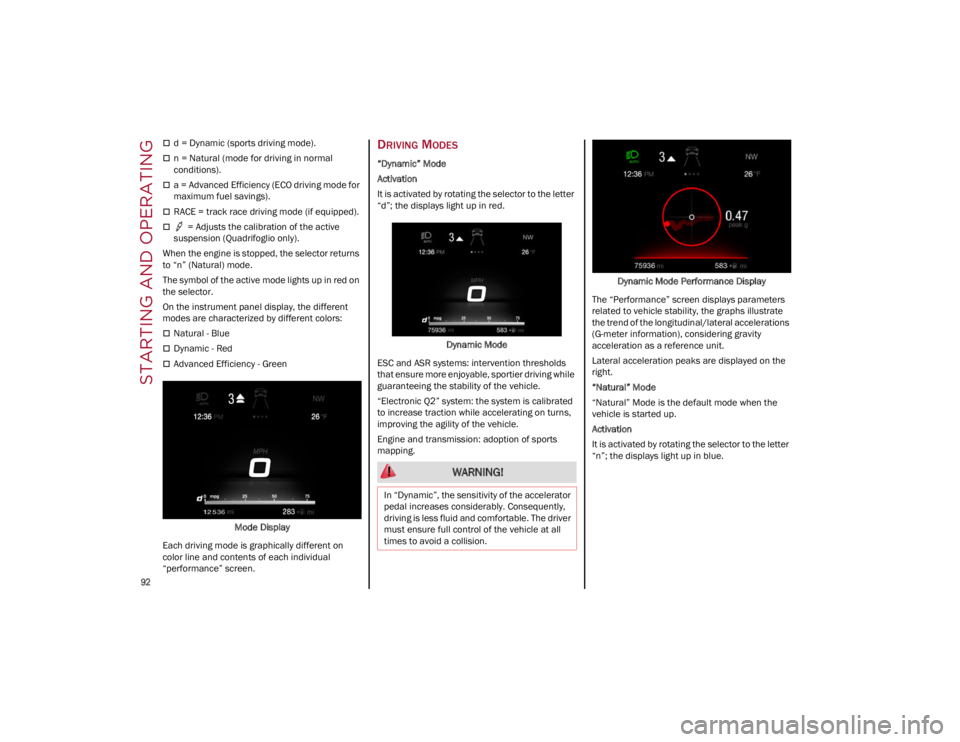
On the instrument panel display, the different
modes are characterized by different colors:
Natural - Blue
Dynamic - Red
Advanced Efficiency - Green
Mode Display
Each driving mode is graphically different on
color line and contents of each individual
“performance” screen.
DRIVING MODES
“Dynamic” Mode
Activation
It is activated by rotating the selector to the letter
“d”; the displays light up in red.
Dynamic Mode
ESC and ASR systems: intervention thresholds
that ensure more enjoyable, sportier driving while
guaranteeing the stability of the vehicle.
“Electronic Q2” system: the system is calibrated
to increase traction while accelerating on turns,
improving the agility of the vehicle.
Engine and transmission: adoption of sports
mapping. Dynamic Mode Performance Display
The “Performance” screen displays parameters
related to vehicle stability, the graphs illustrate
the trend of the longitudinal/lateral accelerations
(G-meter information), considering gravity
acceleration as a reference unit.
Lateral acceleration peaks are displayed on the
right.
“Natural” Mode
“Natural” Mode is the default mode when the
vehicle is started up.
Activation
It is activated by rotating the selector to the letter
“n”; the displays light up in blue.
WARNING!
In “Dynamic”, the sensitivity of the accelerator
pedal increases considerably. Consequently,
driving is less fluid and comfortable. The driver
must ensure full control of the vehicle at all
times to avoid a collision.
22_GA_OM_EN_USC_t.book Page 92
Page 96 of 248
STARTING AND OPERATING
94
“RACE” Mode (Quadrifoglio Only)
Activation
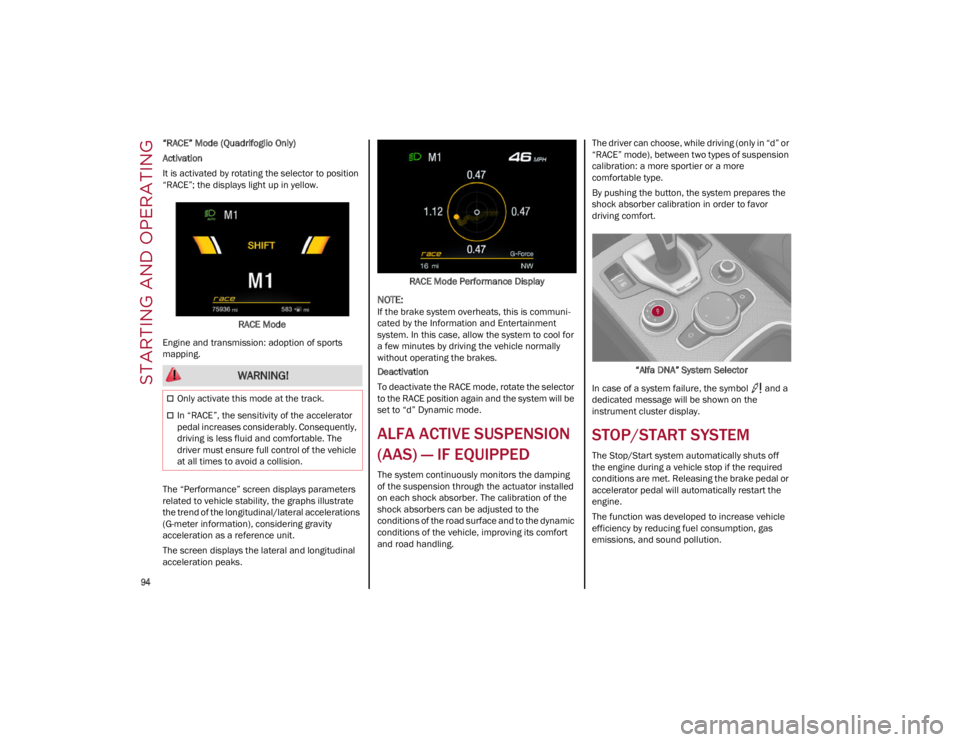
It is activated by rotating the selector to position
“RACE”; the displays light up in yellow.RACE Mode
Engine and transmission: adoption of sports
mapping.
The “Performance” screen displays parameters
related to vehicle stability, the graphs illustrate
the trend of the longitudinal/lateral accelerations
(G-meter information), considering gravity
acceleration as a reference unit.
The screen displays the lateral and longitudinal
acceleration peaks. RACE Mode Performance Display
NOTE:
If the brake system overheats, this is communi
-
cated by the Information and Entertainment
system. In this case, allow the system to cool for
a few minutes by driving the vehicle normally
without operating the brakes.
Deactivation
To deactivate the RACE mode, rotate the selector
to the RACE position again and the system will be
set to “d” Dynamic mode.
ALFA ACTIVE SUSPENSION
(AAS) — IF EQUIPPED
The system continuously monitors the damping
of the suspension through the actuator installed
on each shock absorber. The calibration of the
shock absorbers can be adjusted to the
conditions of the road surface and to the dynamic
conditions of the vehicle, improving its comfort
and road handling. The driver can choose, while driving (only in “d” or
“RACE” mode), between two types of suspension
calibration: a more sportier or a more
comfortable type.
By pushing the button, the system prepares the
shock absorber calibration in order to favor
driving comfort.
“Alfa DNA” System Selector
In case of a system failure, the symbol and a
dedicated message will be shown on the
instrument cluster display.
STOP/START SYSTEM
The Stop/Start system automatically shuts off
the engine during a vehicle stop if the required
conditions are met. Releasing the brake pedal or
accelerator pedal will automatically restart the
engine.
The function was developed to increase vehicle
efficiency by reducing fuel consumption, gas
emissions, and sound pollution.
WARNING!
Only activate this mode at the track.
In “RACE”, the sensitivity of the accelerator
pedal increases considerably. Consequently,
driving is less fluid and comfortable. The
driver must ensure full control of the vehicle
at all times to avoid a collision.
22_GA_OM_EN_USC_t.book Page 94
Page 129 of 248
127
TRANSPORTING ANIMALS
The intervention of the airbags may be dangerous
for an animal on the front seat. It is therefore
advised to arrange animals on the rear seat
inside dedicated cages restrained by the
vehicle’s seat belts.
Keep in mind that, in the event of a sudden
braking or an accident, an inadequately
restrained animal may be projected within the
passenger compartment, risking injury to the
animal itself and the other occupants of the
vehicle.
EXHAUST GAS
Exhaust emissions are very dangerous, and may
be lethal. They contain carbon monoxide, a
colorless, odorless gas which can cause fainting
and poisoning if inhaled.
To avoid inhaling carbon monoxide, take the
following measures:
Do not keep the engine running in closed
spaces.
If, for some reason (e.g. transporting bulky
loads), it is necessary to drive with the trunk
open, close all the windows and run the
climate control fan at maximum speed. DO
NOT activate air recirculation mode.
Should it be necessary to stay in the stationary
vehicle with engine running, adjust the
ventilation/heating system and operate the
fan in such a way that outside air will enter the
passenger compartment. Activate the
maximum fan speed.Maintenance of the exhaust system provides the
best protection against leaks of carbon monoxide
into the passenger compartment.
Should an unusual noise from the exhaust
system or the presence of exhaust gas in the
passenger compartment be identified, or if the
underbody or rear section of the vehicle is
damaged, have the entire exhaust system and
bodywork areas checked to identify any
components which are broken, damaged, worn or
have moved from their correct fitting position. If
any of these things occur, contact an authorized
dealer.
Open welding or loose connections may permit
exhaust gas to enter the passenger
compartment.
Check the exhaust system each time the vehicle
is raised for lubrication or oil change operations.
Replace the components if necessary, contact an
authorized dealer.
PERFORMANCE — QUADRIFOGLIO
This vehicle is equipped with an engine capable
of delivering exceptionally fast acceleration and
speed:
Peak power: 505 HP at 6500 RPM.
Peak torque: 443 ft-lb at 2500–5000 RPM.
Top speed: 191 mph (307 km/h).
Acceleration from 0 to 60 mph (0 to 100 km/h):
3.8 seconds.
For safe driving, it is essential, particularly during
the first days of use, to get to know the car by
driving carefully and gradually discovering its
performance. Brakes
The car braking system may be available with four
carbon-ceramic material brake discs, one on
each wheel.
In order to guarantee the maximum braking
capacity for the first use, Alfa Romeo performs a
“run-in” procedure for discs and pads directly at
the factory.
The use of carbon-ceramic material brake discs
guarantees braking features (better
deceleration/pedal load ratio, braking distances,
fading resistance) proportional to the dynamic
features of the car in addition to considerably
decreasing the unsprung component weight.
The materials used and the structural features of
the system could generate unusual noises which
have absolutely no adverse effect on correct
operation and reliability of the braking system.
Greater pressure may need to be applied to the
brake pedal the first time to keep the same
braking capacities in presence of condensation
or salt on the braking surfaces, for example after
washing or if the car is not used for a long time.
NOTE:
Given the high technological level of this system,
any servicing on it must be performed by an
authorized dealer which exclusively has the skills
needed for the repair and maintenance opera
-
tions.
In case of intensive, high-performance use of the
car, have the efficiency of the carbon-ceramic
material braking system inspected as shown on
the Maintenance Plan at an authorized dealer.
22_GA_OM_EN_USC_t.book Page 127
Page 146 of 248
SAFETY
144
Some of the safety features described in this
section may be standard equipment on some
models, or may be optional equipment on others.
If you are not sure, ask an authorized dealer.
IMPORTANT SAFETY PRECAUTIONS
Please pay close attention to the information in
this section. It tells you how to use your restraint
system properly, to keep you and your
passengers as safe as possible.
Here are some simple steps you can take to
minimize the risk of harm from a deploying air
bag:
1. Children 12 years old and under shouldalways ride buckled up in the rear seat of a
vehicle with a rear seat.
2. A child who is not big enough to wear the vehicle seat belt properly must be secured in
the appropriate child restraint or belt-posi -
tioning booster seat in a rear seating position
Ú
page 157.
3. If a child from 2 to 12 years old (not in a rear-facing child restraint) must ride in the
front passenger seat, move the seat as far
back as possible and use the proper child
restraint
Ú
page 157.
4. Never allow children to slide the shoulder belt behind them or under their arm.
5. You should read the instructions provided with your child restraint to make sure that you
are using it properly.
6. All occupants should always wear their lap and shoulder belts properly.
7. The driver and front passenger seats should be moved back as far as practical to allow the
front air bags room to inflate. 8. Do not lean against the door or window. If
your vehicle has side air bags, and deploy -
ment occurs, the side air bags will inflate
forcefully into the space between occupants
and the door and occupants could be injured.
9. If the air bag system in this vehicle needs to be modified to accommodate a disabled
person, see
Ú
page 236 for customer
service contact information.
SEAT BELT SYSTEMS
Buckle up even though you are an excellent
driver, even on short trips. Someone on the road
may be a poor driver and could cause a collision
that includes you. This can happen far away from
home or on your own street.
Research has shown that seat belts save lives,
and they can reduce the seriousness of injuries in
a collision. Some of the worst injuries happen
when people are thrown from the vehicle. Seat
belts reduce the possibility of ejection and the risk of injury caused by striking the inside of the
vehicle. Everyone in a motor vehicle should be
belted at all times.
Enhanced Seat Belt Use Reminder
System (BeltAlert)
Driver And Passenger BeltAlert — If Equipped
BeltAlert is a feature intended to remind
the driver and outboard front seat
passenger (if equipped with outboard
front passenger seat BeltAlert) to
buckle their seat belts. The BeltAlert feature is
active whenever the ignition switch is in the ON/
RUN position.
Initial Indication
If the driver is unbuckled when the ignition switch
is first in the ON/RUN position, a chime will signal
for a few seconds. If the driver or outboard front
seat passenger (if equipped with outboard front
passenger seat BeltAlert) is unbuckled when the
ignition switch is first in the ON/RUN position the
Seat Belt Reminder Light will turn on and remain
on until both outboard front seat belts are
buckled. The outboard front passenger seat
BeltAlert is not active when an outboard front
passenger seat is unoccupied.
BeltAlert Warning Sequence
The BeltAlert warning sequence is activated
when the vehicle is moving above a specified
vehicle speed range and the driver or outboard
front seat passenger is unbuckled (if equipped
with outboard front passenger seat BeltAlert) (the
outboard front passenger seat BeltAlert is not
active when the outboard front passenger seat is
unoccupied). The BeltAlert warning sequence
starts by blinking the Seat Belt Reminder Light
and sounding an intermittent chime. Once the
WARNING!
Never place a rear-facing child restraint in
front of an air bag. A deploying passenger
front air bag can cause death or serious
injury to a child 12 years or younger,
including a child in a rear-facing child
restraint.
Never install a rear-facing child restraint in
the front seat of a vehicle. Only use a
rear-facing child restraint in the rear seat. If
the vehicle does not have a rear seat, do not
transport a rear-facing child restraint in that
vehicle.
22_GA_OM_EN_USC_t.book Page 144
Page 151 of 248
149
How To Engage The Automatic Locking Mode
1. Buckle the combination lap and shoulder belt.
2. Grab the shoulder portion and pull downward until the entire seat belt is extracted.
3. Allow the seat belt to retract. As the seat belt retracts, you will hear a clicking sound. This
indicates the seat belt is now in the Auto -
matic Locking Mode.
How To Disengage The Automatic Locking Mode
Unbuckle the combination lap/shoulder belt and
allow it to retract completely to disengage the
Automatic Locking Mode and activate the vehicle
sensitive (emergency) locking mode.
SUPPLEMENTAL RESTRAINT SYSTEMS
(SRS)
Some of the safety features described in this
section may be standard equipment on some
models, or may be optional equipment on others.
If you are not sure, ask an authorized dealer.
The air bag system must be ready to protect you
in a collision. The Occupant Restraint Controller
(ORC) monitors the internal circuits and intercon -
necting wiring associated with the electrical Air
Bag System Components. Your vehicle may be
equipped with the following Air Bag System
Components:
Air Bag System Components
Occupant Restraint Controller (ORC)
Air Bag Warning Light
Steering Wheel and Column
Instrument Panel
Knee Impact Bolsters
Driver and Front Passenger Air Bags
Seat Belt Buckle Switch
Supplemental Side Air Bags
Supplemental Knee Air Bags
Front and Side Impact Sensors
Seat Belt Pretensioners
Seat Track Position Sensors
Air Bag Warning Light
The Occupant Restraint Controller (ORC)
monitors the readiness of the electronic
parts of the air bag system whenever
the ignition switch is in the START or
ON/RUN position. If the ignition switch is in the
OFF position or in the ACC position, the air bag
system is not on and the air bags will not inflate.
The ORC contains a backup power supply system
that may deploy the air bag system even if the
battery loses power or it becomes disconnected
prior to deployment.
The ORC turns on the Air Bag Warning Light in the
instrument panel for approximately four to eight
seconds for a self-check when the ignition switch
is first in the ON/RUN position. After the
self-check, the Air Bag Warning Light will turn off.
If the ORC detects a malfunction in any part of the
system, it turns on the Air Bag Warning Light,
either momentarily or continuously. A single
chime will sound to alert you if the light comes on
again after initial startup.
The ORC also includes diagnostics that will
illuminate the instrument panel Air Bag Warning
Light if a malfunction is detected that could affect
WARNING!
Never place a rear-facing child restraint in
front of an air bag. A deploying passenger
front air bag can cause death or serious
injury to a child 12 years or younger,
including a child in a rear-facing child
restraint.
Never install a rear-facing child restraint in
the front seat of a vehicle. Only use a
rear-facing child restraint in the rear seat. If
the vehicle does not have a rear seat, do not
transport a rear-facing child restraint in that
vehicle.
WARNING!
The seat belt assembly must be replaced if
the switchable Automatic Locking Retractor
(ALR) feature or any other seat belt function
is not working properly when checked
according to the procedures in the Service
Manual.
Failure to replace the seat belt assembly
could increase the risk of injury in collisions.
Do not use the Automatic Locking Mode to
restrain occupants who are wearing the seat
belt or children who are using booster seats.
The locked mode is only used to install
rear-facing or forward-facing child restraints
that have a harness for restraining the child.
22_GA_OM_EN_USC_t.book Page 149
Page 168 of 248
SAFETY
166
(Continued)
TRANSPORTING PETS
Air Bags deploying in the front seat could harm
your pet. An unrestrained pet will be thrown about
and possibly injured, or injure a passenger during
panic braking or in a collision.
Pets should be restrained in the rear seat (if
equipped) in pet harnesses or pet carriers that
are secured by seat belts.
CONNECTED VEHICLES
Privacy of any wireless and wired communi-
cations cannot be assured. Third parties may
unlawfully intercept information and private
communications without your consent. For
further information, refer to “Data Collection &
Privacy” in your Uconnect Owner’s Manual
Supplement or “Onboard Diagnostic System
(OBD II) Cybersecurity”
Ú
page 79.
SAFETY CHECKS YOU SHOULD MAKE
I
NSIDE THE VEHICLE
Seat Belts
Inspect the seat belt system periodically,
checking for cuts, frays, and loose parts.
Damaged parts must be replaced immediately.
Do not disassemble or modify the system.
If your vehicle is involved in a collision, or if you
have questions regarding the seat belt or
retractor conditions, take your vehicle to an
authorized FCA dealer or authorized FCA Certified
Collision Care Program facility for inspection.
Air Bag Warning Light
The Air Bag Warning Light will turn on for
four to eight seconds as a bulb check
when the ignition switch is first turned
to ON/RUN. If the light is either not on
during starting, stays on, or turns on while driving,
have the system inspected at an authorized
dealer as soon as possible. After the bulb check,
this light will illuminate with a single chime when
a fault with the Air Bag System has been
detected. It will stay on until the fault is removed. If the light comes on intermittently or remains on
while driving, have an authorized dealer service
the vehicle immediately
Ú
page 143.
Defroster
Check operation by selecting the defrost mode
and place the blower control on high speed. You
should be able to feel the air directed against the
windshield. See an authorized dealer for service
if your defroster is inoperable.
Floor Mat Safety Information
Always use floor mats designed to fit your vehicle.
Only use a floor mat that does not interfere with
the operation of the accelerator, brake or clutch
pedals. Only use a floor mat that is securely
attached using the floor mat fasteners so it
cannot slip out of position and interfere with the
accelerator, brake or clutch pedals or impair safe
operation of your vehicle in other ways.
It is extremely dangerous to ride in a cargo
area, inside or outside of a vehicle. In a
collision, people riding in these areas are
more likely to be seriously injured or killed.
Do not allow people to ride in any area of
your vehicle that is not equipped with seats
and seat belts.
Be sure everyone in your vehicle is in a seat
and using a seat belt properly.
WARNING! WARNING!
It is not possible to know or to predict all of the
possible outcomes if your vehicle’s systems
are breached. It may be possible that vehicle
systems, including safety related systems,
could be impaired or a loss of vehicle control
could occur that may result in an accident
involving serious injury or death.
WARNING!
An improperly attached, damaged, folded, or
stacked floor mat, or damaged floor mat
fasteners may cause your floor mat to
interfere with the accelerator, brake, or clutch
pedals and cause a loss of vehicle control. To
prevent SERIOUS INJURY or DEATH:
ALWAYS securely attach your floor
mat using the floor mat fasteners. DO
NOT install your floor mat upside down
or turn your floor mat over. Lightly pull
to confirm mat is secured using the floor mat
fasteners on a regular basis.
22_GA_OM_EN_USC_t.book Page 166