fold seats ALFA ROMEO GIULIA 2023 Owners Manual
[x] Cancel search | Manufacturer: ALFA ROMEO, Model Year: 2023, Model line: GIULIA, Model: ALFA ROMEO GIULIA 2023Pages: 248, PDF Size: 9.62 MB
Page 10 of 248
8
READ THIS CAREFULLY
Warnings And Cautions.............................. 2
Respecting The Environment .................... 2
Rollover Warning ........................................ 3
VEHICLE CHANGES /
ALTERATIONS
Accessories Purchased By The Owner ...... 4
Installing Electrical/Electronic Devices .... 4
Radio Transmitters And Mobile Phones ... 4
HOW TO USE THIS MANUAL
Operating Instructions ............................... 5
Symbols Key ............................................... 5
Symbols ...................................................... 6
Symbols Glossary .....................................14
GETTING TO KNOW YOUR
VEHICLE
KEYS..........................................................19
Key Fob .................................................. 19
ENGINE IMMOBILIZER SYSTEM ..............21
IGNITION SWITCH .....................................22
Keyless Push Button Ignition ................ 22
REMOTE START — IF EQUIPPED ..............23
How To Use Remote Start ..................... 23
To Exit Remote Start Mode ................... 23
Remote Start Comfort Systems —
If Equipped ............................................. 23
VEHICLE SECURITY
SYSTEM — IF EQUIPPED .......................... 24
To Arm The System................................ 24
To Disarm The System .......................... 24
Volumetric/Anti-Lift Protection —
If Equipped ............................................. 25
DOORS ...................................................... 25
Power Door Locks.................................. 25
Locking The Doors With A Depleted
Battery .................................................... 26 Passive Entry System ........................... 26
Automatic Door Locks — If Equipped .. 28
Child-Protection Door Lock
System — Rear Doors ............................ 28
STEERING WHEEL.................................... 29
Manual Tilt/Telescoping Steering
Column ................................................... 29 Heated Steering Wheel —
If Equipped ............................................. 30
DRIVER MEMORY SETTINGS —
IF EQUIPPED ............................................ 30
Programming The Memory Feature ..... 30
Memory Position Recall ........................ 31
SEATS ....................................................... 31
Sparco Racing Seats
(Quadrifoglio Vehicles) — If Equipped .. 31 Manual Adjustment (Rear Seats) ......... 32
Power Adjustment (Front Seats)........... 34
Heated Seats — If Equipped ................ 35
Head Restraints .................................... 36
MIRRORS ..................................................37
Automatic Dimming Mirror ....................37
Vanity Mirror ...........................................38
Outside Power Mirrors ...........................38
Power Folding Outside Mirrors ..............39
Outside Automatic Dimming Mirrors —
If Equipped .............................................39 Heated Mirrors ......................................39
UNIVERSAL GARAGE DOOR OPENER
(HOMELINK®)
S ...................................39
Before You Begin Programming
HomeLink® ............................................40 Erasing All The HomeLink® Channels ..40
Identifying Whether You Have A
Rolling Code Or Non-Rolling Code
Device .....................................................40 Programming HomeLink® To A
Garage Door Opener ..............................40 Programming HomeLink® To A
Miscellaneous Device ............................ 41 Reprogramming A Single HomeLink®
Button .....................................................41 Canadian/Gate Operator
Programming .......................................... 41 Security ...................................................42
Troubleshooting Tips..............................42
23_GA_OM_EN_USC_t.book Page 8
Page 34 of 248
GETTING TO KNOW YOUR VEHICLE
32
MANUAL ADJUSTMENT (REAR SEATS)
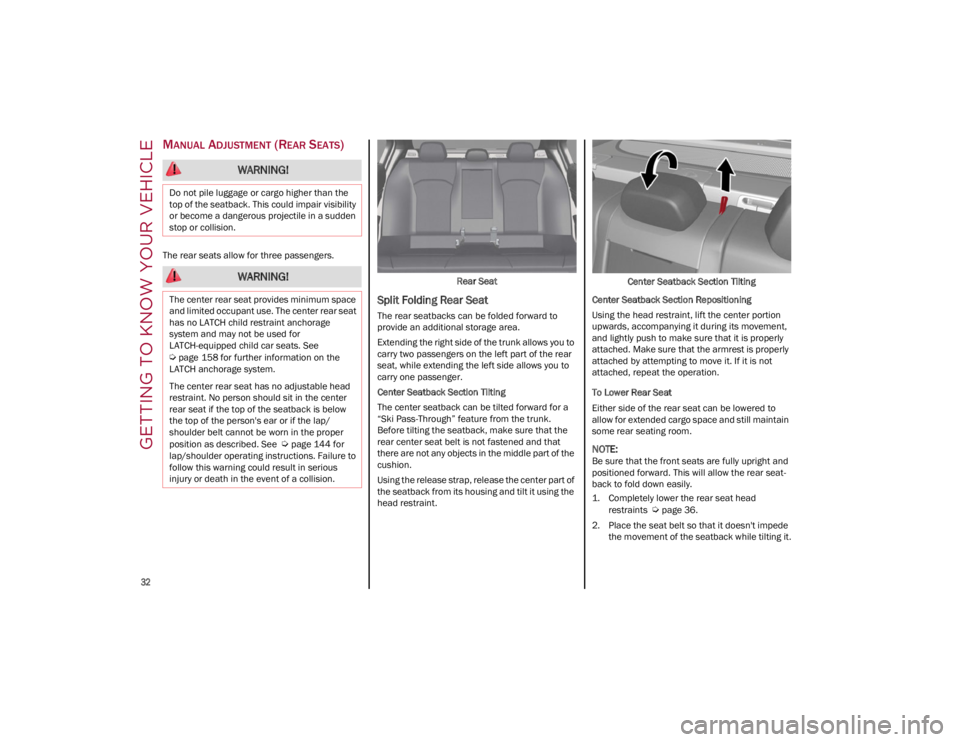
The rear seats allow for three passengers.Rear Seat
Split Folding Rear Seat
The rear seatbacks can be folded forward to
provide an additional storage area.
Extending the right side of the trunk allows you to
carry two passengers on the left part of the rear
seat, while extending the left side allows you to
carry one passenger.
Center Seatback Section Tilting
The center seatback can be tilted forward for a
“Ski Pass-Through” feature from the trunk.
Before tilting the seatback, make sure that the
rear center seat belt is not fastened and that
there are not any objects in the middle part of the
cushion.
Using the release strap, release the center part of
the seatback from its housing and tilt it using the
head restraint.Center Seatback Section Tilting
Center Seatback Section Repositioning
Using the head restraint, lift the center portion
upwards, accompanying it during its movement,
and lightly push to make sure that it is properly
attached. Make sure that the armrest is properly
attached by attempting to move it. If it is not
attached, repeat the operation.
To Lower Rear Seat
Either side of the rear seat can be lowered to
allow for extended cargo space and still maintain
some rear seating room.
NOTE:
Be sure that the front seats are fully upright and
positioned forward. This will allow the rear seat -
back to fold down easily.
1. Completely lower the rear seat head
restraints
Ú
page 36.
2. Place the seat belt so that it doesn't impede the movement of the seatback while tilting it.
WARNING!
Do not pile luggage or cargo higher than the
top of the seatback. This could impair visibility
or become a dangerous projectile in a sudden
stop or collision.
WARNING!
The center rear seat provides minimum space
and limited occupant use. The center rear seat
has no LATCH child restraint anchorage
system and may not be used for
LATCH-equipped child car seats. See
Ú
page 158 for further information on the
LATCH anchorage system.
The center rear seat has no adjustable head
restraint. No person should sit in the center
rear seat if the top of the seatback is below
the top of the person's ear or if the lap/
shoulder belt cannot be worn in the proper
position as described. See
Ú
page 144 for
lap/shoulder operating instructions. Failure to
follow this warning could result in serious
injury or death in the event of a collision.
23_GA_OM_EN_USC_t.book Page 32
Page 35 of 248
33
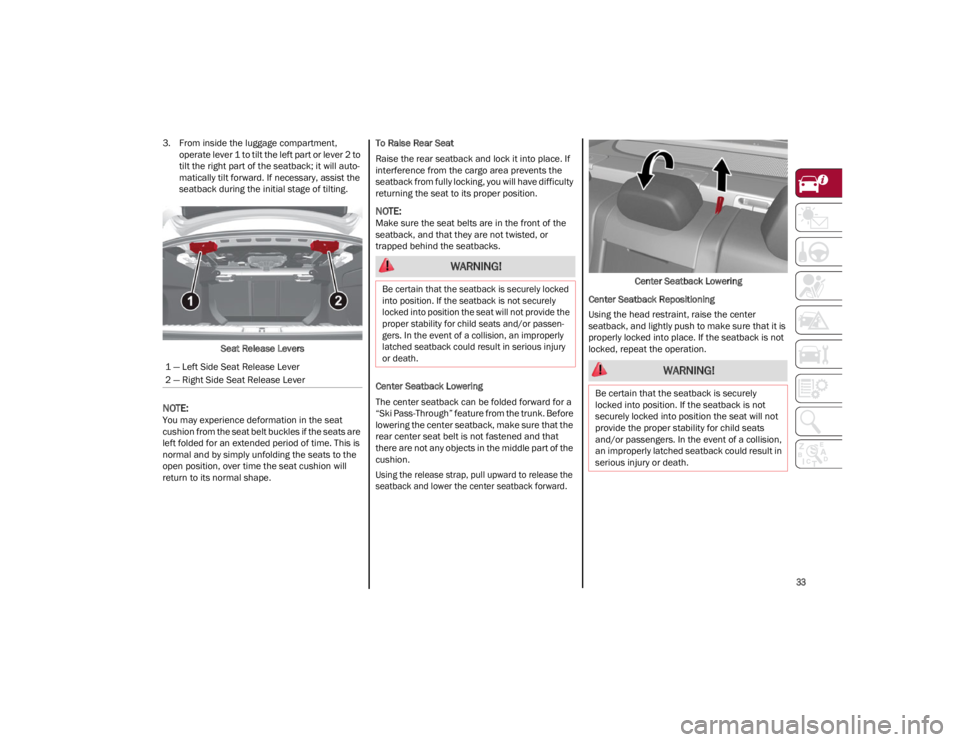
3. From inside the luggage compartment, operate lever 1 to tilt the left part or lever 2 to
tilt the right part of the seatback; it will auto -
matically tilt forward. If necessary, assist the
seatback during the initial stage of tilting.
Seat Release Levers
NOTE:
You may experience deformation in the seat
cushion from the seat belt buckles if the seats are
left folded for an extended period of time. This is
normal and by simply unfolding the seats to the
open position, over time the seat cushion will
return to its normal shape. To Raise Rear Seat
Raise the rear seatback and lock it into place. If
interference from the cargo area prevents the
seatback from fully locking, you will have difficulty
returning the seat to its proper position.
NOTE:
Make sure the seat belts are in the front of the
seatback, and that they are not twisted, or
trapped behind the seatbacks.
Center Seatback Lowering
The center seatback can be folded forward for a
“Ski Pass-Through” feature from the trunk. Before
lowering the center seatback, make sure that the
rear center seat belt is not fastened and that
there are not any objects in the middle part of the
cushion.
Using the release strap, pull upward to release the
seatback and lower the center seatback forward.
Center Seatback Lowering
Center Seatback Repositioning
Using the head restraint, raise the center
seatback, and lightly push to make sure that it is
properly locked into place. If the seatback is not
locked, repeat the operation.
1 — Left Side Seat Release Lever
2 — Right Side Seat Release Lever
WARNING!
Be certain that the seatback is securely locked
into position. If the seatback is not securely
locked into position the seat will not provide the
proper stability for child seats and/or passen -
gers. In the event of a collision, an improperly
latched seatback could result in serious injury
or death.
WARNING!
Be certain that the seatback is securely
locked into position. If the seatback is not
securely locked into position the seat will not
provide the proper stability for child seats
and/or passengers. In the event of a collision,
an improperly latched seatback could result in
serious injury or death.
23_GA_OM_EN_USC_t.book Page 33
Page 147 of 248
145
(Continued)
Enhanced Seat Belt Use Reminder
System (BeltAlert)
Driver And Passenger BeltAlert — If EquippedBeltAlert is a feature intended to remind
the driver and outboard front seat
passenger (if equipped with outboard
front passenger seat BeltAlert) to buckle
their seat belts. The BeltAlert feature is active
whenever the ignition switch is in the ON/RUN
position.
Initial Indication
If the driver is unbuckled when the ignition switch
is first in the ON/RUN position, a chime will signal
for a few seconds. If the driver or outboard front
seat passenger (if equipped with outboard front
passenger seat BeltAlert) is unbuckled when the
ignition switch is first in the ON/RUN position the
Seat Belt Reminder Light will turn on and remain
on until both outboard front seat belts are
buckled. The outboard front passenger seat
BeltAlert is not active when an outboard front
passenger seat is unoccupied.
BeltAlert Warning Sequence
The BeltAlert warning sequence is activated when
the vehicle is moving above a specified vehicle
speed range and the driver or outboard front seat
passenger is unbuckled (if equipped with
outboard front passenger seat BeltAlert) (the
outboard front passenger seat BeltAlert is not
active when the outboard front passenger seat is
unoccupied). The BeltAlert warning sequence
starts by blinking the Seat Belt Reminder Light
and sounding an intermittent chime. Once the
BeltAlert warning sequence has completed, the
Seat Belt Reminder Light will remain on until the
seat belts are buckled. The BeltAlert warning sequence may repeat based on vehicle speed
until the driver and occupied outboard front seat
passenger seat belts are buckled. The driver
should instruct all occupants to buckle their seat
belts.
Change Of Status
If the driver or outboard front seat passenger (if
equipped with outboard front passenger seat
BeltAlert) unbuckles their seat belt while the
vehicle is traveling, the BeltAlert warning
sequence will begin until the seat belts are
buckled again.
The outboard front passenger seat BeltAlert is not
active when the outboard front passenger seat is
unoccupied. BeltAlert may be triggered when an
animal or other items are placed on the outboard
front passenger seat or when the seat is folded
flat (if equipped). It is recommended that pets be
restrained in the rear seat (if equipped) in pet
harnesses or pet carriers that are secured by seat
belts, and cargo is properly stowed.
Lap/Shoulder Belts
All seating positions in your vehicle are equipped
with lap/shoulder belts.
The seat belt webbing retractor will lock only
during very sudden stops or collisions. This
feature allows the shoulder part of the seat belt to
move freely with you under normal conditions.
However, in a collision the seat belt will lock and
reduce your risk of striking the inside of the
vehicle or being thrown out of the vehicle.
WARNING!
Relying on the air bags alone could lead to
more severe injuries in a collision. The air
bags work with your seat belt to restrain you
properly. In some collisions, the air bags
won’t deploy at all. Always wear your seat
belt even though you have air bags.
In a collision, you and your passengers can
suffer much greater injuries if you are not
properly buckled up. You can strike the
interior of your vehicle or other passengers,
or you can be thrown out of the vehicle.
Always be sure you and others in your vehicle
are buckled up properly.
It is dangerous to ride in a cargo area, inside
or outside of a vehicle. In a collision, people
riding in these areas are more likely to be
seriously injured or killed.
Do not allow people to ride in any area of
your vehicle that is not equipped with seats
and seat belts.
Be sure everyone in your vehicle is in a seat
and using a seat belt properly. Occupants,
including the driver, should always wear their
seat belts whether or not an air bag is also
provided at their seating position to minimize
the risk of severe injury or death in the event
of a crash.
23_GA_OM_EN_USC_t.book Page 145
Page 149 of 248
147
5. Position the shoulder belt across theshoulder and chest with minimal, if any slack
so that it is comfortable and not resting on
your neck. The retractor will withdraw any
slack in the shoulder belt.
6. To release the seat belt, push the red button on the buckle. The seat belt will automatically
retract to its stowed position. If necessary,
slide the latch plate down the webbing to
allow the seat belt to retract fully.
Lap/Shoulder Belt Untwisting Procedure
Use the following procedure to untwist a twisted
lap/shoulder belt.
1. Position the latch plate as close as possible to the anchor point.
2. At about 6 to 12 inches (15 to 30 cm) above the latch plate, grab and twist the seat belt
webbing 180 degrees to create a fold that
begins immediately above the latch plate.
3. Slide the latch plate upward over the folded webbing. The folded webbing must enter the
slot at the top of the latch plate.
4. Continue to slide the latch plate up until it clears the folded webbing and the seat belt is
no longer twisted.
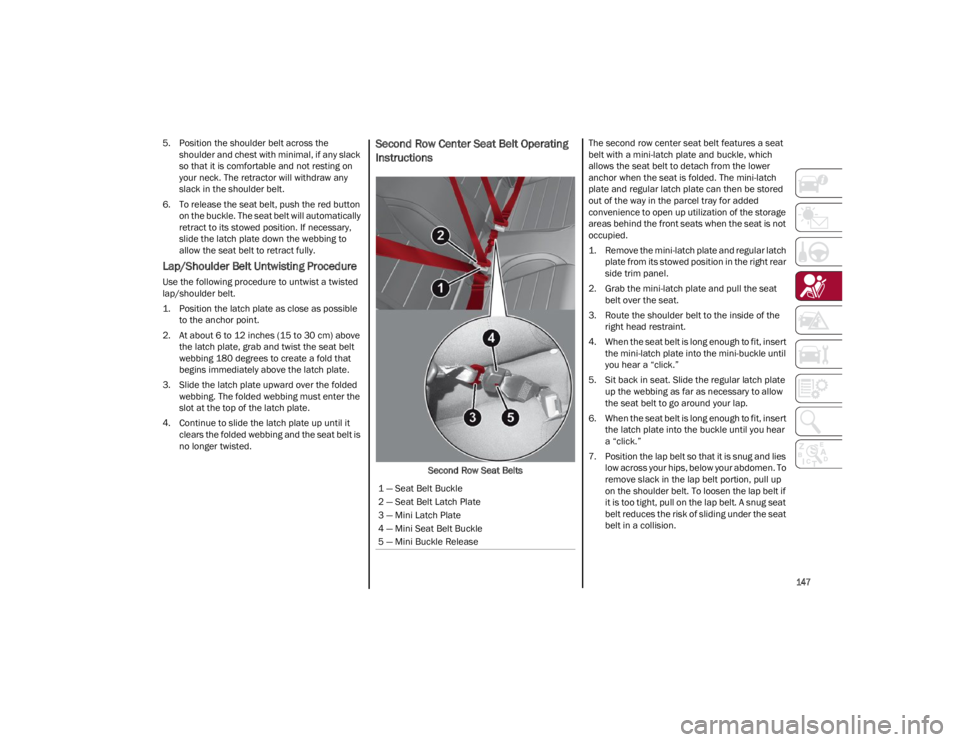
Second Row Center Seat Belt Operating
Instructions
Second Row Seat Belts The second row center seat belt features a seat
belt with a mini-latch plate and buckle, which
allows the seat belt to detach from the lower
anchor when the seat is folded. The mini-latch
plate and regular latch plate can then be stored
out of the way in the parcel tray for added
convenience to open up utilization of the storage
areas behind the front seats when the seat is not
occupied.
1. Remove the mini-latch plate and regular latch
plate from its stowed position in the right rear
side trim panel.
2. Grab the mini-latch plate and pull the seat belt over the seat.
3. Route the shoulder belt to the inside of the right head restraint.
4. When the seat belt is long enough to fit, insert the mini-latch plate into the mini-buckle until
you hear a “click.”
5. Sit back in seat. Slide the regular latch plate up the webbing as far as necessary to allow
the seat belt to go around your lap.
6. When the seat belt is long enough to fit, insert the latch plate into the buckle until you hear
a “click.”
7. Position the lap belt so that it is snug and lies low across your hips, below your abdomen. To
remove slack in the lap belt portion, pull up
on the shoulder belt. To loosen the lap belt if
it is too tight, pull on the lap belt. A snug seat
belt reduces the risk of sliding under the seat
belt in a collision.
1 — Seat Belt Buckle
2 — Seat Belt Latch Plate
3 — Mini Latch Plate
4 — Mini Seat Belt Buckle
5 — Mini Buckle Release
23_GA_OM_EN_USC_t.book Page 147
Page 244 of 248

242
INDEX
J
Jump Starting ............................................. 175
K
Keyless Enter 'n Go™ ................................... 26Passive Entry ............................................ 26
Keys .............................................................. 19
L
Lane Change And Turn Signals ................... 45
Lane Change Assist...................................... 45
Lane Keeping Assist System .....................120
LaneSense ..................................................118
Lap/Shoulder Belts ....................................145
Latches .......................................................168
Leaks, Fluid ................................................168
Life Of Tires.................................................215
Light Bulbs ..................................................168
Lights .......................................................... 168 Air Bag ...........................................150, 167
Ambient .................................................... 46
Brake Warning .................................. 71, 72Courtesy/Reading ............................. 45, 46Daytime Running ..................................... 43
Electronic Stability Program (ESP) Indicator ............................................... 75
Exterior ............................................ 42, 168
Fog ............................................................ 44
Hazard Warning Flasher ........................ 169
High Beam/Low Beam Select ................. 43
Interior ...................................................... 45
Low Fuel ................................................... 76
Malfunction Indicator (Check Engine) .... 73 Park ........................................................ 44, 74
Seat Belt Reminder ..................................71
Turn Signals .............................. 45, 74, 168
Types Of Bulbs ....................................... 202
Warning Instrument Cluster Descriptions .................................. 74, 75
Loading Vehicle ......................................... 125 Tires........................................................ 209
Locks Automatic Door.........................................28
Child Protection ........................................ 28
M
Maintenance .................................................60
Malfunction Indicator Light (Check
Engine) ..........................................................73
Manual Service ................................................... 238
Memory Feature (Memory Seats) ................30
Memory Seat.................................................30
Methanol .................................................... 230
Mirrors Automatic Dimming..................................37
Electric Powered.......................................38
Exterior Folding.........................................38
Heated ...................................................... 39
Rearview ...................................................37
Vanity ..................................................... 204
O
Occupant Restraints.................................. 144
Oil Pressure Light .........................................75
Oil, Engine Pressure Warning Light............................75 Onboard Diagnostic System........................ 79
Opener, Garage Door (Homelink) ............... 39
Operator Manual
Owner's Manual ..................................... 238
P
Paintwork (Cleaning And Maintenance) ... 221
Panic Brake Assist (PBA) System.............. 131
ParkSense System ..................................... 115
Passive Entry ................................................ 26
Performance (Top Speed) ......................... 235
Pets ............................................................. 166
Pinch Protection ........................................... 59
Placard, Tire And Loading Information ..... 209
Power Deck Lid Release ..................................... 61
Outlet (Auxiliary Electrical Outlet) ........... 56
Seats ........................................................ 34
Sunroof..................................................... 58Windows ................................................... 57
Power Seats Forward ..............................................31, 34
Rearward............................................31, 34
Recline ...............................................31, 34
Power Supply.............................................. 225
Pregnant Women And Seat Belts ............. 148
Pretensioners Seat Belts ............................................... 148
Programmable Settings ............................... 69
Prolonged Vehicle Inactivity ...................... 220
R
Radial Ply Tires........................................... 214
Radio Transmitters And Mobile Phones ........4
Rear Camera .............................................. 123
23_GA_OM_EN_USC_t.book Page 242