check engine light Alfa Romeo Giulia Quadrifoglio 2017 User Guide
[x] Cancel search | Manufacturer: ALFA ROMEO, Model Year: 2017, Model line: Giulia Quadrifoglio, Model: Alfa Romeo Giulia Quadrifoglio 2017Pages: 268, PDF Size: 110.98 MB
Page 94 of 268
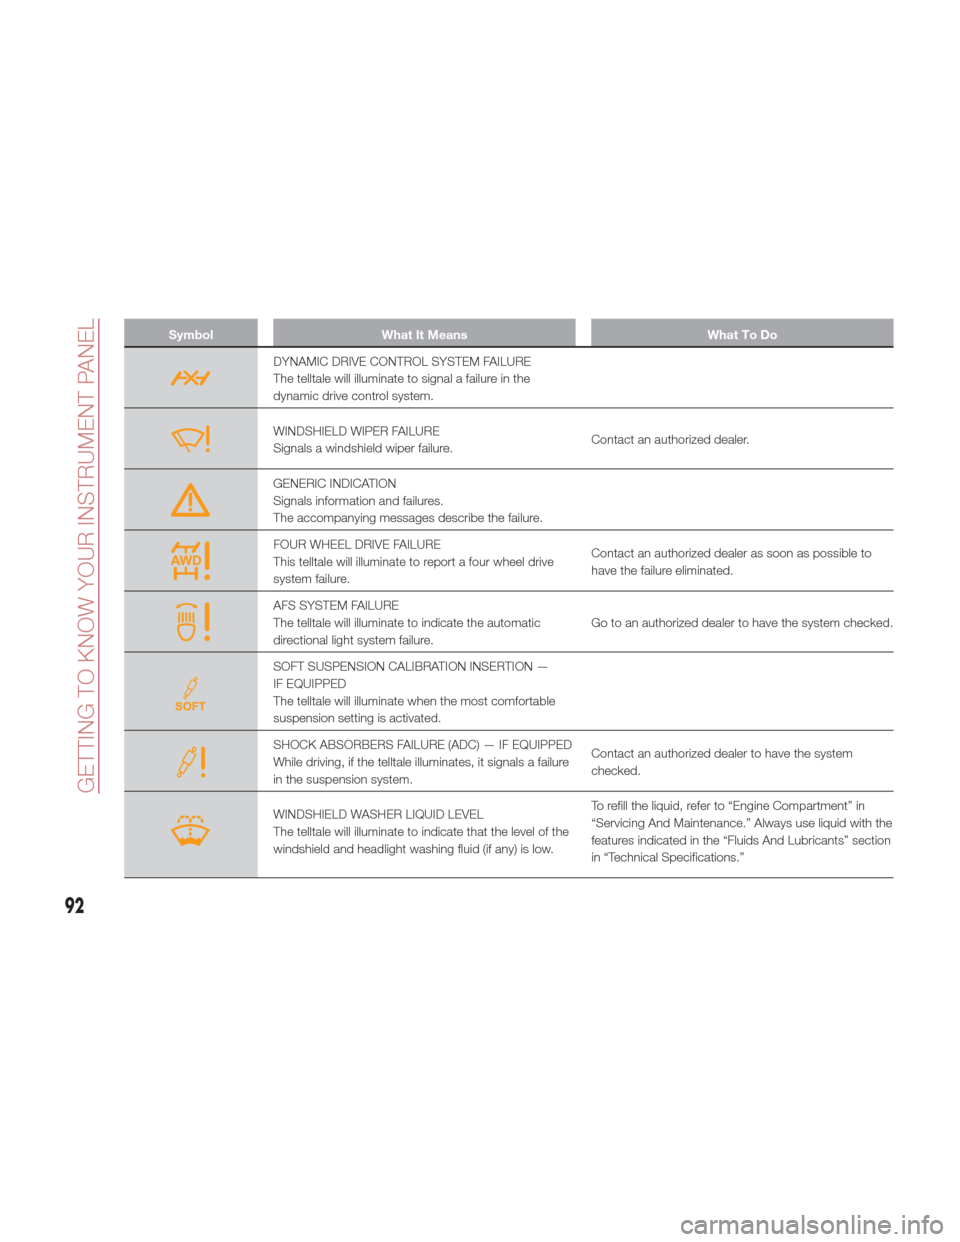
SymbolWhat It Means What To Do
DYNAMIC DRIVE CONTROL SYSTEM FAILURE
The telltale will illuminate to signal a failure in the
dynamic drive control system.
WINDSHIELD WIPER FAILURE
Signals a windshield wiper failure.Contact an authorized dealer.
GENERIC INDICATION
Signals information and failures.
The accompanying messages describe the failure.
FOUR WHEEL DRIVE FAILURE
This telltale will illuminate to report a four wheel drive
system failure.Contact an authorized dealer as soon as possible to
have the failure eliminated.
AFS SYSTEM FAILURE
The telltale will illuminate to indicate the automatic
directional light system failure.
Go to an authorized dealer to have the system checked.
SOFT SUSPENSION CALIBRATION INSERTION —
IF EQUIPPED
The telltale will illuminate when the most comfortable
suspension setting is activated.
SHOCK ABSORBERS FAILURE (ADC) — IF EQUIPPED
While driving, if the telltale illuminates, it signals a failure
in the suspension system.Contact an authorized dealer to have the system
checked.
WINDSHIELD WASHER LIQUID LEVEL
The telltale will illuminate to indicate that the level of the
windshield and headlight washing fluid (if any) is low.To refill the liquid, refer to “Engine Compartment” in
“Servicing And Maintenance.” Always use liquid with the
features indicated in the “Fluids And Lubricants” section
in “Technical Specifications.”
92
GETTING TO KNOW YOUR INSTRUMENT PANEL
Page 96 of 268
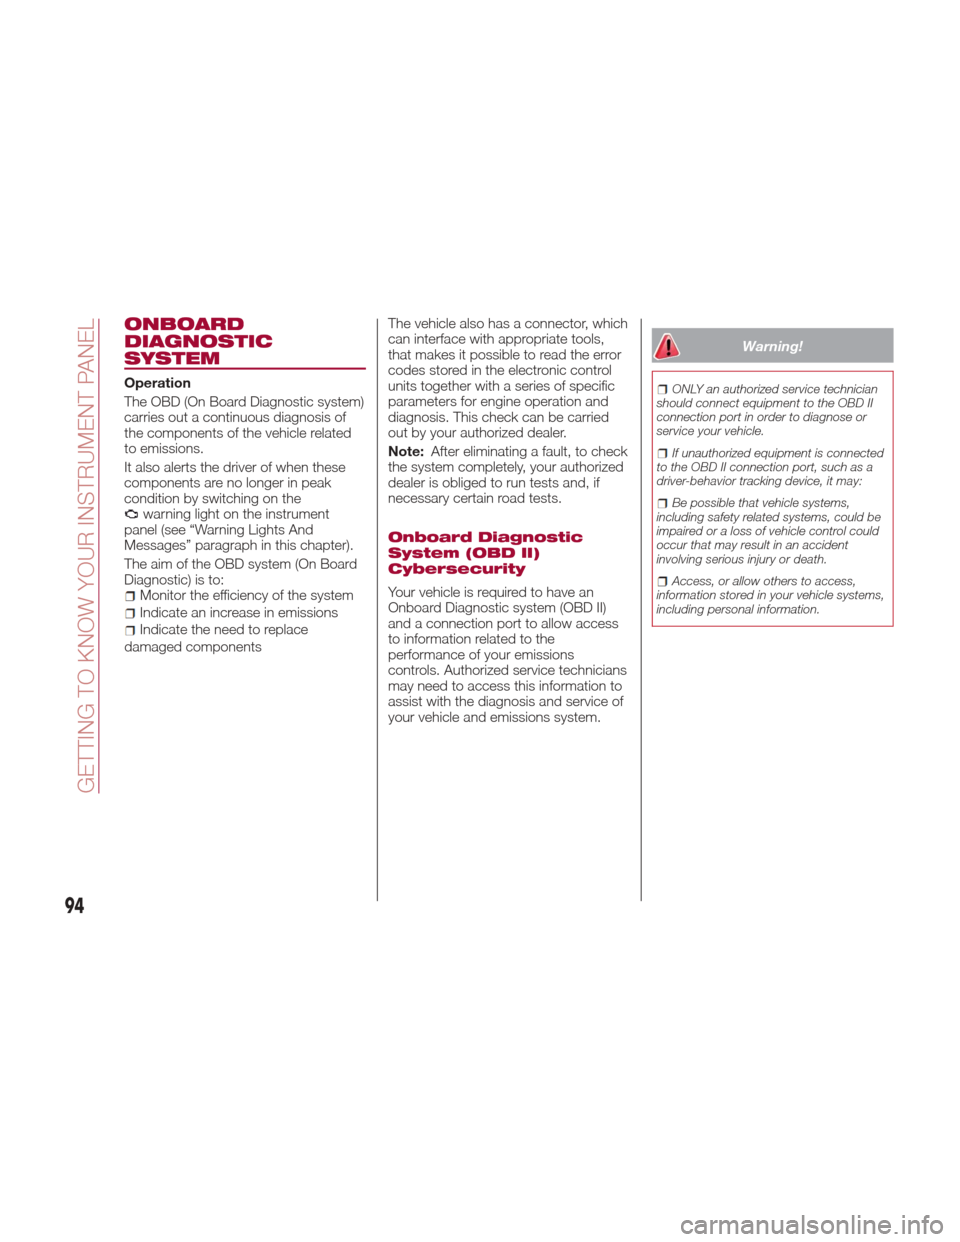
ONBOARD
DIAGNOSTIC
SYSTEM
Operation
The OBD (On Board Diagnostic system)
carries out a continuous diagnosis of
the components of the vehicle related
to emissions.
It also alerts the driver of when these
components are no longer in peak
condition by switching on the
warning light on the instrument
panel (see “Warning Lights And
Messages” paragraph in this chapter).
The aim of the OBD system (On Board
Diagnostic) is to:
Monitor the efficiency of the system
Indicate an increase in emissions
Indicate the need to replace
damaged components The vehicle also has a connector, which
can interface with appropriate tools,
that makes it possible to read the error
codes stored in the electronic control
units together with a series of specific
parameters for engine operation and
diagnosis. This check can be carried
out by your authorized dealer.
Note:
After eliminating a fault, to check
the system completely, your authorized
dealer is obliged to run tests and, if
necessary certain road tests.
Onboard Diagnostic
System (OBD II)
Cybersecurity
Your vehicle is required to have an
Onboard Diagnostic system (OBD II)
and a connection port to allow access
to information related to the
performance of your emissions
controls. Authorized service technicians
may need to access this information to
assist with the diagnosis and service of
your vehicle and emissions system.
Warning!
ONLY an authorized service technician
should connect equipment to the OBD II
connection port in order to diagnose or
service your vehicle.
If unauthorized equipment is connected
to the OBD II connection port, such as a
driver-behavior tracking device, it may:
Be possible that vehicle systems,
including safety related systems, could be
impaired or a loss of vehicle control could
occur that may result in an accident
involving serious injury or death.
Access, or allow others to access,
information stored in your vehicle systems,
including personal information.
94
GETTING TO KNOW YOUR INSTRUMENT PANEL
Page 102 of 268

The system warns the driver about the
presence of vehicles in the detection
area by lighting up, on the relevant side,
the warning light located on the door
mirror.
When the engine is started the warning
light turns on to signal the driver that
the system is active.
Sensors
The sensors are activated when any
forward gear is engaged at a speed
higher than approximately 6 mph
(10 km/h) or when reverse is engaged.
The sensors are temporarily deactivated
when the vehicle is stationary and the
PARK (P) mode active.
The detection area of the system
covers approximately a lane on both
sides of the vehicle which is around 9 ft
(3 m).This area begins from the door mirror
and extends for approximately 19 ft
(6 m) towards the rear part of the
vehicle.
When the sensors are active, the
system monitors the detection areas on
both sides of the vehicle and warns the
driver about the possible presence of
vehicles in these areas.
While driving, the system monitors the
detection area from three different input
points (side, rear and front) to check
whether a alert needs to be sent to the
driver. The system can detect the
presence of a vehicle in one of these
three areas.
Note:
The system does not alert the driver
for the presence of fixed object (e.g.
safety barriers, poles, walls, etc.).
However, in some circumstances, the
system may activate in the presence of
these objects. This is normal and does
not indicate a system malfunction.
The system does not alert the driver
about the presence of vehicles coming
from the opposite direction, in the
adjacent lanes.
Warning!
The Blind Spot Monitoring system is only
an aid to help detect objects in the blind
spot zones. The BSM system is not
designed to detect pedestrians, bicyclists,
or animals. Even if your vehicle is equipped
with the BSM system, always check your
vehicle’s mirrors, glance over your
shoulder, and use your turn signal before
changing lanes. Failure to do so can result
in serious injury or death.
Note:
If a trailer is hitched to the vehicle,
the system automatically deactivates.
For the system to operate correctly,
the rear bumper area where the radar
sensors are located must stay free
from snow, ice and dirt gathered from
the road surface.
Do not cover the rear bumper area
where the radar sensors are located
with any object (e.g. adhesives, bike
rack, etc.).
If you wish to install the tow hook
after purchasing the vehicle, you need to
deactivate the system via the Connect
system. To access the function, select
the following items in sequence on the
main menu: "Settings", "Safety", and
"Blind Spot Alert".
GUID-06016S0002EMBSM Indicator Light
100
SAFETY
Page 103 of 268
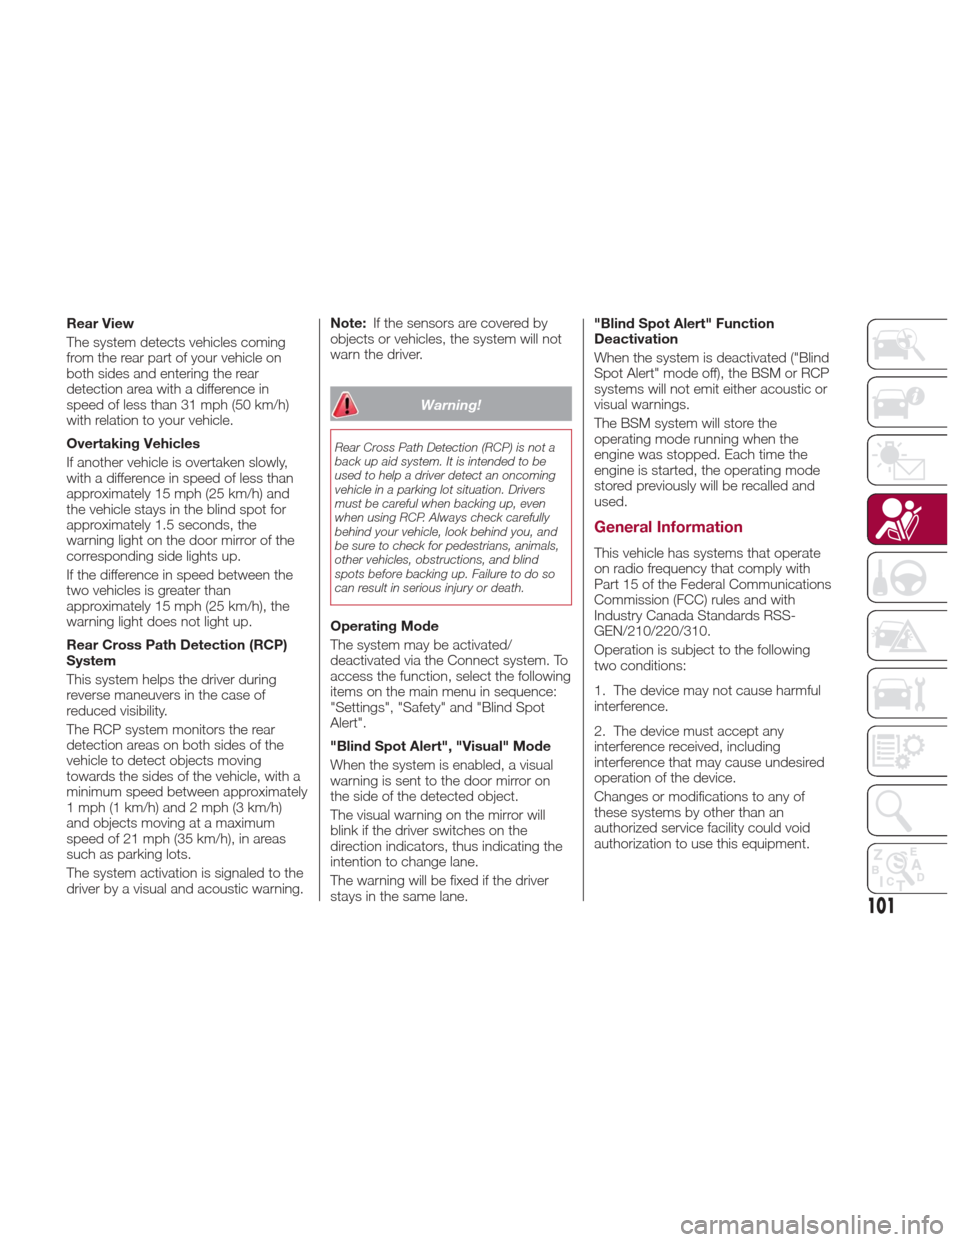
Rear View
The system detects vehicles coming
from the rear part of your vehicle on
both sides and entering the rear
detection area with a difference in
speed of less than 31 mph (50 km/h)
with relation to your vehicle.
Overtaking Vehicles
If another vehicle is overtaken slowly,
with a difference in speed of less than
approximately 15 mph (25 km/h) and
the vehicle stays in the blind spot for
approximately 1.5 seconds, the
warning light on the door mirror of the
corresponding side lights up.
If the difference in speed between the
two vehicles is greater than
approximately 15 mph (25 km/h), the
warning light does not light up.
Rear Cross Path Detection (RCP)
System
This system helps the driver during
reverse maneuvers in the case of
reduced visibility.
The RCP system monitors the rear
detection areas on both sides of the
vehicle to detect objects moving
towards the sides of the vehicle, with a
minimum speed between approximately
1 mph (1 km/h) and 2 mph (3 km/h)
and objects moving at a maximum
speed of 21 mph (35 km/h), in areas
such as parking lots.
The system activation is signaled to the
driver by a visual and acoustic warning.Note:
If the sensors are covered by
objects or vehicles, the system will not
warn the driver.
Warning!
Rear Cross Path Detection (RCP) is not a
back up aid system. It is intended to be
used to help a driver detect an oncoming
vehicle in a parking lot situation. Drivers
must be careful when backing up, even
when using RCP. Always check carefully
behind your vehicle, look behind you, and
be sure to check for pedestrians, animals,
other vehicles, obstructions, and blind
spots before backing up. Failure to do so
can result in serious injury or death.
Operating Mode
The system may be activated/
deactivated via the Connect system. To
access the function, select the following
items on the main menu in sequence:
"Settings", "Safety" and "Blind Spot
Alert".
"Blind Spot Alert", "Visual" Mode
When the system is enabled, a visual
warning is sent to the door mirror on
the side of the detected object.
The visual warning on the mirror will
blink if the driver switches on the
direction indicators, thus indicating the
intention to change lane.
The warning will be fixed if the driver
stays in the same lane. "Blind Spot Alert" Function
Deactivation
When the system is deactivated ("Blind
Spot Alert" mode off), the BSM or RCP
systems will not emit either acoustic or
visual warnings.
The BSM system will store the
operating mode running when the
engine was stopped. Each time the
engine is started, the operating mode
stored previously will be recalled and
used.
General Information
This vehicle has systems that operate
on radio frequency that comply with
Part 15 of the Federal Communications
Commission (FCC) rules and with
Industry Canada Standards RSS-
GEN/210/220/310.
Operation is subject to the following
two conditions:
1. The device may not cause harmful
interference.
2. The device must accept any
interference received, including
interference that may cause undesired
operation of the device.
Changes or modifications to any of
these systems by other than an
authorized service facility could void
authorization to use this equipment.
101
Page 117 of 268
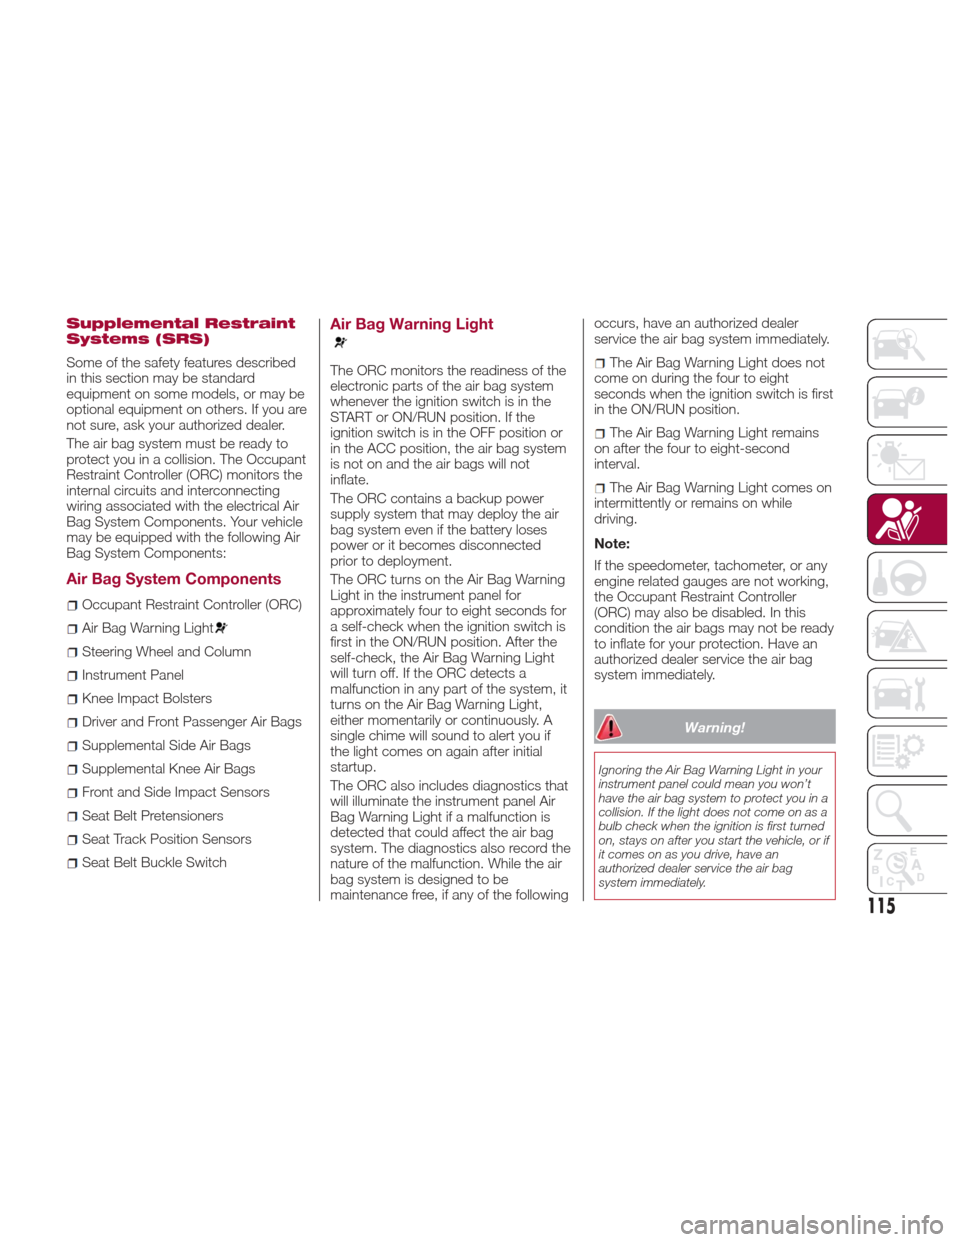
Supplemental Restraint
Systems (SRS)
Some of the safety features described
in this section may be standard
equipment on some models, or may be
optional equipment on others. If you are
not sure, ask your authorized dealer.
The air bag system must be ready to
protect you in a collision. The Occupant
Restraint Controller (ORC) monitors the
internal circuits and interconnecting
wiring associated with the electrical Air
Bag System Components. Your vehicle
may be equipped with the following Air
Bag System Components:
Air Bag System Components
Occupant Restraint Controller (ORC)
Air Bag Warning Light
Steering Wheel and Column
Instrument Panel
Knee Impact Bolsters
Driver and Front Passenger Air Bags
Supplemental Side Air Bags
Supplemental Knee Air Bags
Front and Side Impact Sensors
Seat Belt Pretensioners
Seat Track Position Sensors
Seat Belt Buckle Switch
Air Bag Warning Light
The ORC monitors the readiness of the
electronic parts of the air bag system
whenever the ignition switch is in the
START or ON/RUN position. If the
ignition switch is in the OFF position or
in the ACC position, the air bag system
is not on and the air bags will not
inflate.
The ORC contains a backup power
supply system that may deploy the air
bag system even if the battery loses
power or it becomes disconnected
prior to deployment.
The ORC turns on the Air Bag Warning
Light in the instrument panel for
approximately four to eight seconds for
a self-check when the ignition switch is
first in the ON/RUN position. After the
self-check, the Air Bag Warning Light
will turn off. If the ORC detects a
malfunction in any part of the system, it
turns on the Air Bag Warning Light,
either momentarily or continuously. A
single chime will sound to alert you if
the light comes on again after initial
startup.
The ORC also includes diagnostics that
will illuminate the instrument panel Air
Bag Warning Light if a malfunction is
detected that could affect the air bag
system. The diagnostics also record the
nature of the malfunction. While the air
bag system is designed to be
maintenance free, if any of the followingoccurs, have an authorized dealer
service the air bag system immediately.The Air Bag Warning Light does not
come on during the four to eight
seconds when the ignition switch is first
in the ON/RUN position.
The Air Bag Warning Light remains
on after the four to eight-second
interval.
The Air Bag Warning Light comes on
intermittently or remains on while
driving.
Note:
If the speedometer, tachometer, or any
engine related gauges are not working,
the Occupant Restraint Controller
(ORC) may also be disabled. In this
condition the air bags may not be ready
to inflate for your protection. Have an
authorized dealer service the air bag
system immediately.
Warning!
Ignoring the Air Bag Warning Light in your
instrument panel could mean you won’t
have the air bag system to protect you in a
collision. If the light does not come on as a
bulb check when the ignition is first turned
on, stays on after you start the vehicle, or if
it comes on as you drive, have an
authorized dealer service the air bag
system immediately.
115
Page 123 of 268
you haven’t healed significantly within a
few days, or if you have any blistering,
see your doctor immediately.
As the air bags deflate, you may see
some smoke-like particles. The
particles are a normal by-product of the
process that generates the non-toxic
gas used for air bag inflation. These
airborne particles may irritate the skin,
eyes, nose, or throat. If you have skin or
eye irritation, rinse the area with cool
water. For nose or throat irritation, move
to fresh air. If the irritation continues,
see your doctor. If these particles settle
on your clothing, follow the garment
manufacturer’s instructions for cleaning.
Do not drive your vehicle after the air
bags have deployed. If you are involved
in another collision, the air bags will not
be in place to protect you.
Warning!
Deployed air bags and seat belt
pretensioners cannot protect you in
another collision. Have the air bags, seat
belt pretensioners, and the seat belt
retractor assemblies replaced by an
authorized dealer immediately. Also, have
the Occupant Restraint Controller System
serviced as well.
Note:
Air bag covers may not be obvious
in the interior trim, but they will open
during air bag deployment.
After any collision, the vehicle
should be taken to an authorized
dealer immediately.
Enhanced Accident Response
System
In the event of an impact, if the
communication network remains intact,
and the power remains intact,
depending on the nature of the event,
the ORC will determine whether to have
the Enhanced Accident Response
System perform the following functions:
Cut off fuel to the engine.
Flash hazard lights as long as the
battery has power or until the hazard
light button is pressed. The hazard
lights can be deactivated by pressing
the hazard light button.
Turn on the interior lights, which
remain on as long as the battery has
power or for 15 minutes from the
intervention of the Enhanced Accident
Response System.
Unlock the power door locks.
Turn off the Fuel Pump Heater
(if equipped).
Turn off the HVAC Blower Motor.
Close the HVAC Circulation Door.
Enhanced Accident Response
System Reset Procedure
After the event occurs, when the
system is active, a message regarding
fuel cutoff is displayed. Turn the ignition
switch from ignition START or ON/RUN
to ignition STOP/OFF. Carefully check
the vehicle for fuel leaks in the engine
compartment and on the ground near
the engine compartment and fuel tank
before resetting the system and starting
the engine.
Depending on the nature of the event
the left and right turn signal lights,
located in the instrument panel, may
both be blinking and will continue to
blink. In order to move your vehicle to
the side of the road, you must follow
the system reset procedure.
121
Page 195 of 268
5. Start the compressor by placing the
power switch in the on position (I).
6. Inflate the tire to the pressure
indicated on the tire placard, located on
the driver’s side B-Pillar or the rear edge
of the driver’s side door. Refer to “Tires”
in “Servicing And Maintenance” for
more information. In order to obtain a
more precise reading, check the
pressure value on pressure gauge with
the compressor off.7. If the pressure is not at least
26.1 psi (1.8 bar) after 15 minutes,
disengage the compressor from the
valve and power outlet. Then, move the
vehicle forwards approximately five tire
turns in order to distribute the sealing
fluid inside the tire evenly, and then
repeat the inflation operation.
8. If you still cannot obtain a pressure
of at least 26 psi (1.8 bar) within
15 minutes from the compressor
switching on, do not drive the vehicle,
and contact an authorized dealer.
9. Drive the vehicle for about 5 miles
(8 km), stop, engage the electric
parking brake, and recheck the tire
pressure.
10. If the pressure is less than 26 psi
(1.8 bar),
Do Notdrive the vehicle, and
see an authorized dealer.
11. If a pressure value of at least 26 psi
(1.8 bar) is detected, restore the correct
pressure (with engine running and
electric parking brake engaged), and
drive immediately with great care to an
authorized dealer.
Warning!
Tire Repair Kit is not a permanent flat tire
repair. Have the tire inspected and repaired
or replaced after using Tire Repair Kit. Do
not exceed 50 mph (80 km/h) until the tire
is repaired or replaced. Failure to follow this
warning can result in injuries that are
serious or fatal to you, your passengers,
and others around you. Have the tire
checked as soon as possible at an
authorized dealer.
12. Apply the adhesive label from the
sealant bottle where it can be easily
seen by the driver as a reminder that
the tire has been treated with a Tire
Repair Kit, as well as not to exceed the
speed restriction for the treated tire.
Warning!
Do not adhere the speed restriction sticker
to the padded area on the steering wheel.
Adhering the speed restriction sticker to
the padded area on the steering wheel is
dangerous because the air bag may not
operate (deploy) normally resulting in
serious injury. In addition, do not adhere
the sticker to areas where warning lights or
the speedometer cannot be viewed.
GUID-08066S0005EMAir Compressor5— Power Switch
6— Pressure Gauge
193
Page 205 of 268
SCHEDULED
SERVICING
Correct servicing is crucial for
guaranteeing a long life for the vehicle
under the best conditions.
For this reason, Alfa Romeo has
planned a series of checks and services
for your vehicle at fixed intervals based
on distance and time, as described in
the Scheduled Servicing Plan.
Before each service, it is always
necessary to carefully follow the
instructions in the Scheduled Servicing
Plan (e.g. periodically check level of
fluids, tire pressure, etc.).
Scheduled Servicing is offered by an
authorized dealer according to a set
time schedule. If, during each
operation, in addition to the ones
scheduled, the need arises for further
replacements or repairs, these may be
carried out with owners explicit consent
only.
Note:
Scheduled Servicing intervals are
required by the Manufacturer. Failure to
have them carried out may invalidate
the New Vehicle Limited Warranty.
You are advised to inform your
authorized dealer of any small operating
irregularities without waiting for the next
service.
Periodic Checks
Every month or every600miles
( 1,000 km) or before long trips check
and, if necessary, top off:
Engine coolant level.
Brake fluid level (if insufficient, see
your authorized dealer as soon as
possible).
Windshield washer fluid level.
Tire inflation pressure and condition.
Operation of lighting system
(headlights, direction indicators, hazard
warning lights, etc.).
Operation of windshield
washing/wiping system and
positioning/wear of wiper blades.
Every 2,000 miles ( 3,000km), check
and top off if required:
Engine oil level.
Heavy Usage Of The Car
If the vehicle is used under one of the
following conditions:
Dusty roads.
Short, repeated journeys less than
4 miles (7-8 km) at sub-zero outside
temperatures.
Engine often idling or driving long
distances at low speeds or long periods
of inactivity.
In the event of a long period of
inactivity. The following checks must be carried
out more often than indicated in the
Scheduled Servicing Plan:
Check cleanliness of hood and trunk
locks, cleanliness and lubrication of
linkage.
Visually inspect conditions of: engine,
transmission, pipes and hoses
(exhaust/fuel system/brakes) and
rubber elements (sleeves/bushes, etc.).
Check battery charge and battery
fluid level (electrolyte).
Visually inspect conditions of the
accessory drive belts.
Check and, if necessary, change
engine oil and replace oil filter.
Check and, if necessary, replace
cabin air filter.
Check and, if necessary, replace air
cleaner.
Severe Duty All Models
Change Engine Oil at 4,000 miles
(6,500 km) if the vehicle is operated in a
dusty and off-road environment or is
operated predominately at idle or only
very low engine RPM’s. This type of
vehicle use is considered Severe Duty.
203
Page 206 of 268
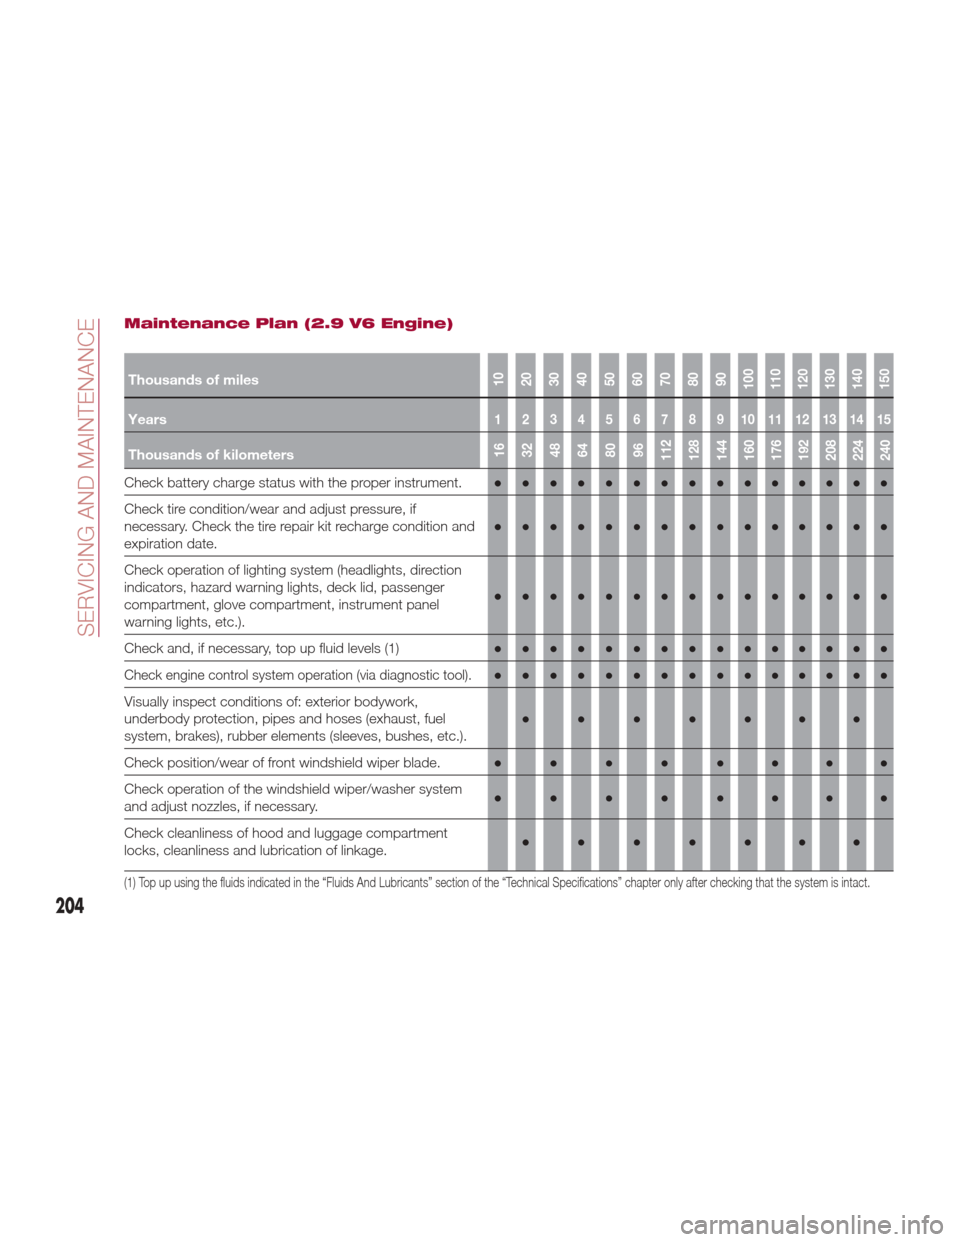
Maintenance Plan (2.9 V6 Engine)
Thousands of miles10
20
30
40
50
60
70
80
90
100
110
120
130
140
150
Years123456789101112131415
Thousands of kilometers16
32
48
64
80
96
112
128
144
160
176
192
208
224
240
Check battery charge status with the proper instrument. ●●●●●●●●●●●●●●●
Check tire condition/wear and adjust pressure, if
necessary. Check the tire repair kit recharge condition and
expiration date. ●●●●●●●●●
●●●●●●
Check operation of lighting system (headlights, direction
indicators, hazard warning lights, deck lid, passenger
compartment, glove compartment, instrument panel
warning lights, etc.). ●●●●●●●●●
●●●●●●
Check and, if necessary, top up fluid levels
(1)●●●●●●●●● ●●●●●●
Check engine control system operation (via diagnostic tool).●●●●●●●●●●●●●●●
Visually inspect conditions of: exterior bodywork,
underbody protection, pipes and hoses (exhaust, fuel
system, brakes), rubber elements (sleeves, bushes, etc.). ●●●●●●●
Check position/wear of front windshield wiper blade. ●●●●●●●●
Check operation of the windshield wiper/washer system
and adjust nozzles, if necessary. ●●●●●●●●
Check cleanliness of hood and luggage compartment
locks, cleanliness and lubrication of linkage. ●●●●●●●
(1) Top up using the fluids indicated in the “Fluids And Lubricants” section of the “Technical Specifications” chapter only after checking that the system is intact.
204
SERVICING AND MAINTENANCE
Page 207 of 268
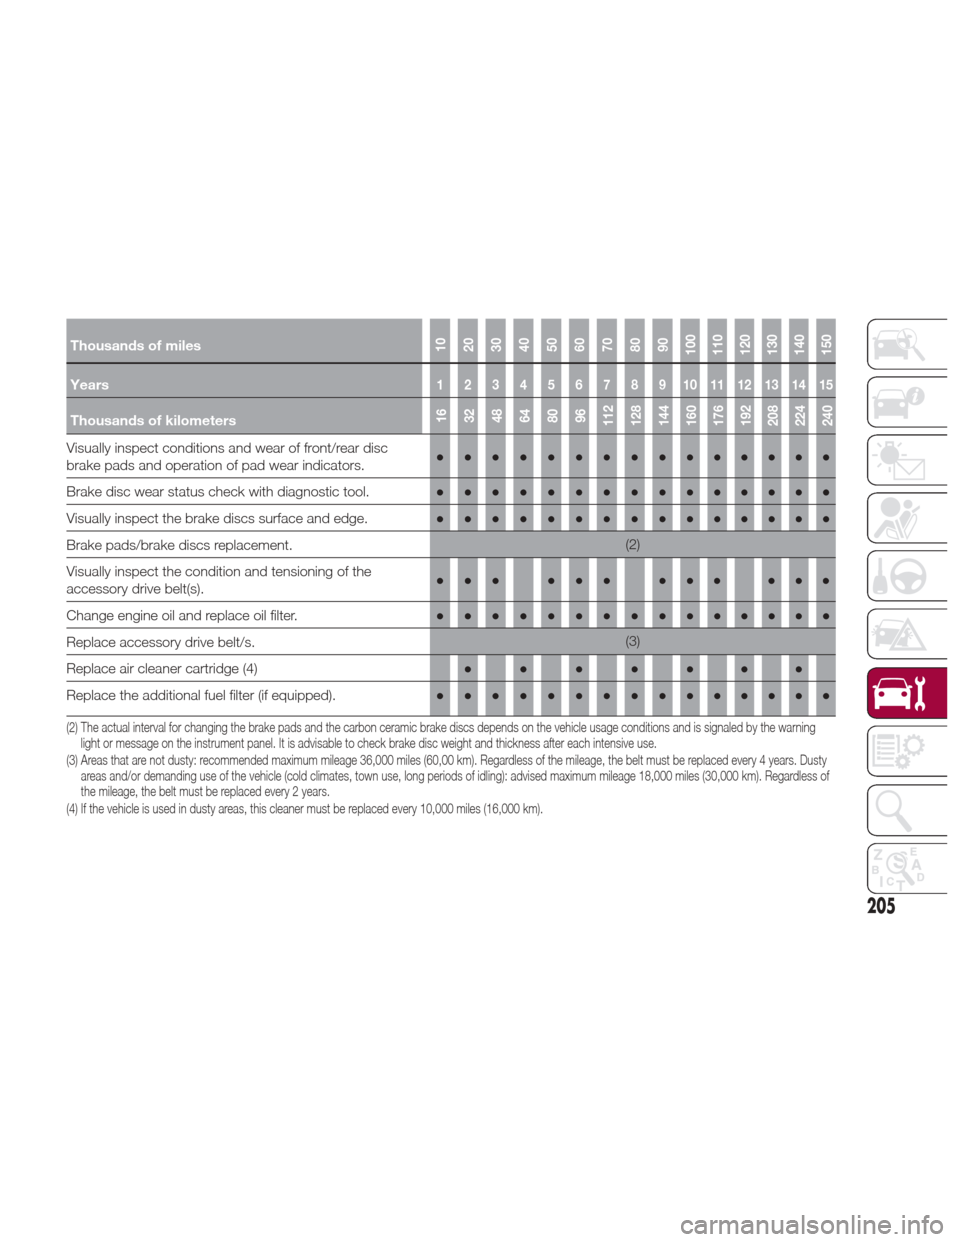
Thousands of miles10
20
30
40
50
60
70
80
90
100
110
120
130
140
150
Years123456789101112131415
Thousands of kilometers16
32
48
64
80
96
112
128
144
160
176
192
208
224
240
Visually inspect conditions and wear of front/rear disc
brake pads and operation of pad wear indicators. ●●●●●●●●●
●●●●●●
Brake disc wear status check with diagnostic tool. ●●●●●●●●●●●●●●●
Visually inspect the brake discs surface and edge. ●●●●●●●●●●●●●●●
Brake pads/brake discs replacement.
(2)
Visually inspect the condition and tensioning of the
accessory drive belt(s). ●●● ●●● ●●● ●●●
Change engine oil and replace oil filter. ●●●●●●●●●●●●●●●
Replace accessory drive belt/s.
(3)
Replace air cleaner cartridge(4)●●●●●●●
Replace the additional fuel filter (if equipped). ●●●●●●●●●●●●●●●
(2) The actual interval for changing the brake pads and the carbon ceramic brake discs depends on the vehicle usage conditions and is signaled by the warning
light or message on the instrument panel. It is advisable to check brake disc weight and thickness after each intensive use.
(3) Areas that are not dusty: recommended maximum mileage 36,000 miles (60,00 km). Regardless of the mileage, the belt must be replaced every 4 years. Dusty areas and/or demanding use of the vehicle (cold climates, town use, long periods of idling): advised maximum mileage 18,000 miles (30,000 km). Regardless of
the mileage, the belt must be replaced every 2 years.
(4) If the vehicle is used in dusty areas, this cleaner must be replaced every 10,000 miles (16,000 km).
205