servicing Alfa Romeo Giulia Quadrifoglio 2017 User Guide
[x] Cancel search | Manufacturer: ALFA ROMEO, Model Year: 2017, Model line: Giulia Quadrifoglio, Model: Alfa Romeo Giulia Quadrifoglio 2017Pages: 268, PDF Size: 110.98 MB
Page 195 of 268
5. Start the compressor by placing the
power switch in the on position (I).
6. Inflate the tire to the pressure
indicated on the tire placard, located on
the driver’s side B-Pillar or the rear edge
of the driver’s side door. Refer to “Tires”
in “Servicing And Maintenance” for
more information. In order to obtain a
more precise reading, check the
pressure value on pressure gauge with
the compressor off.7. If the pressure is not at least
26.1 psi (1.8 bar) after 15 minutes,
disengage the compressor from the
valve and power outlet. Then, move the
vehicle forwards approximately five tire
turns in order to distribute the sealing
fluid inside the tire evenly, and then
repeat the inflation operation.
8. If you still cannot obtain a pressure
of at least 26 psi (1.8 bar) within
15 minutes from the compressor
switching on, do not drive the vehicle,
and contact an authorized dealer.
9. Drive the vehicle for about 5 miles
(8 km), stop, engage the electric
parking brake, and recheck the tire
pressure.
10. If the pressure is less than 26 psi
(1.8 bar),
Do Notdrive the vehicle, and
see an authorized dealer.
11. If a pressure value of at least 26 psi
(1.8 bar) is detected, restore the correct
pressure (with engine running and
electric parking brake engaged), and
drive immediately with great care to an
authorized dealer.
Warning!
Tire Repair Kit is not a permanent flat tire
repair. Have the tire inspected and repaired
or replaced after using Tire Repair Kit. Do
not exceed 50 mph (80 km/h) until the tire
is repaired or replaced. Failure to follow this
warning can result in injuries that are
serious or fatal to you, your passengers,
and others around you. Have the tire
checked as soon as possible at an
authorized dealer.
12. Apply the adhesive label from the
sealant bottle where it can be easily
seen by the driver as a reminder that
the tire has been treated with a Tire
Repair Kit, as well as not to exceed the
speed restriction for the treated tire.
Warning!
Do not adhere the speed restriction sticker
to the padded area on the steering wheel.
Adhering the speed restriction sticker to
the padded area on the steering wheel is
dangerous because the air bag may not
operate (deploy) normally resulting in
serious injury. In addition, do not adhere
the sticker to areas where warning lights or
the speedometer cannot be viewed.
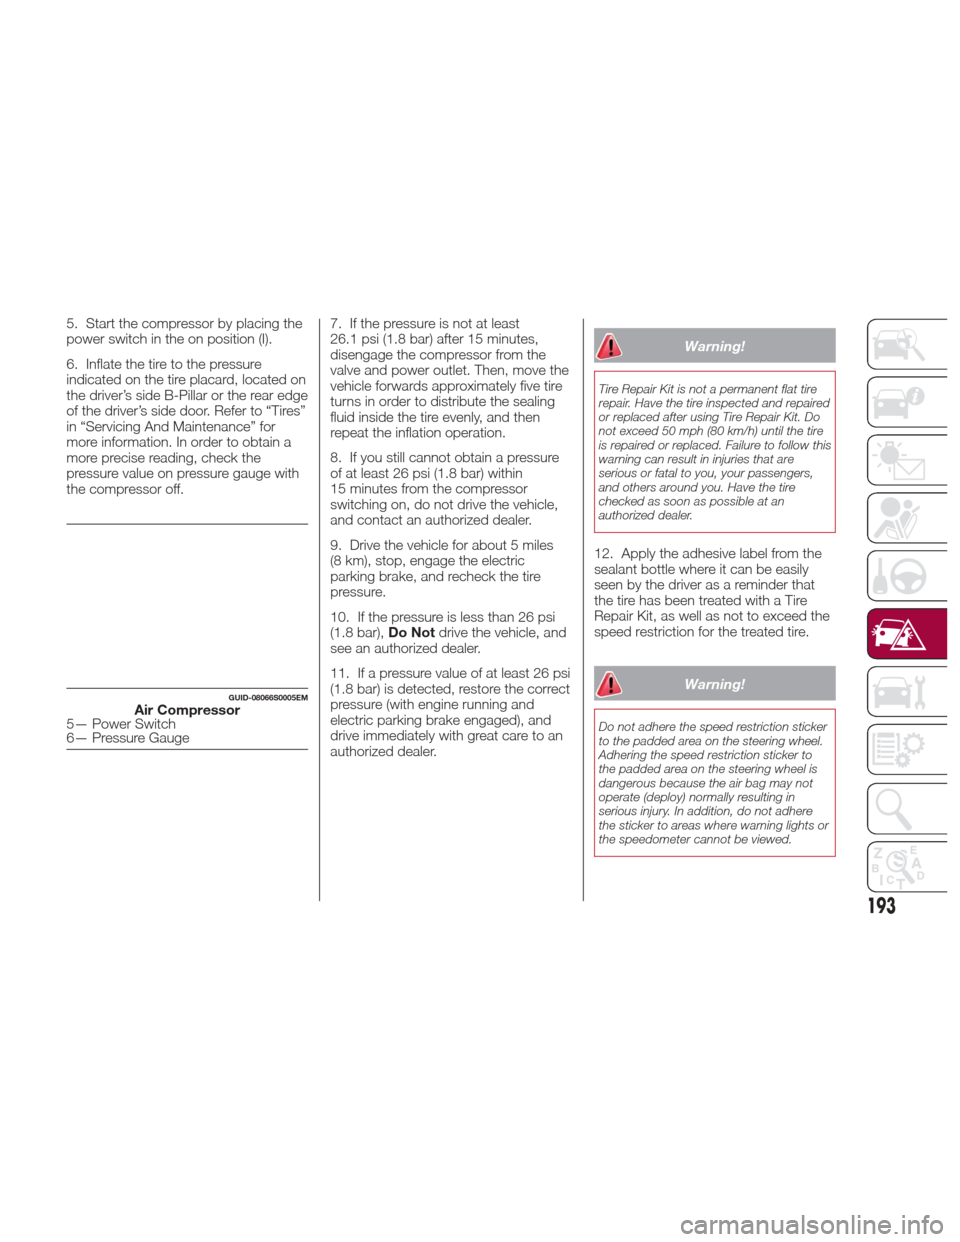
GUID-08066S0005EMAir Compressor5— Power Switch
6— Pressure Gauge
193
Page 204 of 268
SERVICING AND MAINTENANCE
Correct servicing permits the
performance of the vehicle to be
maintained over time, as well as limited
running costs and safeguarding the
efficiency of the safety systems.
This chapter explains how.SCHEDULED SERVICING.......203
ENGINECOMPARTMENT ......207
BATTERY RECHARGING .......210
DEALER SERVICE ...........212
RAISING THE VEHICLE ........218
TIRES .................. .218
DEPARTMENT OF
TRANSPORTATION UNIFORM
TIRE QUALITY GRADES .......232
STORING THE VEHICLE .......233
BODYWORK.............. .234
INTERIORS ............... .236
202
SERVICING AND MAINTENANCE
Page 205 of 268
SCHEDULED
SERVICING
Correct servicing is crucial for
guaranteeing a long life for the vehicle
under the best conditions.
For this reason, Alfa Romeo has
planned a series of checks and services
for your vehicle at fixed intervals based
on distance and time, as described in
the Scheduled Servicing Plan.
Before each service, it is always
necessary to carefully follow the
instructions in the Scheduled Servicing
Plan (e.g. periodically check level of
fluids, tire pressure, etc.).
Scheduled Servicing is offered by an
authorized dealer according to a set
time schedule. If, during each
operation, in addition to the ones
scheduled, the need arises for further
replacements or repairs, these may be
carried out with owners explicit consent
only.
Note:
Scheduled Servicing intervals are
required by the Manufacturer. Failure to
have them carried out may invalidate
the New Vehicle Limited Warranty.
You are advised to inform your
authorized dealer of any small operating
irregularities without waiting for the next
service.
Periodic Checks
Every month or every600miles
( 1,000 km) or before long trips check
and, if necessary, top off:
Engine coolant level.
Brake fluid level (if insufficient, see
your authorized dealer as soon as
possible).
Windshield washer fluid level.
Tire inflation pressure and condition.
Operation of lighting system
(headlights, direction indicators, hazard
warning lights, etc.).
Operation of windshield
washing/wiping system and
positioning/wear of wiper blades.
Every 2,000 miles ( 3,000km), check
and top off if required:
Engine oil level.
Heavy Usage Of The Car
If the vehicle is used under one of the
following conditions:
Dusty roads.
Short, repeated journeys less than
4 miles (7-8 km) at sub-zero outside
temperatures.
Engine often idling or driving long
distances at low speeds or long periods
of inactivity.
In the event of a long period of
inactivity. The following checks must be carried
out more often than indicated in the
Scheduled Servicing Plan:
Check cleanliness of hood and trunk
locks, cleanliness and lubrication of
linkage.
Visually inspect conditions of: engine,
transmission, pipes and hoses
(exhaust/fuel system/brakes) and
rubber elements (sleeves/bushes, etc.).
Check battery charge and battery
fluid level (electrolyte).
Visually inspect conditions of the
accessory drive belts.
Check and, if necessary, change
engine oil and replace oil filter.
Check and, if necessary, replace
cabin air filter.
Check and, if necessary, replace air
cleaner.
Severe Duty All Models
Change Engine Oil at 4,000 miles
(6,500 km) if the vehicle is operated in a
dusty and off-road environment or is
operated predominately at idle or only
very low engine RPM’s. This type of
vehicle use is considered Severe Duty.
203
Page 206 of 268
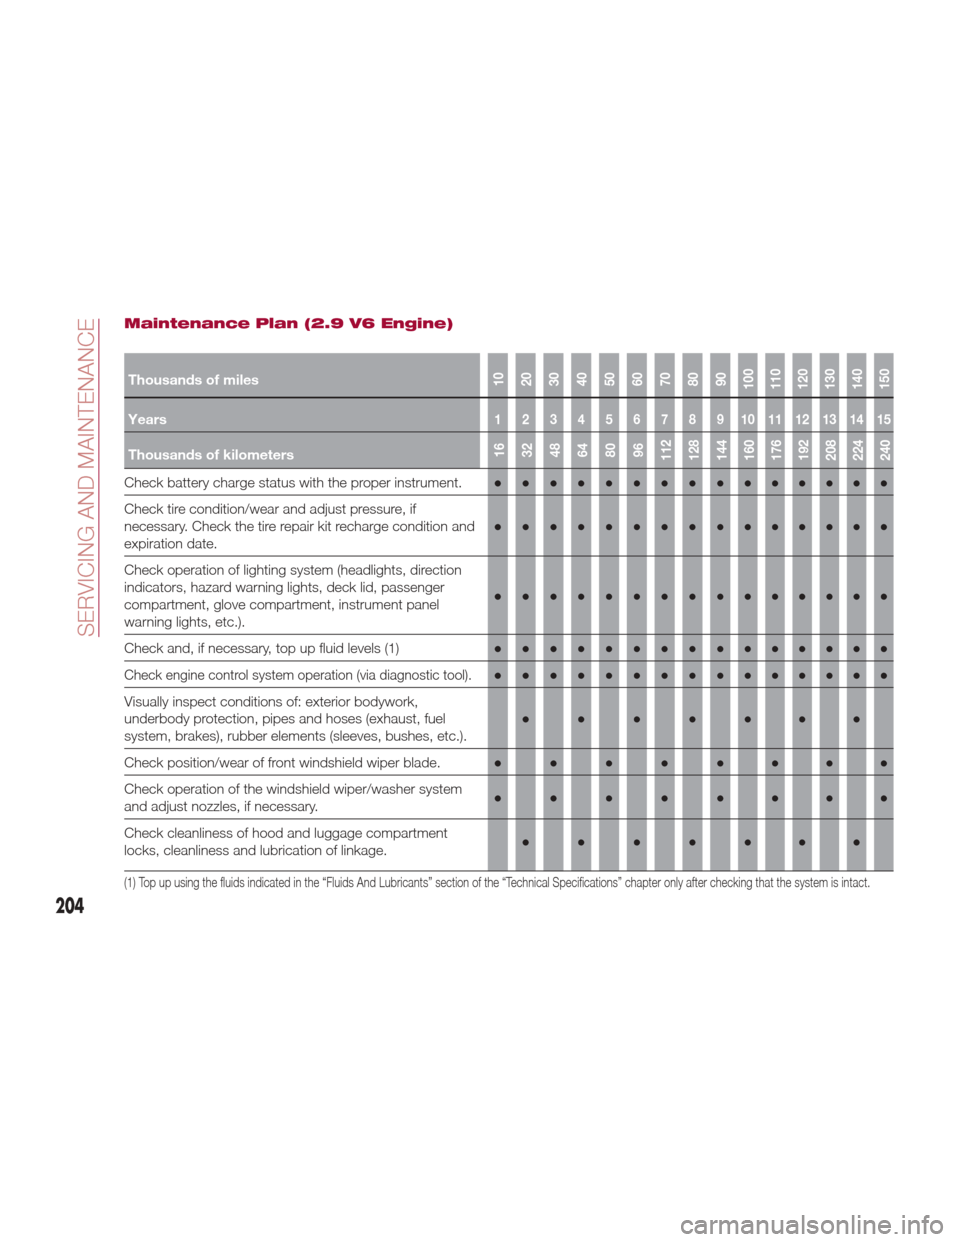
Maintenance Plan (2.9 V6 Engine)
Thousands of miles10
20
30
40
50
60
70
80
90
100
110
120
130
140
150
Years123456789101112131415
Thousands of kilometers16
32
48
64
80
96
112
128
144
160
176
192
208
224
240
Check battery charge status with the proper instrument. ●●●●●●●●●●●●●●●
Check tire condition/wear and adjust pressure, if
necessary. Check the tire repair kit recharge condition and
expiration date. ●●●●●●●●●
●●●●●●
Check operation of lighting system (headlights, direction
indicators, hazard warning lights, deck lid, passenger
compartment, glove compartment, instrument panel
warning lights, etc.). ●●●●●●●●●
●●●●●●
Check and, if necessary, top up fluid levels
(1)●●●●●●●●● ●●●●●●
Check engine control system operation (via diagnostic tool).●●●●●●●●●●●●●●●
Visually inspect conditions of: exterior bodywork,
underbody protection, pipes and hoses (exhaust, fuel
system, brakes), rubber elements (sleeves, bushes, etc.). ●●●●●●●
Check position/wear of front windshield wiper blade. ●●●●●●●●
Check operation of the windshield wiper/washer system
and adjust nozzles, if necessary. ●●●●●●●●
Check cleanliness of hood and luggage compartment
locks, cleanliness and lubrication of linkage. ●●●●●●●
(1) Top up using the fluids indicated in the “Fluids And Lubricants” section of the “Technical Specifications” chapter only after checking that the system is intact.
204
SERVICING AND MAINTENANCE
Page 208 of 268
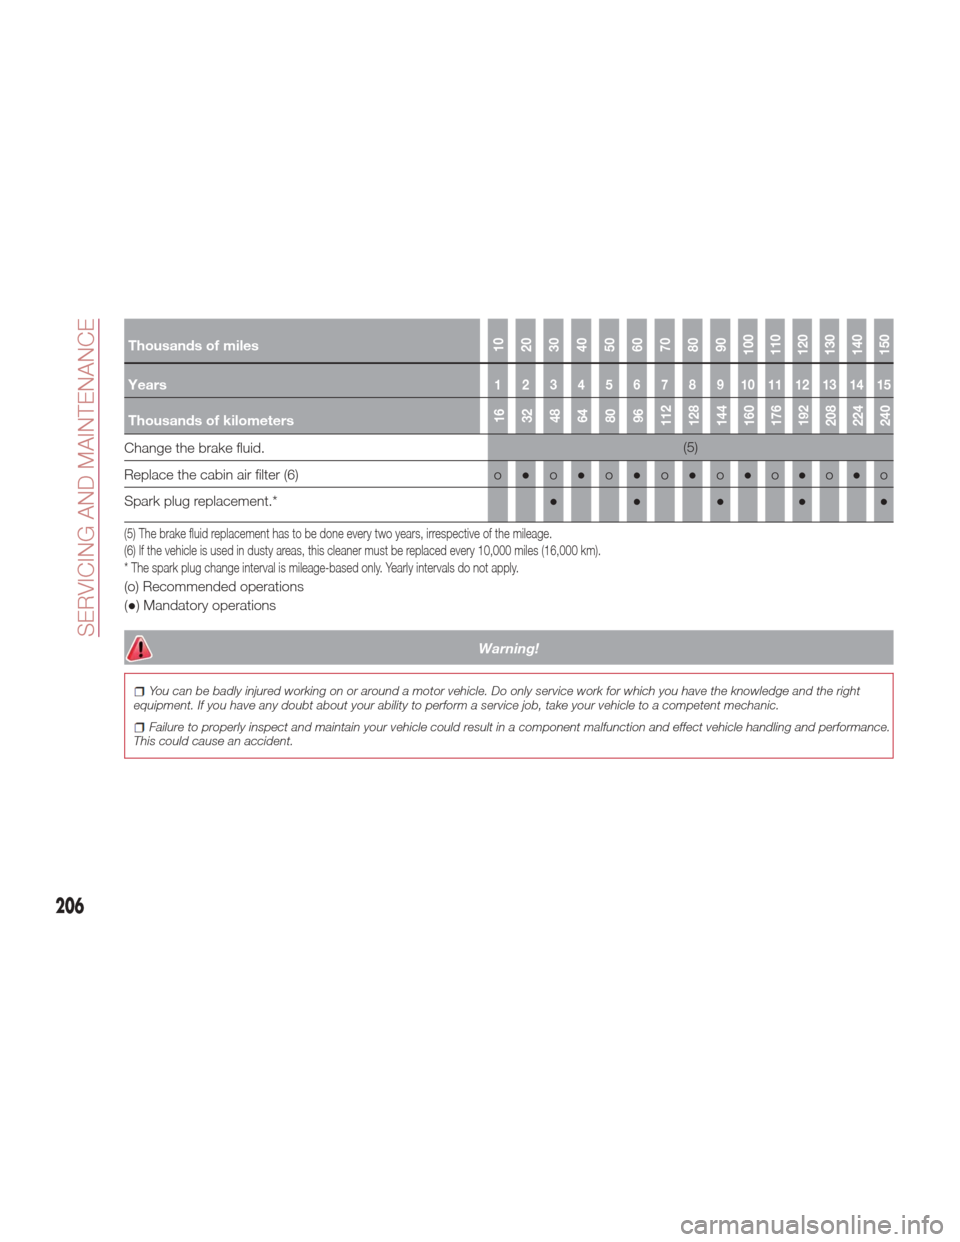
Thousands of miles10
20
30
40
50
60
70
80
90
100
110
120
130
140
150
Years123456789101112131415
Thousands of kilometers16
32
48
64
80
96
112
128
144
160
176
192
208
224
240
Change the brake fluid.(5)
Replace the cabin air filter(6)o ● o● o● o● o● o● o● o
Spark plug replacement.
*●●●●●
(5) The brake fluid replacement has to be done every two years, irrespective of the mileage.
(6) If the vehicle is used in dusty areas, this cleaner must be replaced every 10,000 miles (16,000 km).
* The spark plug change interval is mileage-based only. Yearly intervals do not apply.
(o) Recommended operations
(●) Mandatory operations
Warning!
You can be badly injured working on or around a motor vehicle. Do only service work for which you have the knowledge and the right
equipment. If you have any doubt about your ability to perform a service job, take your vehicle to a competent mechanic.
Failure to properly inspect and maintain your vehicle could result in a component malfunction and effect vehicle handling and performance.
This could cause an accident.
206
SERVICING AND MAINTENANCE
Page 210 of 268
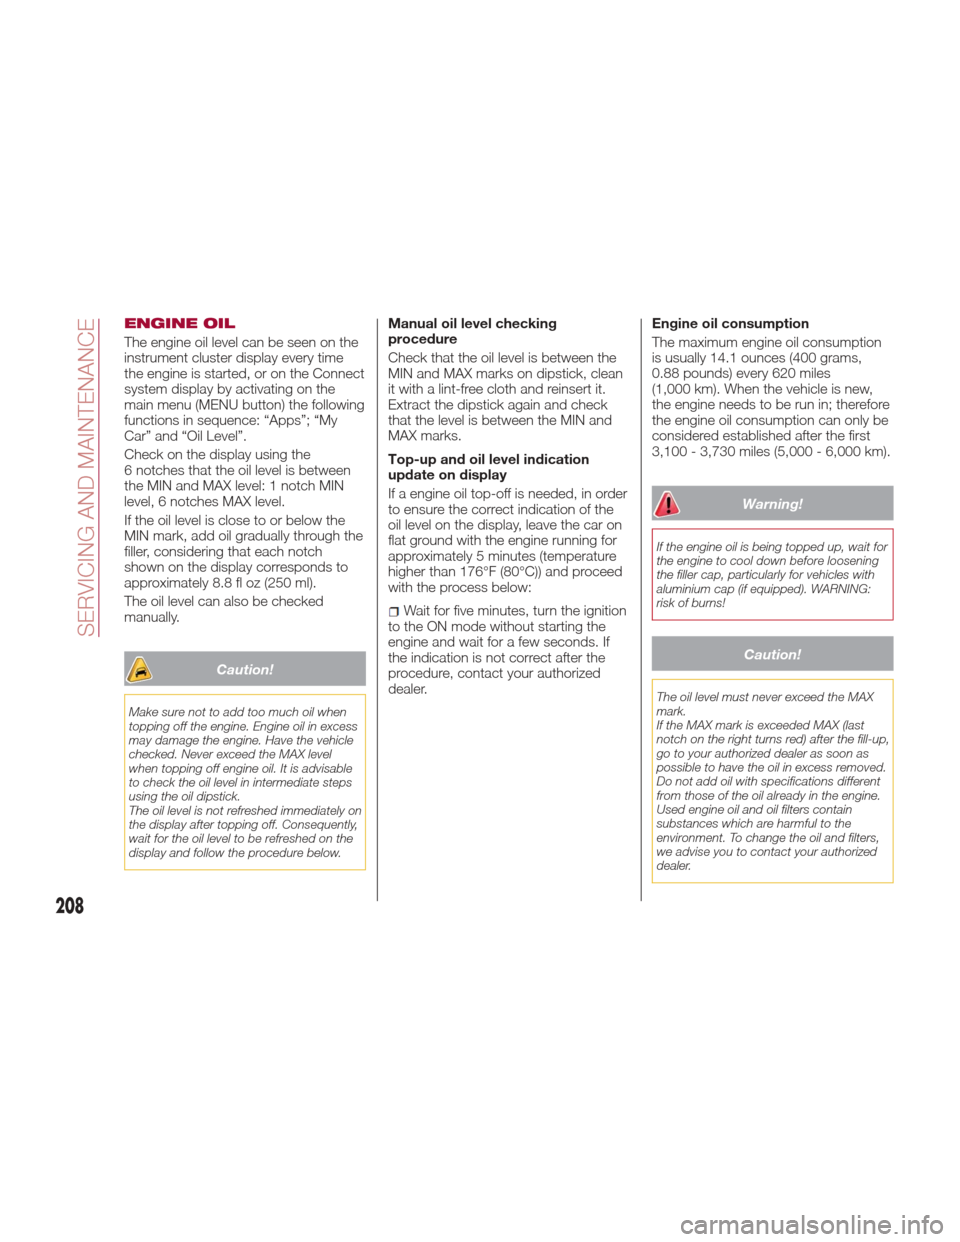
ENGINE OIL
The engine oil level can be seen on the
instrument cluster display every time
the engine is started, or on the Connect
system display by activating on the
main menu (MENU button) the following
functions in sequence: “Apps”; “My
Car” and “Oil Level”.
Check on the display using the
6 notches that the oil level is between
the MIN and MAX level: 1 notch MIN
level, 6 notches MAX level.
If the oil level is close to or below the
MIN mark, add oil gradually through the
filler, considering that each notch
shown on the display corresponds to
approximately 8.8 fl oz (250 ml).
The oil level can also be checked
manually.
Caution!
Make sure not to add too much oil when
topping off the engine. Engine oil in excess
may damage the engine. Have the vehicle
checked. Never exceed the MAX level
when topping off engine oil. It is advisable
to check the oil level in intermediate steps
using the oil dipstick.
The oil level is not refreshed immediately on
the display after topping off. Consequently,
wait for the oil level to be refreshed on the
display and follow the procedure below.
Manual oil level checking
procedure
Check that the oil level is between the
MIN and MAX marks on dipstick, clean
it with a lint-free cloth and reinsert it.
Extract the dipstick again and check
that the level is between the MIN and
MAX marks.
Top-up and oil level indication
update on display
Ifaengineoiltop-offisneeded,inorder
to ensure the correct indication of the
oil level on the display, leave the car on
flat ground with the engine running for
approximately 5 minutes (temperature
higher than 176°F (80°C)) and proceed
with the process below:
Wait for five minutes, turn the ignition
to the ON mode without starting the
engine and wait for a few seconds. If
the indication is not correct after the
procedure, contact your authorized
dealer. Engine oil consumption
The maximum engine oil consumption
is usually 14.1 ounces (400 grams,
0.88 pounds) every 620 miles
(1,000 km). When the vehicle is new,
the engine needs to be run in; therefore
the engine oil consumption can only be
considered established after the first
3,100 - 3,730 miles (5,000 - 6,000 km).
Warning!
If the engine oil is being topped up, wait for
the engine to cool down before loosening
the filler cap, particularly for vehicles with
aluminium cap (if equipped). WARNING:
risk of burns!
Caution!
The oil level must never exceed the MAX
mark.
If the MAX mark is exceeded MAX (last
notch on the right turns red) after the fill-up,
go to your authorized dealer as soon as
possible to have the oil in excess removed.
Do not add oil with specifications different
from those of the oil already in the engine.
Used engine oil and oil filters contain
substances which are harmful to the
environment. To change the oil and filters,
we advise you to contact your authorized
dealer.
208
SERVICING AND MAINTENANCE
Page 212 of 268
Battery
The battery does not require the
electrolyte to be topped up with distilled
water. A periodic check carried out at
an authorized dealer, however, is
necessary to check efficiency.
Follow the battery manufacturer's
instructions for maintenance.
Replacing The Battery
If necessary, replace the battery with
another original battery with the same
specifications. Follow the battery
manufacturer’s instructions for
maintenance.
Warning!
Battery fluid is a corrosive acid solution
and can burn or even blind you. Do not
allow battery fluid to contact your eyes,
skin, or clothing. Do not lean over a battery
when attaching clamps. If acid splashes in
eyes or on skin, flush the area immediately
with large amounts of water. Refer to
“Emergency Starting” in “In Case Of
Emergency” for further information.
Battery gas is flammable and explosive.
Keep flame or sparks away from the
battery. Do not use a booster battery or
any other booster source with an output
greater than 12 Volts. Do not allow cable
clamps to touch each other.
Battery posts, terminals, and related
accessories contain lead and lead
compounds. Wash hands after handling.
Note:
It will not be possible to open the trunk
with a key or by pressing the button in
the passenger compartment when the
battery is disconnected. So, always
position the manual trunk opening strap
on the trunk lock before disconnecting
the battery. The procedure is described
in the "Storing The Vehicle" paragraph
in this chapter.
BATTERY
RECHARGING
Important Notes
Warning!
Never charge or recharge a frozen
battery: it may explode because of the
nitrogen trapped inside the ice crystals.
At all times while charging or recharging
the battery, make sure that any sparks or
open flames are kept sufficiently far away
from the battery.
Note:
Before using the charging device,
always make sure that it is appropriate
for the installed battery, with constant
voltage (below 14.8 V) and low
amperage (maximum 15 A).
Recharge the battery in a well
ventilated environment.
Before using any devices to charge
or to maintain the charge of the
battery, carefully follow the instructions
provided with the device in order to
properly and safely connect it to the
car battery.
210
SERVICING AND MAINTENANCE
Page 214 of 268
DEALER SERVICE
The following pages contain
instructions on the required
maintenance from the technical
personnel who designed the vehicle.
In addition to these specific
maintenance instructions specified for
routine scheduled servicing, there are
other components which may require
periodic maintenance or replacement
over the vehicle’s life cycle.
Engine Oil
Engine Oil Level Check
To ensure correct engine lubrication,
the oil must always be kept at the
prescribed level (see "Engine
Compartment" in this chapter).
Check the oil level at regular intervals,
for example every 1864 miles
(3000 km).
It must be checked about five minutes
after stopping the engine, once full
operating temperature is reached.
The vehicle must also be parked on as
level a surface as possible.
Ensure that the oil level is within the
interval on the dipstick between the
minimum and maximum limits.
The engine oil level can be checked
using the Connect system. To access
the function, activate the main menu
(MENU button) and select the following
options in sequence: “Applications”;
“My Car”; “Oil level”.Changing the Engine Oil
See the "Maintenance Plan" for the
correct servicing intervals.
Choice of Engine Oil Type
To ensure optimal performance and
maximum protection in all operating
conditions, it is advisable to use solely
certified engine oils (see description in
"Fluid And Lubricants" in the "Technical
Specifications" chapter).
Additives for Engine Oil
It is strongly recommended not to use
additives (other than leak detection
dyes) with the engine oil.
The engine oil is a product designed
specially for the vehicle and its
performance may be deteriorated
through the use of further additives.
Disposal of Used Engine Oil and
Filters
For the disposal of the engine oil and
filters, contact the appropriate body to
determine local regulations.
Note:
Used engine oil disposed of incorrectly
may seriously harm the environment.
Engine Oil Filter
Replacing the Engine Oil Filter
The engine oil filter must be replaced
each time the engine oil is changed. It is
advised to replace it with a genuine
spare part, specifically designed for this
vehicle.
Air Filter
Replacing the Air Cleaner
See the "Maintenance Plan" for the
correct servicing intervals. It is advised
to replace it with a genuine spare part,
specifically designed for this vehicle.
Air Conditioning System
Maintenance
To ensure the best possible
performance, the air conditioning
system must be checked and undergo
maintenance at an authorized dealer at
the beginning of the summer.
Caution!
Do not use chemicals to clean the air
conditioning system, since the internal
components may be damaged. This kind
of damage is not covered by warranty.
Replace The Cabin Air Filter
See the "Maintenance Plan" for the
correct servicing intervals. For cleaner
replacement, contact an authorized
dealer.
212
SERVICING AND MAINTENANCE
Page 216 of 268
This function can only be activated
within two minutes of cycling the
ignition to STOP.
To activate this function, move the lever
upward for at least three seconds.
Function deactivation
The function is deactivated if:
Wait for longer than two minutes
before turning the ignition to the STOP
position, after having raised the lever
and starting the service procedure in
this way.
The ignition is cycled to position ON
and the windshield wiper control.
If, after using the function, the ignition is
set back to ON with the blades in a
position other than rest position (at the
base of the windshield), they will only
return to rest position following a
command given using the stalk (stalk upwards, into unstable position) or
when a speed of 3 mph (5 km/h) is
exceeded.
Replacing The Windshield Wiper
Blades
Proceed as follows:
Raise the wiper arm, press tab of
the attachment spring and remove
the blade from the arm.
Fit the new blade, inserting the tab
in the dedicated housing in the arm
and checking that it is
locked.Lower the wiper arm onto
the windshield.
Note:
Do not operate the windshield
wiper with the blades lifted from the
windshield. Windshield Washer
The window washer nozzles are fixed.
If there is no jet of fluid, first check that
there is fluid in the reservoir (see
paragraph “Engine compartment” in
this chapter).
Then, check that the nozzle holes are
not clogged; use a needle to unblock
them if necessary.
Exhaust System
Adequate maintenance of the engine
exhaust system represents the best
protection against leaks of carbon
monoxide into the passenger
compartment.
If an unusual noise from the exhaust or
the presence of smoke in the
passenger compartment is identified, or
GUID-09046S0001EMMultifunction Lever
GUID-09046S0002EMWiper Release Tab
GUID-09046S0003EMWindshield Washers
1 — Washer Nozzles
214
SERVICING AND MAINTENANCE
Page 218 of 268
(e.g. if frequent top ups are required),
have the seal checked at an authorized
dealer.
With the engine off and at normal
operating temperature, check that the
cooling system radiator cap is closed
properly.
Warning!
Do not open hot engine cooling system.
Never add engine coolant (antifreeze) when
the engine is overheated. Do not loosen or
remove the cap to cool an overheated
engine. Heat causes pressure to build up in
the cooling system. To prevent scalding or
injury, do not remove the pressure cap
while the system is hot or under pressure.
Do not use a pressure cap other than
the one specified for your vehicle. Personal
injury or engine damage may result.
Note:
Before removing the engine coolant
reservoir cap, wait for the system to
cool down.
Topping Up / Draining / Flushing
The Engine Coolant
If the engine coolant (antifreeze) is dirty,
have cleaning and flushing carried out
at an authorized dealer.
See the "Maintenance Plan" for the
correct servicing intervals. Note:
For topping up, use a fluid with the
same characteristics as those
indicated in the "Fluids And
Lubricants" table (see "Technical
Specifications" chapter).
Do not use pure water,
alcohol-based coolants, corrosions
inhibitors or additional anti-rust
products because they may be
incompatible with the engine coolant
and cause the clogging of the radiator.
The use of propylene glycol-based
coolant is also not recommended.
Engine Cooling System Cap
To prevent loss of engine coolant, make
sure that the expansion tank cap is
closed. If it is open, screw it completely
until you reach/hear the click.
Periodically check the cap and clean it
from any foreign bodies that may have
deposited on the external surface.
Warning!
Never add coolant with the engine hot
or overheated.
Do not attempt to cool an overheated
engine by loosening or removing the cap.
The heat causes a considerable increase in
pressure in the cooling system.
To prevent damage to the engine, only
use the engine cooling circuit caps
provided.
Disposal of Used Engine Coolant
Disposal of engine coolant is subject to
legal requirements: contact the
appropriate body to determine local
regulations.
Note:
To prevent the fluid from being
ingested by children or animals, do
not keep it in open containers or pour
it on the ground. If ingested, contact a
doctor immediately. Eliminate any
traces of fluid from the ground
immediately.
When the vehicle stops after a short
trip, steam may be seen coming out
from front of the hood. This is a
normal phenomenon which is due to
the presence of rain, snow or a lot of
moisture on the surface of the
radiator.
With engine and system cold, do
not top up with coolant beyond the
maximum level indicated on the
reservoir in the engine compartment.
216
SERVICING AND MAINTENANCE