trunk release Alfa Romeo Giulia Quadrifoglio 2017 Owner's Manual
[x] Cancel search | Manufacturer: ALFA ROMEO, Model Year: 2017, Model line: Giulia Quadrifoglio, Model: Alfa Romeo Giulia Quadrifoglio 2017Pages: 268, PDF Size: 110.98 MB
Page 16 of 268
KEYS
Key Fob
Your vehicle uses a keyless ignition
system. This system includes a key fob
and a keyless push button ignition.
The key fob with Remote Control
contains a Remote Keyless Entry key
fob. The Remote Keyless Entry system
allows you to lock or unlock the doors
and trunk or activate the Panic Alarm
from distances. The key fob does not
need to be pointed at the vehicle to
activate the system.
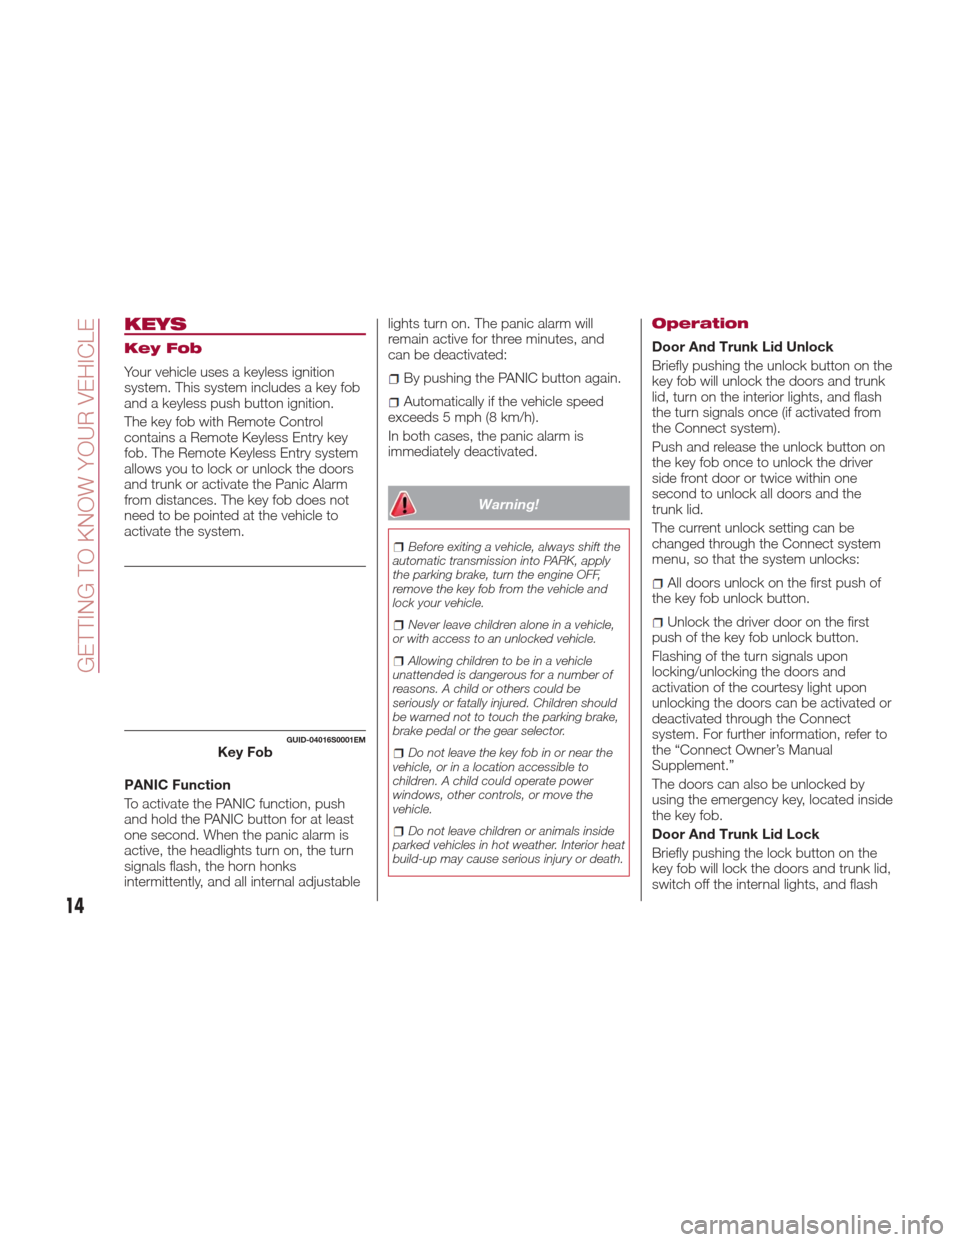
PANIC Function
To activate the PANIC function, push
and hold the PANIC button for at least
one second. When the panic alarm is
active, the headlights turn on, the turn
signals flash, the horn honks
intermittently, and all internal adjustablelights turn on. The panic alarm will
remain active for three minutes, and
can be deactivated:By pushing the PANIC button again.
Automatically if the vehicle speed
exceeds 5 mph (8 km/h).
In both cases, the panic alarm is
immediately deactivated.
Warning!
Before exiting a vehicle, always shift the
automatic transmission into PARK, apply
the parking brake, turn the engine OFF,
remove the key fob from the vehicle and
lock your vehicle.
Never leave children alone in a vehicle,
or with access to an unlocked vehicle.
Allowing children to be in a vehicle
unattended is dangerous for a number of
reasons. A child or others could be
seriously or fatally injured. Children should
be warned not to touch the parking brake,
brake pedal or the gear selector.
Do not leave the key fob in or near the
vehicle, or in a location accessible to
children. A child could operate power
windows, other controls, or move the
vehicle.
Do not leave children or animals inside
parked vehicles in hot weather. Interior heat
build-up may cause serious injury or death.
Operation
Door And Trunk Lid Unlock
Briefly pushing the unlock button on the
key fob will unlock the doors and trunk
lid, turn on the interior lights, and flash
the turn signals once (if activated from
the Connect system).
Push and release the unlock button on
the key fob once to unlock the driver
side front door or twice within one
second to unlock all doors and the
trunk lid.
The current unlock setting can be
changed through the Connect system
menu, so that the system unlocks:
All doors unlock on the first push of
the key fob unlock button.
Unlock the driver door on the first
push of the key fob unlock button.
Flashing of the turn signals upon
locking/unlocking the doors and
activation of the courtesy light upon
unlocking the doors can be activated or
deactivated through the Connect
system. For further information, refer to
the “Connect Owner’s Manual
Supplement.”
The doors can also be unlocked by
using the emergency key, located inside
the key fob.
Door And Trunk Lid Lock
Briefly pushing the lock button on the
key fob will lock the doors and trunk lid,
switch off the internal lights, and flash
GUID-04016S0001EMKey Fob
14
GETTING TO KNOW YOUR VEHICLE
Page 17 of 268
the turn signals (if activated in the
Connect System).
If one or more doors are open, these
doors will also lock, and this is
indicated by a rapid flashing of the turn
signals. The doors prepare for locking,
which becomes active from the
moment they are closed. The doors will
unlock again only if the key fob is
detected inside the passenger
compartment.
The doors can be locked by using the
emergency key in the driver’s side door
lock.
Automatic Window Opening/
Closing Function
Pushing and holding the unlock button
on the key fob will allow all windows to
open to a desired position. Release the
unlock button on the key fob anytime
during this operation, and the windows
will stop automatically.
Pushing and holding the lock button on
the key fob will allow all windows to
close to a desired position. Release the
lock button on the key fob anytime
during this operation, and the windows
will stop automatically.
Trunk Lid Opening
Rapidly push the trunk lid key fob
button twice to open the trunk lid. The
turn signals will flash to indicate that the
trunk lid has been opened.Remote Start — If Equipped
The remote start button on the key fob
enables engine starting (push the
button twice to start the engine).
Car Finder
Push the lock or unlock button to
remotely and temporarily switch on turn
signals and headlights.
This is useful for finding the vehicle
easily in a crowded area like a parking
garage, for example.
Pushing the lock or unlock button again
will restart the lights switch on timer
(if the parking lights functions was
already active, it will remain active).
This function is available only if the
doors are closed.
Replacing The
Electronic Key Fob
Battery
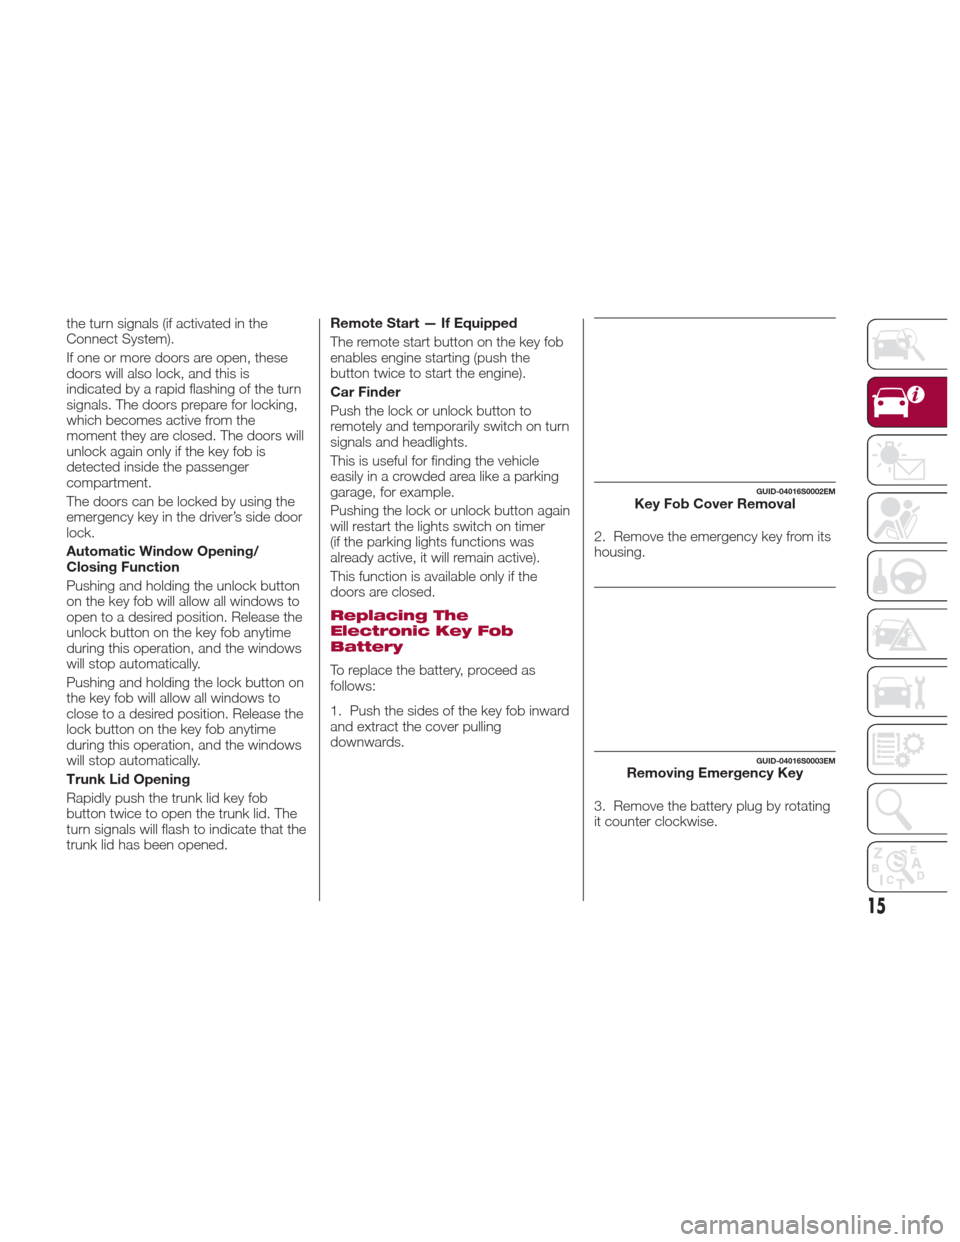
To replace the battery, proceed as
follows:
1. Push the sides of the key fob inward
and extract the cover pulling
downwards.
2. Remove the emergency key from its
housing.
3. Remove the battery plug by rotating
it counter clockwise.
GUID-04016S0002EMKey Fob Cover Removal
GUID-04016S0003EMRemoving Emergency Key
15
Page 21 of 268
ignition to STOP and then to ON; if it is
still blocked, try with the other keys
provided. If it is still not possible to start
the engine, contact an authorized
dealer.
If the Engine Immobilizer
Failure/Break-in Attempt
icon is
displayed while driving, this means that
the system is running a self-diagnosis
(e.g. due to a voltage drop). If the
display persists, contact an authorized
dealer.
Note:
Do not tamper with the Engine
Immobilizer system. Any modifications
or alterations could cause the
protection function to be deactivated.
The Engine Immobilizer system is
not compatible with certain aftermarket
remote starting systems. The use of
these devices could cause problems
when starting, as well as the
deactivation of the protection function.
All keys provided with the vehicle
have been programmed in accordance
with the electronics on the vehicle
itself.
Each key has its own code which
must be stored by the system's control
unit. Contact an authorized dealer to
have new keys (up to eight) stored with
a code.
SECURITY ALARM
SYSTEM — IF
EQUIPPED
Alarm Activation
While armed, the alarm will sound in the
following scenarios:
Opening of doors/hood/deck lid
(perimeter protection)
Operation of ignition with a key which
is not validated
Cutting of the battery cables
Movement inside the passenger
compartment (volumetric protection —
if equipped)
Unexpected lifting/tilting of the car
(anti-lift protection — if equipped)
Activation of the alarm triggers the
acoustic warning and the turn signals.
Note: The alarm system is activated by
the Engine Immobilizer system, which is
automatically activated when you get
out of the vehicle with the key fob and
lock the doors.
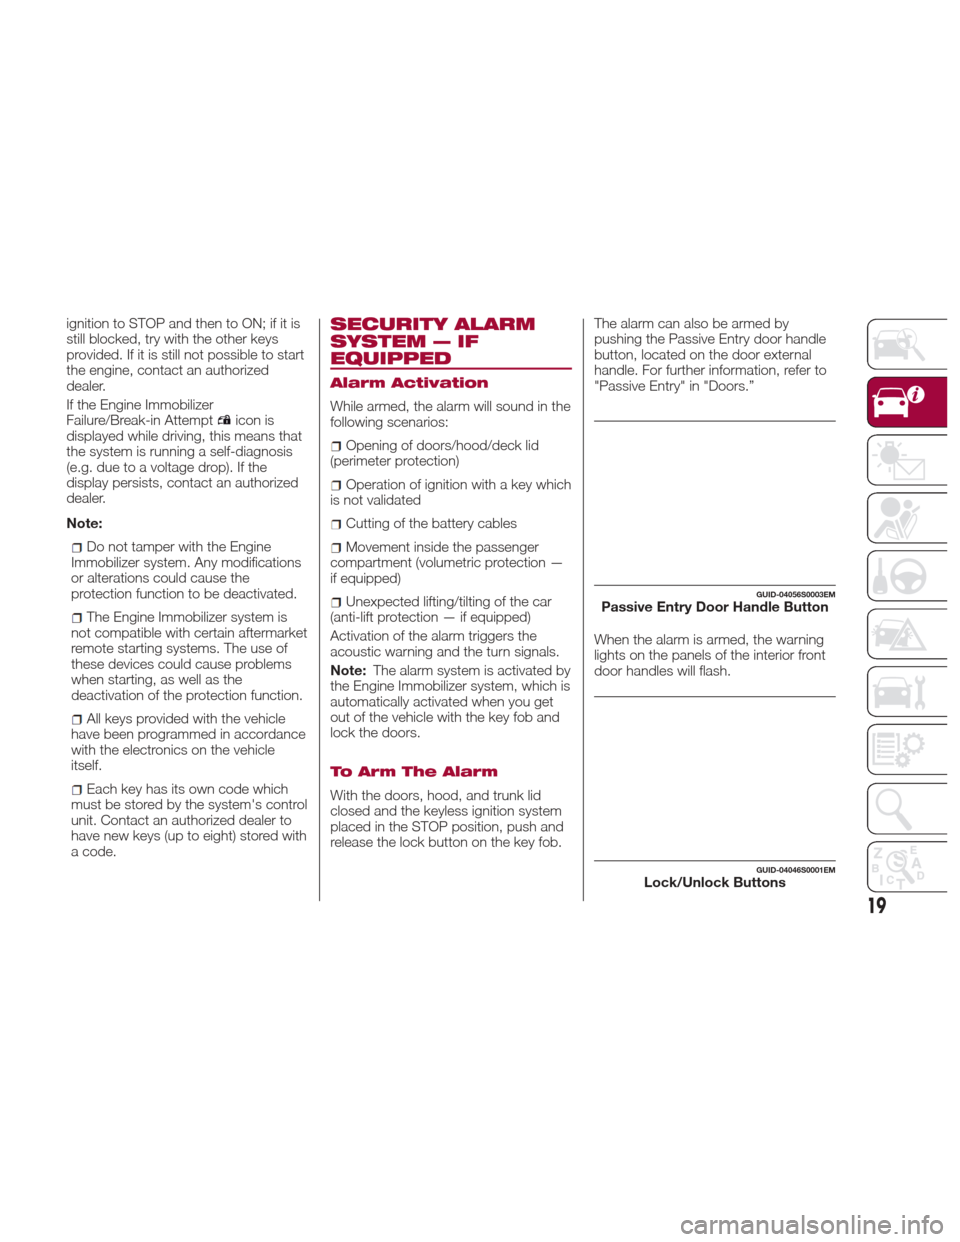
To Arm The Alarm
With the doors, hood, and trunk lid
closed and the keyless ignition system
placed in the STOP position, push and
release the lock button on the key fob. The alarm can also be armed by
pushing the Passive Entry door handle
button, located on the door external
handle. For further information, refer to
"Passive Entry" in "Doors.”
When the alarm is armed, the warning
lights on the panels of the interior front
door handles will flash.
GUID-04056S0003EMPassive Entry Door Handle Button
GUID-04046S0001EMLock/Unlock Buttons
19
Page 24 of 268
Unlock — Turn the emergency key to
the left (counter clockwise)
Passive Entry — If
Equipped
The Passive Entry system can identify
the presence of a key fob near the
doors and trunk lid.
The system enables the doors and trunk
lid to be locked or unlocked without
pushing any button on the key fob.
The key fob is detected only after the
system recognizes the presence of a
hand on one of the front door handles.
If the detected key fob is valid, the
doors and the trunk lid are unlocked
(refer to the Connect Supplement for
Passive Entry Settings).
Note: The key fob may not be found if
it is located next to a mobile phone, lap
top or other electronic device; these
devices may block the key fob’s
wireless signal.
Grasping the handle of the driver's door
unlocks the driver's side door, or all
doors depending on the mode set
using the Connect system (refer to the
Connect Supplement for Passive Entry
Settings). Note:
If wearing gloves, or if it has rained and
the door handle is wet, the activation
sensitivity of the Passive Entry function
may be reduced, resulting in a longer
reaction time.
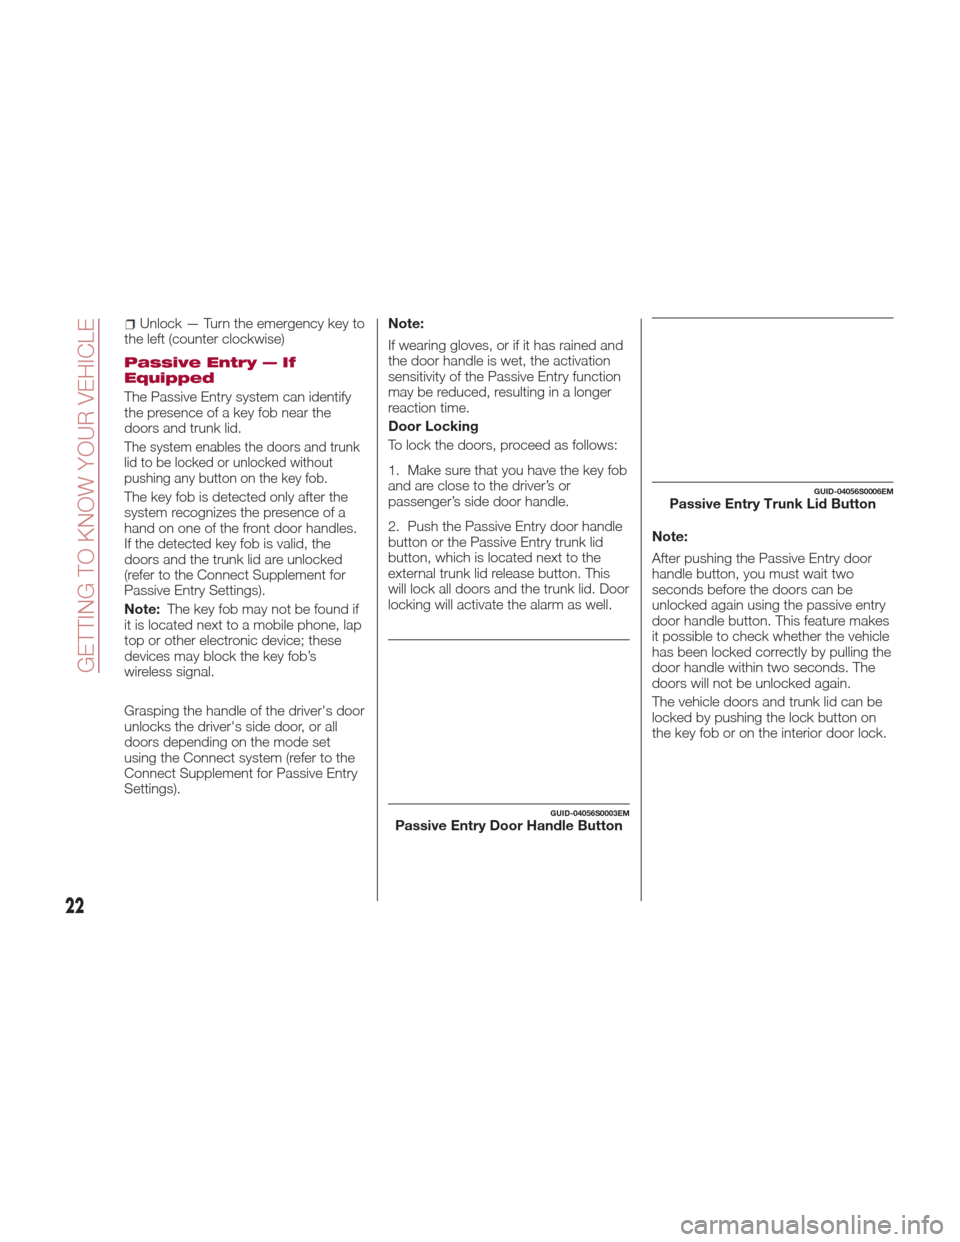
Door Locking
To lock the doors, proceed as follows:
1. Make sure that you have the key fob
and are close to the driver’s or
passenger’s side door handle.
2. Push the Passive Entry door handle
button or the Passive Entry trunk lid
button, which is located next to the
external trunk lid release button. This
will lock all doors and the trunk lid. Door
locking will activate the alarm as well.
Note:
After pushing the Passive Entry door
handle button, you must wait two
seconds before the doors can be
unlocked again using the passive entry
door handle button. This feature makes
it possible to check whether the vehicle
has been locked correctly by pulling the
door handle within two seconds. The
doors will not be unlocked again.
The vehicle doors and trunk lid can be
locked by pushing the lock button on
the key fob or on the interior door lock.
GUID-04056S0003EMPassive Entry Door Handle Button
GUID-04056S0006EMPassive Entry Trunk Lid Button
22
GETTING TO KNOW YOUR VEHICLE
Page 26 of 268
If the key fob is detected inside the
vehicle, the Passive Entry function
automatically unlocks all the vehicle
doors and flashes the turn signals.
If one or more key fobs are inside the
passenger compartment, the lock
button on the key fob inside the
passenger compartment is temporarily
disabled.
The vehicle willnot unlockthe doors if
an unauthorized key fob has been
detected close to the outside of the
vehicle.
If the Passive Entry function is disabled
using the Connect system, the
protections to avoid accidentally
leaving the key fob inside the car are
deactivated. Trunk Lid Access
Approaching the trunk lid with a valid
key fob, push the opening button to
access the trunk lid.
Note:
If the key fob is inadvertently
forgotten inside of the trunk, and an
attempt is made to close it from
outside, the trunk lid will not lock. With
the doors locked, the trunk lid
unlocked, and the key fob detected
inside the vehicle, the trunk lid will
unlock again and the lights flash twice.
Before driving, make sure the trunk
lid is closed correctly. Trunk Lid Lock
The trunk lid of the vehicle may still be
locked by pushing the lock button on
the key fob, pushing the door lock
button on the door handles, or pushing
the lock button on the interior door
panel of the vehicle.
On vehicles equipped with Passive
Entry, the trunk lid and the doors can
be locked by pushing the button
located near the opening button of the
trunk lid.
System Activation/Deactivation
The Passive entry system can be
activated or deactivated using the
Connect system.
GUID-04056S0004EMDo NOT Grab The Door Handle
When Locking
GUID-04056S0005EMExternal Trunk Lid Release Button
GUID-04056S0006EMPassive Entry Trunk Lid Button
24
GETTING TO KNOW YOUR VEHICLE
Page 55 of 268
TRUNK
The trunk unlocking is electrically
operated and is deactivated when the
car is in motion.
Opening
Opening From The Outside
When unlocked, the trunk lid can be
opened from outside the vehicle using
the external trunk lid release button
located between the plate lights. Push
the button until you hear a “click.” The
trunk lid can also be opened by quickly
pushing the external trunk lid release
button on the key fob twice.The turn signal indicators will blink and
the internal lights will switch on when
the trunk lid is opened. They switch off
automatically when the trunk lid is
closed.
The lights switch off automatically after
a few minutes if the trunk lid is left
open.
Opening From The Inside
When unlocked, the trunk lid can be
opened from inside the vehicle using
the internal trunk lid release button,
located under the dashboard near the
engine hood opening lever. Push the
trunk lid release button until you hear a
“click.”Trunk Lid Emergency Opening
A lever can be found in the trunk lid
over the lock to allow opening from the
inside.
Pull the lever in the direction indicated
by the arrow to open the trunk lid.
The lever can be seen in the dark.
GUID-04056S0005EMExternal Trunk Lid Release ButtonGUID-04206S0002EMInternal Trunk Lid Release Button
GUID-04206S0006EMEmergency Release Button
53
Page 176 of 268
Improper weight distributions can have
an adverse effect on the way your
vehicle steers and handles and the way
the brakes operate.
Caution!
Do not load your vehicle any heavier than
the GVWR or the maximum front and rear
GAWR. If you do, parts on your vehicle can
break, or it can change the way your
vehicle handles. This could cause you to
lose control. Also overloading can shorten
the life of your vehicle.
TRAILER TOWING
Trailer Towing — If
Equipped
Trailer towing is not recommended for
this vehicle.
SUGGESTIONS FOR
DRIVING
Saving Fuel
Below are some suggestions which
may help you save fuel and lower the
amount of harmful emissions released
into the atmosphere.
Vehicle maintenance
Checks and operations should be
carried out in accordance with the
"Scheduled Servicing" (see chapter
"Servicing And Maintenance").
Tires
Check the tire pressures at least once
every four weeks: if the pressure is too
low, consumption levels increase as
resistance to rolling is higher.
Unnecessary loads
Do not travel with an overloaded trunk.
The weight of the vehicle and its
arrangement greatly affect fuel
consumption and stability.
Electric devices
Use electrical systems only for the
amount of time needed. The rear
window defroster, additional headlights,
windshield wipers and heater blower
fan require a considerable amount of
energy; increasing the current uptake
increases fuel consumption (by up to
+25% when city driving).
174
STARTING AND OPERATING
Page 188 of 268
Warning!
When replacing a blown fuse, always
use an appropriate replacement fuse with
the same amp rating as the original fuse.
Never replace a fuse with another fuse of
higher amp rating. Never replace a blown
fuse with metal wires or any other material.
Failure to use proper fuses may result in
serious personal injury, fire and/or property
damage.
Before replacing a fuse, make sure that
the ignition is off and that all the other
services are switched off and/or
disengaged.
If the replaced fuse blows again, contact
an authorized dealer.
If a general protection fuse for safety
systems (air bag system, braking system),
power unit systems (engine system,
transmission system) or steering system
blows, contact an authorized dealer.
Fuse Location
The fuses, which can be replaced by
the user, are grouped in two boxes
below the passenger side foot board
and inside the trunk.
Control Unit Under
Passenger Side
Footboard
To access the fuses, proceed as
follows:
1. Lift the upper end of the footboard
on the passenger side, pulling to
release the two buttons.
Release Buttons On Footboard
1 — Footboard 2. Unscrewing the two hooks, remove
the panel pulling downward.
Release Hooks On Footboard
2 — Panel
The fuses are freely accessible on the
control unit.
After replacing the fuse, make sure that
panel and footboard are correctly
locked.
GUID-08036S0010EM
GUID-08036S0011EM
186
IN CASE OF EMERGENCY
Page 215 of 268
Warning!
Use only refrigerants and compressor
lubricants approved by the manufacturer
for your air conditioning system. Some
unapproved refrigerants are flammable and
can explode, injuring you. Other
unapproved refrigerants or lubricants can
cause the system to fail, requiring costly
repairs. Refer to Warranty Information
Book, located in your owner’s information
kit, for further warranty information.
Lubricating Moving
Parts Of The Bodywork
Ensure that the locks and bodywork
junction points, including components
such as the seat guides, door hinges
(and rollers), trunk and hood are
periodically lubricated with
lithium-based grease to ensure correct,
silent operation and to protect them
from rust and wear.
Thoroughly clean the components,
eliminating every trace of dirt and dust.
After lubricating, eliminate excess oil
and grease. Also pay particular
attention to the hood closing devices,
to ensure correct operation. During
operations on the hood, to be carried
out with the engine cold, also
remember to check, clean and lubricate
the locking, release and safety devices.Lubricate the external lock barrels twice
a year. Apply a small amount of
high-quality lubricant directly into the
lock barrel.
If necessary, contact your authorized
dealer as soon as possible.
Windshield Wiper
Periodically clean the windshield and
rear window and rubber profile of the
windshield wiper blades, using a
sponge or a soft cloth and a
non-abrasive detergent. This eliminates
the salt or impurities accumulated when
driving.
Prolonged operation of the windshield
window wipers with dry glass may
cause the deterioration of the blades, in
addition to abrasion of the surface of
the glass. To eliminate the impurities on
the dry glass, always operate the
windshield washers.
In the event of very low outdoor
temperatures, below zero degrees,
ensure that the movement of the rubber
part in contact with the glass is not
obstructed. Use a suitable deicing
product to release it if required.
Avoid using the windshield wipers to
remove frost or ice.
Also avoid contact of the rubber profile
of the blades with petroleum derivatives
such as engine oil, gas, etc.
Warning!
Driving with worn windshield wiper blades
is a serious hazard, because visibility is
reduced in bad weather conditions.
Note:
The life of the windshield wiper blades
varies according to the usage
frequency. In any case, it is advised to
replace the blades approximately once
a year. When the blades are worn,
noise, marks on the glass or streaks of
water may be noticed. In the presence
of these conditions, clean the
windshield wiper blades or, if necessary,
replace them.
R
aising The Windshield Wiper Blades
("Service Position" Function)
The "service position" function allows
the driver to replace the windshield
wiper blades more easily. It is also
recommended to activate this function
when it is snowing and to make it easier
to remove any dirt deposits in the area
where the blades are normally
positioned, when washing.
Activation Of The Function
To activate this function, disable the
windshield wiper before setting the
ignition device to STOP.
213