lock Alfa Romeo Giulietta 2014 Service Manual
[x] Cancel search | Manufacturer: ALFA ROMEO, Model Year: 2014, Model line: Giulietta, Model: Alfa Romeo Giulietta 2014Pages: 280, PDF Size: 6.65 MB
Page 187 of 280
REPLACING
EXTERIOR BULBSFRONT LIGHT CLUSTERS
These contain the bulbs for the side
lights/daytime running lights (DRL),
dipped beams, main beams and
direction indicators. The bulbs are
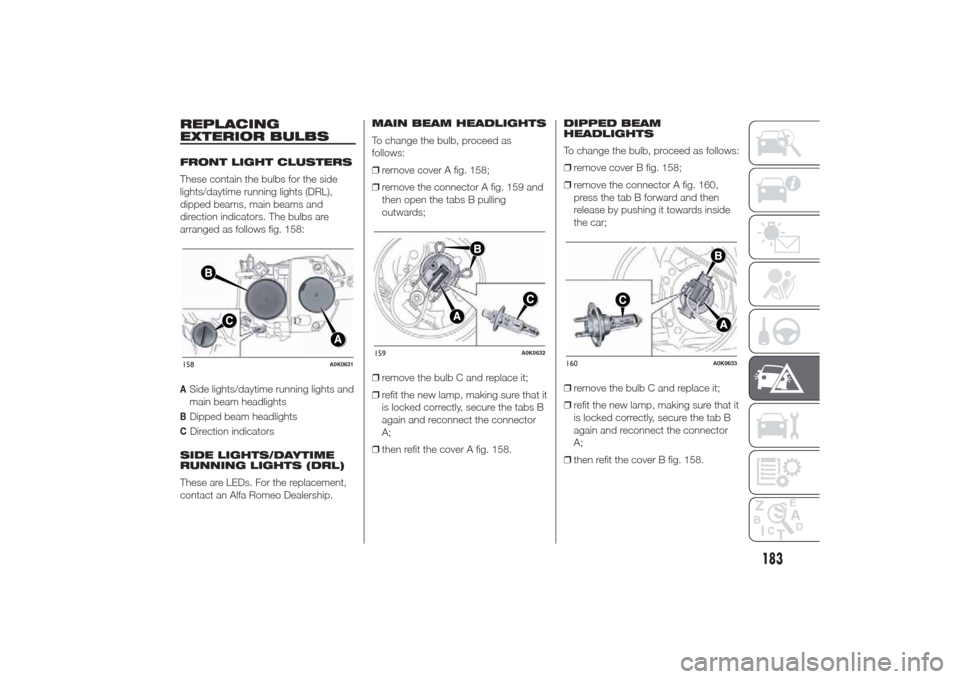
arranged as follows fig. 158:ASide lights/daytime running lights and
main beam headlightsBDipped beam headlightsCDirection indicators
SIDE LIGHTS/DAYTIME
RUNNING LIGHTS (DRL)
These are LEDs. For the replacement,
contact an Alfa Romeo Dealership.MAIN BEAM HEADLIGHTS
To change the bulb, proceed as
follows:
❒remove cover A fig. 158;
❒remove the connector A fig. 159 and
then open the tabs B pulling
outwards;
❒remove the bulb C and replace it;
❒refit the new lamp, making sure that it
is locked correctly, secure the tabs B
again and reconnect the connector
A;
❒then refit the cover A fig. 158.DIPPED BEAM
HEADLIGHTS
To change the bulb, proceed as follows:
❒remove cover B fig. 158;
❒remove the connector A fig. 160,
press the tab B forward and then
release by pushing it towards inside
the car;
❒remove the bulb C and replace it;
❒refit the new lamp, making sure that it
is locked correctly, secure the tab B
again and reconnect the connector
A;
❒then refit the cover B fig. 158.158
A0K0631
159
A0K0632
160
A0K0633
183
Page 188 of 280
DIRECTION INDICATORS
Front
To change the bulb, proceed as follows:
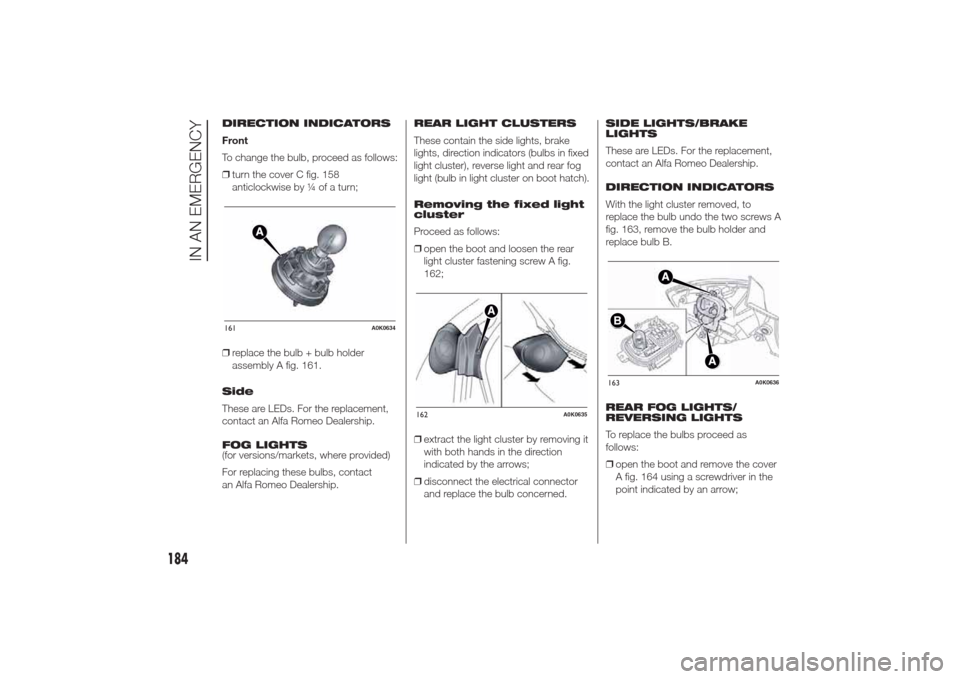
❒turn the cover C fig. 158
anticlockwise by ¼ of a turn;
❒replace the bulb + bulb holder
assembly A fig. 161.
Side
These are LEDs. For the replacement,
contact an Alfa Romeo Dealership.
FOG LIGHTS
(for versions/markets, where provided)
For replacing these bulbs, contact
an Alfa Romeo Dealership.REAR LIGHT CLUSTERS
These contain the side lights, brake
lights, direction indicators (bulbs in fixed
light cluster), reverse light and rear fog
light (bulb in light cluster on boot hatch).
Removing the fixed light
cluster
Proceed as follows:
❒open the boot and loosen the rear
light cluster fastening screw A fig.
162;
❒extract the light cluster by removing it
with both hands in the direction
indicated by the arrows;
❒disconnect the electrical connector
and replace the bulb concerned.SIDE LIGHTS/BRAKE
LIGHTS
These are LEDs. For the replacement,
contact an Alfa Romeo Dealership.
DIRECTION INDICATORS
With the light cluster removed, to
replace the bulb undo the two screws A
fig. 163, remove the bulb holder and
replace bulb B.
REAR FOG LIGHTS/
REVERSING LIGHTS
To replace the bulbs proceed as
follows:
❒open the boot and remove the cover
A fig. 164 using a screwdriver in the
point indicated by an arrow;161
A0K0634
162
A0K0635
163
A0K0636
184
IN AN EMERGENCY
Page 189 of 280

❒remove the connector A fig. 165 and
extract the bulb holder assembly by
operating on the retaining tab B
and then by loosening the screw C;
❒remove the bulb by pushing it slightly
and turning it anticlockwise (D =
reverse light bulb;E=rearfoglight
bulb);
❒refit the bulb holder assembly
positioning it correctly, fasten screw
C and then fix it by means of the
retaining tab B. Reconnect connector
A then refit cover A fig. 164.
IMPORTANT Protect the tip of the
screwdriver with a cloth to prevent
scratching when removing the cover A.3
rd
BRAKE LIGHTS
These are LED lights and are located
on the spoiler integrated with the
tailgate. For the replacement, contact
an Alfa Romeo Dealership.NUMBER PLATE LIGHTS
To replace the bulbs proceed as
follows:
❒remove the number plate light units A
fig. 166;
❒turn the bulb holder B fig. 167
anticlockwise, extract the bulb C and
replace it.
164
A0K0637
165
A0K0638
166
A0K0639
167
A0K0640
185
Page 190 of 280

INTERIOR BULB
REPLACEMENTFRONT ROOF LIGHT
To change the bulb, proceed as follows:
❒remove roof light A fig. 168 working
at the points indicated by the arrows;
❒undo the bulb housings B fig. 169
and remove them by extracting
outwards: then replace bulbs C;
❒correctly fit the new bulbs in the
relevant housings B;
❒fit roof light A fig. 168 in its housing
making sure it is locked.REAR ROOF LIGHT
To change the bulb, proceed as follows:
❒remove roof light A fig. 170 working
at the points indicated by the arrows;
❒open protective flap B fig. 171 and
replace bulb C, releasing it from the
side contacts. Make sure that the
new bulb is correctly secured
between the contacts;❒close protective flap B again and fix
roof light A fig. 170 in its housing,
making sure that it is locked.
LUGGAGE
COMPARTMENT
COURTESY LIGHT
To change the bulb, proceed as follows:
❒open the luggage compartment and
extract courtesy light A fig. 172
working in the point shown by the
arrow;
❒open protection B fig. 173 and
replace the bulb;
❒refit protection B on the lens;
❒refit courtesy light A fig. 172 by
inserting it in its correct position firstly
on one side and then pressing on
the other until it clicks into place.168
A0K0806
169
A0K0807
170
A0K0643
171
A0K0644
186
IN AN EMERGENCY
Page 196 of 280
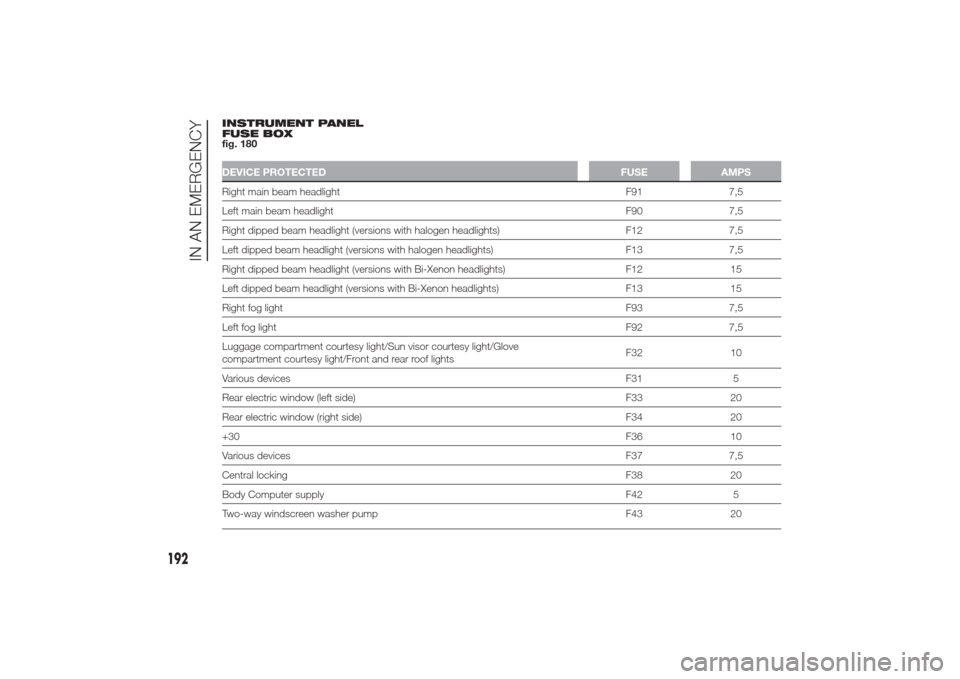
INSTRUMENT PANEL
FUSE BOX
fig. 180DEVICE PROTECTED FUSE AMPSRight main beam headlight F91 7,5
Left main beam headlight F90 7,5
Right dipped beam headlight (versions with halogen headlights) F12 7,5
Left dipped beam headlight (versions with halogen headlights) F13 7,5
Right dipped beam headlight (versions with Bi-Xenon headlights) F12 15
Left dipped beam headlight (versions with Bi-Xenon headlights) F13 15
Right fog lightF93 7,5
Left fog lightF92 7,5
Luggage compartment courtesy light/Sun visor courtesy light/Glove
compartment courtesy light/Front and rear roof lightsF32 10
Various devicesF31 5
Rear electric window (left side) F33 20
Rear electric window (right side) F34 20
+30F36 10
Various devicesF37 7,5
Central lockingF38 20
Body Computer supply F42 5
Two-way windscreen washer pump F43 20
192
IN AN EMERGENCY
Page 201 of 280
RAISING THE CARIf the car needs to be jacked up, go to
an Alfa Romeo Dealership which is
equipped with shop jacks and jack
arms.
IMPORTANT Be careful when
positioning the arm of the lift for
versions with side skirts.
TOWING THE CARThe tow ring provided with the car is
housed in the tool box in the boot.
ATTACHING THE TOW
HOOK
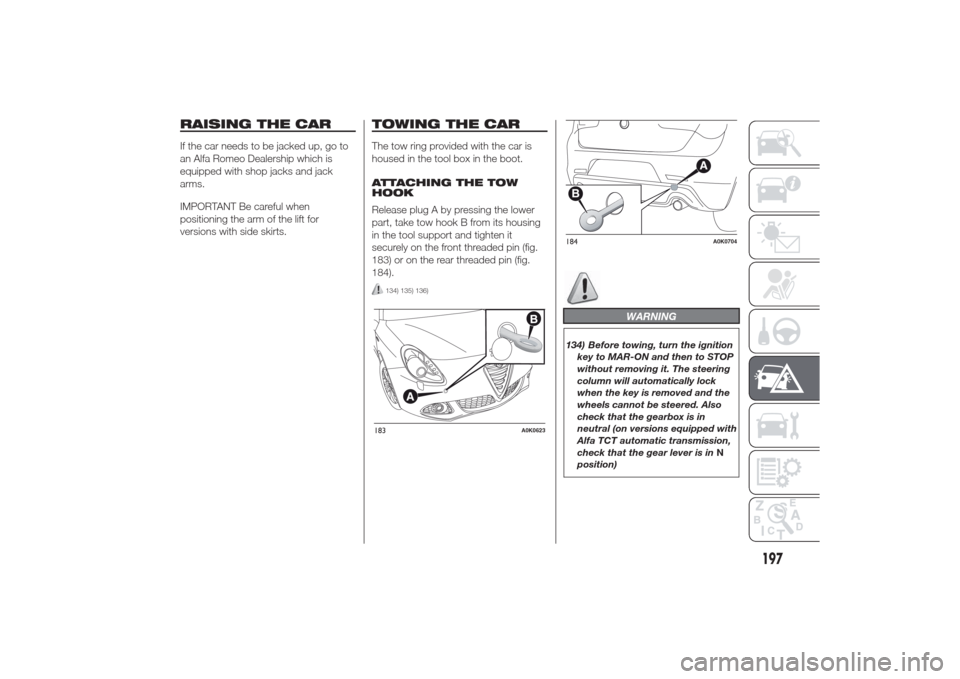
Release plug A by pressing the lower
part, take tow hook B from its housing
in the tool support and tighten it
securely on the front threaded pin (fig.
183) or on the rear threaded pin (fig.
184).
134) 135) 136)
WARNING
134) Before towing, turn the ignition
key to MAR-ON and then to STOP
without removing it. The steering
column will automatically lock
when the key is removed and the
wheels cannot be steered. Also
check that the gearbox is in
neutral (on versions equipped with
Alfa TCT automatic transmission,
check that the gear lever is inN
position)
183
A0K0623
184
A0K0704
197
Page 205 of 280
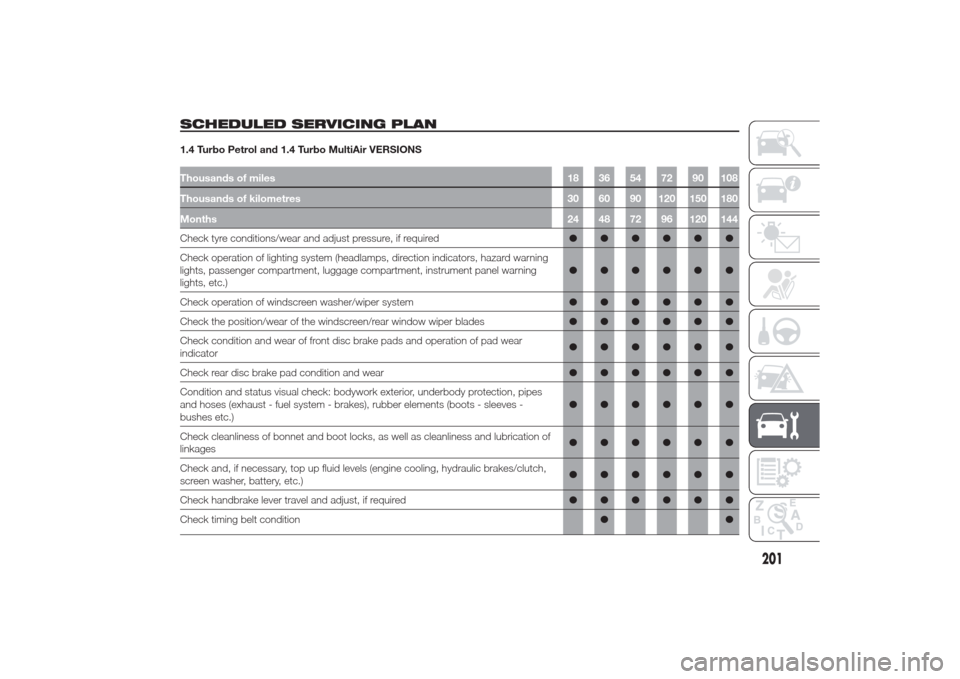
SCHEDULED SERVICING PLAN1.4 Turbo Petrol and 1.4 Turbo MultiAir VERSIONSThousands of miles 18 36 54 72 90 108
Thousands of kilometres 30 60 90 120 150 180
Months24 48 72 96 120 144Check tyre conditions/wear and adjust pressure, if required●●●●●●
Check operation of lighting system (headlamps, direction indicators, hazard warning
lights, passenger compartment, luggage compartment, instrument panel warning
lights, etc.)●●●●●●
Check operation of windscreen washer/wiper system●●●●●●
Check the position/wear of the windscreen/rear window wiper blades●●●●●●
Check condition and wear of front disc brake pads and operation of pad wear
indicator●●●●●●
Check rear disc brake pad condition and wear●●●●●●
Condition and status visual check: bodywork exterior, underbody protection, pipes
and hoses (exhaust - fuel system - brakes), rubber elements (boots - sleeves -
bushes etc.)●●●●●●
Check cleanliness of bonnet and boot locks, as well as cleanliness and lubrication of
linkages●●●●●●
Check and, if necessary, top up fluid levels (engine cooling, hydraulic brakes/clutch,
screen washer, battery, etc.)●●●●●●
Check handbrake lever travel and adjust, if required●●●●●●
Check timing belt condition●●
201
Page 207 of 280
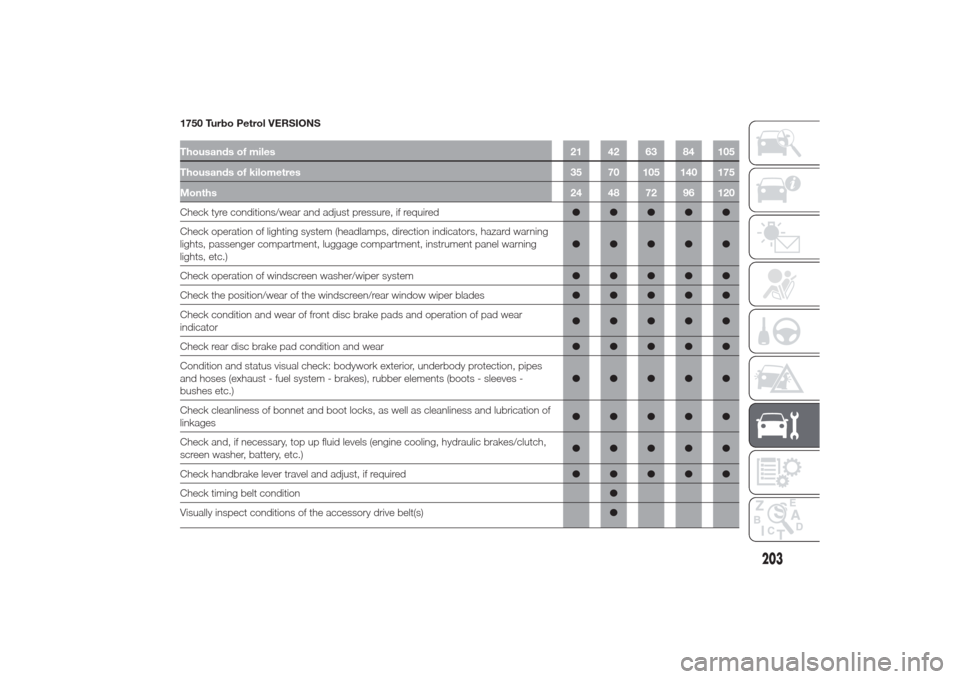
1750 Turbo Petrol VERSIONSThousands of miles 21 42 63 84 105
Thousands of kilometres 35 70 105 140 175
Months24 48 72 96 120Check tyre conditions/wear and adjust pressure, if required●●●●●
Check operation of lighting system (headlamps, direction indicators, hazard warning
lights, passenger compartment, luggage compartment, instrument panel warning
lights, etc.)●●●●●
Check operation of windscreen washer/wiper system●●●●●
Check the position/wear of the windscreen/rear window wiper blades●●●●●
Check condition and wear of front disc brake pads and operation of pad wear
indicator●●●●●
Check rear disc brake pad condition and wear●●●●●
Condition and status visual check: bodywork exterior, underbody protection, pipes
and hoses (exhaust - fuel system - brakes), rubber elements (boots - sleeves -
bushes etc.)●●●●●
Check cleanliness of bonnet and boot locks, as well as cleanliness and lubrication of
linkages●●●●●
Check and, if necessary, top up fluid levels (engine cooling, hydraulic brakes/clutch,
screen washer, battery, etc.)●●●●●
Check handbrake lever travel and adjust, if required●●●●●
Check timing belt condition●
Visually inspect conditions of the accessory drive belt(s)●
203
Page 209 of 280
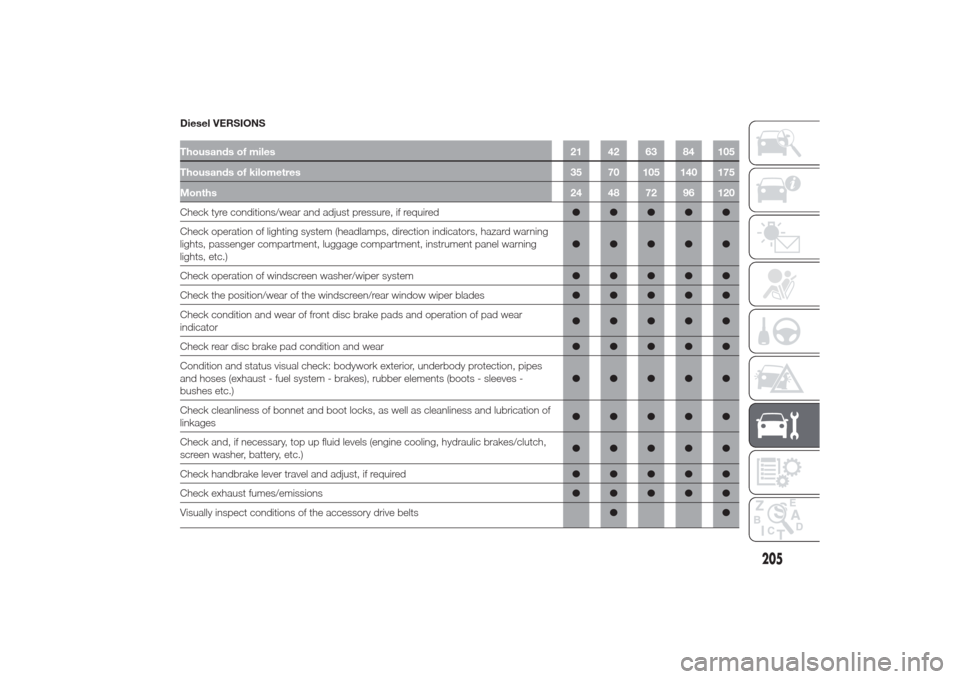
Diesel VERSIONSThousands of miles 21 42 63 84 105
Thousands of kilometres 35 70 105 140 175
Months24 48 72 96 120Check tyre conditions/wear and adjust pressure, if required●●●●●
Check operation of lighting system (headlamps, direction indicators, hazard warning
lights, passenger compartment, luggage compartment, instrument panel warning
lights, etc.)●●●●●
Check operation of windscreen washer/wiper system●●●●●
Check the position/wear of the windscreen/rear window wiper blades●●●●●
Check condition and wear of front disc brake pads and operation of pad wear
indicator●●●●●
Check rear disc brake pad condition and wear●●●●●
Condition and status visual check: bodywork exterior, underbody protection, pipes
and hoses (exhaust - fuel system - brakes), rubber elements (boots - sleeves -
bushes etc.)●●●●●
Check cleanliness of bonnet and boot locks, as well as cleanliness and lubrication of
linkages●●●●●
Check and, if necessary, top up fluid levels (engine cooling, hydraulic brakes/clutch,
screen washer, battery, etc.)●●●●●
Check handbrake lever travel and adjust, if required●●●●●
Check exhaust fumes/emissions●●●●●
Visually inspect conditions of the accessory drive belts●●
205
Page 211 of 280
PERIODIC CHECKSEvery 1,000 km or before long
journeys, check and, if necessary, top
up the following:
❒engine coolant, brake fluid and
windscreen washer fluid level;
❒tyre inflation pressure and condition;
❒operation of lighting system
(headlamps, direction indicators,
hazard warning lights, etc.);
❒operation of window washer/wiper
system and positioning/wear of
windscreen/rear window wiper
blades
Check and top up, if required, the
engine oil level every 3,000 km.
HEAVY-DUTY USE OF
THE CARIf the car is used mainly under one of
the following conditions:
❒towing a trailer or caravan;
❒dusty roads;
❒short, repeated journeys (less than
7-8 km) at sub-zero outside
temperatures;
❒engine often idling or driving long
distances at low speeds or long
periods of idleness;
the following checks must be carried
out more often than indicated in the
Scheduled Servicing Plan:
❒check front disc brake pad
conditions and wear;
❒check cleanliness of bonnet and boot
locks, cleanliness and lubrication of
linkage;
❒visually inspect conditions of: engine,
gearbox, transmission, pipes and
hoses (exhaust - fuel system -
brakes) and rubber elements (boots -
sleeves - bushes - etc.);
❒check battery charge and battery
fluid level (electrolyte);
❒visually inspect condition of the
accessory drive belts;❒check and, if necessary, change
engine oil and replace oil filter;
❒check and, if necessary, replace
pollen filter;
❒check and, if necessary, replace air
cleaner.
207