headlights Alfa Romeo Giulietta 2015 User Guide
[x] Cancel search | Manufacturer: ALFA ROMEO, Model Year: 2015, Model line: Giulietta, Model: Alfa Romeo Giulietta 2015Pages: 288, PDF Size: 7.34 MB
Page 126 of 288
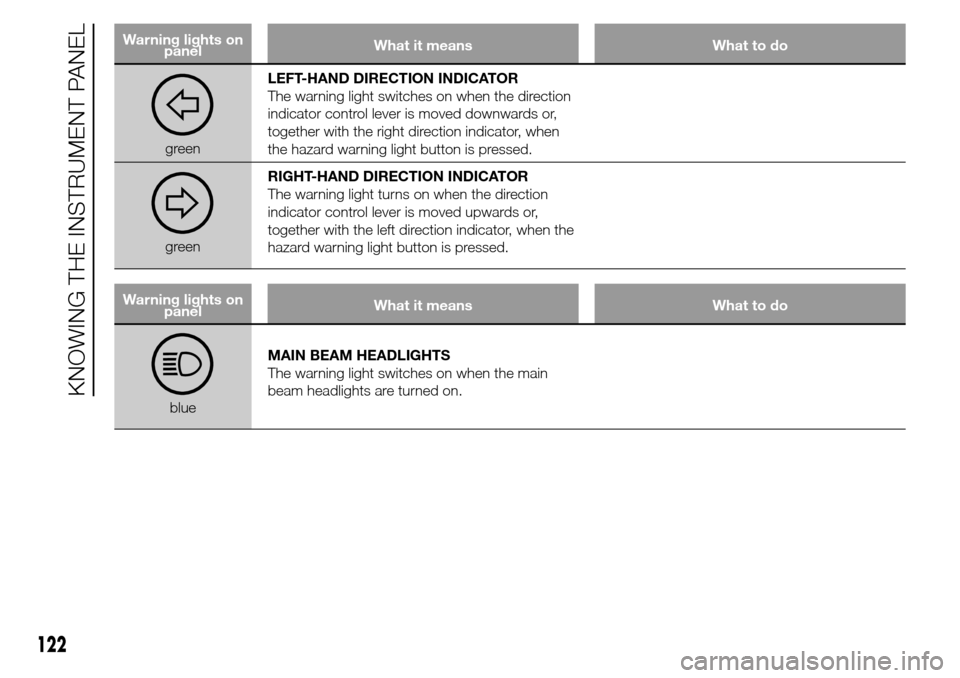
Warning lights on
panelWhat it means What to do
greenLEFT-HAND DIRECTION INDICATOR
The warning light switches on when the direction
indicator control lever is moved downwards or,
together with the right direction indicator, when
the hazard warning light button is pressed.
greenRIGHT-HAND DIRECTION INDICATOR
The warning light turns on when the direction
indicator control lever is moved upwards or,
together with the left direction indicator, when the
hazard warning light button is pressed.
Warning lights on
panelWhat it means What to do
blueMAIN BEAM HEADLIGHTS
The warning light switches on when the main
beam headlights are turned on.
122
KNOWING THE INSTRUMENT PANEL
Page 162 of 288
WARNING
106) Using the levers incorrectly
(levers pushed towards the
dashboard, see fig. 137) could
break them.
107) Never leave children
unattended in the car. Always
remove the ignition key when
leaving the car and take the key
with you.
108) The Launch control function is
only available in Dynamic mode.
Regardless of what is explicitly
indicated in the description of
these modes, the ESC and ASR
systems are deactivated during
operation of the Launch Control
function. This means that vehicle
dynamic control is the sole
responsibility of the driver.
Therefore pay the utmost
attention when using the Launch
Control. Take into account traffic
and road surface conditions and
during manoeuvres make sure
there is enough room in the area
concerned.
SAVING FUEL
Here are some suggestions which can
help you to save fuel and lower harmful
emissions.
GENERAL
CONSIDERATIONS
Car maintenance
Checks and adjustments should be
carried out in accordance with the
“Scheduled Servicing Plan” (see
chapter “Maintenance and care”).
Tyres
Check the tyre pressures at least once
every four weeks: if the pressure is
too low, consumption levels increase as
resistance to rolling is higher.
Unnecessary loads
Do not travel with an overloaded boot.
The weight of the car and its
arrangement greatly affect fuel
consumption and stability.Roof rack/ski rack
Remove the roof rack or the ski rack
from the roof after use. These
accessories lower aerodynamic
penetration and adversely affect
consumption levels. When transporting
particularly large objects, use a trailer
if possible.
Electrical devices
Use the electrical devices only for the
necessary amount of time. The heated
rear window, additional headlights,
screen wipers and heater fan require a
considerable amount of energy;
increasing the current uptake increases
fuel consumption (by up to +25% in
an urban cycle).
Climate control system
Using the climate control system will
increase consumption: use the air vents
when the temperature outside permits.
Devices for
aerodynamic control
The use of non-certified devices for
aerodynamic control may adversely
affect air drag and fuel consumption.
158
STARTING AND DRIVING
Page 178 of 288
IMPORTANT When the weather is cold
or damp or after heavy rain or washing,
the surface of headlights or rear lights,
may steam up and/or form drops of
condensation on the inside. This is
a natural phenomenon due to the
difference in temperature and humidity
between the inside and the outside
of the glass which does not indicate a
fault and does not compromise the
normal operation of lighting devices.
The mist disappears quickly when the
lights are turned on, starting from
the centre of the diffuser, extending
progressively towards the edges.
IMPORTANT
28) Halogen bulbs must be handled
by holding the metallic part only.
Touching the transparent part
of the bulb with your fingers may
reduce the intensity of the
emitted light and even reduce the
lifespan of the bulb. In the case
of accidental contact, rub the
lamp with a cloth and spirit and
leave to dry.
WARNING
127) Changes or repairs to the
electrical system carried out
incorrectly and without due
consideration for the technical
specifications of the system may
lead to malfunctioning and
generate a fire hazard.
128) Halogen bulbs contain
pressurised gas. If they break,
glass fragments could fly
everywhere.
129) Due to the high supply voltage,
gas discharge bulbs (Bi-Xenon)
should only be replaced by
specialised personnel: danger of
death! Contact an Alfa Romeo
Dealership.
174
IN AN EMERGENCY
Page 180 of 288
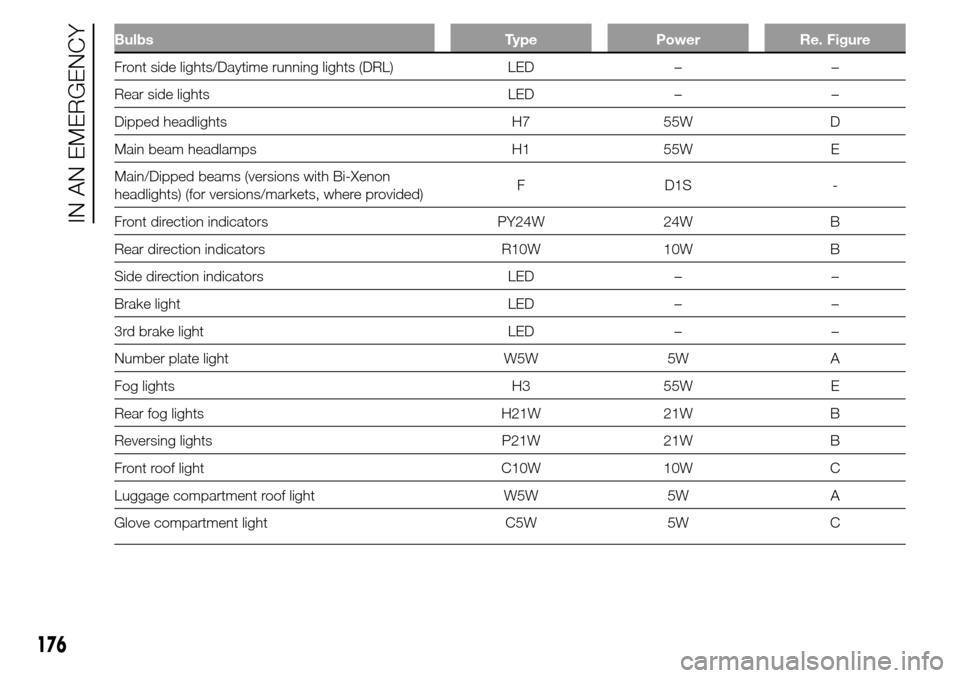
Bulbs Type Power Re. Figure
Front side lights/Daytime running lights (DRL) LED – –
Rear side lights LED – –
Dipped headlights H7 55W D
Main beam headlamps H1 55W E
Main/Dipped beams (versions with Bi-Xenon
headlights) (for versions/markets, where provided)F D1S -
Front direction indicators PY24W 24W B
Rear direction indicators R10W 10W B
Side direction indicators LED – –
Brake light LED – –
3rd brake light LED – –
Number plate light W5W 5W A
Fog lights H3 55W E
Rear fog lights H21W 21W B
Reversing lights P21W 21W B
Front roof light C10W 10W C
Luggage compartment roof light W5W 5W A
Glove compartment light C5W 5W C
176
IN AN EMERGENCY
Page 181 of 288
REPLACING
EXTERIOR BULBS
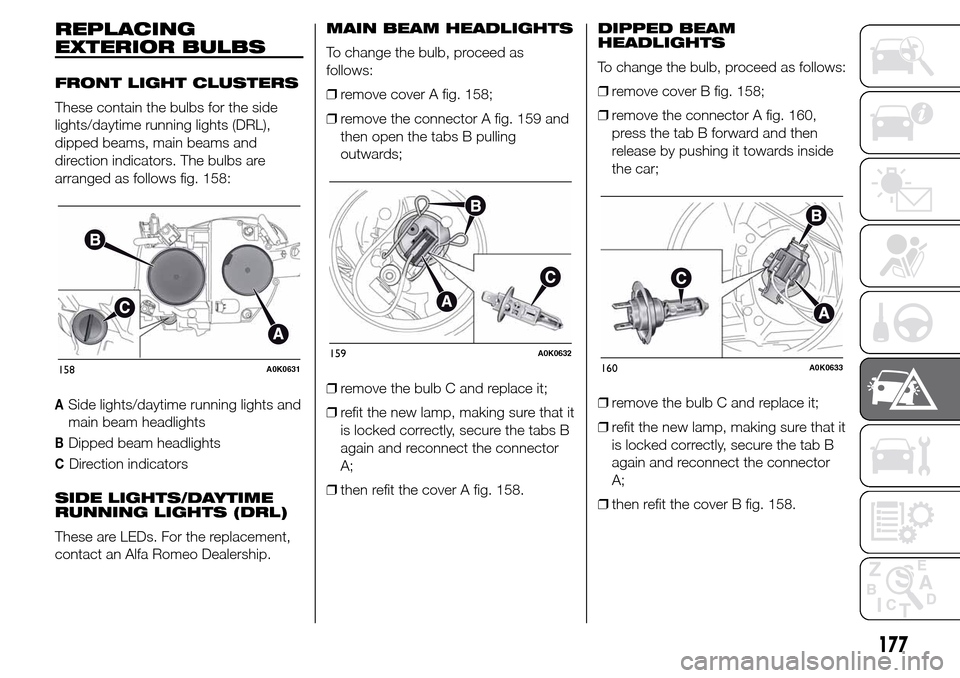
FRONT LIGHT CLUSTERS
These contain the bulbs for the side
lights/daytime running lights (DRL),
dipped beams, main beams and
direction indicators. The bulbs are
arranged as follows fig. 158:
ASide lights/daytime running lights and
main beam headlights
BDipped beam headlights
CDirection indicators
SIDE LIGHTS/DAYTIME
RUNNING LIGHTS (DRL)
These are LEDs. For the replacement,
contact an Alfa Romeo Dealership.MAIN BEAM HEADLIGHTS
To change the bulb, proceed as
follows:
❒remove cover A fig. 158;
❒remove the connector A fig. 159 and
then open the tabs B pulling
outwards;
❒remove the bulb C and replace it;
❒refit the new lamp, making sure that it
is locked correctly, secure the tabs B
again and reconnect the connector
A;
❒then refit the cover A fig. 158.DIPPED BEAM
HEADLIGHTS
To change the bulb, proceed as follows:
❒remove cover B fig. 158;
❒remove the connector A fig. 160,
press the tab B forward and then
release by pushing it towards inside
the car;
❒remove the bulb C and replace it;
❒refit the new lamp, making sure that it
is locked correctly, secure the tab B
again and reconnect the connector
A;
❒then refit the cover B fig. 158.
158A0K0631159A0K0632160A0K0633
177
Page 191 of 288
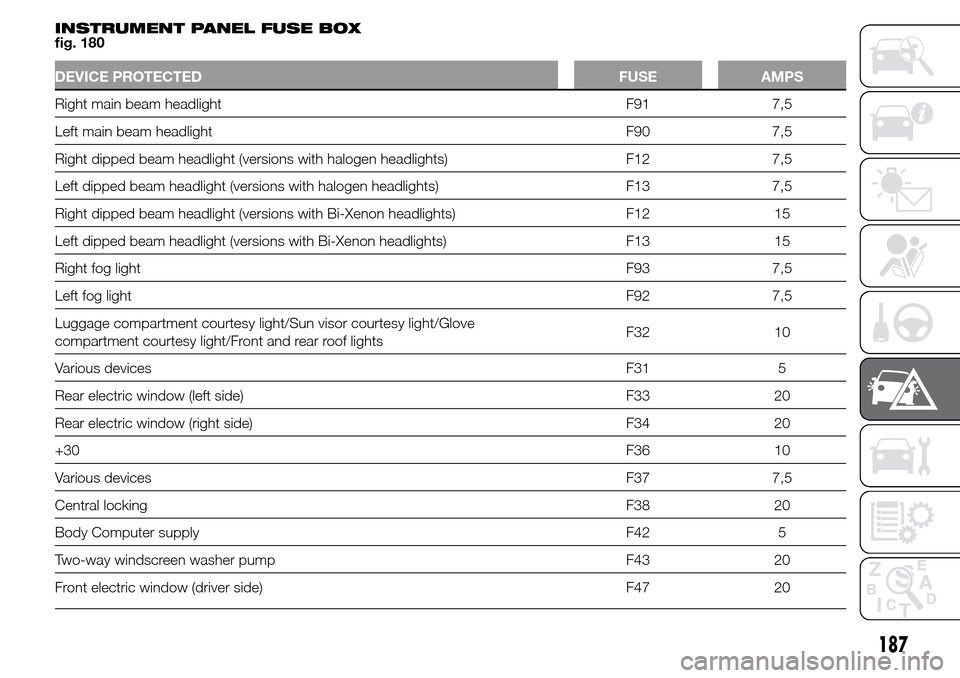
INSTRUMENT PANEL FUSE BOX
fig. 180
DEVICE PROTECTED FUSE AMPS
Right main beam headlight F91 7,5
Left main beam headlight F90 7,5
Right dipped beam headlight (versions with halogen headlights) F12 7,5
Left dipped beam headlight (versions with halogen headlights) F13 7,5
Right dipped beam headlight (versions with Bi-Xenon headlights) F12 15
Left dipped beam headlight (versions with Bi-Xenon headlights) F13 15
Right fog lightF93 7,5
Left fog lightF92 7,5
Luggage compartment courtesy light/Sun visor courtesy light/Glove
compartment courtesy light/Front and rear roof lightsF32 10
Various devicesF31 5
Rear electric window (left side) F33 20
Rear electric window (right side) F34 20
+30F36 10
Various devicesF37 7,5
Central lockingF38 20
Body Computer supply F42 5
Two-way windscreen washer pump F43 20
Front electric window (driver side) F47 20
187
Page 201 of 288
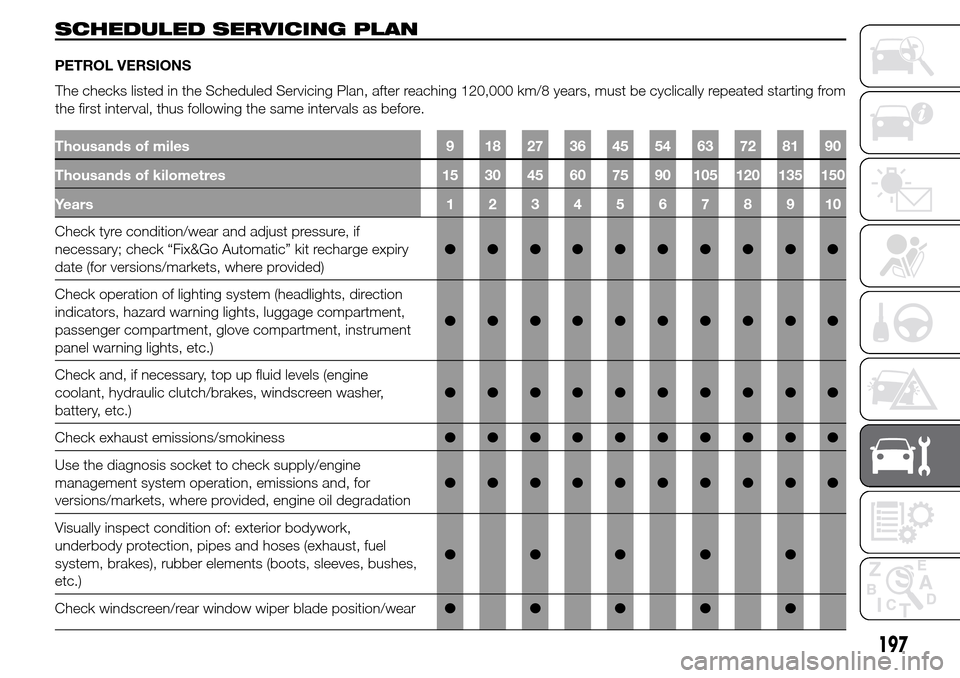
SCHEDULED SERVICING PLAN
PETROL VERSIONS
Thousands of miles 9 18 27 36 45 54 63 72 81 90
Thousands of kilometres 15 30 45 60 75 90 105 120 135 150
Years12345678910
Check tyre condition/wear and adjust pressure, if
necessary; check “Fix&Go Automatic” kit recharge expiry
date (for versions/markets, where provided)●●●●●●●●●●
Check operation of lighting system (headlights, direction
indicators, hazard warning lights, luggage compartment,
passenger compartment, glove compartment, instrument
panel warning lights, etc.)●●●●●●●●●●
Check and, if necessary, top up fluid levels (engine
coolant, hydraulic clutch/brakes, windscreen washer,
battery, etc.)●●●●●●●●●●
Check exhaust emissions/smokiness●●●●●●●●●●
Use the diagnosis socket to check supply/engine
management system operation, emissions and, for
versions/markets, where provided, engine oil degradation●●●●●●●●●●
Visually inspect condition of: exterior bodywork,
underbody protection, pipes and hoses (exhaust, fuel
system, brakes), rubber elements (boots, sleeves, bushes,
etc.)●●●●●
Check windscreen/rear window wiper blade position/wear●●●●●
197
The checks listed in the Scheduled Servicing Plan, after reaching 120,000 km/8 years, must be cyclically repeated starting from
the first interval, thus following the same intervals as before.
Page 205 of 288
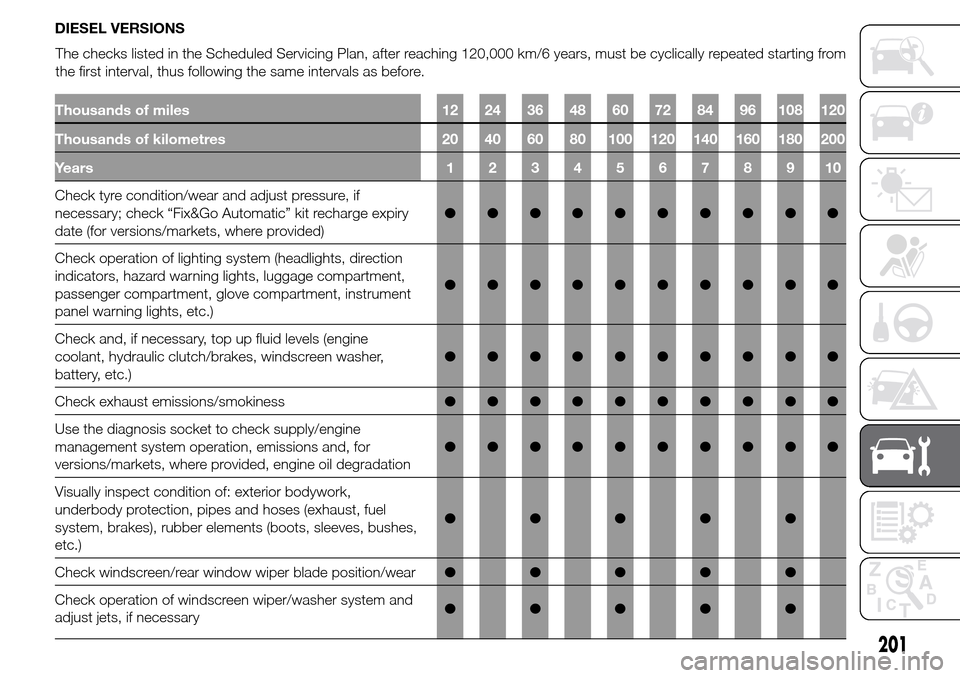
DIESEL VERSIONS
Thousands of miles 12 24 36 48 60 72 84 96 108 120
Thousands of kilometres 20 40 60 80 100 120 140 160 180 200
Years12345678910
Check tyre condition/wear and adjust pressure, if
necessary; check “Fix&Go Automatic” kit recharge expiry
date (for versions/markets, where provided)●●●●●●●●●●
Check operation of lighting system (headlights, direction
indicators, hazard warning lights, luggage compartment,
passenger compartment, glove compartment, instrument
panel warning lights, etc.)●●●●●●●●●●
Check and, if necessary, top up fluid levels (engine
coolant, hydraulic clutch/brakes, windscreen washer,
battery, etc.)●●●●●●●●●●
Check exhaust emissions/smokiness●●●●●●●●●●
Use the diagnosis socket to check supply/engine
management system operation, emissions and, for
versions/markets, where provided, engine oil degradation●●●●●●●●●●
Visually inspect condition of: exterior bodywork,
underbody protection, pipes and hoses (exhaust, fuel
system, brakes), rubber elements (boots, sleeves, bushes,
etc.)●●●●●
Check windscreen/rear window wiper blade position/wear●●●●●
Check operation of windscreen wiper/washer system and
adjust jets, if necessary●●●●●
201
The checks listed in the Scheduled Servicing Plan, after reaching 120,000 km/6 years, must be cyclically repeated starting from
the first interval, thus following the same intervals as before.
Page 219 of 288
If there is no jet of fluid, firstly check
that there is some fluid in the reservoir
(see paragraph "Checking fluid levels"
in this chapter).
Then check that the nozzle holes are
not clogged, if necessary use a needle.
Rear window washer
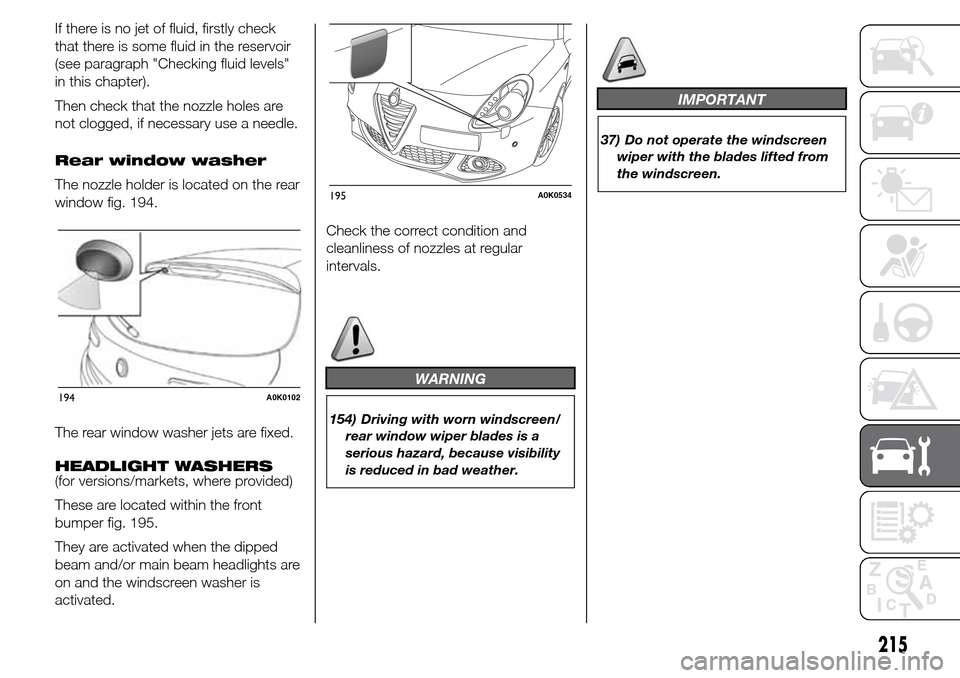
The nozzle holder is located on the rear
window fig. 194.
The rear window washer jets are fixed.
HEADLIGHT WASHERS
(for versions/markets, where provided)
These are located within the front
bumper fig. 195.
They are activated when the dipped
beam and/or main beam headlights are
on and the windscreen washer is
activated.Check the correct condition and
cleanliness of nozzles at regular
intervals.
WARNING
154) Driving with worn windscreen/
rear window wiper blades is a
serious hazard, because visibility
is reduced in bad weather.
IMPORTANT
37) Do not operate the windscreen
wiper with the blades lifted from
the windscreen.
194A0K0102
195A0K0534
215
Page 221 of 288
IMPORTANT
Avoid parking under trees; the resin
dropped by trees makes the paintwork
go opaque and increases the possibility
of corrosion.
Bird droppings must be washed off
immediately and thoroughly as the acid
they contain is particularly aggressive.
Windows
Use specific detergents and clean
cloths to prevent scratching or altering
the transparency.
IMPORTANT Wipe the rear window
inside gently with a cloth following the
direction of the filaments to avoid
damaging the heating device.
Front headlights
Use a soft cloth soaked in water and
detergent for washing cars.
IMPORTANT Never use aromatic
substances (e.g. petrol) or ketenes (e.g.
acetone) for cleaning the plastic lenses
of the front headlights.
IMPORTANT When cleaning with a
pressure washer, keep the water jet at
least 20 cm away from the headlights.Engine compartment
At the end of every winter, wash the
engine compartment thoroughly, taking
care not to aim the jet of water directly
at the electronic control units or at
the windscreen wiper motors. Have this
operation performed at a specialised
workshop.
IMPORTANT The washing should take
place with the engine cold and the
ignition key in the STOP position. After
the washing operation, make sure
that the various protections (e.g. rubber
caps and guards) have not been
removed or damaged.
IMPORTANT
6) Detergents cause water pollution.
Only wash your car in areas
equipped to collect and treat
wastewater from this type
of activity.
IMPORTANT
38) In order to preserve the aesthetic
appearance of the paint abrasive
products and/or polishes should
not be used for cleaning the car.
217