lights Alfa Romeo Giulietta 2015 Repair Manual
[x] Cancel search | Manufacturer: ALFA ROMEO, Model Year: 2015, Model line: Giulietta, Model: Alfa Romeo Giulietta 2015Pages: 288, PDF Size: 7.34 MB
Page 178 of 288
IMPORTANT When the weather is cold
or damp or after heavy rain or washing,
the surface of headlights or rear lights,
may steam up and/or form drops of
condensation on the inside. This is
a natural phenomenon due to the
difference in temperature and humidity
between the inside and the outside
of the glass which does not indicate a
fault and does not compromise the
normal operation of lighting devices.
The mist disappears quickly when the
lights are turned on, starting from
the centre of the diffuser, extending
progressively towards the edges.
IMPORTANT
28) Halogen bulbs must be handled
by holding the metallic part only.
Touching the transparent part
of the bulb with your fingers may
reduce the intensity of the
emitted light and even reduce the
lifespan of the bulb. In the case
of accidental contact, rub the
lamp with a cloth and spirit and
leave to dry.
WARNING
127) Changes or repairs to the
electrical system carried out
incorrectly and without due
consideration for the technical
specifications of the system may
lead to malfunctioning and
generate a fire hazard.
128) Halogen bulbs contain
pressurised gas. If they break,
glass fragments could fly
everywhere.
129) Due to the high supply voltage,
gas discharge bulbs (Bi-Xenon)
should only be replaced by
specialised personnel: danger of
death! Contact an Alfa Romeo
Dealership.
174
IN AN EMERGENCY
Page 180 of 288
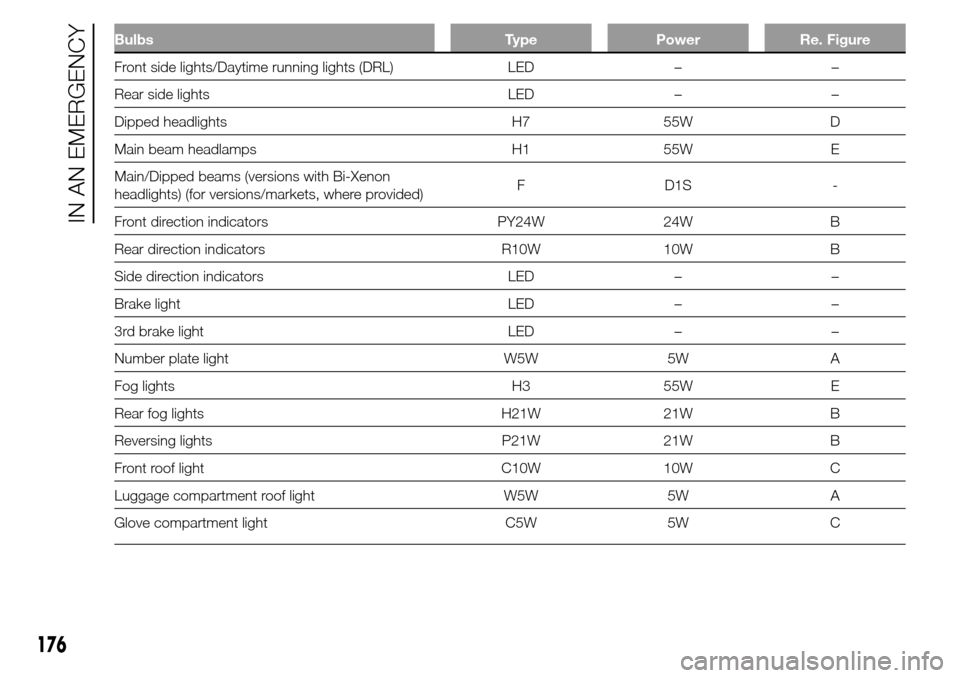
Bulbs Type Power Re. Figure
Front side lights/Daytime running lights (DRL) LED – –
Rear side lights LED – –
Dipped headlights H7 55W D
Main beam headlamps H1 55W E
Main/Dipped beams (versions with Bi-Xenon
headlights) (for versions/markets, where provided)F D1S -
Front direction indicators PY24W 24W B
Rear direction indicators R10W 10W B
Side direction indicators LED – –
Brake light LED – –
3rd brake light LED – –
Number plate light W5W 5W A
Fog lights H3 55W E
Rear fog lights H21W 21W B
Reversing lights P21W 21W B
Front roof light C10W 10W C
Luggage compartment roof light W5W 5W A
Glove compartment light C5W 5W C
176
IN AN EMERGENCY
Page 181 of 288
REPLACING
EXTERIOR BULBS
FRONT LIGHT CLUSTERS
These contain the bulbs for the side
lights/daytime running lights (DRL),
dipped beams, main beams and
direction indicators. The bulbs are
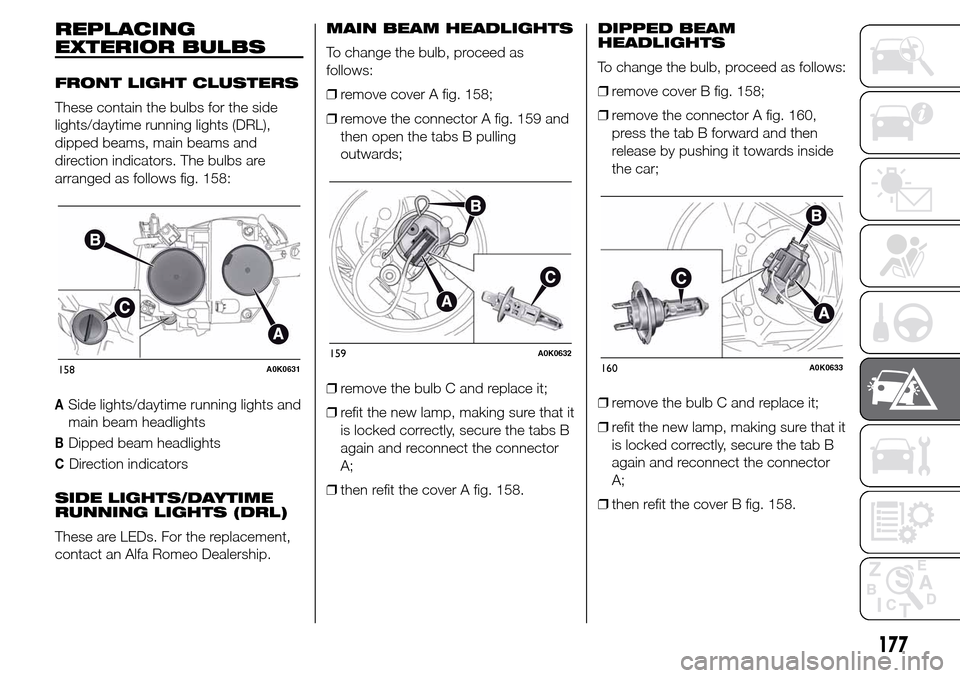
arranged as follows fig. 158:
ASide lights/daytime running lights and
main beam headlights
BDipped beam headlights
CDirection indicators
SIDE LIGHTS/DAYTIME
RUNNING LIGHTS (DRL)
These are LEDs. For the replacement,
contact an Alfa Romeo Dealership.MAIN BEAM HEADLIGHTS
To change the bulb, proceed as
follows:
❒remove cover A fig. 158;
❒remove the connector A fig. 159 and
then open the tabs B pulling
outwards;
❒remove the bulb C and replace it;
❒refit the new lamp, making sure that it
is locked correctly, secure the tabs B
again and reconnect the connector
A;
❒then refit the cover A fig. 158.DIPPED BEAM
HEADLIGHTS
To change the bulb, proceed as follows:
❒remove cover B fig. 158;
❒remove the connector A fig. 160,
press the tab B forward and then
release by pushing it towards inside
the car;
❒remove the bulb C and replace it;
❒refit the new lamp, making sure that it
is locked correctly, secure the tab B
again and reconnect the connector
A;
❒then refit the cover B fig. 158.
158A0K0631159A0K0632160A0K0633
177
Page 182 of 288

DIRECTION INDICATORS
Front
To change the bulb, proceed as follows:
❒turn the cover C fig. 158
anticlockwise by ¼ of a turn;
❒replace the bulb + bulb holder
assembly A fig. 161.
Side
These are LEDs. For the replacement,
contact an Alfa Romeo Dealership.
FOG LIGHTS
(for versions/markets, where provided)
For replacing these bulbs, contact
an Alfa Romeo Dealership.REAR LIGHT CLUSTERS
These contain the side lights, brake
lights, direction indicators (bulbs in fixed
light cluster), reverse light and rear fog
light (bulb in light cluster on boot hatch).
Removing the fixed light
cluster
Proceed as follows:
❒open the boot and loosen the rear
light cluster fastening screw A fig.
162;
❒extract the light cluster by removing it
with both hands in the direction
indicated by the arrows;
❒disconnect the electrical connector
and replace the bulb concerned.SIDE LIGHTS/BRAKE
LIGHTS
These are LEDs. For the replacement,
contact an Alfa Romeo Dealership.
DIRECTION INDICATORS
With the light cluster removed, to
replace the bulb undo the two screws A
fig. 163, remove the bulb holder and
replace bulb B.
REAR FOG LIGHTS/
REVERSING LIGHTS
To replace the bulbs proceed as
follows:
❒open the boot and remove the cover
A fig. 164 using a screwdriver in the
point indicated by an arrow;
161A0K0634
162A0K0635
163A0K0636
178
IN AN EMERGENCY
Page 183 of 288

❒remove the connector A fig. 165 and
extract the bulb holder assembly by
operating on the retaining tab B
and then by loosening the screw C;
❒remove the bulb by pushing it slightly
and turning it anticlockwise (D =
reverse light bulb;E=rearfoglight
bulb);
❒refit the bulb holder assembly
positioning it correctly, fasten screw
C and then fix it by means of the
retaining tab B. Reconnect connector
A then refit cover A fig. 164.
IMPORTANT Protect the tip of the
screwdriver with a cloth to prevent
scratching when removing the cover A.3
rdBRAKE LIGHTS
These are LED lights and are located
on the spoiler integrated with the
tailgate. For the replacement, contact
an Alfa Romeo Dealership.NUMBER PLATE LIGHTS
To replace the bulbs proceed as
follows:
❒remove the number plate light units A
fig. 166;
❒turn the bulb holder B fig. 167
anticlockwise, extract the bulb C and
replace it.
164A0K0637
165A0K0638
166A0K0639
167A0K0640
179
Page 191 of 288
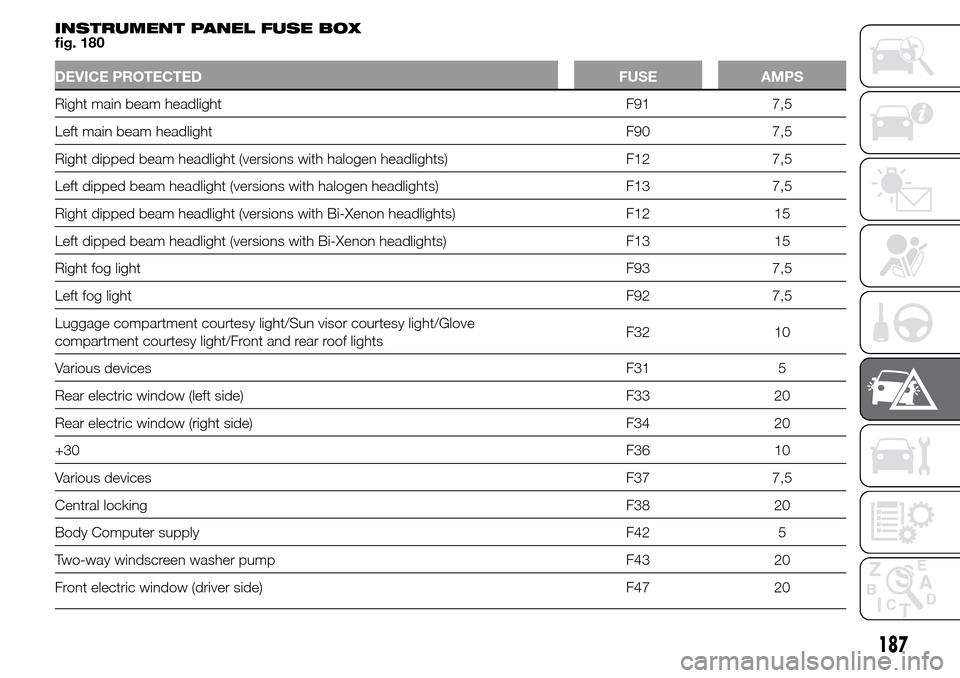
INSTRUMENT PANEL FUSE BOX
fig. 180
DEVICE PROTECTED FUSE AMPS
Right main beam headlight F91 7,5
Left main beam headlight F90 7,5
Right dipped beam headlight (versions with halogen headlights) F12 7,5
Left dipped beam headlight (versions with halogen headlights) F13 7,5
Right dipped beam headlight (versions with Bi-Xenon headlights) F12 15
Left dipped beam headlight (versions with Bi-Xenon headlights) F13 15
Right fog lightF93 7,5
Left fog lightF92 7,5
Luggage compartment courtesy light/Sun visor courtesy light/Glove
compartment courtesy light/Front and rear roof lightsF32 10
Various devicesF31 5
Rear electric window (left side) F33 20
Rear electric window (right side) F34 20
+30F36 10
Various devicesF37 7,5
Central lockingF38 20
Body Computer supply F42 5
Two-way windscreen washer pump F43 20
Front electric window (driver side) F47 20
187
Page 201 of 288
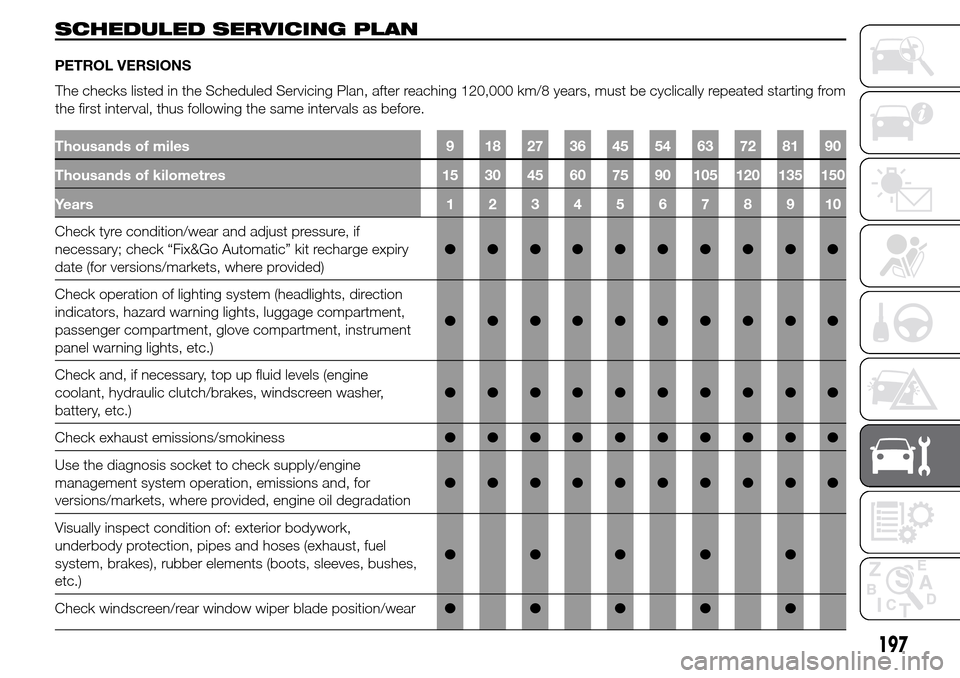
SCHEDULED SERVICING PLAN
PETROL VERSIONS
Thousands of miles 9 18 27 36 45 54 63 72 81 90
Thousands of kilometres 15 30 45 60 75 90 105 120 135 150
Years12345678910
Check tyre condition/wear and adjust pressure, if
necessary; check “Fix&Go Automatic” kit recharge expiry
date (for versions/markets, where provided)●●●●●●●●●●
Check operation of lighting system (headlights, direction
indicators, hazard warning lights, luggage compartment,
passenger compartment, glove compartment, instrument
panel warning lights, etc.)●●●●●●●●●●
Check and, if necessary, top up fluid levels (engine
coolant, hydraulic clutch/brakes, windscreen washer,
battery, etc.)●●●●●●●●●●
Check exhaust emissions/smokiness●●●●●●●●●●
Use the diagnosis socket to check supply/engine
management system operation, emissions and, for
versions/markets, where provided, engine oil degradation●●●●●●●●●●
Visually inspect condition of: exterior bodywork,
underbody protection, pipes and hoses (exhaust, fuel
system, brakes), rubber elements (boots, sleeves, bushes,
etc.)●●●●●
Check windscreen/rear window wiper blade position/wear●●●●●
197
The checks listed in the Scheduled Servicing Plan, after reaching 120,000 km/8 years, must be cyclically repeated starting from
the first interval, thus following the same intervals as before.
Page 205 of 288
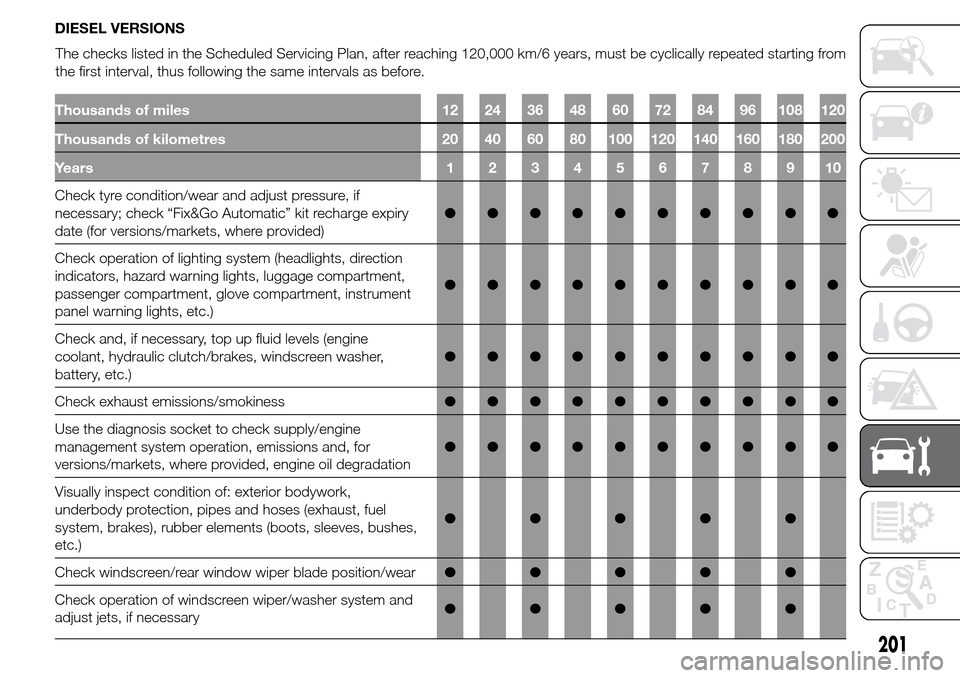
DIESEL VERSIONS
Thousands of miles 12 24 36 48 60 72 84 96 108 120
Thousands of kilometres 20 40 60 80 100 120 140 160 180 200
Years12345678910
Check tyre condition/wear and adjust pressure, if
necessary; check “Fix&Go Automatic” kit recharge expiry
date (for versions/markets, where provided)●●●●●●●●●●
Check operation of lighting system (headlights, direction
indicators, hazard warning lights, luggage compartment,
passenger compartment, glove compartment, instrument
panel warning lights, etc.)●●●●●●●●●●
Check and, if necessary, top up fluid levels (engine
coolant, hydraulic clutch/brakes, windscreen washer,
battery, etc.)●●●●●●●●●●
Check exhaust emissions/smokiness●●●●●●●●●●
Use the diagnosis socket to check supply/engine
management system operation, emissions and, for
versions/markets, where provided, engine oil degradation●●●●●●●●●●
Visually inspect condition of: exterior bodywork,
underbody protection, pipes and hoses (exhaust, fuel
system, brakes), rubber elements (boots, sleeves, bushes,
etc.)●●●●●
Check windscreen/rear window wiper blade position/wear●●●●●
Check operation of windscreen wiper/washer system and
adjust jets, if necessary●●●●●
201
The checks listed in the Scheduled Servicing Plan, after reaching 120,000 km/6 years, must be cyclically repeated starting from
the first interval, thus following the same intervals as before.
Page 208 of 288

PERIODIC CHECKS
Every 1,000 km or before long
journeys, check and, if necessary, top
up the following:
❒engine coolant, brake fluid and
windscreen washer fluid level;
❒tyre inflation pressure and condition;
❒operation of lighting system
(headlamps, direction indicators,
hazard warning lights, etc.);
❒operation of window washer/wiper
system and positioning/wear of
windscreen/rear window wiper
blades
Check and top up, if required, the
engine oil level every 3,000 km.
HEAVY-DUTY USE OF
THE CAR
If the car is used mainly under one of
the following conditions:
❒towing a trailer or caravan;
❒dusty roads;
❒short, repeated journeys (less than
7-8 km) at sub-zero outside
temperatures;
❒engine often idling or driving long
distances at low speeds or long
periods of idleness;
the following checks must be carried
out more often than indicated in the
Scheduled Servicing Plan:
❒check front disc brake pad
conditions and wear;
❒check cleanliness of bonnet and boot
locks, cleanliness and lubrication of
linkage;
❒visually inspect conditions of: engine,
gearbox, transmission, pipes and
hoses (exhaust - fuel system -
brakes) and rubber elements (boots -
sleeves - bushes - etc.);
❒check battery charge and battery
fluid level (electrolyte);
❒visually inspect condition of the
accessory drive belts;❒check and, if necessary, change
engine oil and replace oil filter;
❒check and, if necessary, replace
pollen filter;
❒check and, if necessary, replace air
cleaner.
204
SERVICING AND MAINTENANCE
Page 215 of 288

BATTERY
Battery F (see previous pages) does not
require the electrolyte to be topped up
with distilled water. A periodic check
carried out at an Alfa Romeo Dealership
is, however, necessary to check
efficiency.
REPLACING THE
BATTERY
146) 147) 148) 149)
36)
5)
If necessary, replace the battery with
another original battery with the same
specifications. Follow the battery
manufacturer's instructions for
maintenance.
USEFUL ADVICE FOR
EXTENDING THE LIFE OF
YOUR BATTERY
To avoid draining your battery and
make it last longer, observe the
following instructions:
❒when you park the car, ensure that
the doors, tailgate and bonnet are
closed properly, to prevent any lights
from remaining on inside the
passenger's compartment;❒switch off all roof lights inside the car:
the car is however equipped with a
system which switches all internal
lights off automatically;
❒do not keep accessories (e.g. sound
system, hazard lights, etc.) switched
on for a long time when the engine
is not running;
❒before performing any operation on
the electrical system, disconnect
the negative battery cable.
IMPORTANT After the battery is
disconnected, the steering must be
initialised. Thewarning light
switches on to indicate this. To carry
out this procedure, simply turn the
steering wheel all the way from one end
to the other or drive in a straight line
for about a hundred metres.
IMPORTANT If the charge level remains
under 50% for a long time, the battery
is damaged by sulphation, reducing
its capacity and efficiency at start-up.
The battery will also be more at risk
of freezing (this can happen as early as
–10°C). Refer to the paragraph "Car
inactivity" in "Starting and driving"
chapter if the car is left parked for a
long time.If, after purchasing the car, you wish to
install electrical accessories which
require permanent electrical supply (e.g.
alarm, etc.) or accessories which
influence the electrical supply
requirements, contact an Alfa Romeo
Dealership, whose qualified staff will
evaluate the overall electrical
consumption.WARNING
146) Battery liquid is poisonous and
corrosive. Avoid contact with the
skin and eyes. Keep naked flames
and sources of sparks away from
the battery: risk of explosion and
fire.
147) Using the battery with
insufficient fluid irreparably
damages the battery and may
cause an explosion.
148) If the car must remain unused
for a long time at a very low
temperature, remove the battery
and take it to a warm place, to
avoid freezing.
211