belt Alfa Romeo Giulietta 2015 Owner's Manual
[x] Cancel search | Manufacturer: ALFA ROMEO, Model Year: 2015, Model line: Giulietta, Model: Alfa Romeo Giulietta 2015Pages: 288, PDF Size: 7.34 MB
Page 22 of 288
Recalling a memorised position is also
possible for about 3 minutes after
the doors are opened and about 1
minute after the ignition key is turned to
the STOP position.
To recall a memorised position, press
the relevant button briefly.
SEAT HEATING
(for versions/markets, where provided)
With the ignition key at MAR-ON,
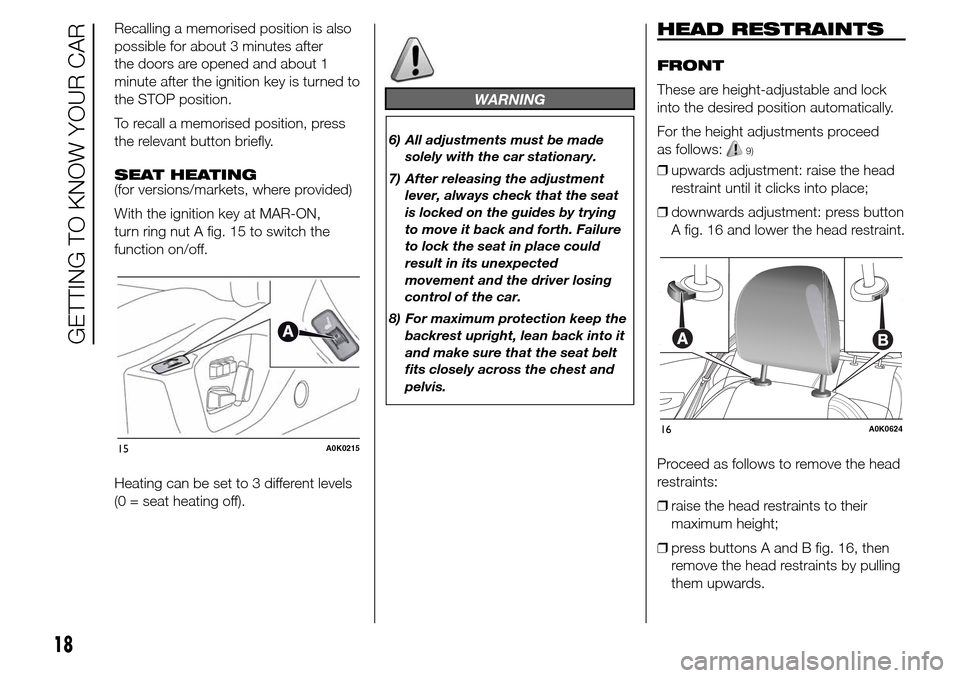
turn ring nut A fig. 15 to switch the
function on/off.
Heating can be set to 3 different levels
(0 = seat heating off).
WARNING
6) All adjustments must be made
solely with the car stationary.
7) After releasing the adjustment
lever, always check that the seat
is locked on the guides by trying
to move it back and forth. Failure
to lock the seat in place could
result in its unexpected
movement and the driver losing
control of the car.
8) For maximum protection keep the
backrest upright, lean back into it
and make sure that the seat belt
fits closely across the chest and
pelvis.
HEAD RESTRAINTS
FRONT
These are height-adjustable and lock
into the desired position automatically.
For the height adjustments proceed
as follows:
9)
❒upwards adjustment: raise the head
restraint until it clicks into place;
❒downwards adjustment: press button
A fig. 16 and lower the head restraint.
Proceed as follows to remove the head
restraints:
❒raise the head restraints to their
maximum height;
❒press buttons A and B fig. 16, then
remove the head restraints by pulling
them upwards.
15A0K0215
16A0K0624
18
GETTING TO KNOW YOUR CAR
Page 61 of 288
See the descriptions in “Removing the
parcel shelf” and “Folding back the
seats” paragraphs for how to expand
the luggage compartment.Removing the parcel
shelf
Proceed as follows:
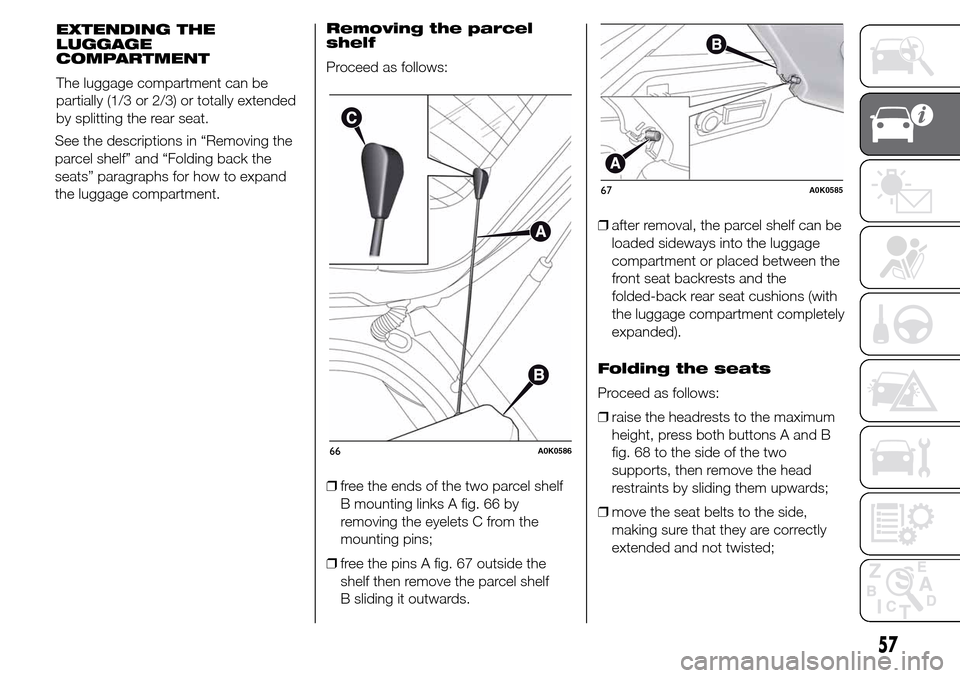
❒free the ends of the two parcel shelf
B mounting links A fig. 66 by
removing the eyelets C from the
mounting pins;
❒free the pins A fig. 67 outside the
shelf then remove the parcel shelf
B sliding it outwards.❒after removal, the parcel shelf can be
loaded sideways into the luggage
compartment or placed between the
front seat backrests and the
folded-back rear seat cushions (with
the luggage compartment completely
expanded).
Folding the seats
Proceed as follows:
❒raise the headrests to the maximum
height, press both buttons A and B
fig. 68 to the side of the two
supports, then remove the head
restraints by sliding them upwards;
❒move the seat belts to the side,
making sure that they are correctly
extended and not twisted;
66A0K0586
67A0K0585
57
EXTENDING THE
LUGGAGE
COMPARTMENT
The luggage compartment can be
partially (1/3 or 2/3) or totally extended
by splitting the rear seat.
Page 62 of 288
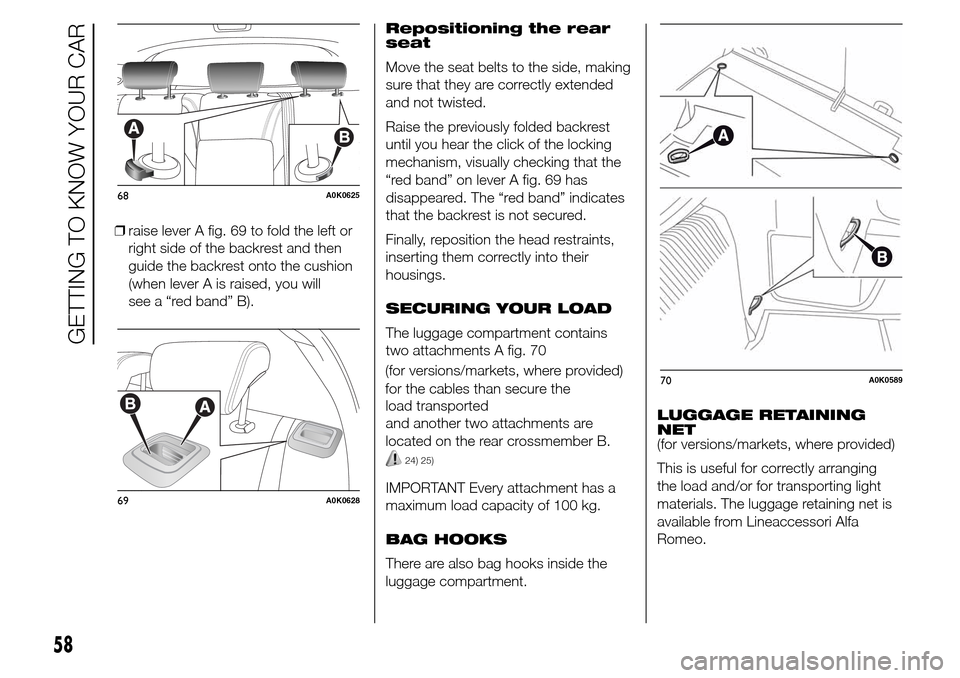
❒raise lever A fig. 69 to fold the left or
right side of the backrest and then
guide the backrest onto the cushion
(when lever A is raised, you will
see a “red band” B).Repositioning the rear
seat
Move the seat belts to the side, making
sure that they are correctly extended
and not twisted.
Raise the previously folded backrest
until you hear the click of the locking
mechanism, visually checking that the
“red band” on lever A fig. 69 has
disappeared. The “red band” indicates
that the backrest is not secured.
Finally, reposition the head restraints,
inserting them correctly into their
housings.
SECURING YOUR LOAD
The luggage compartment contains
two attachments A fig. 70
load transported
and another two attachments are
located on the rear crossmember B.
24) 25)
IMPORTANT Every attachment has a
maximum load capacity of 100 kg.
BAG HOOKS
There are also bag hooks inside the
luggage compartment.LUGGAGE RETAINING
NET
(for versions/markets, where provided)
This is useful for correctly arranging
the load and/or for transporting light
materials. The luggage retaining net is
available from Lineaccessori Alfa
Romeo.
68A0K0625
69A0K0628
70A0K0589
58
GETTING TO KNOW YOUR CAR
(for versions/markets, where provided)
for the cables than secure the
Page 74 of 288
❒driver's door not shut;
❒driver's seat belt not fastened;
❒reverse gear engaged (for example,
for parking manoeuvres);
❒for versions equipped with dual zone
automatic climate control (for
versions/markets, where provided), if
an adequate level of thermal comfort
has not been reached or with
MAX-DEF function activation;
❒during the first period of use, to
initialise the system.
ENGINE RESTARTING
CONDITIONS
Due to comfort, emission control and
safety reasons, the engine can restart
automatically without any action by the
driver, under special conditions, such
as:
❒battery not sufficiently charged;
❒reduced braking system vacuum
(e.g. if the brake pedal is pressed
repeatedly);
❒car moving (e.g. when driving on
roads with a gradient);
❒engine stopping by Start&Stop
system for over 3 minutes;❒for versions equipped with dual zone
automatic climate control system (for
versions/markets, where provided),
if an adequate level of thermal
comfort has not been reached or
MAX-DEF function activation.
With gear engaged, automatic engine
restarting is possible only by fully
depressing the clutch pedal. The driver
is informed by the displaying of a
message on the display and -
for versions/markets, where provided -
by the flashing of the symbol
.
Notes
If the clutch is not pressed, about 3
minutes after the engine stops, the
engine can be restarted only using the
ignition key.
In cases when the engine stops and
this is not desired, due for example to
the clutch pedal being released sharply
with a gear engaged, if the Start&Stop
system is activated, the engine can
be restarted by fully depressing the
clutch pedal or by placing the gear lever
in neutral.SAFETY FUNCTIONS
When the engine is stopped by the
Start&Stop system, if the driver releases
his/her seat belt and opens the driver's
or passenger's door, the engine can
be restarted only using the ignition key.
The driver is informed by a buzzer
and by the flashing of the symbol
on
the display; on some versions, a
message is displayed as well.
"ENERGY SAVING"
FUNCTION
(for versions/markets, where provided)
If, following automatic engine restarting,
the driver does not carry out any
action on the car for over 3 minutes,
the Start&Stop system stops the engine
once and for all, to prevent fuel
consumption. In these cases, the
engine can be restarted only using the
ignition key.
NOTE In any case, it is possible to keep
the engine running by deactivating the
Start&Stop system.
IRREGULAR OPERATION
In the event of malfunction, the
Start&Stop system is deactivated.
70
GETTING TO KNOW YOUR CAR
Page 87 of 288
KNOWING THE INSTRUMENT PANEL
This section of the booklet gives you all
the information you need to
understand, interpret and use the
instrument panel correctly.DISPLAY ......................................... 84
MENU ITEMS .................................. 87
CONTROL PANEL AND
INSTRUMENTS ............................... 94
TRIP COMPUTER ........................... 96
WARNING LIGHTS AND
MESSAGES ................................... 99
- LOW BRAKE FLUID/HANDBRAKE
ENGAGED .......................................... 99
- EBD FAILURE .................................. 100
- AIRBAG FAILURE ............................. 100
- SEAT BELTS NOT FASTENED .......... 100
- ALTERNATOR FAILURE ................... 101
- LOW ENGINE OIL PRESSURE ......... 102
-DEGRADED ENGINE OIL (for
versions/markets, where provided) ..... 103
- ENGINE COOLANT TEMPERATURE
TOO HIGH .......................................... 105
- ALFA TCT FAILURE .......................... 106
-INCOMPLETE DOOR LOCKING ........ 106
-SPEED LIMIT EXCEEDED ................. 106
- DUAL PINION ACTIVE STEERING
FAILURE ............................................. 107
- ALFA ROMEO CODE SYSTEM
FAILURE/ALARM FAILURE ................. 107
- FUEL RESERVE/LIMITED RANGE .... 108
- GENERAL FAILURE ......................... 109
- GENERAL FAILURE ......................... 110
-REAR FOG LIGHTS ........................... 111
- ABS FAILURE ................................... 112
-BRAKE PAD WEAR ........................... 112
- PASSENGER SIDE AIRBAG
DEACTIVATED .................................... 112
- INJECTION/EOBD SYSTEM
FAILURE ............................................. 113
- GLOW PLUG HEATING/GLOW
PLUG HEATING FAILURE (diesel
versions) ............................................. 114-WATER IN DIESEL FILTER (diesel
versions) ............................................. 114
- DPF CLEANING (particulate trap) in
progress (diesel versions with DPF
only) ................................................... 116
- iTPMS SYSTEM ............................... 117
- ELECTRONIC STABILITY CONTROL
(ESC) SYSTEM ................................... 119
- ELECTRONIC STABILITY CONTROL
(ESC) SYSTEM ................................... 120
- CRUISE CONTROL (for
versions/markets, where provided) ..... 121
- SIDE LIGHTS ................................... 121
- FOLLOW ME HOME ........................ 121
- DIPPED BEAM HEADLIGHTS .......... 121
- FOG LIGHTS .................................... 121
- LEFT-HAND DIRECTION
- RIGHT-HAND DIRECTION
INDICATOR ........................................ 122
- MAIN BEAM HEADLIGHTS .............. 122
-FUEL CUT-OFF SYSTEM ................... 123
- POSSIBLE ICE ON ROAD ................ 123
- BRAKE LIGHT FAILURE ................... 123
- DUSK SENSOR FAILURE ................. 123
- RAIN SENSOR FAILURE .................. 124
- PARKING SENSOR FAILURE ........... 124
-START&STOP SYSTEM
ACTIVATION/DEACTIVATION (for
versions/markets, where provided) ..... 125
-START&STOP FAILURE .................... 125
- DISPLAY OF SELECTED DRIVING
MODE (“Alfa DNA” system) ................. 126
83
INDICATOR.......................................... 122
Page 90 of 288
SET/: press briefly to access the
menu and/or go to next screen or
confirm the selection. Hold down to go
back to the standard screen.
: to scroll down through the
displayed menu and the related options
or to decrease the value displayed.
IMPORTANT The
and
buttons activate different
functions according to the following
situations:
❒within the menu, they allow you to
scroll up and down through the
options;
❒during settings operations, they
increase or decrease values.
SETUP MENU
The menu comprises a series of
options which can be selected using
the
andbuttons to access
the different selection and setting
(Setup) operations indicated below.
Some options have a submenu. The
menu can be activated by briefly
pressing the SET/
button.
The menu comprises the following
options:
❒MENU
❒LIGHTING❒SPEED BEEP
❒LIGHT SENSOR (for versions/
markets where provided)
❒RAIN SENSOR (for versions/markets,
where provided)
❒TRIP B ACTIVATION/DATA
❒SET TIME
❒SET DATE
❒FIRST PAGE (for versions/markets
where provided)
❒AUTOCLOSE
❒MEASUREMENT UNIT
❒LANGUAGE
❒BUZZER VOLUME
❒SEAT BELT BEEP/BUZZ
❒SERVICE
❒AIRBAG/PASSENGER BAG
❒DAYTIME RUNNING LIGHTS
❒ADAPTIVE LIGHTS (for versions/
markets, where provided)
❒COURTESY LIGHTS
❒MENU EXIT
NoteOn cars equipped with radio
navigator systems (for versions/
markets, where provided), some menu
items are shown on the navigator
display.Selecting an option from
the main menu without a
submenu:
❒press the SET/
button briefly to
select the main menu setting you
wish to change;
❒press buttons
or(with
single presses) to select the new
setting;
❒press the SET/
button briefly to
save the new setting and go back to
the previous main menu option.
Selecting an option from
the main menu with a
submenu:
❒briefly press the SET/
button to
display the first submenu option;
❒press buttons
or(with
single presses) to scroll through all
the submenu options;
❒briefly press the SET/
button to
select the displayed submenu option
and to open the relevant settings
menu;
❒press buttons
or(with
single presses) to select the new
setting for this submenu option;
❒press the SET/
button briefly to
save the new setting and go back to
the previous submenu option.
86
KNOWING THE INSTRUMENT PANEL
Page 95 of 288
Warnings volume
(Adjusting the
alert/warning acoustic
signal volume)
With this function it is possible to adjust
(to eight levels) the volume of the
acoustic signal which sounds in the
event of alerts and warning.
To set the desired volume proceed as
follows:
❒press the SET/
button briefly,
making the display flash the
previously set volume "level";
❒press the
orbutton to
make the adjustment;
❒briefly press the SET/
button to
go back to the menu screen or hold
the button down to go back to the
standard screen without saving.
Belt reminder
(Reactivation of SBR
buzzer)
(for versions/markets, where provided)
This function can be displayed only
after an Alfa Romeo Dealership has
deactivated the SBR system (see
paragraph “SBR system” in the “Safety”
chapter).To reactivate this function, proceed as
follows:
❒press the SET/
button briefly, the
display shows "OFF" flashing. Press
the
orbutton and "On"
will appear;
❒briefly press the SET/
button to
go back to the previous screen or
hold the button down to go back to
the standard screen without saving.
Service (Scheduled
servicing)
This function allows you to display the
information about km/mileage intervals
or, for versions/markets, where
provided, time intervals for car
servicing.
To consult this information, proceed as
follows:
❒briefly press the SET/
button: the
display shows when servicing is due
in km/mi or days (where provided)
or mi or days (where provided)
according to the previous setting (see
paragraph "Units of measurement");
❒briefly press the SET/
button to
go back to the menu screen or hold
the button down to go back to the
standard screen.IMPORTANT The “Scheduled Servicing
Plan” includes car maintenance at
fixed intervals (refer to the "Maintenance
and care" chapter). This is displayed
automatically, with ignition key at
MAR-ON, 2000 km (or equivalent value
in miles) before servicing or, where
provided, 30 days before servicing. It is
also displayed each time the key is
turned to MAR-ON or, for
versions/markets, where provided,
every 200 km (or equivalent value in
miles). Below this threshold servicing
indications are more frequent. The
display will be in km or miles according
to the unit of measurement set. When
the next scheduled service is
approaching, the word “Service” will
appear on the display, followed by the
number of kilometres/miles or days
(where provided) left, when the key is
turned to MAR-ON. Go to an Alfa
Romeo Dealership, where the
“Scheduled Servicing Plan” operations
will be performed and the message
will be reset.
When the service interval is reached
and for about 1000 km/600 mi or
30 days, a service due message is
displayed.
91
Page 104 of 288
Warning lights on
panelWhat it means What to do
red
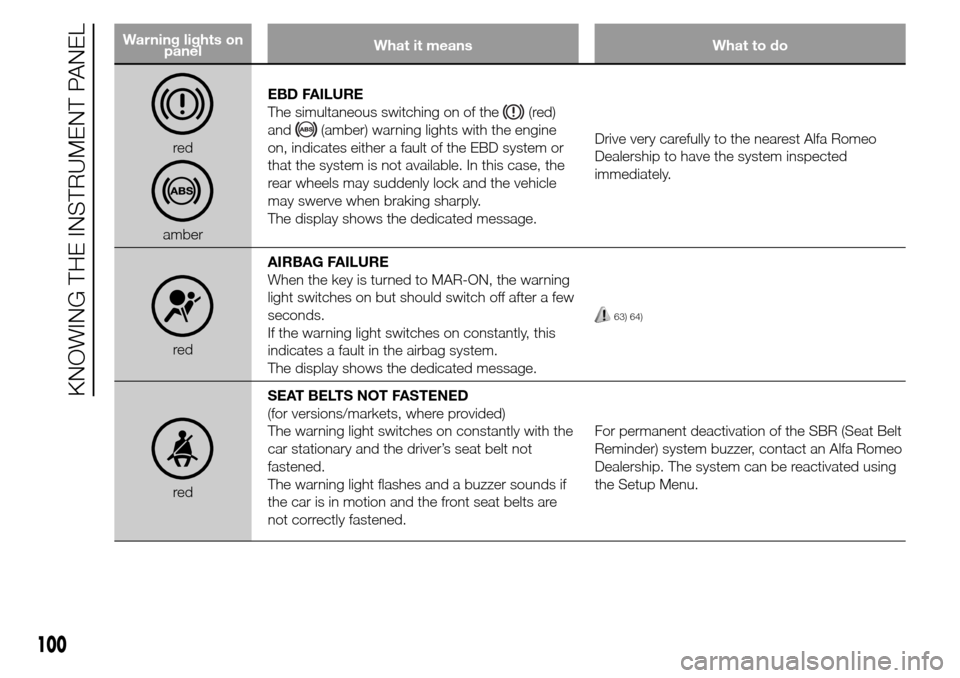
amberEBD FAILURE
The simultaneous switching on of the
(red)
and
(amber) warning lights with the engine
on, indicates either a fault of the EBD system or
that the system is not available. In this case, the
rear wheels may suddenly lock and the vehicle
may swerve when braking sharply.
The display shows the dedicated message.Drive very carefully to the nearest Alfa Romeo
Dealership to have the system inspected
immediately.
redAIRBAG FAILURE
When the key is turned to MAR-ON, the warning
light switches on but should switch off after a few
seconds.
If the warning light switches on constantly, this
indicates a fault in the airbag system.
The display shows the dedicated message.
63) 64)
redSEAT BELTS NOT FASTENED
(for versions/markets, where provided)
The warning light switches on constantly with the
car stationary and the driver’s seat belt not
fastened.
The warning light flashes and a buzzer sounds if
the car is in motion and the front seat belts are
not correctly fastened.For permanent deactivation of the SBR (Seat Belt
Reminder) system buzzer, contact an Alfa Romeo
Dealership. The system can be reactivated using
the Setup Menu.
100
KNOWING THE INSTRUMENT PANEL
Page 131 of 288
SAFETY
The chapter that you are about to read
is very important: it describes the
safety systems with which the car is
equipped and provides instructions on
how to use them correctly.SEAT BELTS ..................................128
SBR SYSTEM (SEAT BELT
REMINDER) ....................................129
PRETENSIONERS...........................131
CARRYING CHILDREN SAFELY ......133
FITTING “UNIVERSAL” CHILD
SEAT (WITH SEAT BELTS)...............134
PREPARATION FOR “ISOFIX”
CHILD SEAT ...................................137
FRONT AIRBAGS............................140
SIDE AIRBAGS (SIDE BAGS -
WINDOW BAGS) .............................144
127
Page 132 of 288
SEAT BELTS
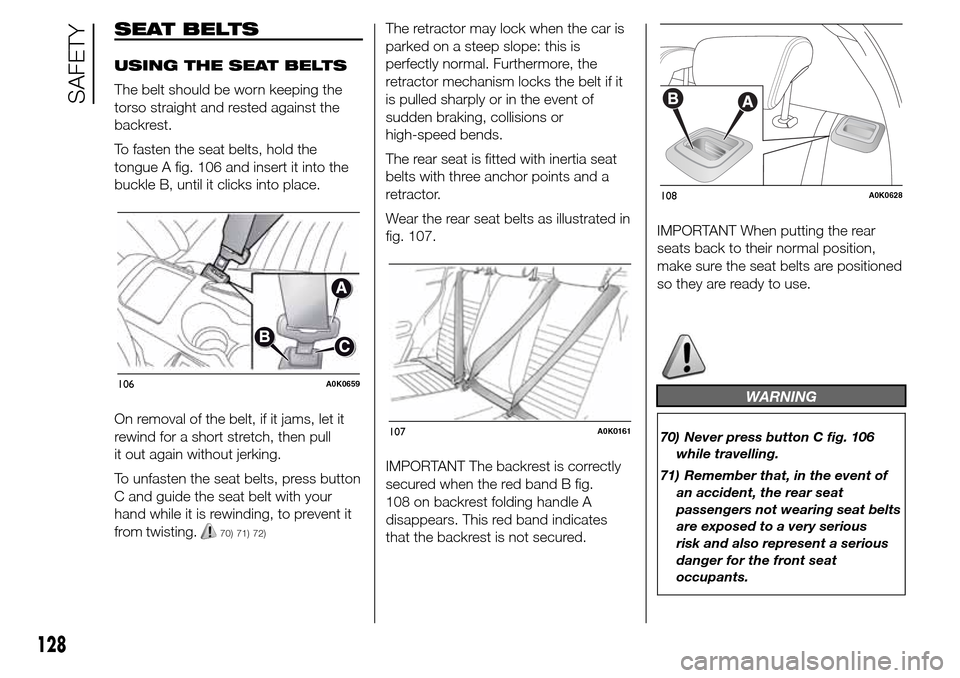
USING THE SEAT BELTS
The belt should be worn keeping the
torso straight and rested against the
backrest.
To fasten the seat belts, hold the
tongue A fig. 106 and insert it into the
buckle B, until it clicks into place.
On removal of the belt, if it jams, let it
rewind for a short stretch, then pull
it out again without jerking.
To unfasten the seat belts, press button
C and guide the seat belt with your
hand while it is rewinding, to prevent it
from twisting.
70) 71) 72)
The retractor may lock when the car is
parked on a steep slope: this is
perfectly normal. Furthermore, the
retractor mechanism locks the belt if it
is pulled sharply or in the event of
sudden braking, collisions or
high-speed bends.
The rear seat is fitted with inertia seat
belts with three anchor points and a
retractor.
Wear the rear seat belts as illustrated in
fig. 107.
IMPORTANT The backrest is correctly
secured when the red band B fig.
108 on backrest folding handle A
disappears. This red band indicates
that the backrest is not secured.IMPORTANT When putting the rear
seats back to their normal position,
make sure the seat belts are positioned
so they are ready to use.
WARNING
70) Never press button C fig. 106
while travelling.
71) Remember that, in the event of
an accident, the rear seat
passengers not wearing seat belts
are exposed to a very serious
risk and also represent a serious
danger for the front seat
occupants.
106A0K0659
107A0K0161
108A0K0628
128
SAFETY