buttons Alfa Romeo Giulietta 2016 User Guide
[x] Cancel search | Manufacturer: ALFA ROMEO, Model Year: 2016, Model line: Giulietta, Model: Alfa Romeo Giulietta 2016Pages: 288, PDF Size: 7.34 MB
Page 58 of 288
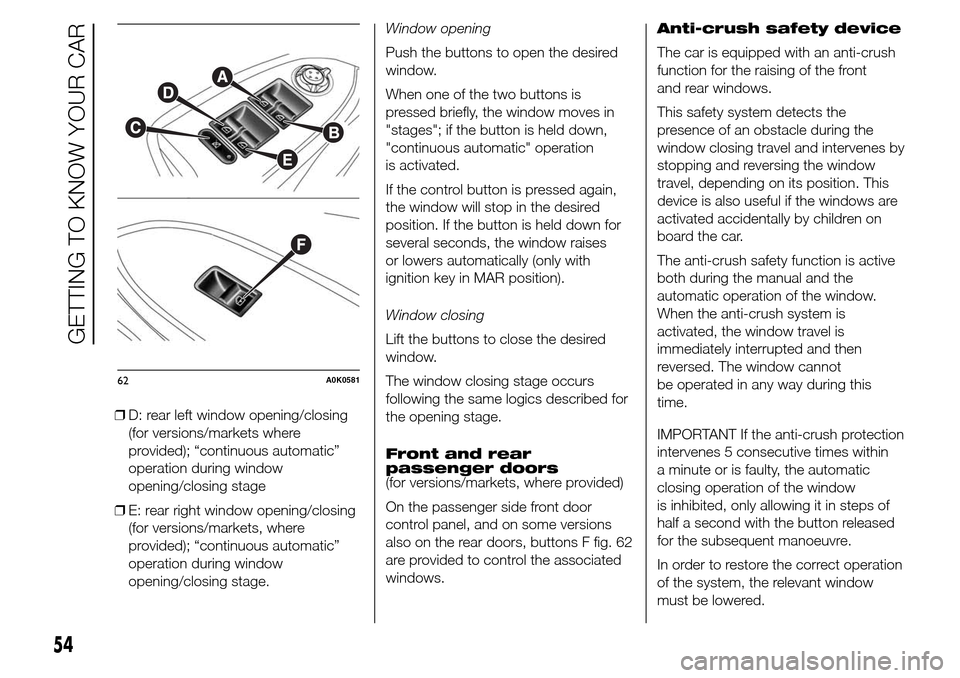
❒D: rear left window opening/closing
(for versions/markets where
provided); “continuous automatic”
operation during window
opening/closing stage
❒E: rear right window opening/closing
(for versions/markets, where
provided); “continuous automatic”
operation during window
opening/closing stage.Window opening
Push the buttons to open the desired
window.
When one of the two buttons is
pressed briefly, the window moves in
"stages"; if the button is held down,
"continuous automatic" operation
is activated.
If the control button is pressed again,
the window will stop in the desired
position. If the button is held down for
several seconds, the window raises
or lowers automatically (only with
ignition key in MAR position).
Window closing
Lift the buttons to close the desired
window.
The window closing stage occurs
following the same logics described for
the opening stage.
Front and rear
passenger doors
(for versions/markets, where provided)
On the passenger side front door
control panel, and on some versions
also on the rear doors, buttons F fig. 62
are provided to control the associated
windows.Anti-crush safety device
The car is equipped with an anti-crush
function for the raising of the front
and rear windows.
This safety system detects the
presence of an obstacle during the
window closing travel and intervenes by
stopping and reversing the window
travel, depending on its position. This
device is also useful if the windows are
activated accidentally by children on
board the car.
The anti-crush safety function is active
both during the manual and the
automatic operation of the window.
When the anti-crush system is
activated, the window travel is
immediately interrupted and then
reversed. The window cannot
be operated in any way during this
time.
IMPORTANT If the anti-crush protection
intervenes 5 consecutive times within
a minute or is faulty, the automatic
closing operation of the window
is inhibited, only allowing it in steps of
half a second with the button released
for the subsequent manoeuvre.
In order to restore the correct operation
of the system, the relevant window
must be lowered.
62A0K0581
54
GETTING TO KNOW YOUR CAR
Page 61 of 288
See the descriptions in “Removing the
parcel shelf” and “Folding back the
seats” paragraphs for how to expand
the luggage compartment.Removing the parcel
shelf
Proceed as follows:
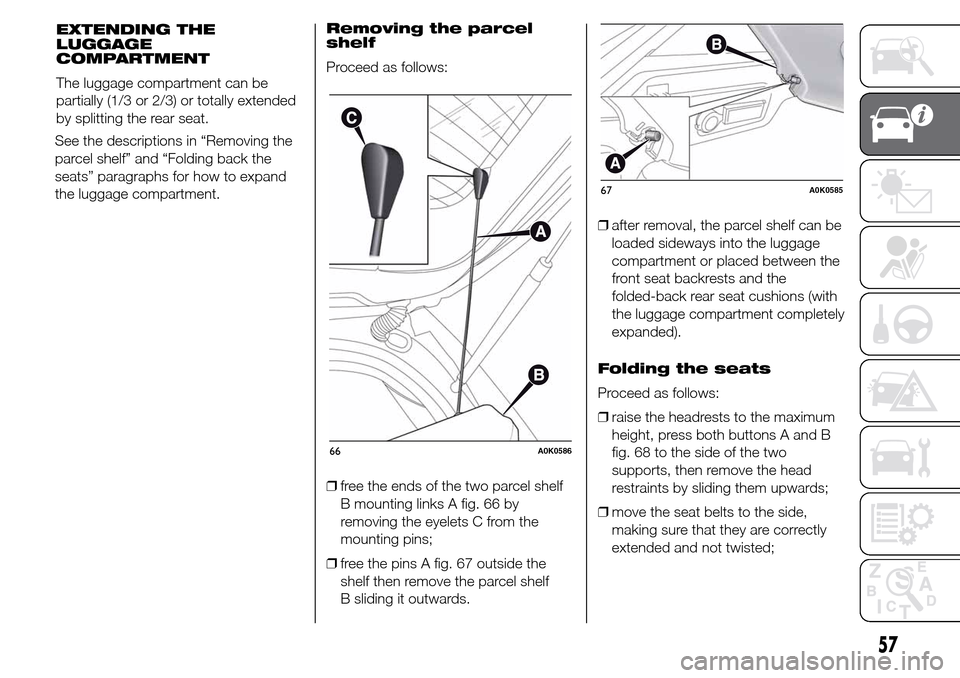
❒free the ends of the two parcel shelf
B mounting links A fig. 66 by
removing the eyelets C from the
mounting pins;
❒free the pins A fig. 67 outside the
shelf then remove the parcel shelf
B sliding it outwards.❒after removal, the parcel shelf can be
loaded sideways into the luggage
compartment or placed between the
front seat backrests and the
folded-back rear seat cushions (with
the luggage compartment completely
expanded).
Folding the seats
Proceed as follows:
❒raise the headrests to the maximum
height, press both buttons A and B
fig. 68 to the side of the two
supports, then remove the head
restraints by sliding them upwards;
❒move the seat belts to the side,
making sure that they are correctly
extended and not twisted;
66A0K0586
67A0K0585
57
EXTENDING THE
LUGGAGE
COMPARTMENT
The luggage compartment can be
partially (1/3 or 2/3) or totally extended
by splitting the rear seat.
Page 65 of 288
HEADLIGHTS
LIGHT BEAM DIRECTION
The correct orientation of the headlights
is important for the driver's comfort
and safety as well as for all other road
users. This is also covered by a specific
rule of the highway code.
The headlights must be correctly
directed to ensure the best visibility
conditions for all drivers. Contact a Alfa
Romeo Dealership to have the
headlights checked and adjusted, if
necessary.
HEADLIGHT ALIGNMENT
CORRECTOR
This device works with the ignition key
in the MAR position and the dipped
headlights on.
Headlight alignment
adjustment
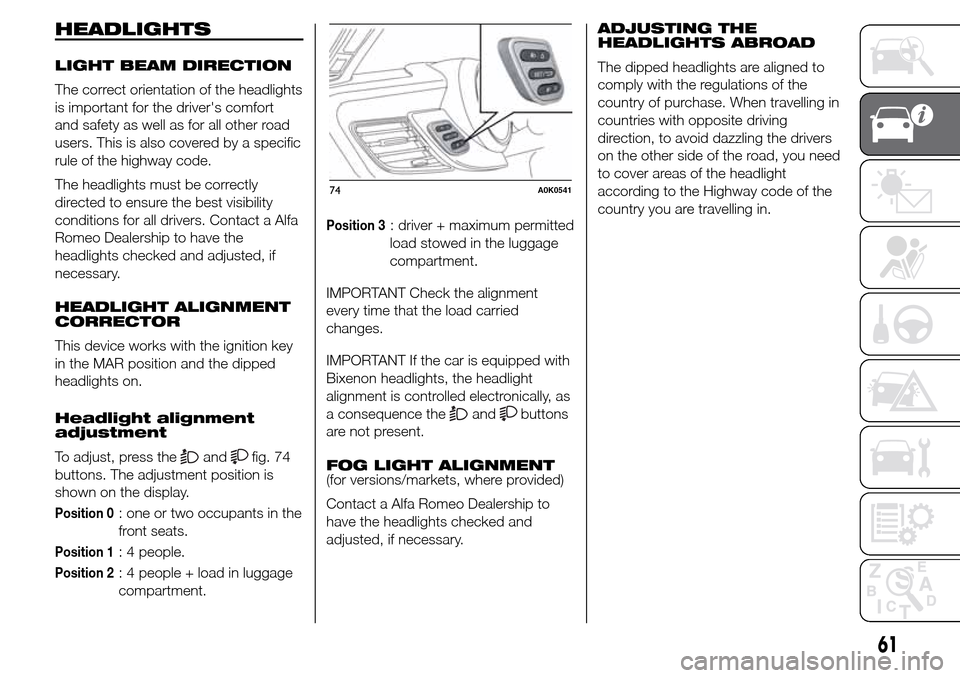
To adjust, press the
andfig. 74
buttons. The adjustment position is
shown on the display.
Position 0: one or two occupants in the
front seats.
Position 1: 4 people.
Position 2: 4 people + load in luggage
compartment.
Position 3: driver + maximum permitted
load stowed in the luggage
compartment.
IMPORTANT Check the alignment
every time that the load carried
changes.
IMPORTANT If the car is equipped with
Bixenon headlights, the headlight
alignment is controlled electronically, as
a consequence the
andbuttons
are not present.
FOG LIGHT ALIGNMENT
(for versions/markets, where provided)
Contact a Alfa Romeo Dealership to
have the headlights checked and
adjusted, if necessary.ADJUSTING THE
HEADLIGHTS ABROAD
The dipped headlights are aligned to
comply with the regulations of the
country of purchase. When travelling in
countries with opposite driving
direction, to avoid dazzling the drivers
on the other side of the road, you need
to cover areas of the headlight
according to the Highway code of the
country you are travelling in.
74A0K0541
61
Page 89 of 288
GEAR SHIFT INDICATOR
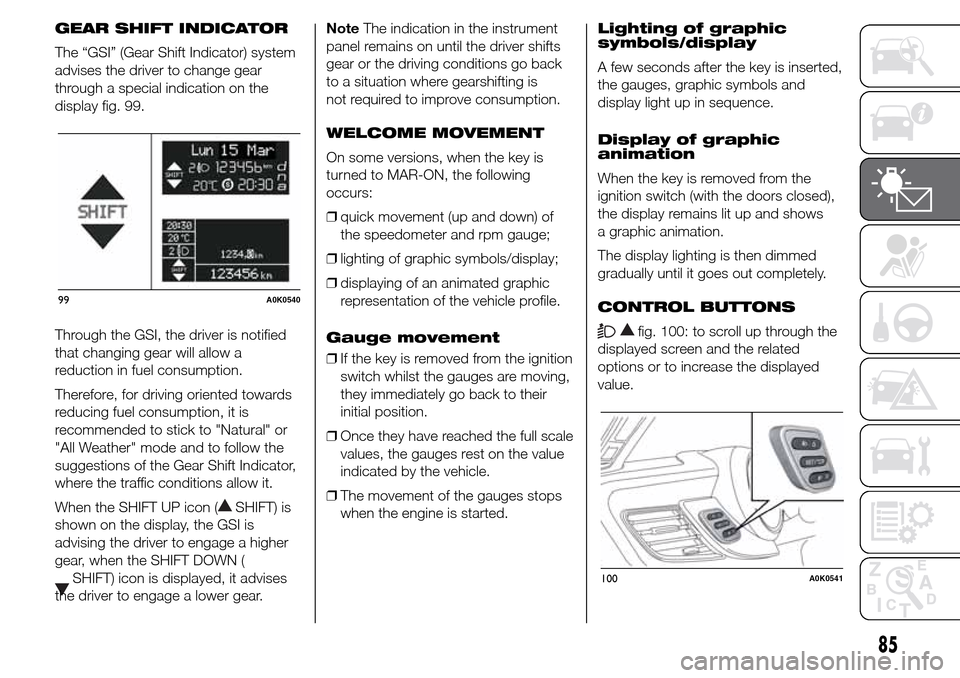
The “GSI” (Gear Shift Indicator) system
advises the driver to change gear
through a special indication on the
display fig. 99.
Through the GSI, the driver is notified
that changing gear will allow a
reduction in fuel consumption.
Therefore, for driving oriented towards
reducing fuel consumption, it is
recommended to stick to "Natural" or
"All Weather" mode and to follow the
suggestions of the Gear Shift Indicator,
where the traffic conditions allow it.
When the SHIFT UP icon (
SHIFT) is
shown on the display, the GSI is
advising the driver to engage a higher
gear, when the SHIFT DOWN (
SHIFT) icon is displayed, it advises
the driver to engage a lower gear.NoteThe indication in the instrument
panel remains on until the driver shifts
gear or the driving conditions go back
to a situation where gearshifting is
not required to improve consumption.
WELCOME MOVEMENT
On some versions, when the key is
turned to MAR-ON, the following
occurs:
❒quick movement (up and down) of
the speedometer and rpm gauge;
❒lighting of graphic symbols/display;
❒displaying of an animated graphic
representation of the vehicle profile.
Gauge movement
❒If the key is removed from the ignition
switch whilst the gauges are moving,
they immediately go back to their
initial position.
❒Once they have reached the full scale
values, the gauges rest on the value
indicated by the vehicle.
❒The movement of the gauges stops
when the engine is started.Lighting of graphic
symbols/display
A few seconds after the key is inserted,
the gauges, graphic symbols and
display light up in sequence.
Display of graphic
animation
When the key is removed from the
ignition switch (with the doors closed),
the display remains lit up and shows
a graphic animation.
The display lighting is then dimmed
gradually until it goes out completely.
CONTROL BUTTONS
fig. 100: to scroll up through the
displayed screen and the related
options or to increase the displayed
value.
99A0K0540
100A0K0541
85
Page 90 of 288
SET/: press briefly to access the
menu and/or go to next screen or
confirm the selection. Hold down to go
back to the standard screen.
: to scroll down through the
displayed menu and the related options
or to decrease the value displayed.
IMPORTANT The
and
buttons activate different
functions according to the following
situations:
❒within the menu, they allow you to
scroll up and down through the
options;
❒during settings operations, they
increase or decrease values.
SETUP MENU
The menu comprises a series of
options which can be selected using
the
andbuttons to access
the different selection and setting
(Setup) operations indicated below.
Some options have a submenu. The
menu can be activated by briefly
pressing the SET/
button.
The menu comprises the following
options:
❒MENU
❒LIGHTING❒SPEED BEEP
❒LIGHT SENSOR (for versions/
markets where provided)
❒RAIN SENSOR (for versions/markets,
where provided)
❒TRIP B ACTIVATION/DATA
❒SET TIME
❒SET DATE
❒FIRST PAGE (for versions/markets
where provided)
❒AUTOCLOSE
❒MEASUREMENT UNIT
❒LANGUAGE
❒BUZZER VOLUME
❒SEAT BELT BEEP/BUZZ
❒SERVICE
❒AIRBAG/PASSENGER BAG
❒DAYTIME RUNNING LIGHTS
❒ADAPTIVE LIGHTS (for versions/
markets, where provided)
❒COURTESY LIGHTS
❒MENU EXIT
NoteOn cars equipped with radio
navigator systems (for versions/
markets, where provided), some menu
items are shown on the navigator
display.Selecting an option from
the main menu without a
submenu:
❒press the SET/
button briefly to
select the main menu setting you
wish to change;
❒press buttons
or(with
single presses) to select the new
setting;
❒press the SET/
button briefly to
save the new setting and go back to
the previous main menu option.
Selecting an option from
the main menu with a
submenu:
❒briefly press the SET/
button to
display the first submenu option;
❒press buttons
or(with
single presses) to scroll through all
the submenu options;
❒briefly press the SET/
button to
select the displayed submenu option
and to open the relevant settings
menu;
❒press buttons
or(with
single presses) to select the new
setting for this submenu option;
❒press the SET/
button briefly to
save the new setting and go back to
the previous submenu option.
86
KNOWING THE INSTRUMENT PANEL
Page 96 of 288
Passenger airbag/side
bag (front passenger
side airbag and side
bag for pelvis, chest
and shoulder protection
- Side bag -
activation/deactivation)
This function is used to activate/
deactivate the passenger side air bag.
Proceed as follows:
❒press the SET/
button and, after
the message (Bag pass: Off) (to
deactivate) or (Bag pass: On) (to
activate) is displayed by pressing
buttons "
"or"", press
the SET/
button again;
❒a confirmation request message will
appear on the display;
❒by pressing the
or
buttons select "Yes" (to confirm
activation/deactivation) or "No" (to
cancel);
❒press the SET/
button briefly, a
message confirming the selection
will be displayed and you will return
to the menu screen or, pressing
the button for longer, you will return
to the standard screen without
memorising.Daytime running lights
(DRL)
With this function is possible to turn the
daytime running lights on and off.
Proceed as follows to activate or
deactivate this function:
❒press the SET/
button briefly to
display a submenu;
❒press the SET/
button briefly to
make the display flash "On" or "Off"
according to what was previously set;
❒press
orto make your
choice;
❒press the SET/
button briefly to
return to the submenu screen or
hold the button down to return to the
main menu screen without saving;
❒hold the SET/
button down
again to return to the standard
screen or to the main menu
according to where you are in the
menu.AFS adaptive lights
(Adaptive Frontlight
System)
(for versions/markets, where provided)
This function allows the AFS (Adaptive
Frontlight System) to be activated/
deactivated.
Proceed as follows to activate or
deactivate this function:
❒press the SET/
button briefly to
display a submenu;
❒press the SET/
button briefly to
make the display flash "On" or "Off"
according to what was previously set;
❒press
orto make your choice;
❒press the SET/
button briefly
to return to the submenu screen
or hold the button down to return to
the main menu screen without
saving;
❒hold the SET/
button down
again to return to the standard
screen or to the main menu
according to where you are in the
menu.
92
KNOWING THE INSTRUMENT PANEL
Page 263 of 288
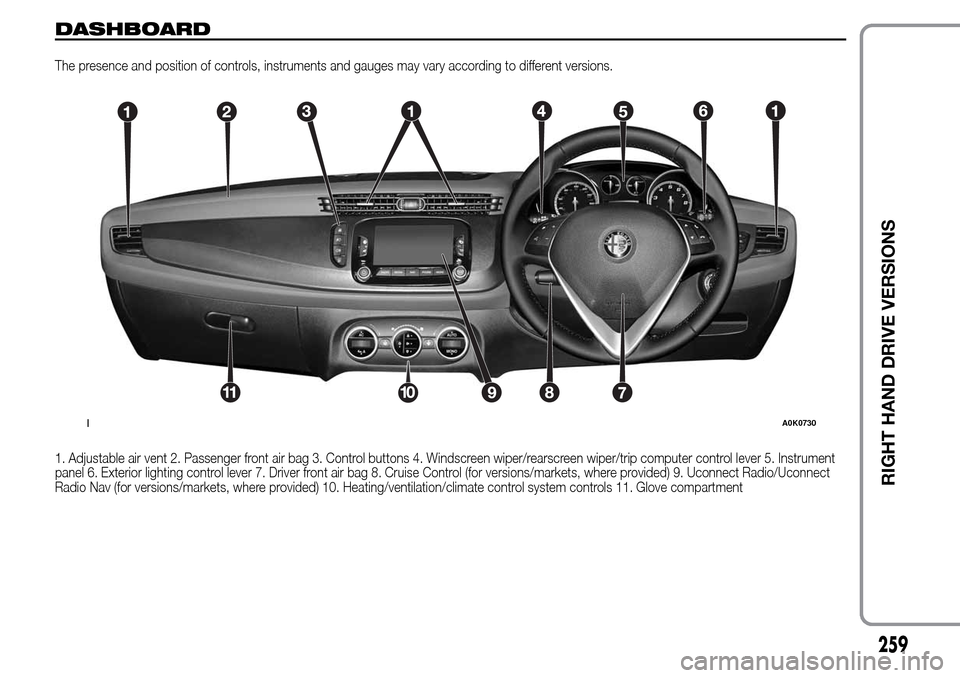
DASHBOARD
The presence and position of controls, instruments and gauges may vary according to different versions.
1. Adjustable air vent 2. Passenger front air bag 3. Control buttons 4. Windscreen wiper/rearscreen wiper/trip computer control lever 5. Instrument
panel 6. Exterior lighting control lever 7. Driver front air bag 8. Cruise Control (for versions/markets, where provided) 9. Uconnect Radio/Uconnect
Radio Nav (for versions/markets, where provided) 10. Heating/ventilation/climate control system controls 11. Glove compartment
1A0K0730
259
RIGHT HAND DRIVE VERSIONS
Page 281 of 288
INDEX
A
BS .............................................. 62
Additional heater ............................ 35
AFS adaptive lights (Adaptive
Frontlight System) ........................ 38
Air cleaner ...................................... 210
Alarm ............................................. 14
“Alfa DNA” system ........................ 66
– Driving modes ........................... 66
– "Natural" Mode.......................... 67
Alfa Romeo Code system ............. 10
ALFA TCT ...................................... 151
Ashtray .......................................... 48
ASR system (Anti-Slip
Regulation) ................................... 63
Automatic dual zone climate
control ......................................... 28
Battery .......................................... 211
– advice for extending lifetime ...... 211
– replacement .............................. 211
Battery (recharging) ........................ 191
Bodywork
– maintenance ............................. 216
– protection against
atmospheric agents................... 216
– warranty .................................... 216
Bonnet ........................................... 59
– Closing ...................................... 59
– Opening .................................... 59Brakes ........................................... 233
– brake fluid level.......................... 209
bulb replacement ........................... 178
Bulb replacement
– exterior lights ............................. 177
– interior lights .............................. 180
Bulbs
– types of bulbs ........................... 175
Carrying children safely ................. 133
CBC (Cornering Brake Control)
system ......................................... 63
Central locking ............................... 45
Changing a bulb............................. 173
– General instructions................... 173
Changing a wheel .......................... 165
Checking levels .............................. 205
Cigar lighter.................................... 48
Cleaning and maintenance
– bodywork .................................. 216
– car interior ................................. 218
– front headlights ......................... 217
– leather parts .............................. 218
– leather seats.............................. 218
– plastic and coated parts ............ 218
– seats and fabric parts ................ 218
Climate control ............................... 22
– Central air diffusers.................... 22
– Rear air diffuser ......................... 22
– Side air diffusers ........................ 22– Upper air diffusers ..................... 22
Climatic comfort ............................. 23
– Diffusers .................................... 23
Clutch ............................................ 232
CO2 emissions............................... 254
CODE Card .................................... 11
Control buttons .............................. 85
Control panel and instruments ....... 94
– Multifunction display .................. 94
– Reconfigurable multifunction
display....................................... 95
Controls ......................................... 44
Courtesy light
– bulb replacement ...................... 181
Cruise Control ................................ 40
Daytime running lights (DRL) ......... 35
Diesel filter ..................................... 210
Dimensions .................................... 240
Dipped beam headlights
– bulb replacement ...................... 177
Direction indicators ................... 37-178
– bulb replacement ...................... 178
– “Lane change” function ............. 37
Display ........................................... 84
Doors ............................................. 51
– Child safety device .................... 52
– Door central
locking/unlocking ...................... 51
DPF (particulate filter) ..................... 81