Alfa Romeo Giulietta 2018 Owner's Manual
Manufacturer: ALFA ROMEO, Model Year: 2018, Model line: Giulietta, Model: Alfa Romeo Giulietta 2018Pages: 216, PDF Size: 3.39 MB
Page 101 of 216
A punctured tyre or a burnt-out bulb?
At times, a problem may interfere with our journey.
The pages on emergencies can help you to deal with critical
situations independently and with calm. In an emergency we
recommend that you call the freephone number found in the
Warranty Booklet. You can also use the universal, national or
international freephone number to find your nearest Authorised
Alfa Romeo Dealership.
IN AN EMERGENCY
HAZARD WARNING LIGHTS.......................100
REPLACING A BULB............................100
REPLACING AN EXTERIOR BULB....................104
REPLACING FUSES............................106
CHANGING A WHEEL ...........................114
FIX&GO KIT.................................117
JUMP STARTING..............................120
FUEL CUT-OFF SYSTEM.........................121
TCT - KEY REMOVAL...........................121
TOWING THE CAR.............................123
Page 102 of 216
HAZARD WARNING LIGHTS
Operation
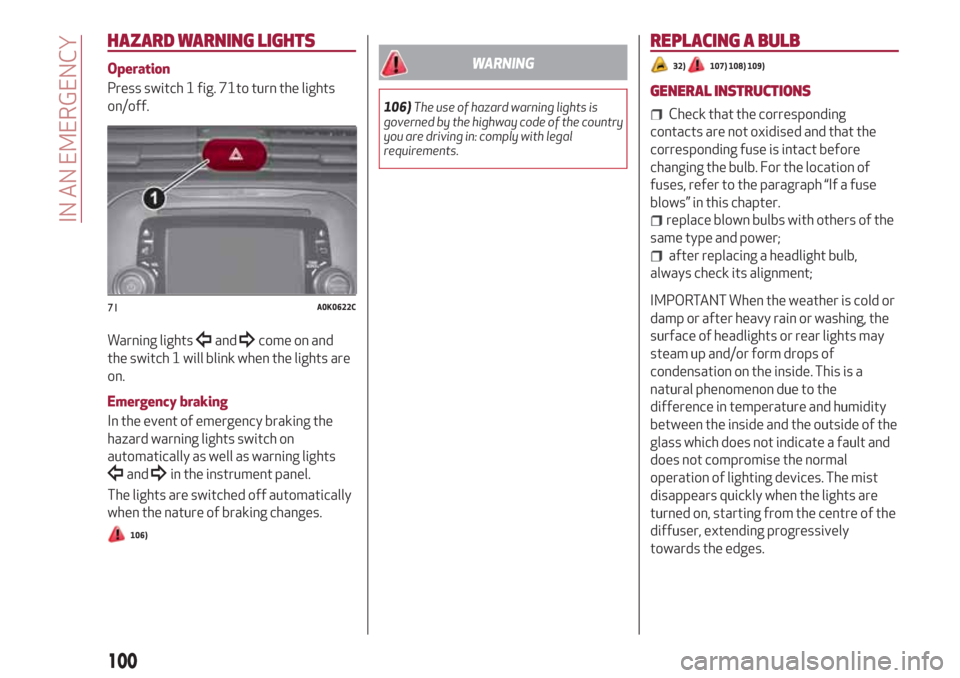
Press switch 1 fig. 71to turn the lights
on/off.
Warning lights
andcome on and
the switch 1 will blink when the lights are
on.
Emergency braking
In the event of emergency braking the
hazard warning lights switch on
automatically as well as warning lights
andin the instrument panel.
The lights are switched off automatically
when the nature of braking changes.
106)
WARNING
106)The use of hazard warning lights is
governed by the highway code of the country
you are driving in: comply with legal
requirements.
REPLACING A BULB
32)107) 108) 109)
GENERAL INSTRUCTIONS
Check that the corresponding
contacts are not oxidised and that the
corresponding fuse is intact before
changing the bulb. For the location of
fuses, refer to the paragraph “If a fuse
blows” in this chapter.
replace blown bulbs with others of the
same type and power;
after replacing a headlight bulb,
always check its alignment;
IMPORTANT When the weather is cold or
damp or after heavy rain or washing, the
surface of headlights or rear lights may
steam up and/or form drops of
condensation on the inside. This is a
natural phenomenon due to the
difference in temperature and humidity
between the inside and the outside of the
glass which does not indicate a fault and
does not compromise the normal
operation of lighting devices. The mist
disappears quickly when the lights are
turned on, starting from the centre of the
diffuser, extending progressively
towards the edges.71A0K0622C
100
IN AN EMERGENCY
Page 103 of 216
TYPES OF BULBS
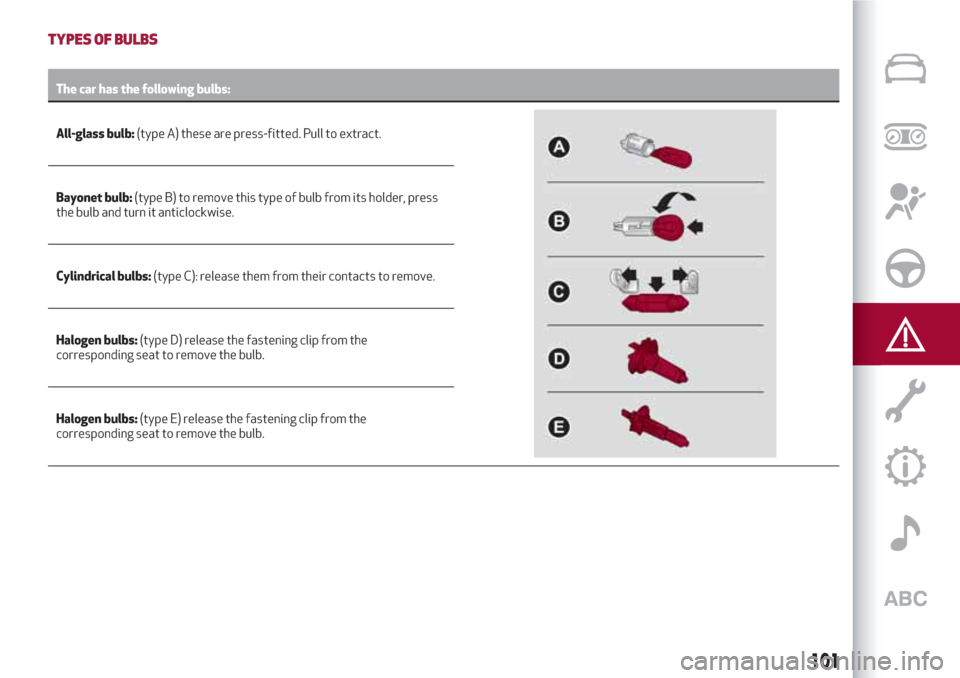
The car has the following bulbs:
All-glass bulb:(type A) these
are press-fitted. Pull to extract.
Bayonet bulb:(type B) to remove this type of bulb from its holder, press
the bulb and turn it anticlockwise.
Cylindrical bulbs:(type C): release them from their contacts to remove.
Halogen bulbs:(type D) release the fastening clip from the
corresponding seat to remove the bulb.
Halogen bulbs:(type E) release the fastening clip from the
corresponding seat to remove the bulb.
101
Page 104 of 216
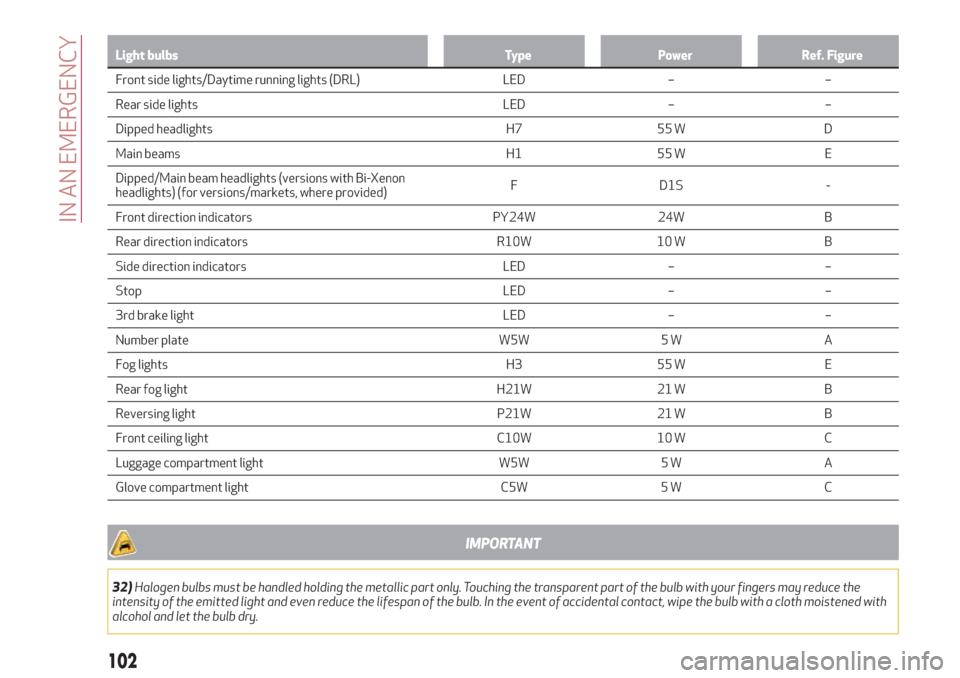
Light bulbs Type Power Ref. Figure
Front side lights/Daytime running lights (DRL) LED – –
Rear side lights LED – –
Dipped
headlights H7 55 W D
Main beams H1 55 W E
Dipped/Main beam headlights (versions with Bi-Xenon
headlights) (for versions/markets, where provided)F D1S -
Front direction indicators PY24W 24W B
Rear direction indicators R10W 10 W B
Side direction indicators LED – –
Stop LED – –
3rd brake light LED – –
Number plate W5W 5 W A
Fog lights H3 55 W E
Rear fog light H21W 21 W B
Reversing light P21W 21 W B
Front ceiling light C10W 10 W C
Luggage compartment light W5W 5 W A
Glove compartment light C5W 5 W C
IMPORTANT
32)Halogen bulbs must be handled holding the metallic part only. Touching the transparent part of the bulb with your fingers may reduce the
intensity of the emitted light and even reduce the lifespan of the bulb. In the event of accidental contact, wipe the bulb with a cloth moistened with
alcohol and let the bulb dry.
102
IN AN EMERGENCY
Page 105 of 216
WARNING
107)Modifications or repairs to the electric system that are not carried out properly or do not take the system technical specifications into
account can cause malfunctions leading to the risk of fire.
108)Halogen bulbs contain pressurised gas, in the case of breakage they may burst causing glass fragments to be projected outwards.
109)Due to the high power supply voltage, gas discharge bulbs (Bi-Xenon) should only be replaced by specialised personnel: danger of death!
Contact an Alfa Romeo Dealership.
103
Page 106 of 216
REPLACING AN EXTERIOR BULB
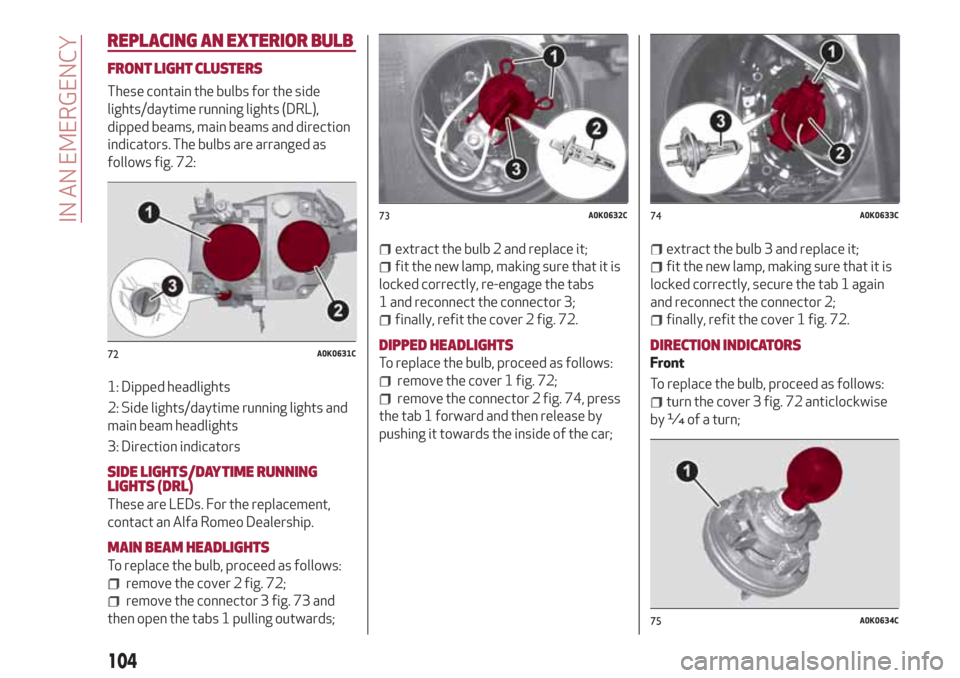
FRONT LIGHT CLUSTERS
These contain the bulbs for the side
lights/daytime running lights (DRL),
dipped beams, main beams and direction
indicators. The bulbs are arranged as
follows fig. 72:
1: Dipped headlights
2: Side lights/daytime running lights and
main beam headlights
3: Direction indicators
SIDE LIGHTS/DAYTIME RUNNING
LIGHTS (DRL)
These are LEDs. For the replacement,
contact an Alfa Romeo Dealership.
MAIN BEAM HEADLIGHTS
To replace the bulb, proceed as follows:
remove the cover 2 fig. 72;
remove the connector 3 fig. 73 and
then open the tabs 1 pulling outwards;
extract the bulb 2 and replace it;
fit the new lamp, making sure that it is
locked correctly, re-engage the tabs
1 and reconnect the connector 3;
finally, refit the cover 2 fig. 72.
DIPPED HEADLIGHTS
To replace the bulb, proceed as follows:
remove the cover 1 fig. 72;
remove the connector 2 fig. 74, press
the tab 1 forward and then release by
pushing it towards the inside of the car;
extract the bulb 3 and replace it;
fit the new lamp, making sure that it is
locked correctly, secure the tab 1 again
and reconnect the connector 2;
finally, refit the cover 1 fig. 72.
DIRECTION INDICATORS
Front
To replace the bulb, proceed as follows:
turn the cover 3 fig. 72 anticlockwise
by ¼ of a turn;
72A0K0631C
73A0K0632C74A0K0633C
75A0K0634C
104
IN AN EMERGENCY
Page 107 of 216
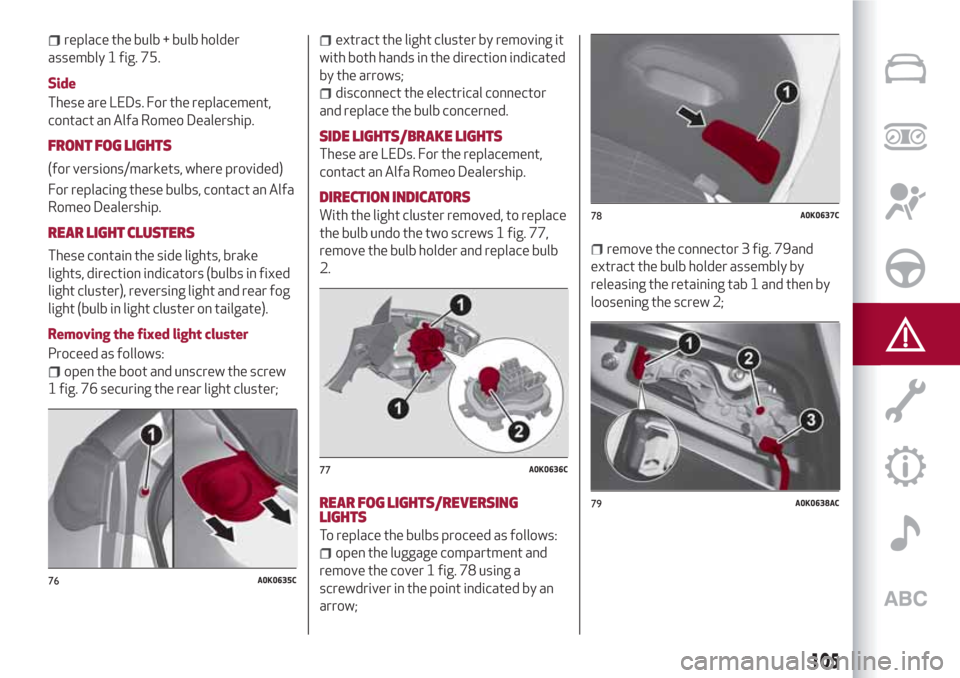
replace the bulb + bulb holder
assembly 1 fig. 75.
Side
These are LEDs. For the replacement,
contact an Alfa Romeo Dealership.
FRONT FOG LIGHTS
(for versions/markets, where provided)
For replacing these bulbs, contact an Alfa
Romeo Dealership.
REAR LIGHT CLUSTERS
These contain the side lights, brake
lights, direction indicators (bulbs in fixed
light cluster), reversing light and rear fog
light (bulb in light cluster on tailgate).
Removing the fixed light cluster
Proceed as follows:
open the boot and unscrew the screw
1 fig. 76 securing the rear light cluster;
extract the light cluster by removing it
with both hands in the direction indicated
by the arrows;
disconnect the electrical connector
and replace the bulb concerned.
SIDE LIGHTS/BRAKE LIGHTS
These are LEDs. For the replacement,
contact an Alfa Romeo Dealership.
DIRECTION INDICATORS
With the light cluster removed, to replace
the bulb undo the two screws 1 fig. 77,
remove the bulb holder and replace bulb
2.
REAR FOG LIGHTS/REVERSING
LIGHTS
To replace the bulbs proceed as follows:
open the luggage compartment and
remove the cover 1 fig. 78 using a
screwdriver in the point indicated by an
arrow;
remove the connector 3 fig. 79and
extract the bulb holder assembly by
releasing the retaining tab 1 and then by
loosening the screw 2;
76A0K0635C
77A0K0636C
78A0K0637C
79A0K0638AC
105
Page 108 of 216
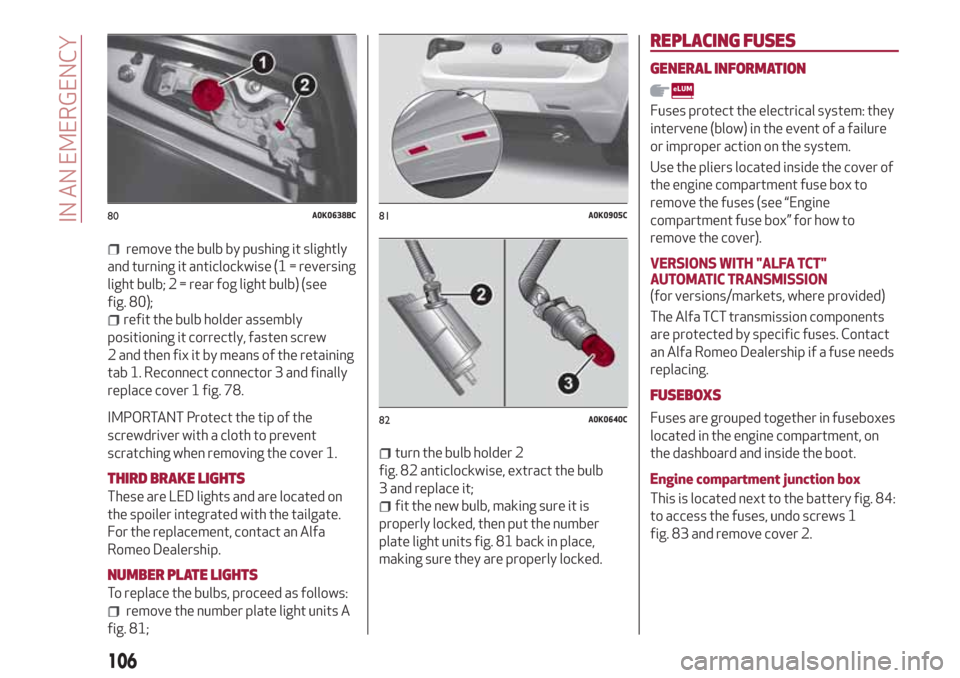
remove the bulb by pushing it slightly
and turning it anticlockwise (1 = reversing
light bulb; 2 = rear fog light bulb) (see
fig. 80);
refit the bulb holder assembly
positioning it correctly, fasten screw
2 and then fix it by means of the retaining
tab 1. Reconnect connector 3 and finally
replace cover 1 fig. 78.
IMPORTANT Protect the tip of the
screwdriver with a cloth to prevent
scratching when removing the cover 1.
THIRD BRAKE LIGHTS
These are LED lights and are located on
the spoiler integrated with the tailgate.
For the replacement, contact an Alfa
Romeo Dealership.
NUMBER PLATE LIGHTS
To replace the bulbs, proceed as follows:
remove the number plate light units A
fig. 81;
turn the bulb holder 2
fig. 82 anticlockwise, extract the bulb
3 and replace it;
fit the new bulb, making sure it is
properly locked, then put the number
plate light units fig. 81 back in place,
making sure they are properly locked.
REPLACING FUSES
GENERAL INFORMATION
Fuses protect the electrical system: they
intervene (blow) in the event of a failure
or improper action on the system.
Use the pliers located inside the cover of
the engine compartment fuse box to
remove the fuses (see “Engine
compartment fuse box” for how to
remove the cover).
VERSIONS WITH "ALFA TCT"
AUTOMATIC TRANSMISSION
(for versions/markets, where provided)
The Alfa TCT transmission components
are protected by specific fuses. Contact
an Alfa Romeo Dealership if a fuse needs
replacing.
FUSEBOXS
Fuses are grouped together in fuseboxes
located in the engine compartment, on
the dashboard and inside the boot.
Engine compartment junction box
This is located next to the battery fig. 84:
to access the fuses, undo screws 1
fig. 83 and remove cover 2.
80A0K0638BC81A0K0905C
82A0K0640C
106
IN AN EMERGENCY
Page 109 of 216
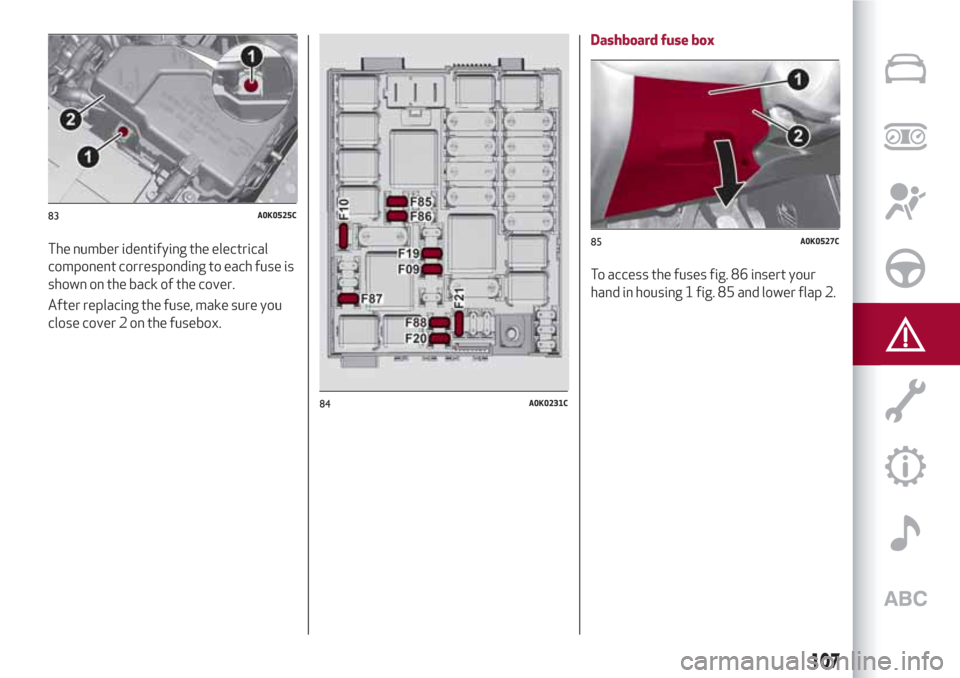
The number identifying the electrical
component corresponding to each fuse is
shown on the back of the cover.
After replacing the fuse, make sure you
close cover 2 on the fusebox.Dashboard fuse box
To access the fuses fig. 86 insert your
hand in housing 1 fig. 85 and lower flap 2.
83A0K0525C
84A0K0231C
85A0K0527C
107
Page 110 of 216
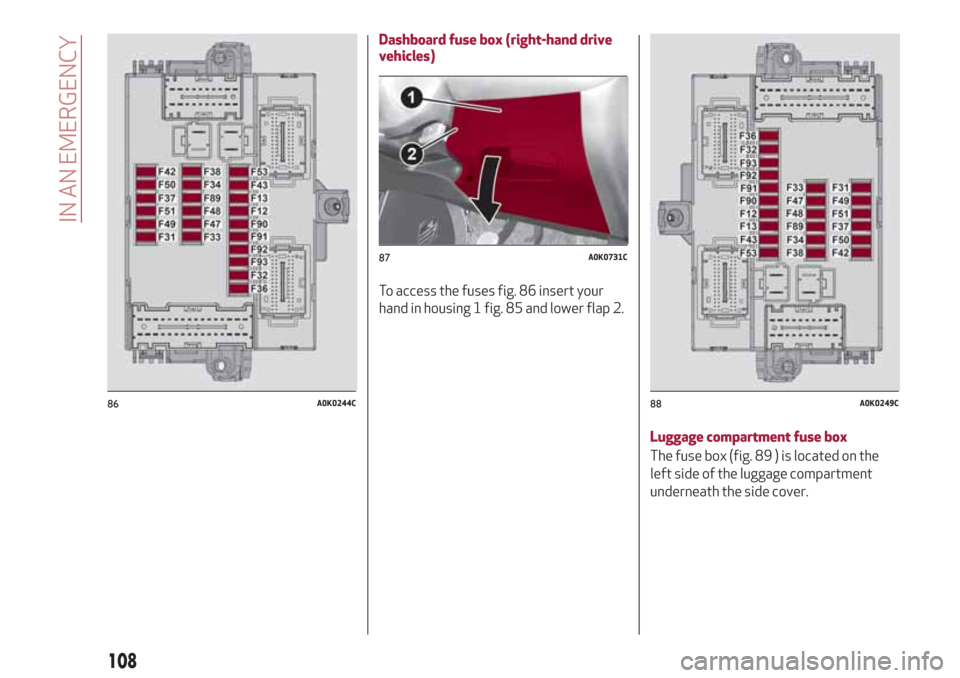
Dashboard fuse box (right-hand drive
vehicles)
To access the fuses fig. 86 insert your
hand in housing 1 fig. 85 and lower flap 2.
Luggage compartment fuse box
The fuse box (fig. 89 ) is located on the
left side of the luggage compartment
underneath the side cover.
86A0K0244C
87A0K0731C
88A0K0249C
108
IN AN EMERGENCY