Alfa Romeo GT 2005 Owner handbook (in English)
Manufacturer: ALFA ROMEO, Model Year: 2005, Model line: GT, Model: Alfa Romeo GT 2005Pages: 307, PDF Size: 6.05 MB
Page 211 of 307

CORRECT USE OF THE CAR
209
Keep your speed
down when snow
chains are fitted.
Do not exceed 50 km/h. Avoid
potholes, steps and pavements to
prevent damaging the tyres, sus-
pension and steering. Remember
that with snow chains fitted the
brake distance will increase.
VEHICLE INACTIVITY
If the vehicle is to be left inactive for
long periods, the following precautions
should be noted:
– House the vehicle under cover in a dry
and possibly ventilated place.
– Engage a gear.
– Check that the handbrake is not
engaged.
– Clean and protect the paintwork by
protective wax.
– Cover the rubber windscreen and
rearscreen wiper blades with talcum pow-
der and raise them off the glass.
– Open the windows slightly.
– Inflate the tyres to a pressure of 0.5
bars above normal. If possible rest the
tyres on wooden planks and periodically
check the pressure.
– Do not turn on the electronic alarm
system.– Disconnect the battery negative termi-
nal (–) from the battery and check the
battery charge. This check should be
repeated once a month during stowage.
Charge the battery if the loadless voltage
is below 12,5V.
– Do not empty the engine cooling sys-
tem.
– Cover the vehicle with a fabric or per-
forated plastic cover. Do not use compact
plastic covers which prevent the humidity
on the surface of the vehicle from evapo-
rating. Snow chains cannot be
fitted to the compact
spare wheel. So, if a front
(drive) wheel is punctured and
chains are needed, a rear wheel
should be fitted to the front of
the vehicle (inflate the tyres to
the specified pressure as soon as
possible) and the spare wheel
should be fitted to the rear. This
way, with two normal drive
wheels, snow chains can be fitted
to them to solve an emergency.
With snow chains fitted
it is advisable to turn off
the ASR system. Press
the ASR-OFF button, led on but-
ton on.
Page 212 of 307

IN AN EMERGENCY
210
3) Fully depress the accelerator pedal
and keep it pressed. The
Uwarning light
will come on for eight seconds and then
go off, now release the accelerator pedal.
4) The
Uwarning light begins to flash:
after it has flashed the same number of
times as the first digit on the CODE card,
press the accelerator pedal and keep it
pressed until the
Uwarning light turns
on (for four seconds) and then goes off;
now release the accelerator pedal.
5) The
Uwarning light starts to flash:
after the number of flashes corresponding
to the second digit on the CODE card,
press the accelerator pedal and keep it
pressed.
6) Repeat this procedure for the remain-
ing digits on the CODE card.
7) After entering the last figure, keep
the accelerator pedal pressed. The
U
warning light turns on (for four seconds)
and then goes off; now release the accel-
erator pedal.8) A quick flash of the
Uwarning light
(for about four seconds) confirms that the
operation has been carried out correctly.
9) Start the engine turning the ignition
key from MARtoAV Vwithout return-
ing the key to the STOPposition.
Conversely, if the
Uwarning light stays
on, turn the key to STOPand repeat the
procedure starting from point 1).
IMPORTANTAfter emergency starting
it is advisable to contact Alfa Romeo
Authorised Services, because the emer-
gency procedure must be repeated each
time the engine is started.
EMERGENCY
STARTING
If it is not possible to deactivate the
engine inhibitor with the Alfa Romeo
CODE system, the
YandUwarning
lights stay on and the engine will not
start. Emergency starting is needed to
start the engine.
IMPORTANTYou are advised to care-
fully read the entire procedure before car-
rying it out.
If a mistake is made during the emer-
gency procedure, the ignition key should
be turned to STOPand the operations
must be repeated from the start (point 1).
1) Read the 5-figure electronic code on
the CODE card.
2) Turn the ignition key to MAR.
I I
N N
A A
N N
E E
M M
E E
R R
G G
E E
N N
C C
Y Y
Page 213 of 307

IN AN EMERGENCY
211
STARTING WITH AN
AUXILIARY BATTERY
If the battery is flat (for battery with
optical hydrometer: dark colour without
green area in the centre), it is possible to
start the engine using an auxiliary battery
with the same capacity or a little higher
than the flat one.
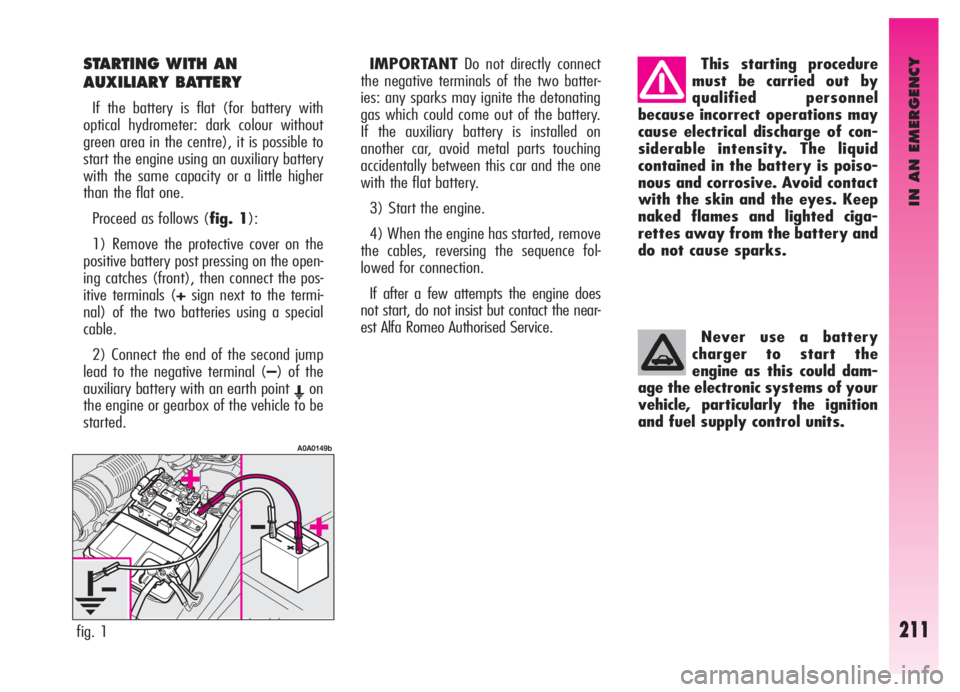
Proceed as follows (fig. 1):
1) Remove the protective cover on the
positive battery post pressing on the open-
ing catches (front), then connect the pos-
itive terminals (+sign next to the termi-
nal) of the two batteries using a special
cable.
2) Connect the end of the second jump
lead to the negative terminal (–) of the
auxiliary battery with an earth point
Eon
the engine or gearbox of the vehicle to be
started.IMPORTANTDo not directly connect
the negative terminals of the two batter-
ies: any sparks may ignite the detonating
gas which could come out of the battery.
If the auxiliary battery is installed on
another car, avoid metal parts touching
accidentally between this car and the one
with the flat battery.
3) Start the engine.
4) When the engine has started, remove
the cables, reversing the sequence fol-
lowed for connection.
If after a few attempts the engine does
not start, do not insist but contact the near-
est Alfa Romeo Authorised Service.
fig. 1
A0A0149b
This starting procedure
must be carried out by
qualified personnel
because incorrect operations may
cause electrical discharge of con-
siderable intensity. The liquid
contained in the battery is poiso-
nous and corrosive. Avoid contact
with the skin and the eyes. Keep
naked flames and lighted ciga-
rettes away from the battery and
do not cause sparks.
Never use a battery
charger to start the
engine as this could dam-
age the electronic systems of your
vehicle, particularly the ignition
and fuel supply control units.
Page 214 of 307

IN AN EMERGENCY
212
STARTING BY INERTIA
If the car is equipped with “Kit for tyre
repair Fix&Go“, see the instructions con-
tained in the following chapter.
GENERAL INSTRUCTIONS
As an alternative to FIX & GO, the com-
pact spare wheel or a wheel with the nor-
mal size can be supplied upon request;
wheel changing and correct use of the
jack and compact spare wheel call for
some precautions as listed below.
IN THE EVENT OF A PUNCTURE
Never push, tow or
coast start the vehicle.
This could cause fuel to
flow into the catalyst damaging
it irreversibly.
Remember that the
engine brake and power
steering are not opera-
tional until the engine is started,
therefore, much greater effort
than usual is needed on the brake
pedal and steering wheel.
Signal the presence of
the stationary vehicle
according to current regu-
lations: hazard warning lights,
reflecting triangle etc..
Any passengers should leave
the car and wait for the wheel to
be changed out of harm of the
traffic.
If parked on a slope or rough
surface, chock the wheels with
wedges or other suitable devices
to prevent the car from rolling.
Never start the engine
with the car jacked.
When driving with a
trailer, disconnect the trailer
before raising the car.
The compact spare wheel is spe-
cific to your car, do not use it on
other models, or use the spare
wheel of other models on your
vehicle.
Should the type of wheels used
be changed (alloy rims instead of
steel), it is also necessary to
change the whole set of fastening
bolts with others of suitable size.
The compact spare wheel is nar-
rower than normal wheels, it
should be used only for the dis-
tance necessary to reach a service
point to have the punctured tyre
repaired and, during its use, the
car speed must not exceed 80
km/h.
Page 215 of 307

IN AN EMERGENCY
213
The spare wheel has a
sticker that summarises
the main cautions for use
and limitations. The sticker
should never be removed or cov-
ered. The sticker contains the fol-
lowing in four languages:
CAUTION! FOR TEMPORARY
USE ONLY! MAX 80 km/h!
REPLACE BY NORMAL WHEEL AS
SOON AS POSSIBLE. DO NOT
COVER THIS LABEL IN USE.
Never fit a wheel cap on a com-
pact spare wheel.
The vehicle will handle differ-
ently with the spare wheel fitted:
avoid heavy braking and acceler-
ating, sharp corners and fast
bends.The life of the spare
wheel is approx. 3000
km, after this distance it
should be replaced with another
of the same type.
Never attempt to fit a conven-
tional tyre on a rim designed for
use as a compact spare wheel.
Have the punctured wheel
repaired and refitted as soon as
possible.
Two or more compact spare
wheels should never be used
together.
Do not grease the threads of
bolts before installing them; they
might slip out.
The jack only serves for chang-
ing wheels on the car with which
it is provided or on cars of the
same model. It must not be used
for other purposes such as for
instance raising cars of other
models. In no case should it be
used for repairs under the vehi-
cle.
Incorrect positioning of the jack
may cause the jacked vehicle to
fall.
Do not use the jack for higher
capacities than stated on its
label.Snow chains cannot be
fitted on the compact
spare wheel, so, if a front
wheel is punctured and chains
need to be used, the front axle
should be fitted with normal
wheels and the compact spare
wheel fitted to the rear. This
way, with two normal wheels at
the front, snow chains can be fit-
ted thereby solving the emer-
gency situation.
Never tamper with the inflation
valve.
Do not insert tools of any kind
between the rim and the tyre.
Check, and if necessary, restore
the pressure of the tyres and of
the compact spare wheel to the
values given in the “Technical
Specifications” chapter.
Page 216 of 307

IN AN EMERGENCY
214
CHANGING A WHEEL
Please be informed that:
– the jack mass is 2,100 kg.
– the jack requires no adjustment.
– the jack cannot be repaired. In the
event of breakage, it must be replaced by
another original one.
– no tools other than its operating crank
can be fitted to the jack.
To change a wheel, proceed as follows:– Stop the car in such a position that it
is not dangerous for the traffic, where it is
possible to change the wheel safely.
Where possible, park on a level, compact
surface.
– Switch off the engine and engage the
handbrake.
– Engage first gear or reverse.– Use handle(A-fig.2) to remove the
stiff covering (B).
– Loosen the clamping device (A-
fig. 3).
– Take out the tool container (B) and
take it near the wheel to be changed.
– Take the spare wheel (C).
– Remove the wheel cap (A-fig. 4)
(only versions with steel rims)
fig. 2
A0A0645b
fig. 3
A0A0151b
fig. 4
A0A0154b
Page 217 of 307

IN AN EMERGENCY
215
– Using the wrench provided (A-
fig. 5), loosen the fastening bolts by
about one turn.
– Set the jack under the car, near the
wheel to be changed taking care not to
damage the plastic streamlined guard.
– Work the jack crank (A-fig. 6), to
extend it until the groove (B) on the
upper part of jack is correctly inserted on
the lower profile of the body (C) approx.
40 cm from the profile of the wheelhouse.
– Work the jack and raise the car until
the wheel is a few centimetres from the
ground.
– Completely unscrew the fastening
bolts and remove the wheel.– Make sure that the contact surfaces of
the spare wheel with the hub are clean
and free of impurities which may later
cause the fastening bolts to slacken.
– Install the spare wheel matching the
hole (A-fig. 7) with the corresponding
pin (B).
– Using the wrench provided, fasten the
five bolts.
– Lower the car and remove the jack.
– Using the wrench provided, fully tighten
the bolts in the sequence shown in fig. 8.REFITTING A NORMAL WHEEL
– Following the procedure described
previously, raise the car and remove the
spare wheel.
For versions with steel rims:
– Fit the normal wheel matching the
hole (A-fig. 7) with the corresponding
pin (B).
– Make sure that the contact surfaces of
the wheel with the hub are clean and free
of impurities which may later cause the
fastening bolts to slacken.
fig. 5
A0A0694b
fig. 6
A0A0695b
Page 218 of 307

IN AN EMERGENCY
216
– Using the wrench provided, tighten
the fastening bolts.
– Lower the car and remove the jack.
– Using the wrench provided, fully tight-
en the bolts in the sequence shown previ-
ously for the compact spare wheel fig. 8.
– Place the cap near the wheel so that
the inflation valve can come through the
slot provided on the cap.
– Press the circumference of the cap,
starting from the parts nearest to the infla-
tion valve until it is inserted completely.
IMPORTANTIncorrect fitting may
cause the wheel cap to come off when the
car is travelling.For versions with alloy rims:
– Tighten the pin (A-fig. 9) in one of
the fastening bolt holes on the wheel hub.
– Insert the wheel on the pin and, using
the wrench provided, tighten the four bolts
available. This is facilitated by the exten-
sion provided (B).
– Remove the pin (A-fig. 9) and tight-
en the last fastening bolt.
– Lower the car and remove the jack.
– Using the wrench provided, tighten
the bolts in the sequence shown previous-
ly for the compact spare wheel fig. 8.After refitting a wheel:
– stow the spare wheel in the space pro-
vided in the boot
– insert the jack in its container forcing
it lightly to prevent it from vibrating when
travelling
– place the tools used in the housings in
the container
– stow the container complete with tools
on the spare wheel and secure everything
with the clamping device (A-fig. 3)
– correctly re-position the stiff cover.
fig. 7
A0A0155b
fig. 8
A0A0156b
fig. 9
A0A0693b
Page 219 of 307

IN AN EMERGENCY
217
QUICK TYRE REPAIR
KIT FIX&GO automatic
The car is provided with the quick tyre re-
pair kit “FIX&GO automatic”, instead of the
traditional tool kit and space-saver spare
wheel.
The kit fig. 10, is placed in the boot. In
this container are also housed the screw-
driver and the tow hitch. The quick tyre repair kit includes:
– a bottle A-fig. 10containing the seal-
er, fitted with:
– filling pipe B
– sticker Cbearing the notice “max. 80
km/h”, to be placed in a position visible
to the driver (on the instrument panel) af-
ter fixing the tyre;
– compressor Dwith pressure gauge and
fittings;– instruction brochure fig. 11, to be used
for prompt and proper use of the quick re-
pair kit and to be then handed to the per-
sonnel charged with handling the tyre treat-
ed with the tyre repair kit;
– a pair of protection gloves located in the
side space of the compressor;
– adapters for inflating different elements.
fig. 10
A0A1095b
fig. 11
A0A1096b
Page 220 of 307

IN AN EMERGENCY
218
Hand the instruction
brochure to the personnel
charged with treating the
tyre repaired with the kit.
In the event of a puncture
caused by foreign bodies,
it is possible to repair tyres
showing damages on the track or
shoulder up to max 4 mm diame-
ter. IT SHOULD BE NOTICED THAT:
The sealing fluid of the quick tyre repair kit
is effective with external temperatures be-
tween –20°C and +50°C. The sealing flu-
id has limited life.
Holes and damages on
the tyre side walls cannot
be repaired. Do not use the
quick tyre repair kit if damaging
is due to running with flat tyre.
Repairs are not possible
in case of damages on the
wheel rim (bad groove dis-
tortion causing air loss). Do not re-
move foreign bodies (screws or
nails) from the tyre.The cylinder contains eth-
ylene glycol. The cylinder
contains latex: it can cause
allergic reactions. It is harmful if in-
gested or inhaled and irritant for
the eyes and in case of contact. In
case of contact rinse immediately
with water and take off contami-
nated clothes. If swallowed, do not
induce vomit, rinse out the mouth,
drink a lot of water and call the
doctor immediately. Keep away
from children. This product must
not be used by asthmatics. Do not
inhale vapours. Call the doctor im-
mediately in case of allergic reac-
tions. Keep the cylinder in the
space provided for the purpose and
far from heat. The sealing fluid has
limited life.