key Alfa Romeo GT 2006 Owner handbook (in English)
[x] Cancel search | Manufacturer: ALFA ROMEO, Model Year: 2006, Model line: GT, Model: Alfa Romeo GT 2006Pages: 307, PDF Size: 6.05 MB
Page 139 of 307

GETTING TO KNOW YOUR CAR
137
PARKING THE CAR
To park the car safely it is absolutely nec-
essary to engage first gear (1) or reverse
(R) and also the handbrake if the road is
on a slope.
Turning off the engine with the car on an
uphill slope and a gear engaged, it is ab-
solutely necessary to wait for the display
showing the gear engaged to go off before
releasing the brake pedal, so that the clutch
is completely closed.
If the gearbox is in neutral (N) and want-
ing to engage a parking gear, the system
should be activated and with the foot on the
brake pedal it is necessary to engage (1)
or (R).
TOWING THE CAR
IMPORTANTFor towing the car follow
local regulations. Make sure that the gear-
box is in neutral (N) (checking that the car
moves if pushed) and tow as for a car with
normal mechanical gearbox following the
instructions given in the chapter “In an emer-
gency”.
Should it be impossible to set to neutral,
do not tow the vehicle; contact Alfa Romeo
Authorised Services.
While towing the car do
not start the engine.
BUZZER WARNINGS
The buzzer is activated when:
– reverse gear is engaged (R);
– the car is parked with the gearbox in
neutral (N); signal that can be noted turn-
ing the ignition key to STOP;
– clutch overheating occurs when moving
off;
– the car moves in the opposite direction
to the gear engaged (e.g.: the car moves
downwards with reverse gear engaged);
– the system has shifted automatically
to neutral (N) when:
no action is made on the accelerator
and/or brake pedal for at least 3 minutes;
or the brake is pressed for over 10 min-
utes;
or the driver’s door is opened and no ac-
tion is made on the accelerator and brake
for at least 1 second;
or a gearbox failure has been detected.
– In the event of gearbox failure.
Page 140 of 307

GETTING TO KNOW YOUR CAR
138
INTERIOR FITTINGS
GLOVEBOX
On the dashboard there is a glovebox with
lid and light.
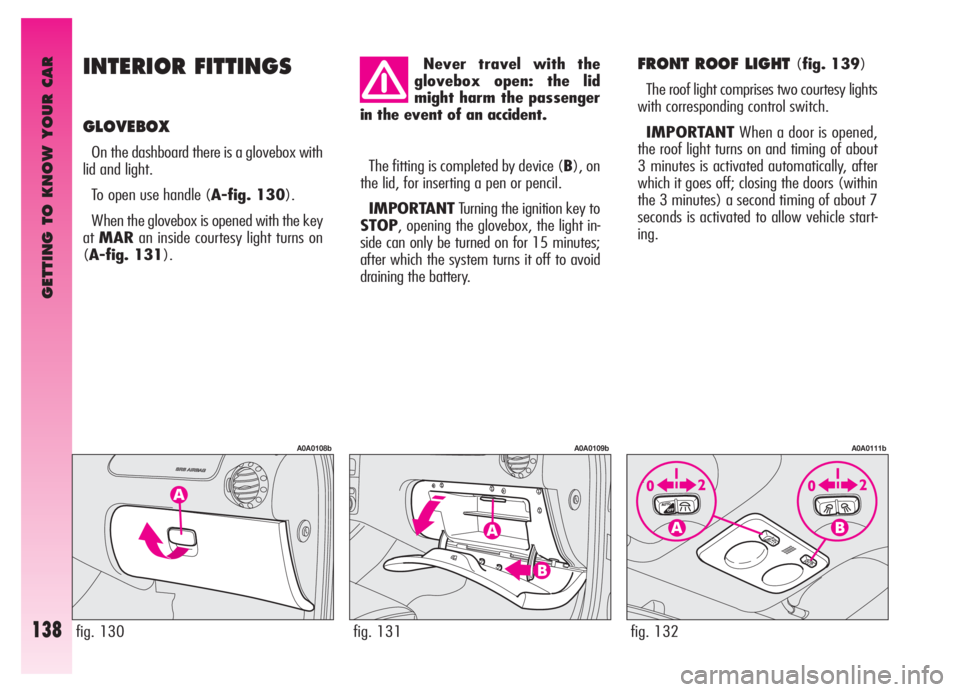
To open use handle (A-fig. 130).
When the glovebox is opened with the key
atMARan inside courtesy light turns on
(A-fig. 131).
FRONT ROOF LIGHT (fig. 139)
The roof light comprises two courtesy lights
with corresponding control switch.
IMPORTANTWhen a door is opened,
the roof light turns on and timing of about
3 minutes is activated automatically, after
which it goes off; closing the doors (within
the 3 minutes) a second timing of about 7
seconds is activated to allow vehicle start-
ing.
fig. 130
A0A0108b
fig. 131
A0A0109b
Never travel with the
glovebox open: the lid
might harm the passenger
in the event of an accident.
The fitting is completed by device (B), on
the lid, for inserting a pen or pencil.
IMPORTANTTurning the ignition key to
STOP, opening the glovebox, the light in-
side can only be turned on for 15 minutes;
after which the system turns it off to avoid
draining the battery.
fig. 132
A0A0111b
Page 141 of 307

GETTING TO KNOW YOUR CAR
139fig. 133
A0A0112b
Unlocking the doors using the remote con-
trol, the roof light turns on gradually and tim-
ing is activated automatically for about 15
seconds. Locking the doors with the remote
control the roof light turns off gradually.
The lights are turned off moving the igni-
tion key to MAR(with the doors closed).
With switch (A) in the central position
(1), both lights are turned on when a door
is opened.
Pressing switch (A) to the left (position
0), the lights stay off (OFFposition).
Pressing switch (A) to the right (position
2) both lights stay on.
Switch (B) turns the lights on individually.
Pressing switch (B) to the left (position
0) the left light is turned on. Pressing the
switch to the right (position 2) the right light
is turned on.
With switch (B) in the central position (po-
sition1) the lights stay off.IMPORTANTTurning the ignition key to
STOP, turning the roof light on is only pos-
sible for 15 minutes; after which the system
turns it off to avoid draining the battery.
IMPORTANTBefore leaving the car,
make sure that both switches are in the cen-
tral position. By so doing, the roof lights will
turn off when the doors are closed. Forget-
ting a door open the lights will turn off au-
tomatically after a few seconds.COURTESY LIGHTS (fig. 133)
On the back of the driver’s or passenger’s
sun visor, opening the cover (A) the roof
lights turn on (B) at the side of the courtesy
mirror, with the ignition key at MAR. These
lights allow use of the courtesy mirror when
the light is poor.
IMPORTANTTurning the ignition key to
STOPthe lights can be activated only for
15 minutes: after which the system turns
them off to avoid draining the battery.
Page 142 of 307

GETTING TO KNOW YOUR CAR
140
REAR ROOF LIGHT (fig. 134)
IMPORTANTWhen a door is opened,
the roof light turns on and timing of about
3 minutes is activated automatically, after
which it goes off; closing the doors (within
the 3 minutes) a second timing of about 7
seconds is activated to allow vehicle start-
ing.
Unlocking the doors using the remote con-
trol, the roof light turns on gradually and tim-
ing is activated automatically for about 15
seconds. Locking the doors with the remote
control the roof light turns off gradually.
The light turns off in any case turning the
ignition key to MAR(with the door
closed).PUDDLE LIGHTS (fig. 135)
(for versions/markets where
applicable)
The light (A) housed in the doors turns on
when the associated door is opened, re-
gardless of the position of the ignition key.
fig. 134
A0A0633b
On the light there is a switch with three
positions.
When switch (A) is in the central posi-
tion (0) the light turns on automatically
when a door is opened.
Moving the switch to the right (position 1)
the light stays off.
Moving the switch to the left (position 2)
the light stays on.
IMPORTANTTurning the ignition key to
STOPthe roof light can be turned on for on-
ly 15 minutes; after which it is turned off to
avoid draining the battery.
IMPORTANTBefore leaving the car,
make sure that the switch (A) is in the cen-
tral position (0), so that the roof light turns
off when the doors are closed.
fig. 135
A0A0243b
Page 143 of 307

GETTING TO KNOW YOUR CAR
141
Do not use the ashtray as
waste paper basket: it
might set on fire in contact
with cigarette stubs.
Always ensure that the
cigar lighter has turned off.
The cigar lighter gets ex-
tremely hot. Handle with
care and prevent its use by
children: danger of fire and/or
burning.DETERRENT LED (fig. 136)
The led (A) on the instrument cluster
comes into operation when the doors are
locked (ignition key at STOPor removed)
and it remains in the “deterrence” condition,
flashing with a red light until the next time
the doors are unlocked.
IMPORTANTIf a door or the tailgate are
not closed perfectly, the deterrent led flash-
es at a higher frequency for 4 seconds and
then flashes at normal frequency again.FRONT ASHTRAY AND CIGAR
LIGHTER
(fig. 137)
To gain access to the ashtray and the cig-
ar lighter open the lid (A).
To use the cigar lighter, with the key at
MAR, press button (B); after a few sec-
onds the button will return automatically
to its initial position and the cigar lighter is
ready for use.
Remove the tray to empty and clean the
ashtray (C).
The position of the cigar lighter in relation
to the ashtray and viceversa, may vary de-
pending on the trim level.
fig. 136
A0A0005b
fig. 137
A0A0634b
Page 147 of 307

GETTING TO KNOW YOUR CAR
145
OPENING FROM INSIDE
(fig. 143)
Tailgate is released electrically and this can
be performed only when the ignition key
is in position MARwith car at a standstill
or in STOPorPARKposition for 3 min-
utes without unlocking/locking one of the
doors.
To unlock the tailgate, press button (A)
on the centre console panel.
Tailgate raising is facilitated by the gas
shock springs.
OPENING WITH REMOTE
CONTROL
(fig. 144)
The tailgate can be opened by remote con-
trol from outside pressing the button (A),
also when the electronic alarm is engaged.
Opening of the tailgate is accompanied by
a double flash of the direction indicators;
closing is accompanied by a single flash.
If an electronic alarm is fitted, with the
opening of the tailgate, the alarm system
switches off volumetric protection and the
tailgate control sensor, the system “beeps”
twice (with the exception of certain mar-
kets).
Closing the tailgate again, the control func-
tions are restored, the system “beeps” twice
(with the exception of certain markets).
fig. 143
A0A0129b
LUGGAGE
COMPARTMENT
The tailgate can be opened:
from the outside of the car- by a
remote control impulse;
from the inside of the door- by de-
pressing the button (A-fig. 143).
IMPORTANTIf the boot is not proper-
ly shut, the
´warning light will come on
(on certain versions accompanied by the
message on the reconfigurable multifunction
display).
The gas springs are cali-
brated to ensure correct
tailgate raising with the
weights foreseen by the manufac-
turer. The arbitrary addition of
items (such spoilers, etc.) may
compromise the correct operation
and safety of the actual tailgate.
fig. 144
A0A0636b
Page 148 of 307

GETTING TO KNOW YOUR CAR
146
EMERGENCY OPENING
OF TAILGATE
To succeed in opening the tailgate from the
inside, should the car battery be flat, or be-
cause of a defect of the electric lock of the
tailgate itself, proceed as follows (see “Ex-
tending the luggage compartment” in the
chapter “Getting to know you car”):
– tilt the rear seat cushions;
– tilt the backrests;
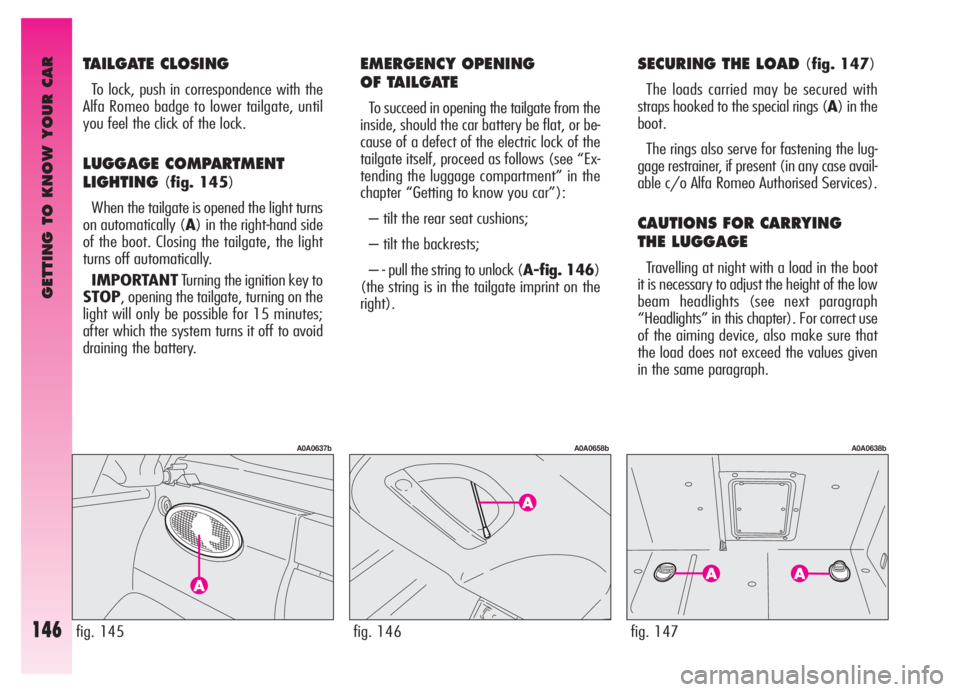
– - pull the string to unlock (A-fig. 146)
(the string is in the tailgate imprint on the
right).
TAILGATE CLOSING
To lock, push in correspondence with the
Alfa Romeo badge to lower tailgate, until
you feel the click of the lock.
LUGGAGE COMPARTMENT
LIGHTING
(fig. 145)
When the tailgate is opened the light turns
on automatically (A) in the right-hand side
of the boot. Closing the tailgate, the light
turns off automatically.
IMPORTANTTurning the ignition key to
STOP, opening the tailgate, turning on the
light will only be possible for 15 minutes;
after which the system turns it off to avoid
draining the battery.
fig. 145
A0A0637b
fig. 146
A0A0658b
SECURING THE LOAD (fig. 147)
The loads carried may be secured with
straps hooked to the special rings (A) in the
boot.
The rings also serve for fastening the lug-
gage restrainer, if present (in any case avail-
able c/o Alfa Romeo Authorised Services).
CAUTIONS FOR CARRYING
THE LUGGAGE
Travelling at night with a load in the boot
it is necessary to adjust the height of the low
beam headlights (see next paragraph
“Headlights” in this chapter). For correct use
of the aiming device, also make sure that
the load does not exceed the values given
in the same paragraph.
fig. 147
A0A0638b
Page 149 of 307

GETTING TO KNOW YOUR CAR
147fig. 149
A0A0707b
Do this only with the car
stationary.
DANGER-SERIOUS IN-
JURY. When carrying out
checks or maintenance op-
erations in the engine compart-
ment, take special care not to bump
the head on the raised bonnet.
If checks are needed in
the engine compartment,
when it is still hot, do not
approach the fan: it might start
working also with the ignition key
removed. Wait for the engine to
cool down.
BONNET
The bonnet opening lever is under the left
end of the dashboard.
To open:
– pull the lever (A-fig. 148) until the
bonnet clicks open.
– press the safety lever (A-fig. 149)
upwards.
– raise the bonnet.
IMPORTANTBonnet raising is aided by
two gas springs. Do not tamper with these
springs and accompany the bonnet while
raising it.
fig. 148
A0A0135b
Do not load the boot
above the permitted max-
imum (see “Technical spec-
ifications”). Also make sure that
the objects contained in the boot
are well secured to prevent them
from being thrown forward, caus-
ing harm to the passengers.
A heavy load that has not
been secured may cause
serious harm to passen-
gers.
If you want to carry re-
serve fuel in a can, follow
legal regulations, only us-
ing a certified can, suitably fastened
to the load securing eyelets. Even
in this way the risk of fire is in-
creased in the case of an accident.
Page 158 of 307

GETTING TO KNOW YOUR CAR
156
IMPORTANTAfter eliminating the in-
convenience, to check the system com-
pletely, Alfa Romeo Authorised Services are
obliged to run a bench test and, if necessary,
road tests which may also call for a long jour-
ney.
INTRODUCTION
The radio is fitted with CD player (radio
with Compact Disc player) or CD MP3 play-
er (radio with Compact Disc MP3 player)
and has been designed in accordance with
the specific features of the passenger com-
partment, with a personalised design that
blends with the style of the dashboard. The
radio dimensions are suitable for the car and
as it is of fixed type it cannot be installed on
any other vehicle.
The instructions for use also include how
to control the CD Changer (if fitted) through
the radio. For the instructions for use of the
CD Changer, refer to the specific manual.
ADVICE
Too high a volume when
driving can put the drivers
life at risk and that of oth-
er people. Therefore the volume
should always be adjusted in such
a way that it is always possible to
hear the noises of the surrounding
environment (e.g. horns, ambu-
lance, police sirens, etc.).
Road safety
You are advised to learn how to use the
various radio functions (e.g. storing stations)
before starting to drive.
Reception conditions
The reception conditions change constant-
ly when travelling. Reception may be dis-
turbed by the presence of mountains, build-
ings or bridges in particular if far away from
the broadcasting transmitter. If, turning the ignition key
to MAR, the warning light
Udoes not turn on or if,
while travelling it turns on glow-
ing steadily or flashing (on some
versions together with the mes-
sage + symbol on the reconfig-
urable multifunction display), con-
tact Alfa Romeo Authorised Ser-
vices as soon as possible.
RADIO WITH COMPACT DISC PLAYER
(Upon request for versions/markets where applicable)
Page 162 of 307

GETTING TO KNOW YOUR CAR
160
Entering the secret code
Entry of the secret code is required to al-
low the radio to work after the first con-
nection to the vehicle electric system or to
a different Body Computer than the original
one.
Connecting the radio to the car supply, the
display will show the wording “CODE” for
about 2 seconds, followed by four dashes
“- - - -”.
The secret code comprises four figures from
1 to 6, each corresponding to one of the
dashes.
To enter the first digit of the code, press
the corresponding key of the preset stations
(from 1 to 6). Enter the other code digits in
the same way.
If the four figures are not entered within
20 seconds, the display shows the word
“CODE” for 2 seconds and then four dash-
es “- - - -”. This is not to be considered
as in incorrect code entry.
After entering the fourth digit (within 20
seconds), the radio starts to work.If a wrong code is entered, the radio
sounds a “beep”, the display shows the
word “CODE” for 2 seconds and then four
dashes “- - - -” to inform it is necessary
to enter the correct code.
Every time the user enters a wrong code,
the waiting time increases gradually (1 min,
2 min, 4 min, 8 min, 16 min, 30 min, 1h,
2h, 4h, 8h, 16h, 24h) until reaching a max-
imum of 24 hours.
The waiting time will be shown on the dis-
play with the word “WAIT”. When this
goes off it is possible to start the new code
entry procedure.
Code Card
This is the document that certifies posses-
sion of the radio. The Code Card contains
the radio model, serial number and secret
code.
IMPORTANTKeep the Code Card care-
fully to be able to give the related data to
the competent authorities in the event of
theft.GLOSSARY
AF (Alternative Frequency)
Function that allows the radio to stay tuned
on the FM station selected also passing
through areas served by transmitters with
different frequencies.
In fact the RDS system keeps the intensi-
ty and quality of the signal received under
control, automatically switching tuning on
the frequency of the transmitter that is send-
ing the strongest signal.
Autostore/Travelstore
Function with which it is possible to auto-
matically store radio stations.
Balance (Channel balancing)
Function with which it is possible to ap-
propriately adjust the sound from the right
or left speakers.
Bass
This function adjusts the bass tones.
CD-Changer
Multiple Compact Disc player.