boot Alfa Romeo GT 2006 Owner handbook (in English)
[x] Cancel search | Manufacturer: ALFA ROMEO, Model Year: 2006, Model line: GT, Model: Alfa Romeo GT 2006Pages: 307, PDF Size: 6.05 MB
Page 9 of 307
GETTING TO KNOW YOUR CAR
7
The key metal insert operates:
– the ignition switch
-– The driver's door lock and, optional for
versions/markets where applicable, the pas-
senger's door lock
– the passenger’s side air-bag deactiva-
tion
IMPORTANTTo guarantee the perfect
efficiency of the electronic devices con-
tained in keys, avoid letting them directly
exposed to sunrays.
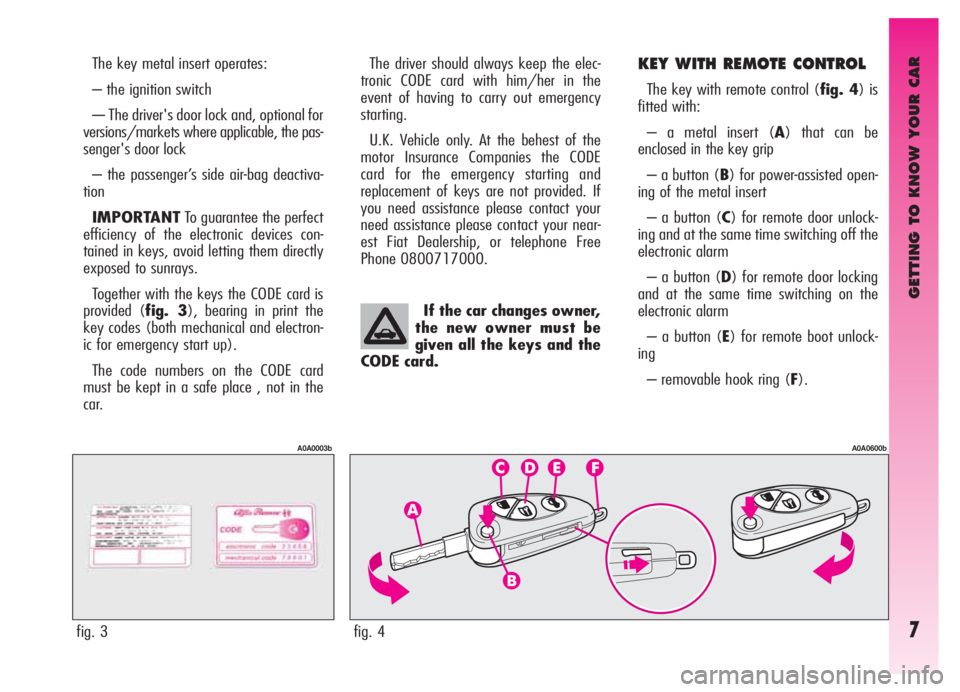
Together with the keys the CODE card is
provided (fig. 3), bearing in print the
key codes (both mechanical and electron-
ic for emergency start up).
The code numbers on the CODE card
must be kept in a safe place , not in the
car.The driver should always keep the elec-
tronic CODE card with him/her in the
event of having to carry out emergency
starting.
U.K. Vehicle only. At the behest of the
motor Insurance Companies the CODE
card for the emergency starting and
replacement of keys are not provided. If
you need assistance please contact your
need assistance please contact your near-
est Fiat Dealership, or telephone Free
Phone 0800717000.KEY WITH REMOTE CONTROL
The key with remote control (fig. 4) is
fitted with:
– a metal insert (A) that can be
enclosed in the key grip
– a button (B) for power-assisted open-
ing of the metal insert
– a button (C) for remote door unlock-
ing and at the same time switching off the
electronic alarm
– a button (D) for remote door locking
and at the same time switching on the
electronic alarm
– a button (E) for remote boot unlock-
ing
– removable hook ring (F).
fig. 3
A0A0003b
If the car changes owner,
the new owner must be
given all the keys and the
CODE card.
fig. 4
A0A0600b
Page 13 of 307
GETTING TO KNOW YOUR CAR
11
ELECTRONIC ALARM
DESCRIPTION
The system comprises: a transmitter,
receiver, control unit with siren and volu-
metric sensors. The electronic alarm is
controlled by the receiver incorporated in
the instrument cluster and it is turned on
and off by the remote control in the key
which sends the crypted and variable
code. The electronic alarm controls: the
unlawful opening of doors, bonnet and
boot (perimetral protection), operation of
the ignition key, battery cable cutting, the
presence of moving bodies in the passen-
ger compartment (volumetric protection),
any abnormal raising/sloping of the car
(for versions/markets where applicable)
and central door locking. It also makes it
possible to cut off the volumetric protec-
tion.
IMPORTANTThe engine inhibitor
function is guaranteed by the Alfa Romeo
CODE system which is activated automati-
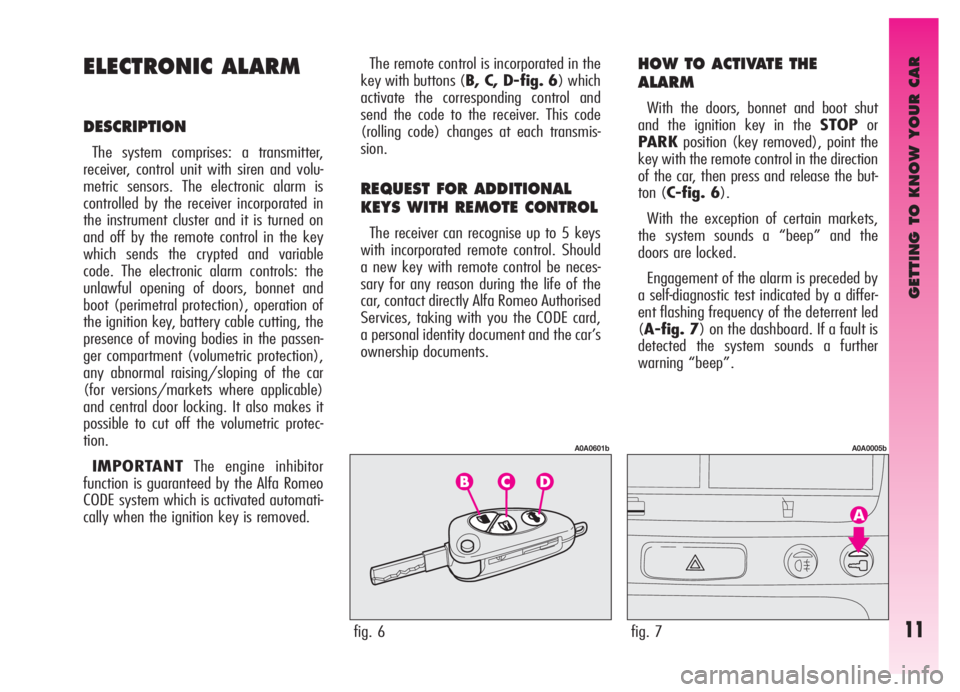
cally when the ignition key is removed.The remote control is incorporated in the
key with buttons (B, C, D-fig. 6) which
activate the corresponding control and
send the code to the receiver. This code
(rolling code) changes at each transmis-
sion.
REQUEST FOR ADDITIONAL
KEYS WITH REMOTE CONTROL
The receiver can recognise up to 5 keys
with incorporated remote control. Should
a new key with remote control be neces-
sary for any reason during the life of the
car, contact directly Alfa Romeo Authorised
Services, taking with you the CODE card,
a personal identity document and the car’s
ownership documents.
HOW TO ACTIVATE THE
ALARM
With the doors, bonnet and boot shut
and the ignition key in the STOPor
PARKposition (key removed), point the
key with the remote control in the direction
of the car, then press and release the but-
ton (C-fig. 6).
With the exception of certain markets,
the system sounds a “beep” and the
doors are locked.
Engagement of the alarm is preceded by
a self-diagnostic test indicated by a differ-
ent flashing frequency of the deterrent led
(A-fig. 7) on the dashboard. If a fault is
detected the system sounds a further
warning “beep”.
fig. 6
A0A0601b
fig. 7
A0A0005b
Page 14 of 307
GETTING TO KNOW YOUR CAR
12
– if the led continues flashing, but at dif-
ferent intervals than normal, this means
that different attempts to break in have
occurred. Through the number of flashes it
is possible to identify the type of attempt:
1 flash:one or more doors
2 flashes:tailgate
3 flashes:bonnet
4 flashes:ultrasounds
5 flashes:abnormal vehicle lift-
ing/sloping (for ver-
sions/markets where
applicable)
6 flashes:tampering with car start-
ing cables
7 flashes:tampering with battery
cables or cutting emer-
gency key cables
8 flashes:connection line to sen-
sors and siren
9 flashes:at least three causes of
alarm. Surveillance
After switching on, the flashing of the
deterrent led (A-fig. 7) on the dash-
board indicates the system surveillance
mode. The led flashes throughout this
period.
IMPORTANTOperation of the elec-
tronic alarm is adapted at the origin to the
rules of the different countries.
Self-diagnostic functions
and door, bonnet, boot control
If, after engaging the alarm, a second
“beep” is sounded, switch off the system
pressing the button (B-fig. 6), check
that the doors, bonnet and tailgate are
properly shut, then switch the system on
again pressing the button (C). Otherwise,
the door, bonnet or tailgate that is not
shut properly will be excluded from the
alarm system control.
If the doors, bonnet and boot are shut
correctly and the control signal is repeat-
ed, the system self-diagnostic has detect-
ed a system operating fault. It is therefore
necessary to contact Alfa Romeo
Authorised Services.HOW TO DEACTIVATE
THE ALARM
To deactivate the alarm press the button
(B-fig. 6) of the key with remote control.
The system will react as follows (with the
exception of certain markets):
– two brief flashes of the direction indi-
cators
– two brief “beeps” of the system
– door unlocking.
IMPORTANTIf when the system is
turned off the deterrent led (A-fig. 7)
on the dashboard stays on (maximum 2
minutes or until the ignition key is set to
MAR) the following should be borne in
mind:
Page 21 of 307
GETTING TO KNOW YOUR CAR
19
REAR SEATSTILTING THE FRONT SEAT
BACK REST
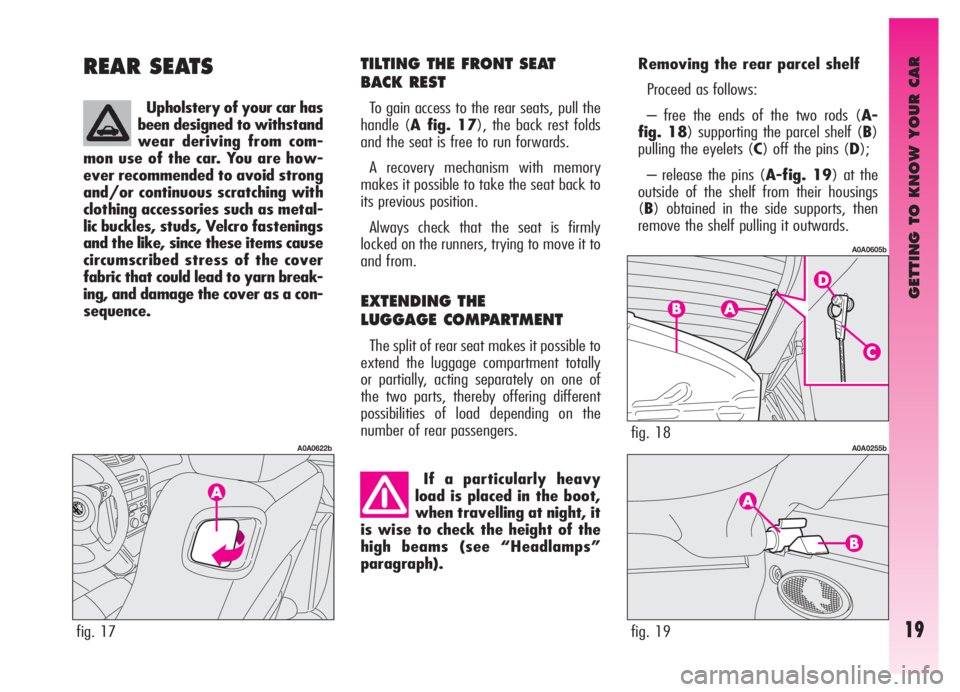
To gain access to the rear seats, pull the
handle (A fig. 17), the back rest folds
and the seat is free to run forwards.
A recovery mechanism with memory
makes it possible to take the seat back to
its previous position.
Always check that the seat is firmly
locked on the runners, trying to move it to
and from.
EXTENDING THE
LUGGAGE COMPARTMENT
The split of rear seat makes it possible to
extend the luggage compartment totally
or partially, acting separately on one of
the two parts, thereby offering different
possibilities of load depending on the
number of rear passengers.
fig. 17
A0A0622b
If a particularly heavy
load is placed in the boot,
when travelling at night, it
is wise to check the height of the
high beams (see “Headlamps”
paragraph).
fig. 18
A0A0605b
Removing the rear parcel shelf
Proceed as follows:
– free the ends of the two rods (A-
fig. 18) supporting the parcel shelf (B)
pulling the eyelets (C) off the pins (D);
– release the pins (A-fig. 19) at the
outside of the shelf from their housings
(B) obtained in the side supports, then
remove the shelf pulling it outwards.
fig. 19
A0A0255b
Upholstery of your car has
been designed to withstand
wear deriving from com-
mon use of the car. You are how-
ever recommended to avoid strong
and/or continuous scratching with
clothing accessories such as metal-
lic buckles, studs, Velcro fastenings
and the like, since these items cause
circumscribed stress of the cover
fabric that could lead to yarn break-
ing, and damage the cover as a con-
sequence.
Page 128 of 307

GETTING TO KNOW YOUR CAR
126
The adjustment of Xenon headlights is au-
tomatic, therefore the versions fitted with
this optional lack the headlight aiming de-
vice (fig. 116a).
HAND BRAKE(fig. 117)
The hand brake lever is located between
the two front seats.
To operate the brake when the vehicle is
stationary, pull lever (A) upwards, until the
required braking action is obtained.
When the ignition key is at MAR, the
warning light on the instrument cluster
x
will come on.
fig. 117
A0A0620b
fig. 116a versions with Xenon headlights
A0A0677b
Adjust the beams every
time the load carried
changes.
For correct adjustment, bear in mind the
following conditions:
– position 0: one or two people occupy-
ing the the front seats
– position 1: five people;
– position 2: five people + load in the
boot;
– position 3: driver + maximum permis-
sible load all stowed in lug-
gage compartment
fig. 116 versions without Xenon headlights
A0A0093b
HEADLIGHT AIMING DEVICE
(fig. 116)
The headlights should be aimed correctly
depending on the vehicle load.
To do this, use the rocker button (A), on
the plate at the side of the steering column:
– press the arrow on the button (
A), to
increase by one position (e.g.:0
➟1➟2➟
3);
– press the arrow on the button (
S), to lower
by one position (e.g.:3
➟2➟1➟0);
The display (B) in the tachometer shows the
positions during adjustment.
Page 147 of 307

GETTING TO KNOW YOUR CAR
145
OPENING FROM INSIDE
(fig. 143)
Tailgate is released electrically and this can
be performed only when the ignition key
is in position MARwith car at a standstill
or in STOPorPARKposition for 3 min-
utes without unlocking/locking one of the
doors.
To unlock the tailgate, press button (A)
on the centre console panel.
Tailgate raising is facilitated by the gas
shock springs.
OPENING WITH REMOTE
CONTROL
(fig. 144)
The tailgate can be opened by remote con-
trol from outside pressing the button (A),
also when the electronic alarm is engaged.
Opening of the tailgate is accompanied by
a double flash of the direction indicators;
closing is accompanied by a single flash.
If an electronic alarm is fitted, with the
opening of the tailgate, the alarm system
switches off volumetric protection and the
tailgate control sensor, the system “beeps”
twice (with the exception of certain mar-
kets).
Closing the tailgate again, the control func-
tions are restored, the system “beeps” twice
(with the exception of certain markets).
fig. 143
A0A0129b
LUGGAGE
COMPARTMENT
The tailgate can be opened:
from the outside of the car- by a
remote control impulse;
from the inside of the door- by de-
pressing the button (A-fig. 143).
IMPORTANTIf the boot is not proper-
ly shut, the
´warning light will come on
(on certain versions accompanied by the
message on the reconfigurable multifunction
display).
The gas springs are cali-
brated to ensure correct
tailgate raising with the
weights foreseen by the manufac-
turer. The arbitrary addition of
items (such spoilers, etc.) may
compromise the correct operation
and safety of the actual tailgate.
fig. 144
A0A0636b
Page 148 of 307
GETTING TO KNOW YOUR CAR
146
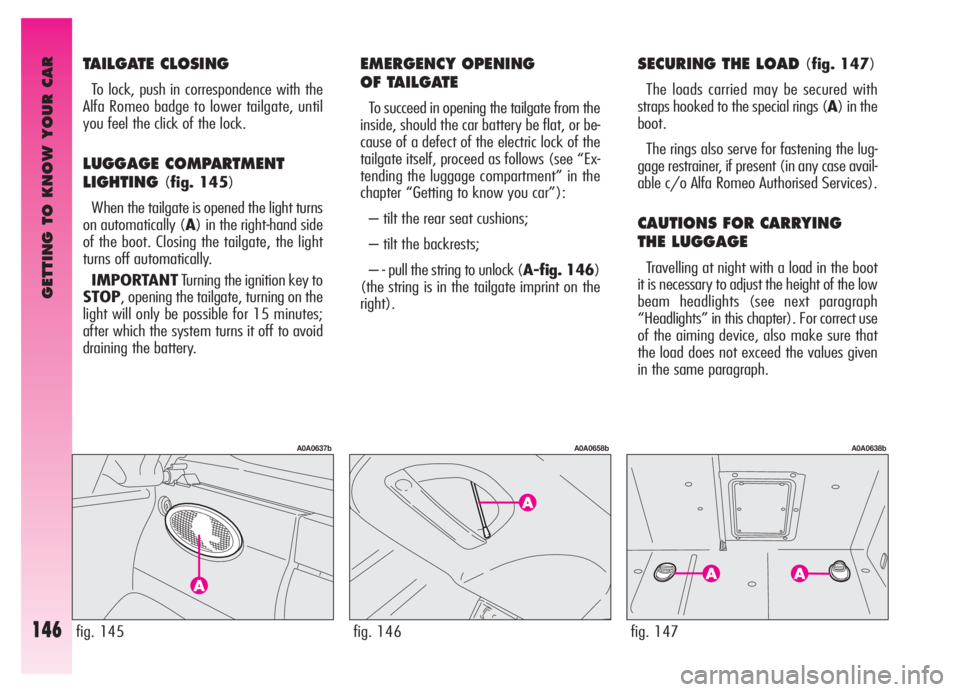
EMERGENCY OPENING
OF TAILGATE
To succeed in opening the tailgate from the
inside, should the car battery be flat, or be-
cause of a defect of the electric lock of the
tailgate itself, proceed as follows (see “Ex-
tending the luggage compartment” in the
chapter “Getting to know you car”):
– tilt the rear seat cushions;
– tilt the backrests;
– - pull the string to unlock (A-fig. 146)
(the string is in the tailgate imprint on the
right).
TAILGATE CLOSING
To lock, push in correspondence with the
Alfa Romeo badge to lower tailgate, until
you feel the click of the lock.
LUGGAGE COMPARTMENT
LIGHTING
(fig. 145)
When the tailgate is opened the light turns
on automatically (A) in the right-hand side
of the boot. Closing the tailgate, the light
turns off automatically.
IMPORTANTTurning the ignition key to
STOP, opening the tailgate, turning on the
light will only be possible for 15 minutes;
after which the system turns it off to avoid
draining the battery.
fig. 145
A0A0637b
fig. 146
A0A0658b
SECURING THE LOAD (fig. 147)
The loads carried may be secured with
straps hooked to the special rings (A) in the
boot.
The rings also serve for fastening the lug-
gage restrainer, if present (in any case avail-
able c/o Alfa Romeo Authorised Services).
CAUTIONS FOR CARRYING
THE LUGGAGE
Travelling at night with a load in the boot
it is necessary to adjust the height of the low
beam headlights (see next paragraph
“Headlights” in this chapter). For correct use
of the aiming device, also make sure that
the load does not exceed the values given
in the same paragraph.
fig. 147
A0A0638b
Page 149 of 307

GETTING TO KNOW YOUR CAR
147fig. 149
A0A0707b
Do this only with the car
stationary.
DANGER-SERIOUS IN-
JURY. When carrying out
checks or maintenance op-
erations in the engine compart-
ment, take special care not to bump
the head on the raised bonnet.
If checks are needed in
the engine compartment,
when it is still hot, do not
approach the fan: it might start
working also with the ignition key
removed. Wait for the engine to
cool down.
BONNET
The bonnet opening lever is under the left
end of the dashboard.
To open:
– pull the lever (A-fig. 148) until the
bonnet clicks open.
– press the safety lever (A-fig. 149)
upwards.
– raise the bonnet.
IMPORTANTBonnet raising is aided by
two gas springs. Do not tamper with these
springs and accompany the bonnet while
raising it.
fig. 148
A0A0135b
Do not load the boot
above the permitted max-
imum (see “Technical spec-
ifications”). Also make sure that
the objects contained in the boot
are well secured to prevent them
from being thrown forward, caus-
ing harm to the passengers.
A heavy load that has not
been secured may cause
serious harm to passen-
gers.
If you want to carry re-
serve fuel in a can, follow
legal regulations, only us-
ing a certified can, suitably fastened
to the load securing eyelets. Even
in this way the risk of fire is in-
creased in the case of an accident.
Page 151 of 307

GETTING TO KNOW YOUR CAR
149
Check beam aiming every
time the load carried
changes.
fig. 152
A0A0199b
For correct adjustment, bear in mind the
following conditions:
– position 0: one or two people occupy-
ing the front seats
– position 1: five people;
– position 2: five people + load in the
boot;
– position 3: driver + maximum permis-
sible load all stowed in lug-
gage compartmentHEADLIGHT ADJUSTMENT
ABROAD
(fig. 152)
The dipped-beam headlights are adjusted
for circulation in the country in which the ve-
hicle is marketed. In countries with opposite
circulation, to avoid glaring oncoming vehi-
cles it is necessary to cover the area of the
headlights as shown below; this is done us-
ing non-transparent sticker tape.
The illustration refers to passing from right-
hand drive to left-hand drive.
fig. 151
A0A00677b
IMPORTANTThe compensation for tilt of
Xenon headlights (if fitted) is carried out au-
tomatically and therefore in the versions fitted
with this type of headlights the aiming de-
vice is not present (fig. 151).
Page 160 of 307

GETTING TO KNOW YOUR CAR
158
IMPORTANTDo not use the protective
sheets for CD in commerce or discs with sta-
bilisers, etc. as they might get stuck in the
internal mechanism and damage the disc.
IMPORTANT In case CDs protected by
copy are used, it is possible to wait for a few
seconds before the system starts playing
them.
New discs may be rough around the edges.
When these discs are used, the player
might not work or the sound might skip.
To remove the roughness from the edge of
the disc use a ball-point etc.
The radio is installed in a user-friendly po-
sition for the driver and the passenger and
the graphics on the front panel make loca-
tion of the controls quick, facilitating use
use.
The CD Changer for 10 discs, if present,
is housed in the left-hand side of the boot.
Below you will find the instructions for use,
which you are advised to read through care-
fully. GENERAL
The set possesses the following functions:
Radio section
– PLL tuning with FM/MW/LW frequen-
cy bands
– RDS (Radio Data System) with TA (traf-
fic information) - PTY (Program Type) - EON
(Enhanced Other Network) - REG (Regional
Programmes) functions
– Alternative frequency search selection in
RDS mode (AF function)
– Emergency alarm reception provision
– Automatic/manual station tuning
– Manual storage of 30 stations: 18 in
the FM band (6 in FM1, 6 in FM2, 6 in
FMT), 6 in the MW band and 6 in the LW
band
– Automatic storage (Autostore function)
of 6 stations in FMT band
– SENS DX/LO function (sensitivity ad-
justing in searching radio stations)
– Scan function (scanning stored stations)
– Automatic Stereo/Mono switching.Compact Disc section
– Disc select (disc n)
– Track select (forward/backward)
– Fast forward/backward
– Repeat function (repetition of last piece)
– Scan function (scanning the tracks on
the Compact Disc)
– Mix function (random playing)
– TPM function (storing CD track playing
sequence)
– CLR function (clearing CD track storage).
For installation and con-
nection of the CD-Changer
apply only to Alfa Romeo
Authorised Services.