boot Alfa Romeo GT 2007 Owner handbook (in English)
[x] Cancel search | Manufacturer: ALFA ROMEO, Model Year: 2007, Model line: GT, Model: Alfa Romeo GT 2007Pages: 271, PDF Size: 5.57 MB
Page 9 of 271
GETTING TO KNOW YOUR CAR
7
The key metal insert operates:
– the ignition switch
– driver’s door lock and, upon request for
versions/markets where applicable, the pas-
senger’s door lock
– the passenger’s side air-bag deactivation
IMPORTANTTo guarantee the perfect
efficiency of the electronic devices contained
in keys, avoid letting them directly exposed
to sunrays.
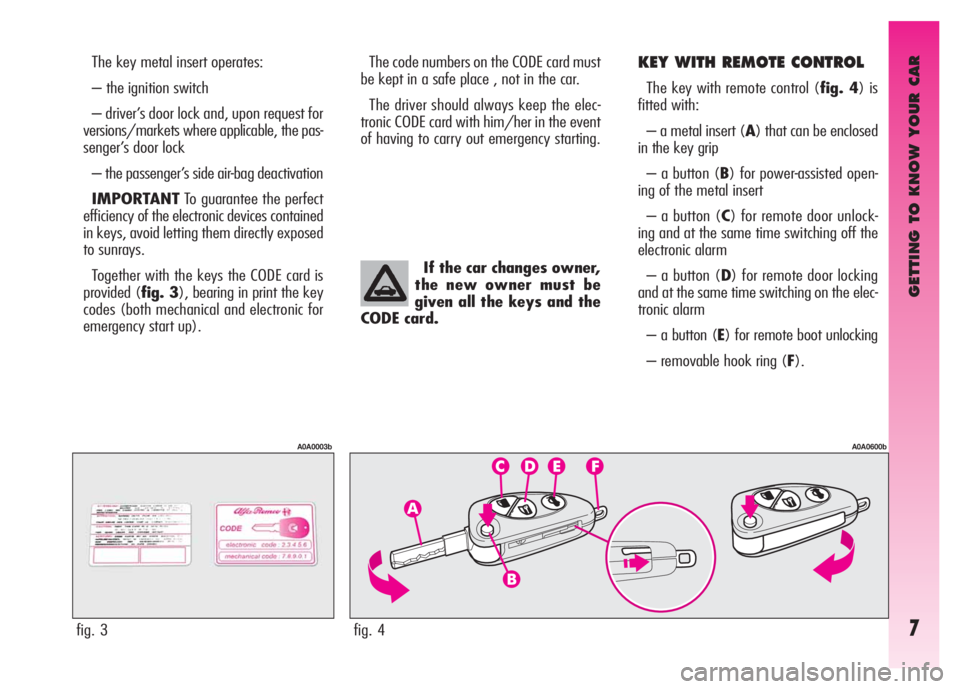
Together with the keys the CODE card is
provided (fig. 3), bearing in print the key
codes (both mechanical and electronic for
emergency start up).The code numbers on the CODE card must
be kept in a safe place , not in the car.
The driver should always keep the elec-
tronic CODE card with him/her in the event
of having to carry out emergency starting.KEY WITH REMOTE CONTROL
The key with remote control (fig. 4) is
fitted with:
– a metal insert (A) that can be enclosed
in the key grip
– a button (B) for power-assisted open-
ing of the metal insert
– a button (C) for remote door unlock-
ing and at the same time switching off the
electronic alarm
– a button (D) for remote door locking
and at the same time switching on the elec-
tronic alarm
– a button (E) for remote boot unlocking
– removable hook ring (F).
fig. 3
A0A0003b
If the car changes owner,
the new owner must be
given all the keys and the
CODE card.
fig. 4
A0A0600b
Page 13 of 271
GETTING TO KNOW YOUR CAR
11
ELECTRONIC ALARM
DESCRIPTION
The system comprises: a transmitter, re-
ceiver, control unit with siren and volumet-
ric sensors. The electronic alarm is controlled
by the receiver incorporated in the instru-
ment cluster and it is turned on and off by
the remote control in the key which sends
the crypted and variable code. The electronic
alarm controls: the unlawful opening of
doors, bonnet and boot (perimetral protec-
tion), operation of the ignition key, battery
cable cutting, the presence of moving bod-
ies in the passenger compartment (volu-
metric protection), any abnormal rais-
ing/sloping of the car (for versions/mar-
kets where applicable) and central door lock-
ing. It also makes it possible to cut off the
volumetric protection.
IMPORTANTThe engine inhibitor func-
tion is guaranteed by the Alfa Romeo CODE
system which is activated automatically
when the ignition key is removed.The remote control is incorporated in the
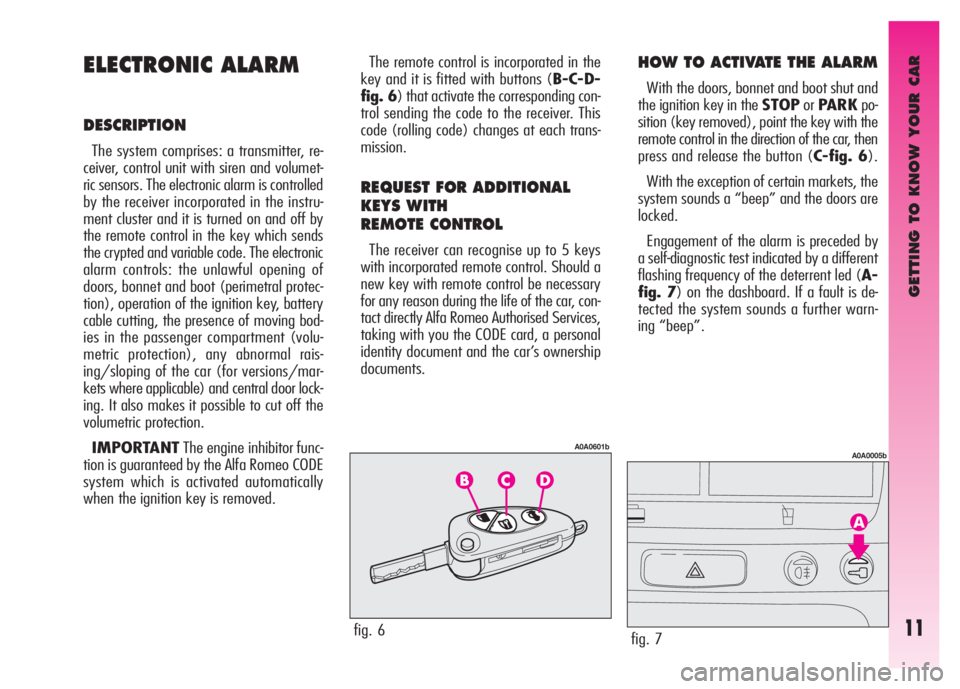
key and it is fitted with buttons (B-C-D-
fig. 6) that activate the corresponding con-
trol sending the code to the receiver. This
code (rolling code) changes at each trans-
mission.
REQUEST FOR ADDITIONAL
KEYS WITH
REMOTE CONTROL
The receiver can recognise up to 5 keys
with incorporated remote control. Should a
new key with remote control be necessary
for any reason during the life of the car, con-
tact directly Alfa Romeo Authorised Services,
taking with you the CODE card, a personal
identity document and the car’s ownership
documents.
HOW TO ACTIVATE THE ALARM
With the doors, bonnet and boot shut and
the ignition key in the STOPorPARKpo-
sition (key removed), point the key with the
remote control in the direction of the car, then
press and release the button (C-fig. 6).
With the exception of certain markets, the
system sounds a “beep” and the doors are
locked.
Engagement of the alarm is preceded by
a self-diagnostic test indicated by a different
flashing frequency of the deterrent led (A-
fig. 7) on the dashboard. If a fault is de-
tected the system sounds a further warn-
ing “beep”.
fig. 6
A0A0601b
fig. 7
A0A0005b
Page 14 of 271
GETTING TO KNOW YOUR CAR
12
– if the led continues flashing, but at dif-
ferent intervals than normal, this means that
different attempts to break in have occurred.
Through the number of flashes it is possi-
ble to identify the type of attempt:
1 flash:one or more doors
2 flashes:tailgate
3 flashes:bonnet
4 flashes:ultrasounds
5 flashes:abnormal car lifting/slop-
ing (for versions/markets
where applicable)
6 flashes:tampering with car starting
cables
7 flashes:tampering with battery ca-
bles or cutting emergency
key cables
8 flashes:connection line to sensors
and siren
9 flashes:at least three causes of
alarm. Surveillance
After switching on, the flashing of the de-
terrent led (A-fig. 7) on the dashboard in-
dicates the system surveillance mode. The
led flashes throughout this period.
IMPORTANTOperation of the electronic
alarm is adapted at the origin to the rules
of the different countries.
Self-diagnostic functions
and door, bonnet, boot control
If, after engaging the alarm, a second
“beep” is sounded, switch off the system
pressing the button (B-fig. 6), check that
the doors, bonnet and tailgate are properly
shut, then switch the system on again press-
ing the button (C). Otherwise, the door,
bonnet or tailgate that is not shut properly
will be excluded from the alarm system con-
trol.
If the doors, bonnet and boot are shut cor-
rectly and the control signal is repeated, the
system self-diagnostic has detected a sys-
tem operating fault. It is therefore necessary
to contact Alfa Romeo Authorised Services.HOW TO DEACTIVATE
THE ALARM
To deactivate the alarm press the button (B-
fig. 6) of the key with remote control. The
system will react as follows (with the ex-
ception of certain markets):
– two brief flashes of the direction indi-
cators
– two brief “beeps” of the system
– door unlocking.
IMPORTANTIf when the system is
turned off the deterrent led (A-fig. 7) on
the dashboard stays on (maximum 2 min-
utes or until the ignition key is set to MAR)
the following should be borne in mind:
Page 21 of 271

GETTING TO KNOW YOUR CAR
19
REAR SEATS
If a particularly heavy
load is placed in the boot,
when travelling at night, it
is wise to check the height of the
high beams (see “Headlamps”
paragraph).
fig. 18
A0A0605b
Removing the rear parcel shelf
Proceed as follows:
– free the ends of the two rods (A-fig. 18)
supporting the parcel shelf (B) pulling the
eyelets (C) off the pins (D);
– release the pins (A-fig. 19) at the out-
side of the shelf from their housings (B) ob-
tained in the side supports, then remove the
shelf pulling it outwards.
fig. 19
A0A0255b
EXTENDING THE
LUGGAGE COMPARTMENT
The split of rear seat makes it possible to
extend the luggage compartment totally or
partially, acting separately on one of the two
parts, thereby offering different possibilities
of load depending on the number of rear
passengers. Fabric upholstery of your
car is purpose-made to
withstand common wear
resulting from normal use of the
car. It is however absolutely nec-
essary to prevent hard and/or pro-
longed scratching/scraping caused
by clothing accessories like metal-
lic buckles, studs, “Velcro” fixings,
etc. that stressing locally the fabric
could break yarns and damage the
upholstery as a consequence.
Page 30 of 271

GETTING TO KNOW YOUR CAR
28
Rear seat belts shall be worn as shown in
fig. 38.Fig. 39shows improper belt fas-
tening. To tilt the back rest see paragraph
“Boot extension”.
IMPORTANTThe centre rear seatbelt is
installed on request only for versions/mar-
kets on which it is required.
IMPORTANTRemember that, in the
event of an accident, any passengers occu-
pying the rear seats who are not wearing
a seat belt not only subject themselves to
great personal risk, but constitute a danger
to the occupants of the front seats.PRE-TENSIONING DEVICES
To increase the efficiency of the front seat
belts, the car is fitted with pre-tensioning de-
vices. These devices “feel” that the car is
being subject to a violent impact by way of
a sensor and rewind the seat belts a few
centimetres. In this way they ensure that
the seat belt adheres to the wearer before
the restraining action begins.
The seat belt locks to indicate that the de-
vice has intervened; the seat belt cannot be
drawn back up even when guiding it man-
ually.
IMPORTANTThe pretensioner will give
maximum protection when the seat belt ad-
heres snugly to wearer’s chest and hips.
fig. 39
A0A0387b
fig. 38
A0A0386b
fig. 37
A0A0686b
REAR BELTS
To fasten the belt: gently pull the belt from
its reel and guide the tape to prevent it from
twisting, then insert the tongue (A-fig. 37)
into the buckle housing (B).
To unfasten the seat belts, press button (E).
Page 110 of 271
GETTING TO KNOW YOUR CAR
108
The wheels should be
locked after a few clicks of
the hand brake. If it does
not occur contact Alfa Romeo Au-
thorised Services to have the hand
brake adjusted.
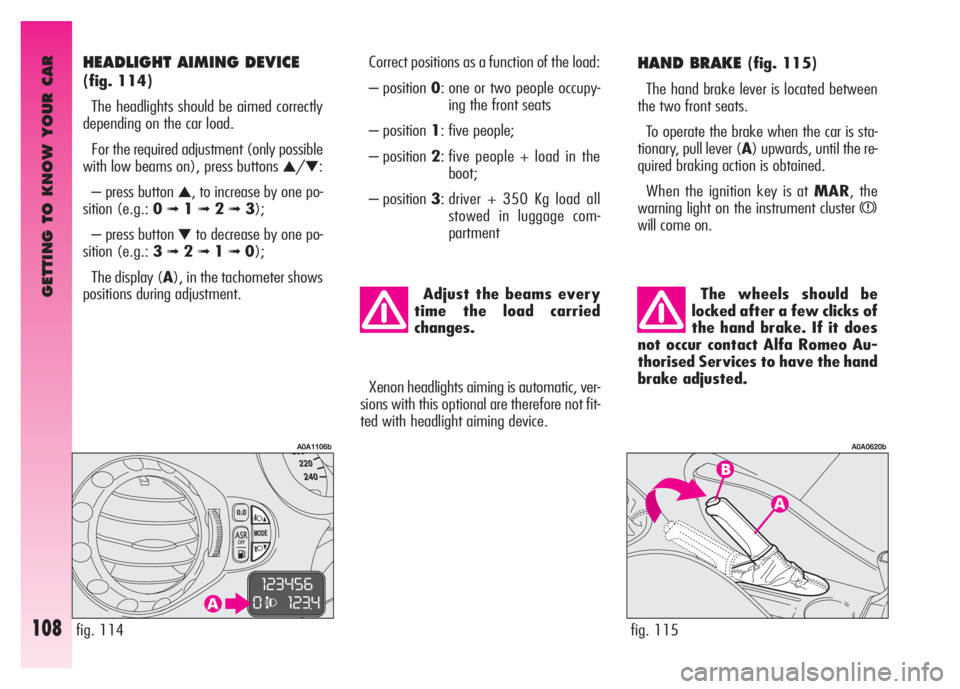
HAND BRAKE (fig. 115)
The hand brake lever is located between
the two front seats.
To operate the brake when the car is sta-
tionary, pull lever (A) upwards, until the re-
quired braking action is obtained.
When the ignition key is at MAR, the
warning light on the instrument cluster
x
will come on.
fig. 115
A0A0620b
Adjust the beams every
time the load carried
changes.
Correct positions as a function of the load:
– position 0: one or two people occupy-
ing the front seats
– position 1: five people;
– position 2: five people + load in the
boot;
– position 3: driver + 350 Kg load all
stowed in luggage com-
partment
fig. 114
A0A1106b
HEADLIGHT AIMING DEVICE
(fig. 114)
The headlights should be aimed correctly
depending on the car load.
For the required adjustment (only possible
with low beams on), press buttons
▲/▼:
– press button
▲, to increase by one po-
sition (e.g.: 0
➟1➟ 2➟3);
– press button
▼to decrease by one po-
sition (e.g.: 3
➟2➟1➟0);
The display (A), in the tachometer shows
positions during adjustment.
Xenon headlights aiming is automatic, ver-
sions with this optional are therefore not fit-
ted with headlight aiming device.
Page 130 of 271
GETTING TO KNOW YOUR CAR
128
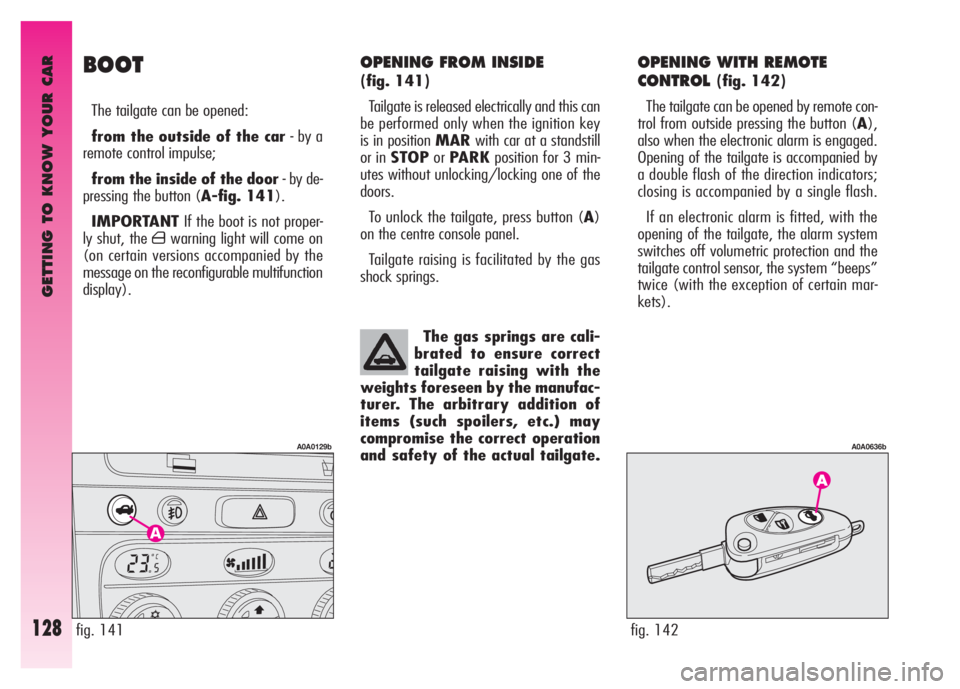
OPENING FROM INSIDE
(fig. 141)
Tailgate is released electrically and this can
be performed only when the ignition key
is in position MARwith car at a standstill
or in STOPorPARKposition for 3 min-
utes without unlocking/locking one of the
doors.
To unlock the tailgate, press button (A)
on the centre console panel.
Tailgate raising is facilitated by the gas
shock springs.
OPENING WITH REMOTE
CONTROL
(fig. 142)
The tailgate can be opened by remote con-
trol from outside pressing the button (A),
also when the electronic alarm is engaged.
Opening of the tailgate is accompanied by
a double flash of the direction indicators;
closing is accompanied by a single flash.
If an electronic alarm is fitted, with the
opening of the tailgate, the alarm system
switches off volumetric protection and the
tailgate control sensor, the system “beeps”
twice (with the exception of certain mar-
kets).
fig. 141
A0A0129b
BOOT
The tailgate can be opened:
from the outside of the car- by a
remote control impulse;
from the inside of the door- by de-
pressing the button (A-fig. 141).
IMPORTANTIf the boot is not proper-
ly shut, the
´warning light will come on
(on certain versions accompanied by the
message on the reconfigurable multifunction
display).
The gas springs are cali-
brated to ensure correct
tailgate raising with the
weights foreseen by the manufac-
turer. The arbitrary addition of
items (such spoilers, etc.) may
compromise the correct operation
and safety of the actual tailgate.
fig. 142
A0A0636b
Page 131 of 271
GETTING TO KNOW YOUR CAR
129fig. 143
A0A0637b
fig. 144
A0A0658b
Closing the tailgate again, the control func-
tions are restored, the system “beeps” twice
(with the exception of certain markets).
TAILGATE CLOSING
To lock, push in correspondence with the
Alfa Romeo badge to lower tailgate, until
you feel the click of the lock.
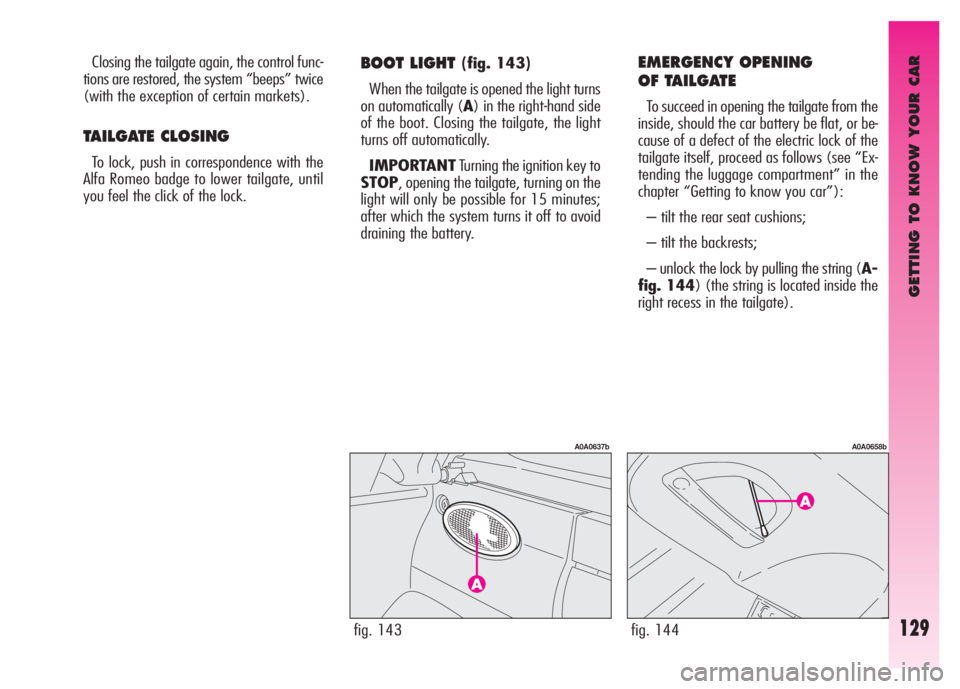
BOOT LIGHT (fig. 143)
When the tailgate is opened the light turns
on automatically (A) in the right-hand side
of the boot. Closing the tailgate, the light
turns off automatically.
IMPORTANTTurning the ignition key to
STOP, opening the tailgate, turning on the
light will only be possible for 15 minutes;
after which the system turns it off to avoid
draining the battery. EMERGENCY OPENING
OF TAILGATE
To succeed in opening the tailgate from the
inside, should the car battery be flat, or be-
cause of a defect of the electric lock of the
tailgate itself, proceed as follows (see “Ex-
tending the luggage compartment” in the
chapter “Getting to know you car”):
– tilt the rear seat cushions;
– tilt the backrests;
– unlock the lock by pulling the string (A-
fig. 144) (the string is located inside the
right recess in the tailgate).
Page 132 of 271
GETTING TO KNOW YOUR CAR
130
Do not load the boot
above the permitted max-
imum (see “Technical spec-
ifications”). Also make sure that
the objects contained in the boot
are well secured to prevent them
from being thrown forward, caus-
ing harm to the passengers.
A heavy load that has not
been secured may cause
serious harm to passen-
gers.
If you want to carry re-
serve fuel in a can, follow
legal regulations, only us-
ing a certified can, suitably fas-
tened to the load securing eyelets.
Even in this way the risk of fire is
increased in the case of an accident.
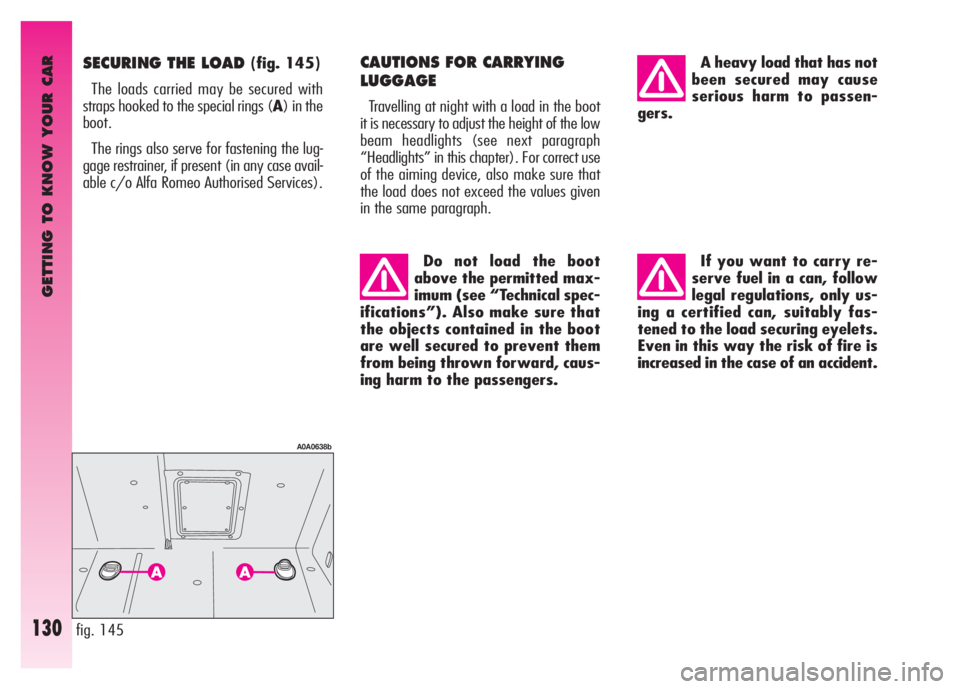
SECURING THE LOAD (fig. 145)
The loads carried may be secured with
straps hooked to the special rings (A) in the
boot.
The rings also serve for fastening the lug-
gage restrainer, if present (in any case avail-
able c/o Alfa Romeo Authorised Services). CAUTIONS FOR CARRYING
LUGGAGE
Travelling at night with a load in the boot
it is necessary to adjust the height of the low
beam headlights (see next paragraph
“Headlights” in this chapter). For correct use
of the aiming device, also make sure that
the load does not exceed the values given
in the same paragraph.
fig. 145
A0A0638b
Page 135 of 271
GETTING TO KNOW YOUR CAR
133
Check beam aiming every
time the load carried
changes. Correct positions as a function of the load:
– position 0: one or two people occupy-
ing the front seats
– position 1: five people;
– position 2: five people + load in the
boot;
– position 3: driver + 350 Kg load all
stowed in luggage com-
partment
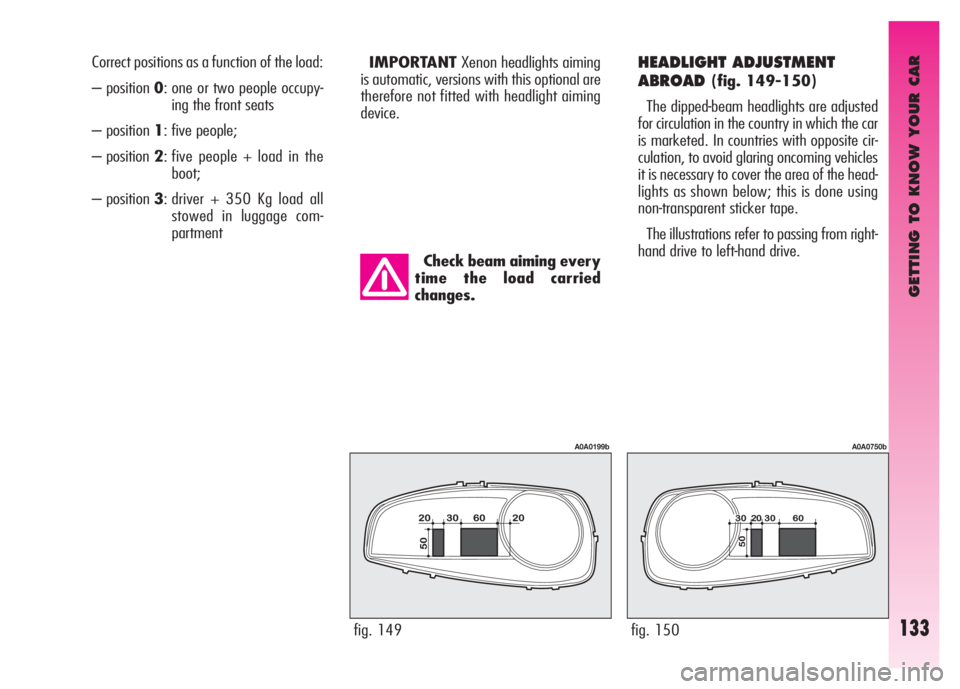
HEADLIGHT ADJUSTMENT
ABROAD
(fig. 149-150)
The dipped-beam headlights are adjusted
for circulation in the country in which the car
is marketed. In countries with opposite cir-
culation, to avoid glaring oncoming vehicles
it is necessary to cover the area of the head-
lights as shown below; this is done using
non-transparent sticker tape.
The illustrations refer to passing from right-
hand drive to left-hand drive.
IMPORTANTXenon headlights aiming
is automatic, versions with this optional are
therefore not fitted with headlight aiming
device.
fig. 149
A0A0199b
fig. 150
A0A0750b