headlight Alfa Romeo GT 2007 Owner handbook (in English)
[x] Cancel search | Manufacturer: ALFA ROMEO, Model Year: 2007, Model line: GT, Model: Alfa Romeo GT 2007Pages: 271, PDF Size: 5.57 MB
Page 47 of 271
GETTING TO KNOW YOUR CAR
45
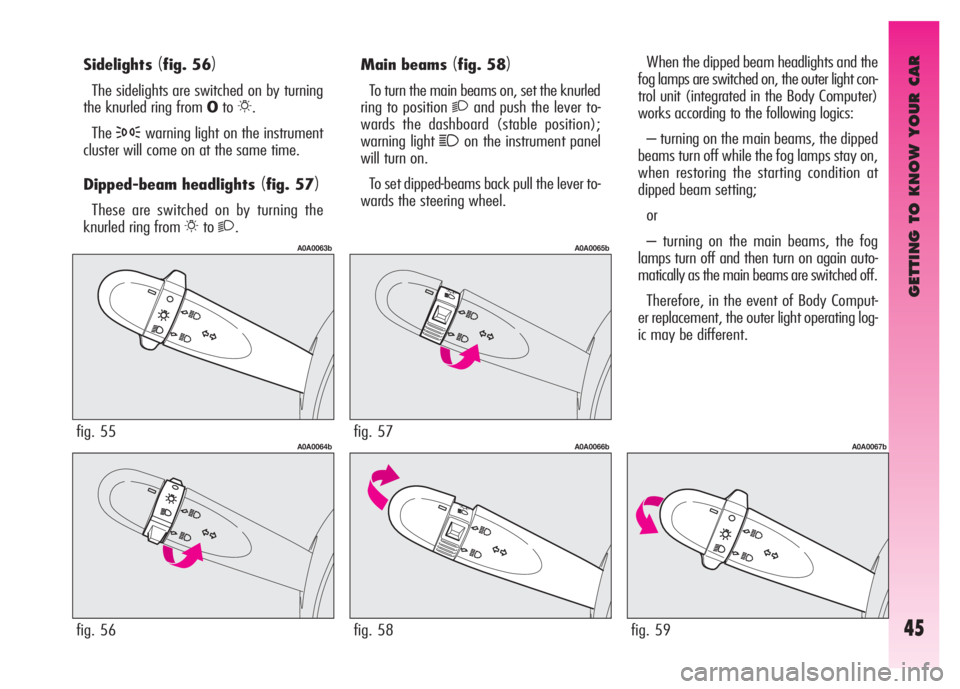
Sidelights(fig. 56)
The sidelights are switched on by turning
the knurled ring from Oto
6.
The
3warning light on the instrument
cluster will come on at the same time.
Dipped-beam headlights
(fig. 57)
These are switched on by turning the
knurled ring from
6to2.
fig. 55
A0A0063b
fig. 56
A0A0064b
Main beams (fig. 58)
To turn the main beams on, set the knurled
ring to position
2and push the lever to-
wards the dashboard (stable position);
warning light
1on the instrument panel
will turn on.
To set dipped-beams back pull the lever to-
wards the steering wheel.
fig. 57
A0A0065b
fig. 58
A0A0066b
When the dipped beam headlights and the
fog lamps are switched on, the outer light con-
trol unit (integrated in the Body Computer)
works according to the following logics:
– turning on the main beams, the dipped
beams turn off while the fog lamps stay on,
when restoring the starting condition at
dipped beam setting;
or
– turning on the main beams, the fog
lamps turn off and then turn on again auto-
matically as the main beams are switched off.
Therefore, in the event of Body Comput-
er replacement, the outer light operating log-
ic may be different.
fig. 59
A0A0067b
Page 48 of 271
GETTING TO KNOW YOUR CAR
46
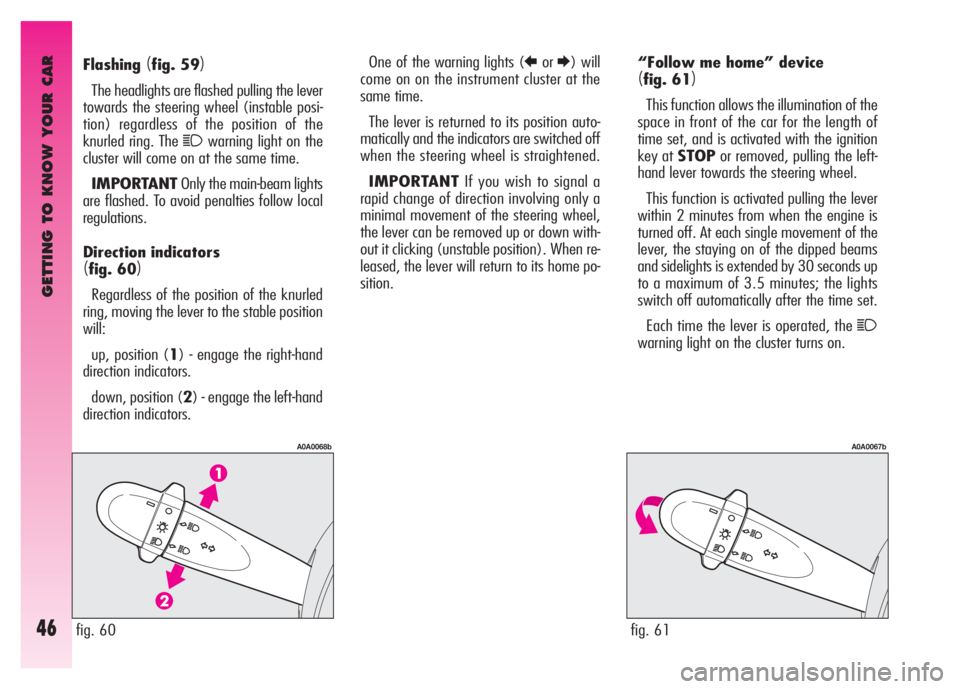
“Follow me home” device
(fig. 61)
This function allows the illumination of the
space in front of the car for the length of
time set, and is activated with the ignition
key at STOPor removed, pulling the left-
hand lever towards the steering wheel.
This function is activated pulling the lever
within 2 minutes from when the engine is
turned off. At each single movement of the
lever, the staying on of the dipped beams
and sidelights is extended by 30 seconds up
to a maximum of 3.5 minutes; the lights
switch off automatically after the time set.
Each time the lever is operated, the
1
warning light on the cluster turns on. Flashing
(fig. 59)
The headlights are flashed pulling the lever
towards the steering wheel (instable posi-
tion) regardless of the position of the
knurled ring. The
1warning light on the
cluster will come on at the same time.
IMPORTANTOnly the main-beam lights
are flashed. To avoid penalties follow local
regulations.
Direction indicators
(fig. 60)
Regardless of the position of the knurled
ring, moving the lever to the stable position
will:
up, position (1) - engage the right-hand
direction indicators.
down, position (2) - engage the left-hand
direction indicators.One of the warning lights (
RorE) will
come on on the instrument cluster at the
same time.
The lever is returned to its position auto-
matically and the indicators are switched off
when the steering wheel is straightened.
IMPORTANTIf you wish to signal a
rapid change of direction involving only a
minimal movement of the steering wheel,
the lever can be removed up or down with-
out it clicking (unstable position). When re-
leased, the lever will return to its home po-
sition.
fig. 61
A0A0067b
fig. 60
A0A0068b
Page 51 of 271
GETTING TO KNOW YOUR CAR
49
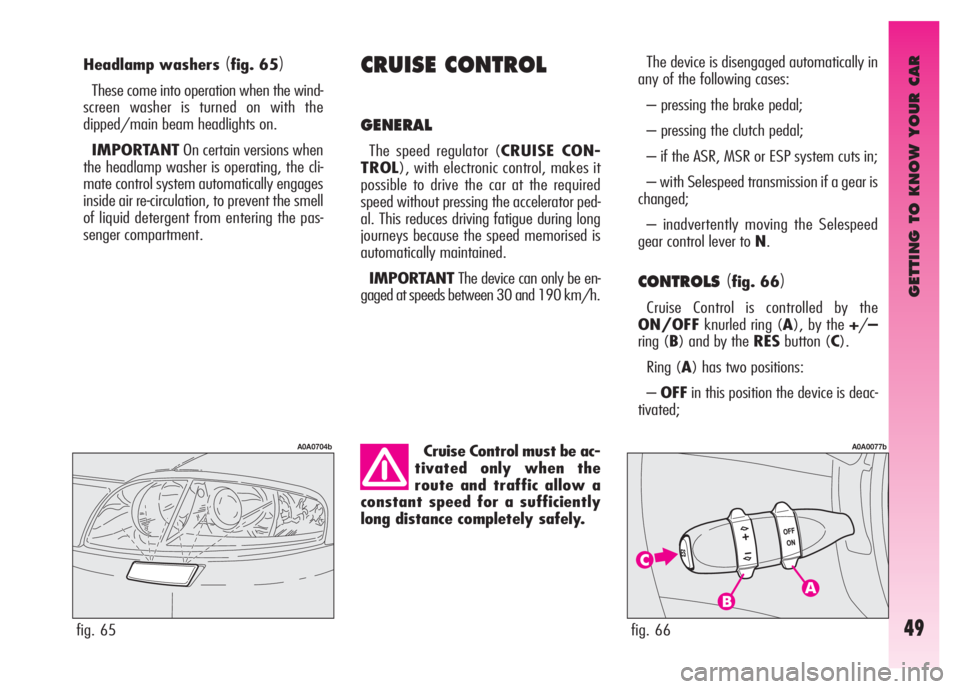
Headlamp washers (fig. 65)
These come into operation when the wind-
screen washer is turned on with the
dipped/main beam headlights on.
IMPORTANTOn certain versions when
the headlamp washer is operating, the cli-
mate control system automatically engages
inside air re-circulation, to prevent the smell
of liquid detergent from entering the pas-
senger compartment.
CRUISE CONTROL
GENERAL
The speed regulator (CRUISE CON-
TROL), with electronic control, makes it
possible to drive the car at the required
speed without pressing the accelerator ped-
al. This reduces driving fatigue during long
journeys because the speed memorised is
automatically maintained.
IMPORTANTThe device can only be en-
gaged at speeds between 30 and 190 km/h.
fig. 65
A0A0704bCruise Control must be ac-
tivated only when the
route and traffic allow a
constant speed for a sufficiently
long distance completely safely.
The device is disengaged automatically in
any of the following cases:
– pressing the brake pedal;
– pressing the clutch pedal;
– if the ASR, MSR or ESP system cuts in;
– with Selespeed transmission if a gear is
changed;
– inadvertently moving the Selespeed
gear control lever to N.
CONTROLS(fig. 66)
Cruise Control is controlled by the
ON/OFFknurled ring (A), by the +/–
ring (B) and by the RESbutton (C).
Ring (A) has two positions:
–OFFin this position the device is deac-
tivated;
fig. 66
A0A0077b
Page 58 of 271
GETTING TO KNOW YOUR CAR
56
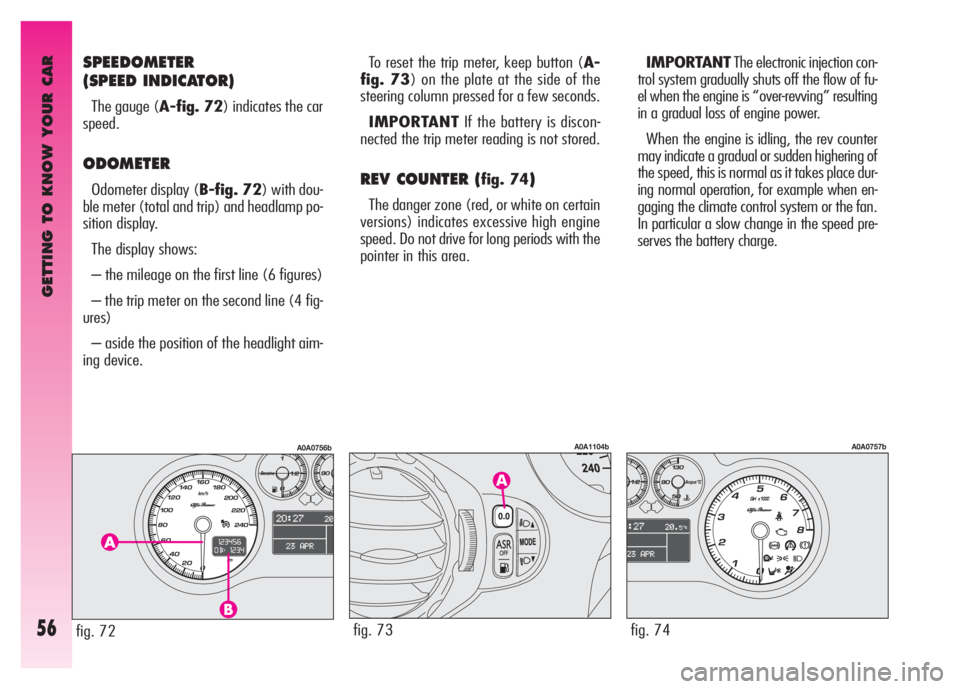
SPEEDOMETER
(SPEED INDICATOR)
The gauge (A-fig. 72) indicates the car
speed.
ODOMETER
Odometer display (B-fig. 72) with dou-
ble meter (total and trip) and headlamp po-
sition display.
The display shows:
– the mileage on the first line (6 figures)
– the trip meter on the second line (4 fig-
ures)
– aside the position of the headlight aim-
ing device.To reset the trip meter, keep button (A-
fig. 73) on the plate at the side of the
steering column pressed for a few seconds.
IMPORTANTIf the battery is discon-
nected the trip meter reading is not stored.REV COUNTER (fig. 74)
The danger zone (red, or white on certain
versions) indicates excessive high engine
speed. Do not drive for long periods with the
pointer in this area.IMPORTANTThe electronic injection con-
trol system gradually shuts off the flow of fu-
el when the engine is “over-revving” resulting
in a gradual loss of engine power.
When the engine is idling, the rev counter
may indicate a gradual or sudden highering of
the speed, this is normal as it takes place dur-
ing normal operation, for example when en-
gaging the climate control system or the fan.
In particular a slow change in the speed pre-
serves the battery charge.
fig. 73
A0A1104b
fig. 74
A0A0757b
fig. 72
A0A0756b
Page 66 of 271

GETTING TO KNOW YOUR CAR
64
SPEED
With this function it is possible to set the
car speed limit (km/h or mph), when this
limit is exceeded the driver is immediately
alerted (see section “Warning lights and mes-
sages”).
To set the speed limit, proceed as follows:
❒press briefly button MODE: the display
will show the word ON;
❒press briefly button MODEthen, use
buttons
▲/▼to set the required speed
(during setting the value flashes).
❒press briefly button MODEto go back
to the menu screen or press the button
for long to go back to the standard
screen.
IMPORTANTThe possible setting is be-
tween 30 and 250 km/h or between 20
and 150 mph depending on the unit set pre-
viously (see paragraph “UNITS” described
later). Every press of the button
▲/▼in-
creases or decreases by one unit. Keeping
button
▲/▼pressed, obtain automatic fast
increase/decrease. When you are near the
required setting release the button and com-
plete adjustment with single presses. To clear setting:
❒press briefly button MODE: the display
will show the word OFF;
❒press button (▼): the display will show
the word OFF;
❒press briefly button MODEto go back
to the menu screen or press the button
for long to go back to the standard
screen.
DIMMER
With this function it is possible to adjust
the lighting (dimming/brightening) of the
instrument cluster, mileage recorder (total,
trip meter), headlight aiming display, radio
display, radio navigator display (where pro-
vided) and two-zone climate control (where
provided).
Proceed as follows:
❒press briefly button MODE: the display
will show a graduated scale;
❒press buttons ▲/▼to adjust as re-
quired.
Partial lighting
Keeping button (
▼) pressed for more than 4
seconds, the rev counter lighting is turned off.
Keeping button (
▲) pressed for more than
4 seconds, the complete instrument cluster
lighting is turned on again.
IMPORTANTWhen external lights are
switched on dimming of the brightness can
be perceived. In the event of any faults,
lighting adjustment (rheostat) is not possi-
ble and the display is shown at its maximum
brightness.
Page 108 of 271
GETTING TO KNOW YOUR CAR
106
CONTROLS
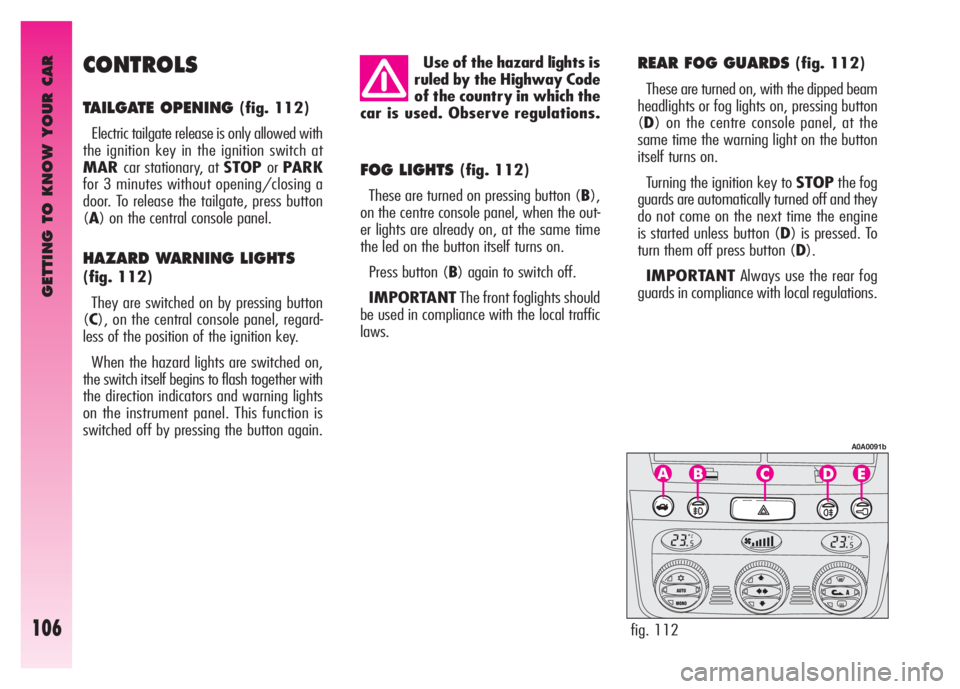
TAILGATE OPENING (fig. 112)
Electric tailgate release is only allowed with
the ignition key in the ignition switch at
MARcar stationary, at STOPorPARK
for 3 minutes without opening/closing a
door. To release the tailgate, press button
(A) on the central console panel.
HAZARD WARNING LIGHTS
(fig. 112)
They are switched on by pressing button
(C), on the central console panel, regard-
less of the position of the ignition key.
When the hazard lights are switched on,
the switch itself begins to flash together with
the direction indicators and warning lights
on the instrument panel. This function is
switched off by pressing the button again. Use of the hazard lights is
ruled by the Highway Code
of the country in which the
car is used. Observe regulations.
FOG LIGHTS (fig. 112)
These are turned on pressing button (B),
on the centre console panel, when the out-
er lights are already on, at the same time
the led on the button itself turns on.
Press button (B) again to switch off.
IMPORTANTThe front foglights should
be used in compliance with the local traffic
laws.
fig. 112
A0A0091b
REAR FOG GUARDS (fig. 112)
These are turned on, with the dipped beam
headlights or fog lights on, pressing button
(D) on the centre console panel, at the
same time the warning light on the button
itself turns on.
Turning the ignition key to STOPthe fog
guards are automatically turned off and they
do not come on the next time the engine
is started unless button (D) is pressed. To
turn them off press button (D).
IMPORTANTAlways use the rear fog
guards in compliance with local regulations.
Page 110 of 271
GETTING TO KNOW YOUR CAR
108
The wheels should be
locked after a few clicks of
the hand brake. If it does
not occur contact Alfa Romeo Au-
thorised Services to have the hand
brake adjusted.
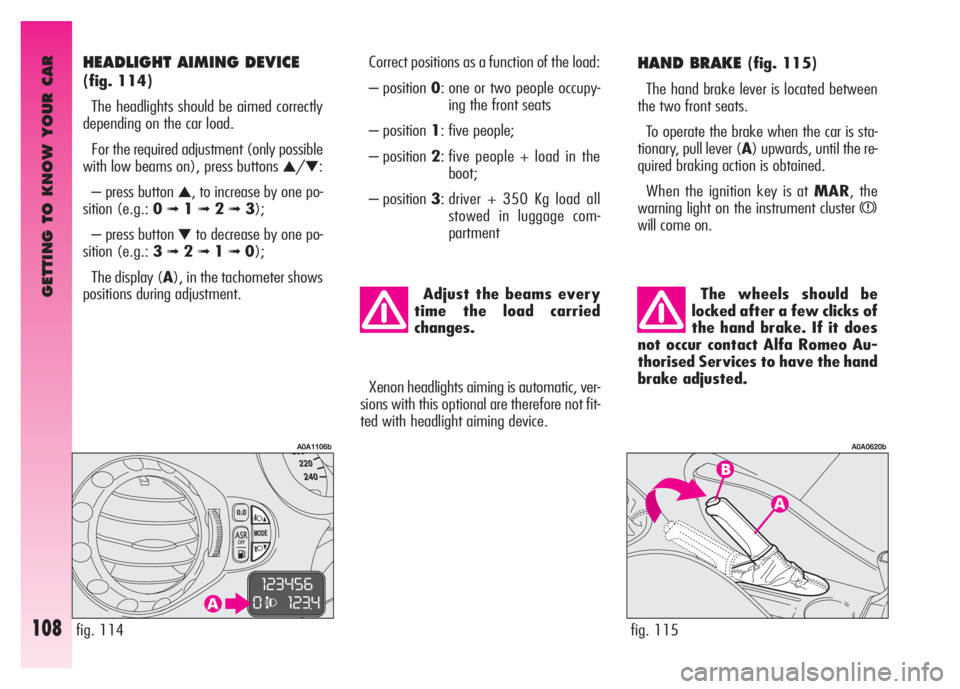
HAND BRAKE (fig. 115)
The hand brake lever is located between
the two front seats.
To operate the brake when the car is sta-
tionary, pull lever (A) upwards, until the re-
quired braking action is obtained.
When the ignition key is at MAR, the
warning light on the instrument cluster
x
will come on.
fig. 115
A0A0620b
Adjust the beams every
time the load carried
changes.
Correct positions as a function of the load:
– position 0: one or two people occupy-
ing the front seats
– position 1: five people;
– position 2: five people + load in the
boot;
– position 3: driver + 350 Kg load all
stowed in luggage com-
partment
fig. 114
A0A1106b
HEADLIGHT AIMING DEVICE
(fig. 114)
The headlights should be aimed correctly
depending on the car load.
For the required adjustment (only possible
with low beams on), press buttons
▲/▼:
– press button
▲, to increase by one po-
sition (e.g.: 0
➟1➟ 2➟3);
– press button
▼to decrease by one po-
sition (e.g.: 3
➟2➟1➟0);
The display (A), in the tachometer shows
positions during adjustment.
Xenon headlights aiming is automatic, ver-
sions with this optional are therefore not fit-
ted with headlight aiming device.
Page 132 of 271
GETTING TO KNOW YOUR CAR
130
Do not load the boot
above the permitted max-
imum (see “Technical spec-
ifications”). Also make sure that
the objects contained in the boot
are well secured to prevent them
from being thrown forward, caus-
ing harm to the passengers.
A heavy load that has not
been secured may cause
serious harm to passen-
gers.
If you want to carry re-
serve fuel in a can, follow
legal regulations, only us-
ing a certified can, suitably fas-
tened to the load securing eyelets.
Even in this way the risk of fire is
increased in the case of an accident.
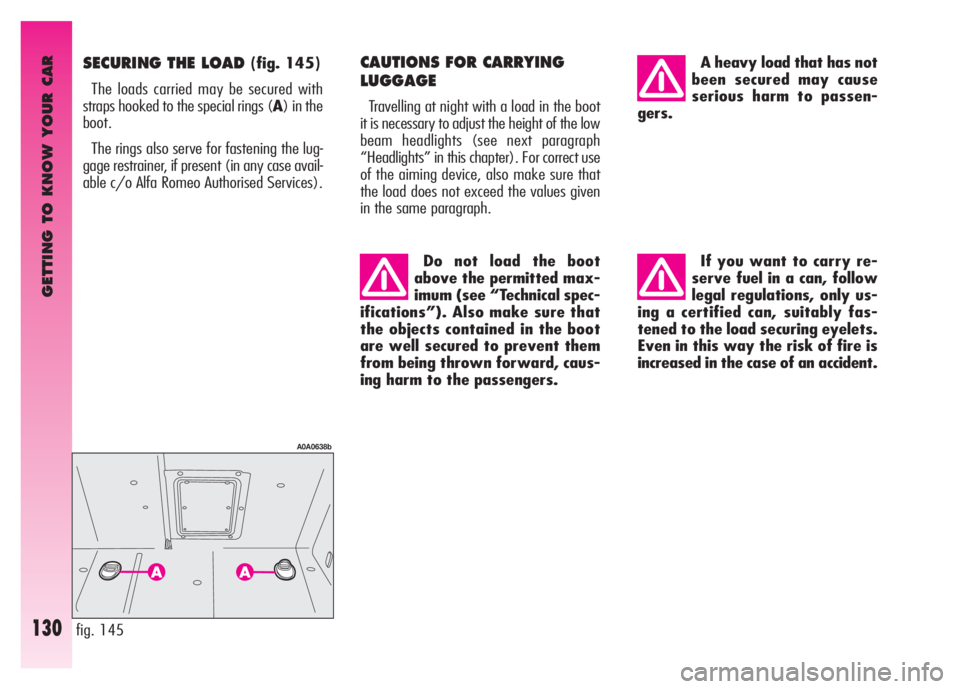
SECURING THE LOAD (fig. 145)
The loads carried may be secured with
straps hooked to the special rings (A) in the
boot.
The rings also serve for fastening the lug-
gage restrainer, if present (in any case avail-
able c/o Alfa Romeo Authorised Services). CAUTIONS FOR CARRYING
LUGGAGE
Travelling at night with a load in the boot
it is necessary to adjust the height of the low
beam headlights (see next paragraph
“Headlights” in this chapter). For correct use
of the aiming device, also make sure that
the load does not exceed the values given
in the same paragraph.
fig. 145
A0A0638b
Page 134 of 271
GETTING TO KNOW YOUR CAR
132
HEADLIGHTS
The adjustment of the headlights is vital to
your safety and comfort and to that of oth-
er road users.
The adjustment of the headlights is also
governed by precise regulations.
Contact Alfa Romeo Authorised Services to
have the headlights correctly adjusted.
IMPORTANTThe headlight inner sur-
face may get slightly misted: this does not
mean it is faulty; it is a natural phenome-
non due to low temperature and the air hu-
midity level. Misting will disappear as soon
as the headlights are turned on. The pres-
ence of water drops inside the headlight in-
dicates water infiltration: contact Alfa Romeo
Authorised Services.
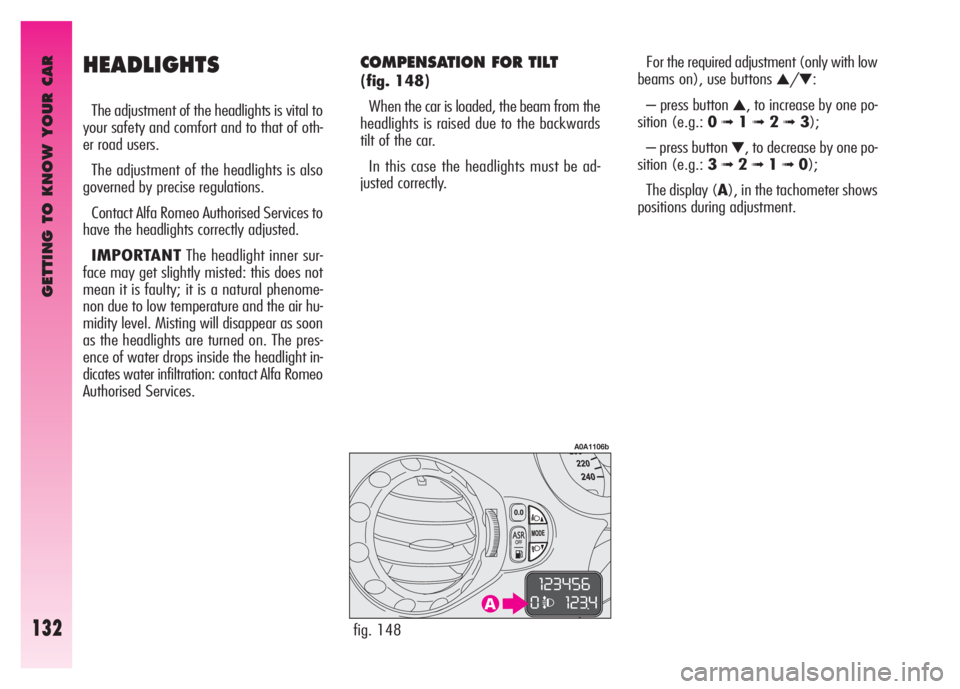
COMPENSATION FOR TILT
(fig. 148)
When the car is loaded, the beam from the
headlights is raised due to the backwards
tilt of the car.
In this case the headlights must be ad-
justed correctly. For the required adjustment (only with low
beams on), use buttons ▲/▼:
– press button
▲, to increase by one po-
sition (e.g.: 0
➟1➟ 2➟3);
– press button
▼, to decrease by one po-
sition (e.g.: 3
➟2➟1➟0);
The display (A), in the tachometer shows
positions during adjustment.
fig. 148
A0A1106b
Page 135 of 271
GETTING TO KNOW YOUR CAR
133
Check beam aiming every
time the load carried
changes. Correct positions as a function of the load:
– position 0: one or two people occupy-
ing the front seats
– position 1: five people;
– position 2: five people + load in the
boot;
– position 3: driver + 350 Kg load all
stowed in luggage com-
partment
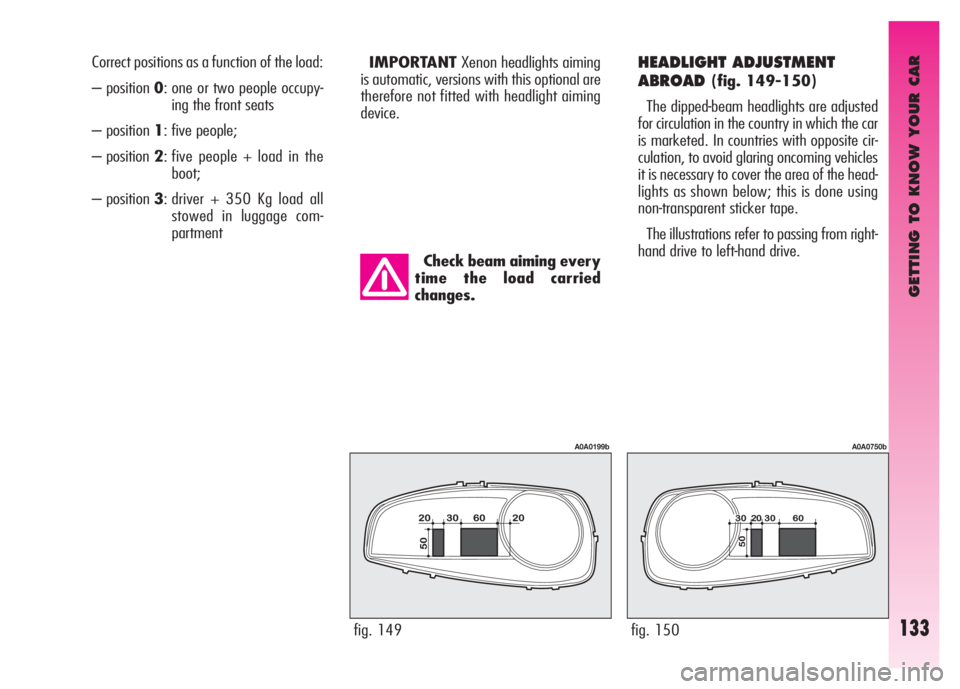
HEADLIGHT ADJUSTMENT
ABROAD
(fig. 149-150)
The dipped-beam headlights are adjusted
for circulation in the country in which the car
is marketed. In countries with opposite cir-
culation, to avoid glaring oncoming vehicles
it is necessary to cover the area of the head-
lights as shown below; this is done using
non-transparent sticker tape.
The illustrations refer to passing from right-
hand drive to left-hand drive.
IMPORTANTXenon headlights aiming
is automatic, versions with this optional are
therefore not fitted with headlight aiming
device.
fig. 149
A0A0199b
fig. 150
A0A0750b