tow Alfa Romeo GT 2010 Owner handbook (in English)
[x] Cancel search | Manufacturer: ALFA ROMEO, Model Year: 2010, Model line: GT, Model: Alfa Romeo GT 2010Pages: 271, PDF Size: 5.34 MB
Page 183 of 271
IN AN EMERGENCY
181
STARTING BY INERTIA
If the car is equipped with “Kit for tyre re-
pair Fix&Go“, see the instructions contained
in the following chapter.
GENERAL INSTRUCTIONS
As an alternative to the FIX & GO, the car
can be provided (upon request) with space-
saver spare wheel or standard wheel; wheel
changing and correct use of the jack call for
some precautions as listed below.
IN THE EVENT OF A PUNCTURE
Never push, tow or coast
start the car. This could
cause fuel to flow into the
catalyst damaging it irreversibly.
Remember that the en-
gine brake and power
steering are not opera-
tional until the engine is started,
therefore, much greater effort than
usual is needed on the brake ped-
al and steering wheel.
Signal the presence of the
stationary car according to
current regulations: hazard
warning lights, reflecting triangle
etc.. Any passengers should leave
the car and wait for the wheel to be
changed out of harm of the traffic.
If parked on a slope or rough sur-
face, chock the wheels with
wedges or other suitable devices
to prevent the car from rolling.
Never start the engine
with the car jacked.
When driving with a trail-
er, disconnect the trailer before
raising the car. The compact spare
wheel is specific to your car, do not
use it on other models, or use the
spare wheel of other models on
your car.
Should the type of wheels used
be changed (alloy rims instead of
steel), it is also necessary to
change the whole set of fastening
bolts with others of suitable size.
The compact spare wheel is nar-
rower than normal wheels, it
should be used only for the dis-
tance necessary to reach a service
point to have the punctured tyre
repaired and, during its use, the car
speed must not exceed 80 km/h.
Page 187 of 271

IN AN EMERGENCY
185
– Using the wrench provided, tighten the
fastening bolts.
– Lower the car and remove the jack.
– Using the wrench provided, fully tight-
en the bolts in the sequence shown previ-
ously for the compact spare wheel fig. 8.
– Place the cap near the wheel so that the
inflation valve can come through the slot
provided on the cap.
– Press the circumference of the cap, start-
ing from the parts nearest to the inflation
valve until it is inserted completely.
IMPORTANTIncorrect fitting may cause
the wheel cap to come off when the car is
travelling.For versions with alloy rims:
– Tighten the pin (A-fig. 9) in one of
the fastening bolt holes on the wheel hub.
– Insert the wheel on the pin and, using
the wrench provided, tighten the four bolts
available. This is facilitated by the extension
provided (B).
– Remove the pin (A-fig. 9) and tight-
en the last fastening bolt.
– Lower the car and remove the jack.
– Using the wrench provided, tighten the
bolts in the sequence shown previously for
the compact spare wheel fig. 8.After refitting a wheel:
– stow the spare wheel in the space pro-
vided in the boot
– insert the jack in its container forcing it
lightly to prevent it from vibrating when trav-
elling
– place the tools used in the housings in
the container
– stow the container complete with tools
on the spare wheel and secure everything
with the clamping device (A-fig. 3)
– correctly re-position the stiff cover.
fig. 7
A0A0155b
fig. 8
A0A0156b
fig. 9
A0A0693b
Page 188 of 271

IN AN EMERGENCY
186
QUICK TYRE
REPAIR KIT
FIX&GO automatic
The car is equipped with a tyre quick re-
pairing kit called “FIX&GO automatic”, re-
placing the tools and the compact spare
wheel usually provided with the car.
The kit fig. 10is placed in the boot. In
the kit container you will also find the screw-
driver and the tow ring.The quick tyre repair kit includes:
– bottle A-fig. 10containing sealer and
fitted with:
– filler hose B
– sticker Cwith caution “max. 80
km/h”, to be affixed in a visible position
for the driver (instrument panel) after re-
pairing the tyre;
– compressor Dincluding gauge and con-
nections;– instruction brochure fig. 11, to be used
for prompt and proper use of the quick re-
pair kit and to be then handed to the per-
sonnel charged with handling the treated
tyre;
– a pair of protection gloves located in the
side space of the compressor;
– adapters for inflating different elements.
fig. 10
A0A1095b
fig. 11
A0A1096b
Page 200 of 271

IN AN EMERGENCY
198
– Replace the bulb;
– Refit the bulb holder turning counter-
clockwise and check that it is secured cor-
rectly;
– Refit the transparent.SIDE DIRECTION INDICATORS
(fig. 30)
– Push the transparent cover towards the
rear of the car to compress the catch (A).
Release the front part and remove this unit.
– Turn the bulb holder (B) counter-clock-
wise and remove it from the cover.
– Remove the snap-fitted bulb and replace it.
– Insert the bulb holder (B) in the trans-
parent cover, then position the unit mak-
ing sure the catch clicks into place (A).
fig. 29
A0A0626b
fig. 30
A0A0166b
FRONT DIRECTION
INDICATORS
(fig. 28-29)
To change the bulb, proceed as follows:
– Using the screwdriver provided, remove
the transparent unit operating on the two
metal clips as shown in the figure;
– Turn the bulb holder clockwise (A) and
remove it;
– Remove the bulb (B) pushing gently
and turning counter-clockwise;
fig. 28
A0A0625b
Page 215 of 271
IN AN EMERGENCY
213
IF THE CAR IS TO BE TOWED
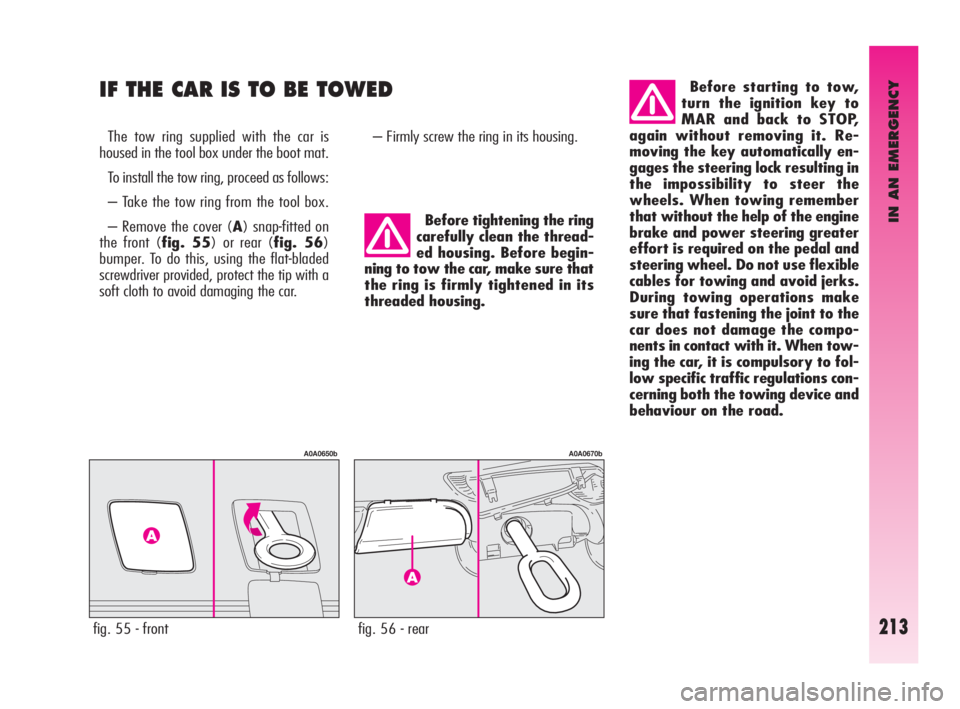
The tow ring supplied with the car is
housed in the tool box under the boot mat.
To install the tow ring, proceed as follows:
– Take the tow ring from the tool box.
– Remove the cover (A) snap-fitted on
the front (fig. 55) or rear (fig. 56)
bumper. To do this, using the flat-bladed
screwdriver provided, protect the tip with a
soft cloth to avoid damaging the car.– Firmly screw the ring in its housing.
fig. 55 - front
A0A0650b
fig. 56 - rear
A0A0670b
Before tightening the ring
carefully clean the thread-
ed housing. Before begin-
ning to tow the car, make sure that
the ring is firmly tightened in its
threaded housing.
Before starting to tow,
turn the ignition key to
MAR and back to STOP,
again without removing it. Re-
moving the key automatically en-
gages the steering lock resulting in
the impossibility to steer the
wheels. When towing remember
that without the help of the engine
brake and power steering greater
effort is required on the pedal and
steering wheel. Do not use flexible
cables for towing and avoid jerks.
During towing operations make
sure that fastening the joint to the
car does not damage the compo-
nents in contact with it. When tow-
ing the car, it is compulsory to fol-
low specific traffic regulations con-
cerning both the towing device and
behaviour on the road.
Page 216 of 271

IN AN EMERGENCY
214
Take care when position-
ing the arms of the lift or
workshop lift to avoid dam-
aging the side strips.
USING AN ARM LIFT OR
WORKSHOP LIFT
The car must only be lifted laterally posi-
tioning the ends of the arms or the workshop
lift in the areas illustrated, approx. 40 cm from
the profile of the wheelhouse (fig. 57).These points are identified by symbol
▼
on the bottom of the sidemember.
The car may fall if the jack
is not positioned correctly.
Never use the jack for
higher capacities than the one stat-
ed on the label.
IMPORTANTFor versions with Sele-
speed transmission, make sure that the
gears are in neutral (N) (checking that the
car moves if pushed) and then proceed as
for towing a normal car with mechanical
transmission, following the instructions giv-
en previously.
Should it be impossible to set the gears to
neutral, do not tow the car and contact Al-
fa Romeo Authorised Services.Do not start the engine
when towing the car.
IF THE CAR IS TO BE LIFTED
fig. 57
A0A0672b
Page 222 of 271
CAR MAINTENANCE
220
IMPORTANT
Engine oil
Should prevailing use of the car be under
one of the following specially heavy condi-
tions:
– trailer or caravan towing
– dusty roads
– short distances (less than 7-8 km) re-
peated and with external temperatures be-
low zero
– frequently idling engines or long distance
low speed driving or in case of a long term
inactivity
replace engine oil more frequently than re-
quired on the Scheduled Maintenance Pro-
gramme.IMPORTANT
Diesel filter
The variety of the degree of purity of the
fuel oil in commerce may make it necessary
to change the fuel oil filter more frequently
than stated in the Scheduled Maintenance
Programme. If the engine is “sobbing” it
is a sign that the filter needs changing.IMPORTANT
Air cleaner
Using the car on dusty roads change the
air cleaner more frequently than specified in
the Schedule Maintenance Programme.
For any doubts concerning the intervals be-
tween the engine oil and air cleaner re-
placement in relation to how the car is used,
contact Alfa Romeo Authorised Services.
Page 253 of 271
TECHNICAL SPECIFICATIONS
251
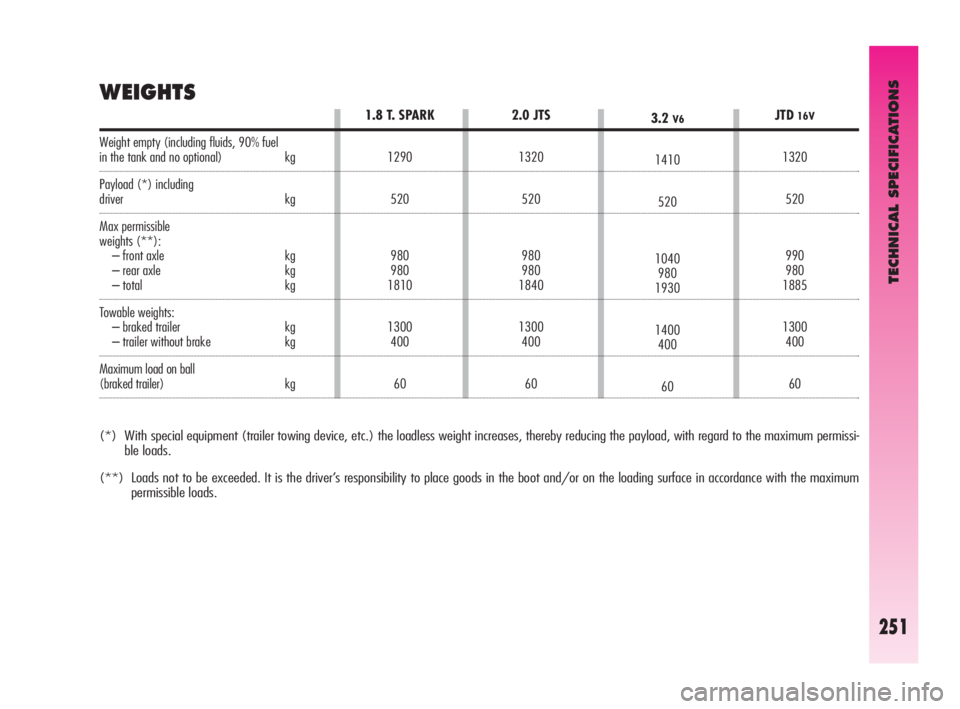
Weight empty (including fluids, 90% fuel
in the tank and no optional) kg
Payload (*) including
driver kg
Max permissible
weights (**):
– front axle kg
– rear axle kg
– total kg
Towable weights:
– braked trailer kg
– trailer without brake kg
Maximum load on ball
(braked trailer) kg
WEIGHTS
(*) With special equipment (trailer towing device, etc.) the loadless weight increases, thereby reducing the payload, with regard to the maximum permissi-
ble loads.
(**) Loads not to be exceeded. It is the driver’s responsibility to place goods in the boot and/or on the loading surface in accordance with the maximum
permissible loads.
JTD16V
1320
520
990
980
1885
1300
400
60
3.2V6
1410
520
1040
980
1930
1400
400
60
2.0 JTS
1320
520
980
980
1840
1300
400
60
1.8 T. SPARK
1290
520
980
980
1810
1300
400
60
Page 265 of 271
ALPHABETICAL INDEX
263
- rear centre lap belt .................. 27
- use of belts ............................ 26
Seats
- front ..................................... 16
- rear ...................................... 19
Selespeed gearbox ...................... 110
Sidelights
- changing front bulbs ................ 197
- changing rear bulbs ................. 199
- switching on .......................... 45
Snow chains ............................... 177
Speedometer .............................. 56
Steering lock .............................. 15
Steering system .......................... 245
Steering wheel ........................... 22
Sun visors .................................. 126
Suspensions ............................... 245
Symbols .................................... 5-6
Technical specifications........ 240
Towing the car ............................ 213
Towing trailers ............................ 174
Transmission ............................... 243
Tyres
- correct reading ....................... 246 - Fix&Go automatic ................... 186
- inflating pressure .................... 249
- replacement ........................... 181
- snow chains ........................... 177
- types of tyres and rims ............ 247
- winter ................................... 177
VDC system ............................. 136
Vehicle inactivity ......................... 178
Warning lights and messages ..... 72
Weights ..................................... 251
Wheel geometry ......................... 246
Wheels and tyres ................... 233-246
Windscreen washer
- intelligent washing function ...... 47
- operation ............................... 47
- spray jets .............................. 235
Windscreen wiper
- blade replacement .................. 235
- operation ............................... 47
- rain sensor ............................. 48
- spray jets .............................. 235
Page 266 of 271

PROVISIONS FOR THE PROCESSING OF A VEHICLE
AT THE END OF ITS LIFE-CYCLE
For years now Alfa Romeo has been developing its global commitment towards the safeguarding and protection of the Environment through
the continuous improvement of its production processes and the making of increasingly more “eco friendly” products. With a view to guaran-
teeing the best possible service to clients in full observance of environmental standards and in response to the obligations imposed by Euro-
pean Directive 2000/53/EC on end-of-life vehicles, Alfa Romeo offers its clients the possibility to hand in their vehicle* at the end of its life
span without additional costs.
The European Directive, in fact, provides for the take-back of the vehicle without the last holder or owner of the same incurring expenses due
to the fact that the market value of the vehicle is zero or negative. In particular, in almost all of the countries of the
European Union, up until 1st January 2007, take-back of the vehicle free of charge only applies to vehicles registered from 1 July 2002 on,
while, from 2007 on, take-back will be carried out free of charge, independently of the year of registration, provided that the vehicle still con-
tains all its essential component parts (especially engine and body) and is free from additional waste materials.
Our contracted network of authorised treatment facilities has been carefully selected in order to provide a quality service to our customers by
de-polluting and recycling “End of Life Vehicles” to approved environmental standards. To find out the location of your nearest authorised
treatment facility, offering free of charge take-back, simply contact one of our dealers or refer to the Alfa Romeo web site or call the toll free
number 00800 2532 0000.
*
Passenger transportation vehicles to seat a max. of nine persons, having a total admissible weight of 3.5 t