headlight aiming Alfa Romeo GT 2010 Owner handbook (in English)
[x] Cancel search | Manufacturer: ALFA ROMEO, Model Year: 2010, Model line: GT, Model: Alfa Romeo GT 2010Pages: 271, PDF Size: 5.34 MB
Page 66 of 271

GETTING TO KNOW YOUR CAR
64
SPEED
With this function it is possible to set the
car speed limit (km/h or mph), when this
limit is exceeded the driver is immediately
alerted (see section “Warning lights and mes-
sages”).
To set the speed limit, proceed as follows:
❒press briefly button MODE: the display
will show the word ON;
❒press briefly button MODEthen, use
buttons
▲/▼to set the required speed
(during setting the value flashes).
❒press briefly button MODEto go back
to the menu screen or press the button
for long to go back to the standard
screen.
IMPORTANTThe possible setting is be-
tween 30 and 250 km/h or between 20
and 150 mph depending on the unit set pre-
viously (see paragraph “UNITS” described
later). Every press of the button
▲/▼in-
creases or decreases by one unit. Keeping
button
▲/▼pressed, obtain automatic fast
increase/decrease. When you are near the
required setting release the button and com-
plete adjustment with single presses. To clear setting:
❒press briefly button MODE: the display
will show the word OFF;
❒press button (▼): the display will show
the word OFF;
❒press briefly button MODEto go back
to the menu screen or press the button
for long to go back to the standard
screen.
DIMMER
With this function it is possible to adjust
the lighting (dimming/brightening) of the
instrument cluster, mileage recorder (total,
trip meter), headlight aiming display, radio
display, radio navigator display (where pro-
vided) and two-zone climate control (where
provided).
Proceed as follows:
❒press briefly button MODE: the display
will show a graduated scale;
❒press buttons ▲/▼to adjust as re-
quired.
Partial lighting
Keeping button (
▼) pressed for more than 4
seconds, the rev counter lighting is turned off.
Keeping button (
▲) pressed for more than
4 seconds, the complete instrument cluster
lighting is turned on again.
IMPORTANTWhen external lights are
switched on dimming of the brightness can
be perceived. In the event of any faults,
lighting adjustment (rheostat) is not possi-
ble and the display is shown at its maximum
brightness.
Page 110 of 271

GETTING TO KNOW YOUR CAR
108
The wheels should be
locked after a few clicks of
the hand brake. If it does
not occur contact Alfa Romeo Au-
thorised Services to have the hand
brake adjusted.
HAND BRAKE (fig. 115)
The hand brake lever is located between
the two front seats.
To operate the brake when the car is sta-
tionary, pull lever (A) upwards, until the re-
quired braking action is obtained.
When the ignition key is at MAR, the
warning light on the instrument cluster
x
will come on.
fig. 115
A0A0620b
Adjust the beams every
time the load carried
changes.
Correct positions as a function of the load:
– position 0: one or two people occupy-
ing the front seats
– position 1: five people;
– position 2: five people + load in the
boot;
– position 3: driver + 350 Kg load all
stowed in luggage com-
partment
fig. 114
A0A1106b
HEADLIGHT AIMING DEVICE
(fig. 114)
The headlights should be aimed correctly
depending on the car load.
For the required adjustment (only possible
with low beams on), press buttons
▲/▼:
– press button
▲, to increase by one po-
sition (e.g.: 0
➟1➟ 2➟3);
– press button
▼to decrease by one po-
sition (e.g.: 3
➟2➟1➟0);
The display (A), in the tachometer shows
positions during adjustment.
Xenon headlights aiming is automatic, ver-
sions with this optional are therefore not fit-
ted with headlight aiming device.
Page 132 of 271

GETTING TO KNOW YOUR CAR
130
Do not load the boot
above the permitted max-
imum (see “Technical spec-
ifications”). Also make sure that
the objects contained in the boot
are well secured to prevent them
from being thrown forward, caus-
ing harm to the passengers.
A heavy load that has not
been secured may cause
serious harm to passen-
gers.
If you want to carry re-
serve fuel in a can, follow
legal regulations, only us-
ing a certified can, suitably fas-
tened to the load securing eyelets.
Even in this way the risk of fire is
increased in the case of an accident.
SECURING THE LOAD (fig. 145)
The loads carried may be secured with
straps hooked to the special rings (A) in the
boot.
The rings also serve for fastening the lug-
gage restrainer, if present (in any case avail-
able c/o Alfa Romeo Authorised Services). CAUTIONS FOR CARRYING
LUGGAGE
Travelling at night with a load in the boot
it is necessary to adjust the height of the low
beam headlights (see next paragraph
“Headlights” in this chapter). For correct use
of the aiming device, also make sure that
the load does not exceed the values given
in the same paragraph.
fig. 145
A0A0638b
Page 135 of 271

GETTING TO KNOW YOUR CAR
133
Check beam aiming every
time the load carried
changes. Correct positions as a function of the load:
– position 0: one or two people occupy-
ing the front seats
– position 1: five people;
– position 2: five people + load in the
boot;
– position 3: driver + 350 Kg load all
stowed in luggage com-
partment
HEADLIGHT ADJUSTMENT
ABROAD
(fig. 149-150)
The dipped-beam headlights are adjusted
for circulation in the country in which the car
is marketed. In countries with opposite cir-
culation, to avoid glaring oncoming vehicles
it is necessary to cover the area of the head-
lights as shown below; this is done using
non-transparent sticker tape.
The illustrations refer to passing from right-
hand drive to left-hand drive.
IMPORTANTXenon headlights aiming
is automatic, versions with this optional are
therefore not fitted with headlight aiming
device.
fig. 149
A0A0199b
fig. 150
A0A0750b
Page 195 of 271

IN AN EMERGENCY
193
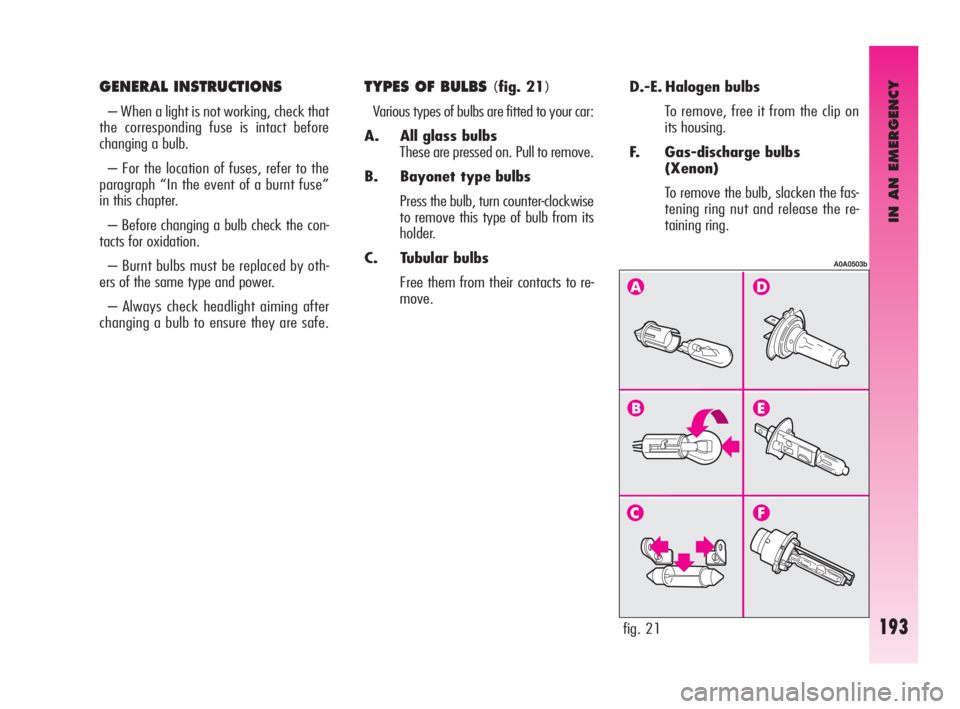
D.-E. Halogen bulbs
To remove, free it from the clip on
its housing.
F. Gas-discharge bulbs
(Xenon)
To remove the bulb, slacken the fas-
tening ring nut and release the re-
taining ring.GENERAL INSTRUCTIONS
– When a light is not working, check that
the corresponding fuse is intact before
changing a bulb.
– For the location of fuses, refer to the
paragraph “In the event of a burnt fuse”
in this chapter.
– Before changing a bulb check the con-
tacts for oxidation.
– Burnt bulbs must be replaced by oth-
ers of the same type and power.
– Always check headlight aiming after
changing a bulb to ensure they are safe.
TYPES OF BULBS (fig. 21)
Various types of bulbs are fitted to your car:
A. All glass bulbs
These are pressed on. Pull to remove.
B. Bayonet type bulbs
Press the bulb, turn counter-clockwise
to remove this type of bulb from its
holder.
C. Tubular bulbs
Free them from their contacts to re-
move.
fig. 21
A0A0503b
Page 210 of 271

IN AN EMERGENCY
208
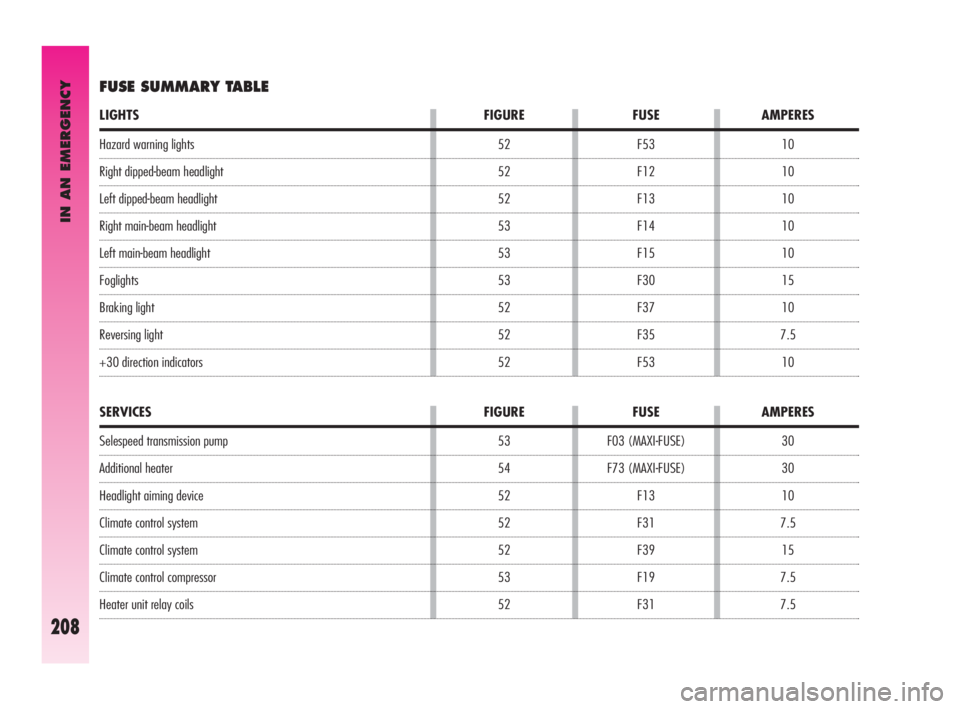
30
30
10
7.5
15
7.5
7.5 F03 (MAXI-FUSE)
F73 (MAXI-FUSE)
F13
F31
F39
F19
F31
SERVICES FIGURE FUSE AMPERES
Hazard warning lights
Right dipped-beam headlight
Left dipped-beam headlight
Right main-beam headlight
Left main-beam headlight
Foglights
Braking light
Reversing light
+30 direction indicators10
10
10
10
10
15
10
7.5
10 F53
F12
F13
F14
F15
F30
F37
F35
F53
LIGHTS FIGURE FUSE AMPERES
FUSE SUMMARY TABLE
Selespeed transmission pump
Additional heater
Headlight aiming device
Climate control system
Climate control system
Climate control compressor
Heater unit relay coils52
52
52
53
53
53
52
52
52
53
54
52
52
52
53
52