bulb Alfa Romeo MiTo 2009 Owner handbook (in English)
[x] Cancel search | Manufacturer: ALFA ROMEO, Model Year: 2009, Model line: MiTo, Model: Alfa Romeo MiTo 2009Pages: 250, PDF Size: 4.61 MB
Page 21 of 250
20GETTING TO KNOW YOUR CAR
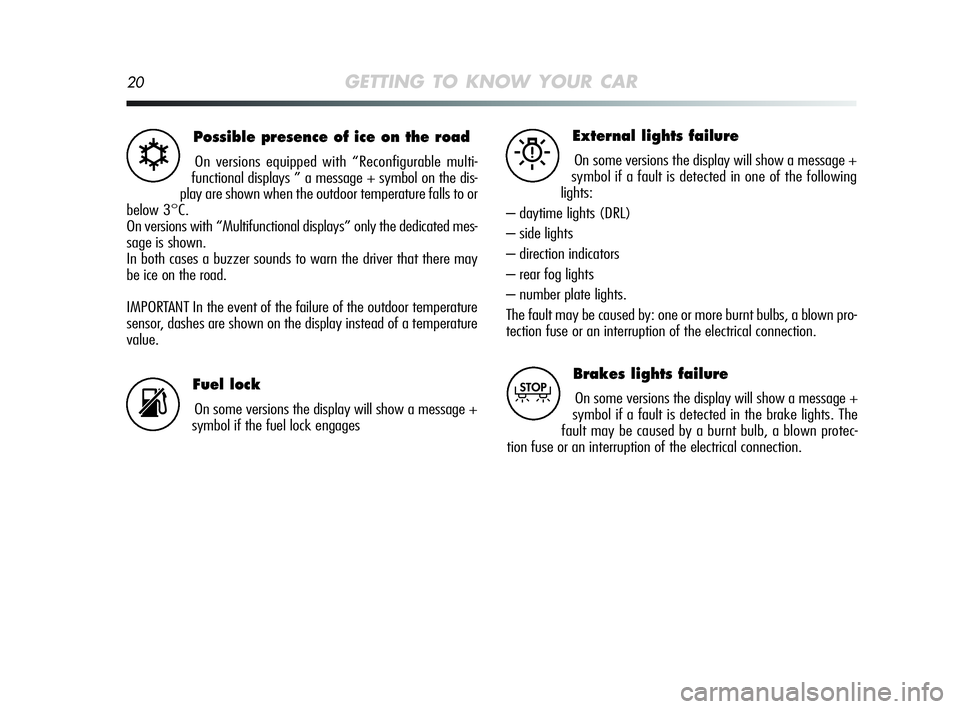
Possible presence of ice on the road
On versions equipped with “Reconfigurable multi-
functional displays ” a message + symbol on the dis-
play are shown when the outdoor temperature falls to or
below 3°C.
On versions with “Multifunctional displays” only the dedicated mes-
sage is shown.
In both cases a buzzer sounds to warn the driver that there may
be ice on the road.
IMPORTANT In the event of the failure of the outdoor temperature
sensor, dashes are shown on the display instead of a temperature
value.√
Fuel lock
On some versions the display will show a message +
symbol if the fuel lock engagess
External lights failure
On some versions the display will show a message +
symbol if a fault is detected in one of the following
lights:
– daytime lights (DRL)
– side lights
– direction indicators
– rear fog lights
– number plate lights.
The fault may be caused by: one or more burnt bulbs, a blown pro-
tection fuse or an interruption of the electrical connection.W
Brakes lights failure
On some versions the display will show a message +
symbol if a fault is detected in the brake lights. The
fault may be caused by a burnt bulb, a blown protec-
tion fuse or an interruption of the electrical connection.T
001-126 Alfa MiTo GB 13-11-2008 10:08 Pagina 20
Page 160 of 250
IN AN EMERGENCY159
4
In an emergency we recommend that you call the freephone number found in the Warranty Booklet.
You can also consult www.alfaromeo.com to find Alfa Romeo Authorised Services your nearest
Starting the engine..................................................................... 160
Replacing a wheel....................................................................... 161
“Fix&Go Automatic” Kit............................................................... 169
Changing a bulb.......................................................................... 174
Replacing exterior bulbs................................................................ 176
Replacing an interior bulb.............................................................. 180
Replacing fuses........................................................................... 183
Recharging the battery ................................................................. 193
Lifting the car............................................................................. 193
Towing the car ............................................................................ 194
159-196 Alfa MiTo GB 12-11-2008 15:45 Pagina 159
Page 175 of 250
174IN AN EMERGENCY
CHANGING A BULB
GENERAL INSTRUCTIONS
❍Before changing a bulb check the contacts for oxidation;
❍blown bulbs must be replaced with others of the same type and
power:
❍After replacing a headlight bulb, always check its alignment;
❍When a bulb is not working, check that the corresponding fuse
is intact before replacing it: refer to the “Replacing fuses” para-
graph in this section for the location of fuses.
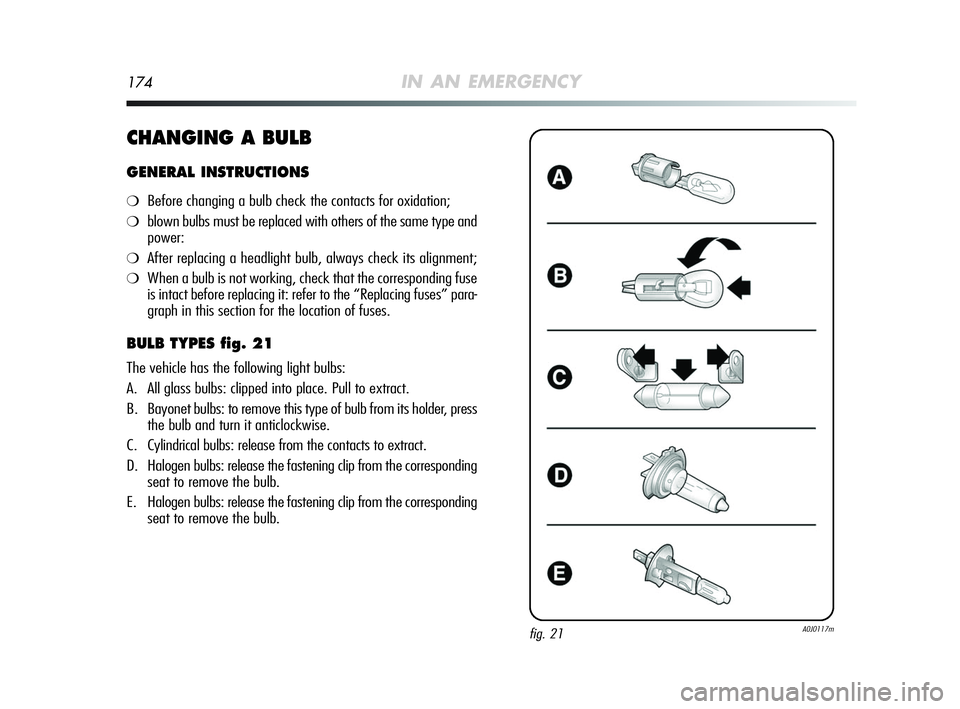
BULB TYPES fig. 21
The vehicle has the following light bulbs:
A. All glass bulbs: clipped into place. Pull to extract.
B. Bayonet bulbs: to remove this type of bulb from its holder, press
the bulb and turn it anticlockwise.
C. Cylindrical bulbs: release from the contacts to extract.
D. Halogen bulbs: release the fastening clip from the corresponding
seat to remove the bulb.
E. Halogen bulbs: release the fastening clip from the corresponding
seat to remove the bulb.
fig. 21A0J0117m
159-196 Alfa MiTo GB 12-11-2008 15:45 Pagina 174
Page 176 of 250
5/21W
–
55W
55W
D1S
21W
21W
5W
–
–
5W
55W
21W
21W
10W
5W
5W
5WA
–
D
D
–
B
B
A
–
–
A
E
B
B
C
A
C
A
IN AN EMERGENCY175
4
W21/5W
LED
H7
H7
F
WY21W
P21W
W5W
LED
LED
W5W
H1
P21W
P21W
C10W
W5W
C5W
W5W
Bulb Type Power Ref. figure
Front side lights/Daylight lights
Rear side lights
Dipped beams
Main beams
Dipped beams/Main beams (versions with
Bi-xenon headlights) (where provided)
Front direction indicators
Rear direction indicators
Side direction indicators
Brake light
3rd brake light
Number plate light
Fog lights
Rear fog lights
Reversing light
Front courtesy light
luggage compartment courtesy light
Glove compartment courtesy light
Door lights
159-196 Alfa MiTo GB 12-11-2008 15:45 Pagina 175
Page 177 of 250
176IN AN EMERGENCY
REPLACING EXTERIOR BULBS
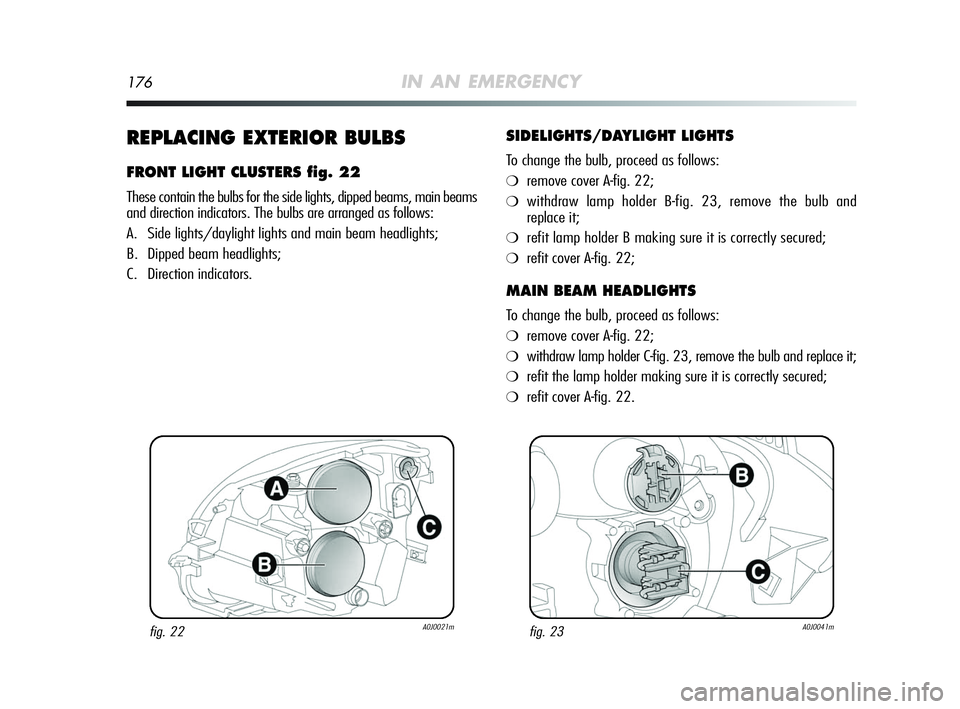
FRONT LIGHT CLUSTERS fig. 22
These contain the bulbs for the side lights, dipped beams, main beams
and direction indicators. The bulbs are arranged as follows:
A. Side lights/daylight lights and main beam headlights;
B. Dipped beam headlights;
C. Direction indicators.
SIDELIGHTS/DAYLIGHT LIGHTS
To change the bulb, proceed as follows:
❍remove cover A-fig. 22;
❍withdraw lamp holder B-fig. 23, remove the bulb and
replace it;
❍refit lamp holder B making sure it is correctly secured;
❍refit cover A-fig. 22;
MAIN BEAM HEADLIGHTS
To change the bulb, proceed as follows:
❍remove cover A-fig. 22;
❍withdraw lamp holder C-fig. 23, remove the bulb and replace it;
❍refit the lamp holder making sure it is correctly secured;
❍refit cover A-fig. 22.
fig. 22A0J0021mfig. 23A0J0041m
159-196 Alfa MiTo GB 12-11-2008 15:45 Pagina 176
Page 178 of 250
IN AN EMERGENCY177
4
DIPPED BEAM HEADLIGHTS
With incandescent bulb
To change the bulb, proceed as follows:
❍remove cover B-fig. 22;
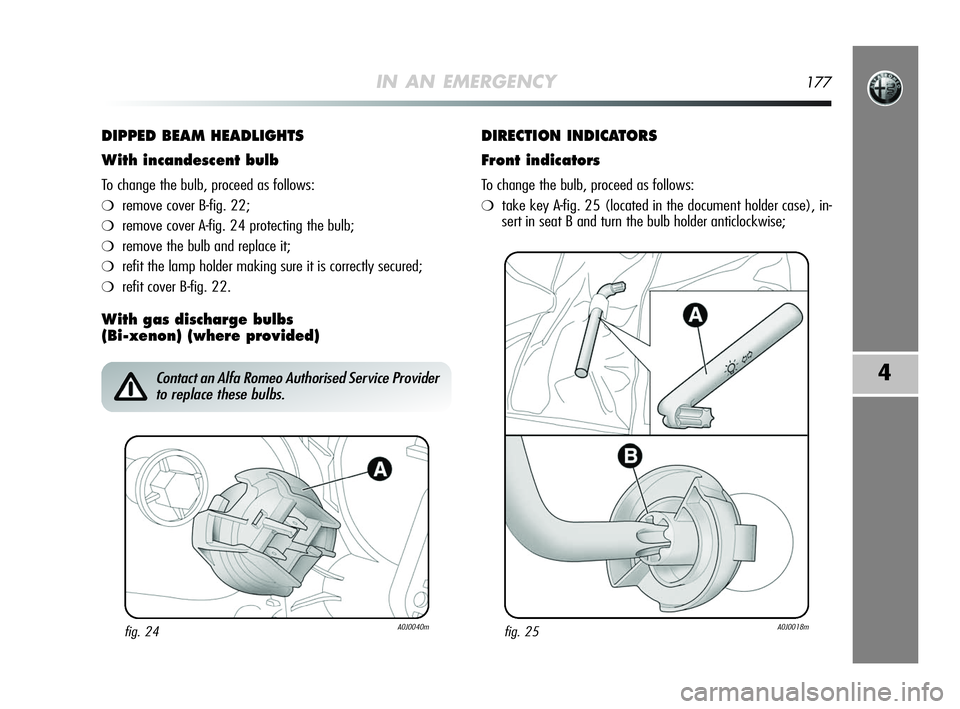
❍remove cover A-fig. 24 protecting the bulb;
❍remove the bulb and replace it;
❍refit the lamp holder making sure it is correctly secured;
❍refit cover B-fig. 22.
With gas discharge bulbs
(Bi-xenon) (where provided)DIRECTION INDICATORS
Front indicators
To change the bulb, proceed as follows:
❍take key A-fig. 25 (located in the document holder case), in-
sert in seat B and turn the bulb holder anticlockwise;
fig. 24A0J0040m
Contact an Alfa Romeo Authorised Service Provider
to replace these bulbs.
fig. 25A0J0018m
159-196 Alfa MiTo GB 12-11-2008 15:45 Pagina 177
Page 179 of 250
178IN AN EMERGENCY
❍remove the bulb and replace it.
Side indicators
To change the bulb, proceed as follows:
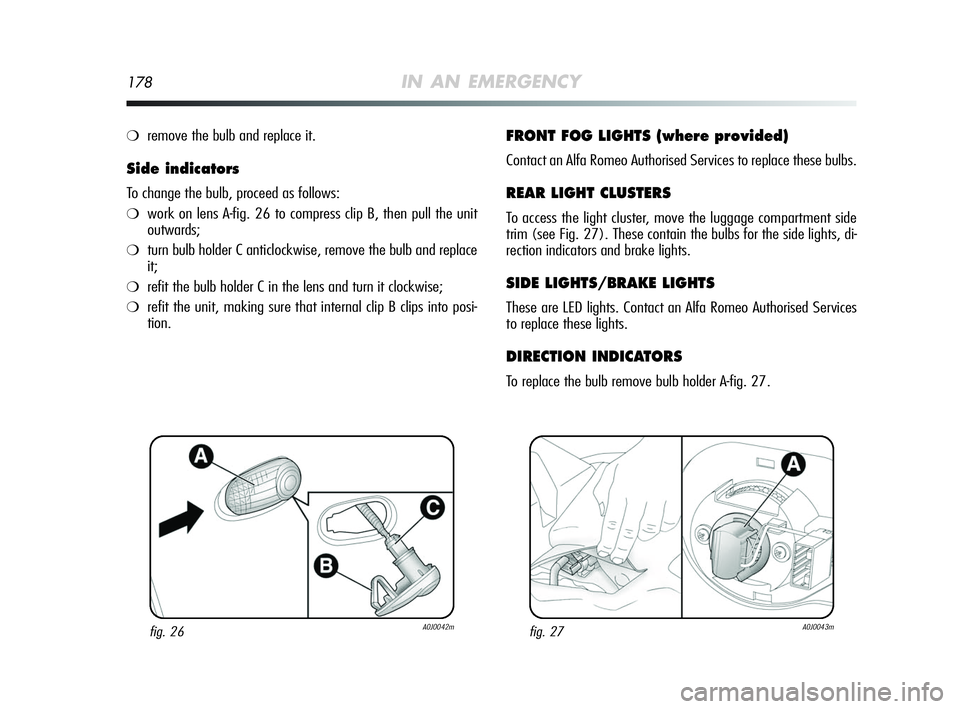
❍work on lens A-fig. 26 to compress clip B, then pull the unit
outwards;
❍turn bulb holder C anticlockwise, remove the bulb and replace
it;
❍refit the bulb holder C in the lens and turn it clockwise;
❍refit the unit, making sure that internal clip B clips into posi-
tion.
FRONT FOG LIGHTS (where provided)
Contact an Alfa Romeo Authorised Services to replace these bulbs.
REAR LIGHT CLUSTERS
To access the light cluster, move the luggage compartment side
trim (see Fig. 27). These contain the bulbs for the side lights, di-
rection indicators and brake lights.
SIDE LIGHTS/BRAKE LIGHTS
These are LED lights. Contact an Alfa Romeo Authorised Services
to replace these lights.
DIRECTION INDICATORS
To replace the bulb remove bulb holder A-fig. 27.
fig. 26A0J0042mfig. 27A0J0043m
159-196 Alfa MiTo GB 12-11-2008 15:45 Pagina 178
Page 180 of 250
IN AN EMERGENCY179
4
REAR FOG LIGHTS/REVERSING LIGHTS
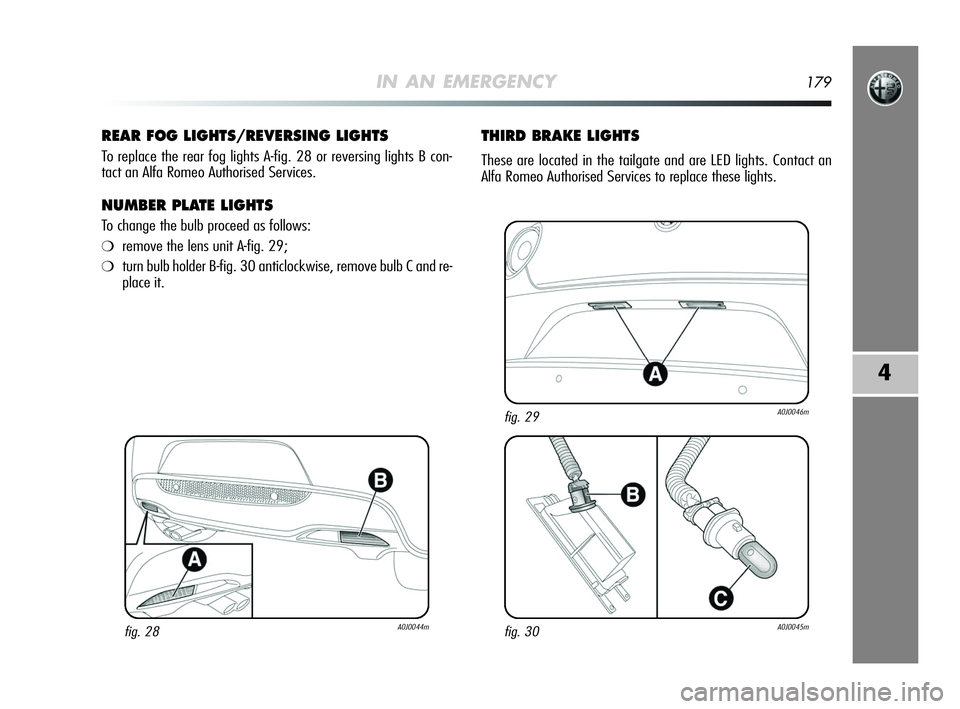
To replace the rear fog lights A-fig. 28 or reversing lights B con-
tact an Alfa Romeo Authorised Services.
NUMBER PLATE LIGHTS
To change the bulb proceed as follows:
❍remove the lens unit A-fig. 29;
❍turn bulb holder B-fig. 30 anticlockwise, remove bulb C and re-
place it.
THIRD BRAKE LIGHTS
These are located in the tailgate and are LED lights. Contact an
Alfa Romeo Authorised Services to replace these lights.
fig. 28A0J0044mfig. 30A0J0045m
fig. 29A0J0046m
159-196 Alfa MiTo GB 12-11-2008 15:45 Pagina 179
Page 181 of 250
180IN AN EMERGENCY
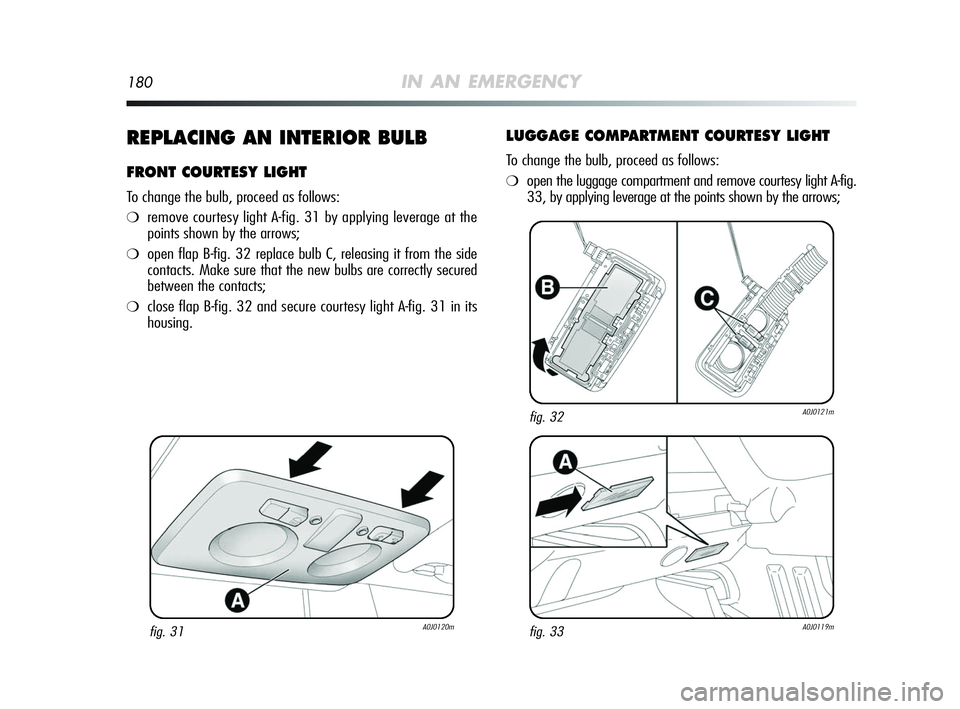
REPLACING AN INTERIOR BULB
FRONT COURTESY LIGHT
To change the bulb, proceed as follows:
❍remove courtesy light A-fig. 31 by applying leverage at the
points shown by the arrows;
❍open flap B-fig. 32 replace bulb C, releasing it from the side
contacts. Make sure that the new bulbs are correctly secured
between the contacts;
❍close flap B-fig. 32 and secure courtesy light A-fig. 31 in its
housing.
LUGGAGE COMPARTMENT COURTESY LIGHT
To change the bulb, proceed as follows:
❍open the luggage compartment and remove courtesy light A-fig.
33, by applying leverage at the points shown by the arrows;
fig. 31A0J0120m
fig. 32A0J0121m
fig. 33A0J0119m
159-196 Alfa MiTo GB 12-11-2008 15:45 Pagina 180
Page 182 of 250
IN AN EMERGENCY181
4
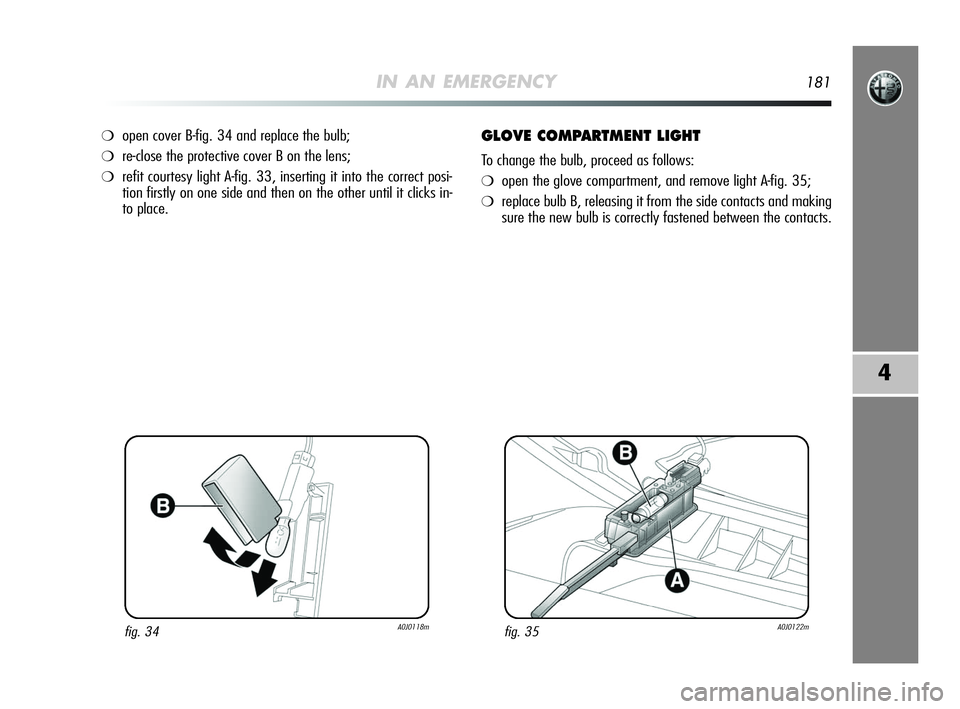
❍open cover B-fig. 34 and replace the bulb;
❍re-close the protective cover B on the lens;
❍refit courtesy light A-fig. 33, inserting it into the correct posi-
tion firstly on one side and then on the other until it clicks in-
to place.
GLOVE COMPARTMENT LIGHT
To change the bulb, proceed as follows:
❍open the glove compartment, and remove light A-fig. 35;
❍replace bulb B, releasing it from the side contacts and making
sure the new bulb is correctly fastened between the contacts.
fig. 34A0J0118mfig. 35A0J0122m
159-196 Alfa MiTo GB 12-11-2008 15:45 Pagina 181