stop start Alfa Romeo MiTo 2011 Owner handbook (in English)
[x] Cancel search | Manufacturer: ALFA ROMEO, Model Year: 2011, Model line: MiTo, Model: Alfa Romeo MiTo 2011Pages: 262, PDF Size: 6.46 MB
Page 119 of 262
118GETTING TO KNOW YOUR CAR
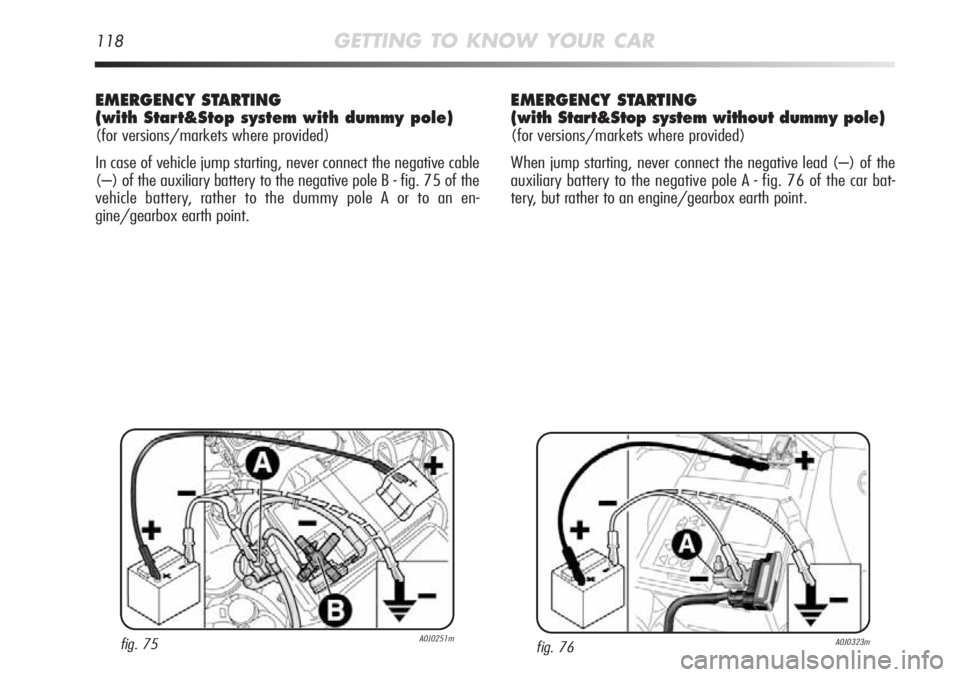
EMERGENCY STARTING
(with Start&Stop system with dummy pole)
(for versions/markets where provided)
In case of vehicle jump starting, never connect the negative cable
(–) of the auxiliary battery to the negative pole B - fig. 75 of the
vehicle battery, rather to the dummy pole A or to an en-
gine/gearbox earth point.
fig. 75A0J0251m
EMERGENCY STARTING
(with Start&Stop system without dummy pole)
(for versions/markets where provided)
When jump starting, never connect the negative lead (–) of the
auxiliary battery to the negative pole A - fig. 76 of the car bat-
tery, but rather to an engine/gearbox earth point.
fig. 76A0J0323m
Page 135 of 262
134SAFETY
The warning lights can be red and green and they operate as fol-
lows (fig. 4):
❍1=front left seat (driver's condition for left-hand drive versions)
❍2=rear left seat (passenger)
❍3=rear centre seat (passenger)
❍4=rear right seat (passenger)
❍5=front right seat (passenger's condition for left-hand drive
versions)
Front seats (warning light no. 1 = driver and
no. 5 = passenger)
Driver
If the driver is the only occupant and his seat belt is unfastened,
when 20 km/h is exceeded or when travelling at a speed from 10
to 20 km/h for longer than 5 seconds, an acoustic reminder se-
quence will be started for front seats, consisting of a tone for 6 sec-
onds followed by a 90 second beep. The warning light will blink.
The warning lights will stay on fixed at the end of the cycle until
the engine is stopped. The acoustic reminder will be interrupted im-
mediately when the driver's seat belt is fastened and the warning
light will turn green. The reminder cycle (acoustic and visual) will
be repeated as described above and the red warning light will flash
if the seat belt is unfastened again while travelling.
Passenger
A similar situation arises for the front passenger, except that the
warning lights becomes green and the signal also stops when the
passenger leaves the car. In the event that both front seat belts are
unfastened with the vehicle in motion, a few seconds apart, the
acoustic signal refers to the most recent event, while both warning
lights display a visual signal independently of one another.
Rear seats (warning light no. 2, no. 3 and no. 4)
For rear seats, the reminder cycle is run only when any seat belt
is unfastened (red flashing warning light). In this condition, the
warning light referred to the seat belt which has been unfastened
will become red and blink for approximately 30 seconds. There is
also an acoustic signal.
The visual indication (red flashing) will start and stop independently
for each warning light if several seat belts are unfastened. The warn-
ing light will become green when the relevant seat belt is fas-
tened again.
After about 30 seconds from the last reminder, the warning lights
for rear seats will switch off, independently of the belt conditions
(red or green).
IMPORTANT NOTES
The warning lights are all off if all seat belts (front and rear) are
already fastened when the ignition key is turned on MAR.
All warning lights will light up when at least one belt goes from fas-
tened to unfastened or vice versa.
Page 155 of 262
154STARTING UP AND DRIVING
STARTING THE ENGINE
STARTING PROCEDURE FOR PETROL VERSIONS
Proceed as follows:
❍engage the handbrake and place the gearbox in neutral;
❍press the clutch pedal down to the floor without touching the
accelerator;
❍turn the ignition key to AVV and let it go the moment the en-
gine starts.
IMPORTANT NOTES
❍If the engine does not start on the first attempt, turn the igni-
tion key to STOP before repeating the operation.
❍If, when the ignition key is on MAR, the Ywarning light (or
symbol in the display) remains lit together with the
Uwarning
light, turn the key to STOP and then back to MAR; if the warn-
ing light remains on, try using the other keys provided with the
car. If you are still unable to start the engine carry out the emer-
gency starting procedure (see “Emergency Start-up” in chap-
ter 4) and contact an Alfa Romeo Authorised Service Provider.
❍Never leave the ignition key on MAR when the engine is off.
PROCEDURE FOR DIESEL VERSIONS
Proceed as follows:
❍engage the handbrake and place the gearbox in neutral;
❍turn the ignition key to MAR: the mandYwarning lights
(or symbol in the display) will come on;
❍wait for the warning light (or symbol in the display) to go
out;
❍press the clutch pedal down to the floor without touching the
accelerator;
❍turn the ignition key to AVV as soon as the mwarning light
goes out. Waiting too long will waste the work done by the
glow plugs. Release the key as soon as the engine starts.
If warning light mblinks for 60 seconds after
starting or during prolonged cranking, this indi-
cates a fault in the glow plug pre-heating system.
Use the car normally if the engine starts and contact an
Alfa Romeo Authorised Services provider as soon as pos-
sible.
Is is dangerous to let the engine run in enclosed
spaces. The engine depletes oxygen and discharges
carbon dioxide, carbon monoxide and other toxic
gases.
Page 156 of 262
STARTING UP AND DRIVING155
3
In the initial period of use, it is advisable to avoid
placing the car under excessive stress (for instance
excessive acceleration, extended travel at maxi-
mum speed, sharp braking etc.).
Remember that the servo brake and electric pow-
er steering are not operational until the engine has
been started, therefore more effort than usual is
required on the brake pedal and steering wheel.
Avoid jump starting the engine by pushing, towing
or driving downhill. These manoeuvres may dam-
age the catalytic converter.
When the engine is off, do not leave the key in
the ignition switch turned to MAR to avoid drain-
ing the battery.
HOW TO WARM UP THE ENGINE AFTER IT HAS
JUST STARTED (petrol and diesel engines)
Proceed as follows:
❍drive off slowly, letting the engine turn at medium speed. Do
not accelerate abruptly;
❍do not demand maximum performance for the first few kilo-
metres. Wait until the engine coolant gauge starts moving.
EMERGENCY START
If the Ywarning light in the instrument panel remains on con-
stantly, contact an Alfa Romeo Authorised Service Provider.
STOPPING THE ENGINE
Turn the ignition key to STOP while the engine is idling.
IMPORTANT After a taxing drive, before turning the engine off you
should allow it to idle to allow the temperature in the engine com-
partment to fall.
A quick burst on the accelerator before turning off
the engine serves absolutely no practical purpose,
it wastes fuel and is damaging, especially to tur-
bocharged engines.
Page 160 of 262
STARTING UP AND DRIVING159
3
Roof rack/ski rack
Remove the roof rack or the ski rack from the roof after use. These
accessories decrease aerodynamic penetration of the car and have
a negative effect on fuel consumption. It is better to use a trailer,
particularly for transporting bulky objects.
Electric devices
Use electric devices only for the amount of time needed. The heat-
ed rear windscreen, additional headlights, windscreen wipers and
heater fan require a considerable amount of energy; increasing the
current uptake increases fuel consumption (by up to +25% in an
urban cycle).
Climate control
Using the climate control system increases fuel consumption: use
the air vents when outdoor temperature permits.
Spoilers
The use of non-certified spoilers may adversely affect air drag and
fuel consumption.
DRIVING STYLE
Starting
Do not warm the engine up with the car at a standstill and do not
use excessive engine speeds: the engine warms up very slowly in
these conditions, increasing fuel consumption and emissions. It is
advisable to start off immediately and slowly, keeping the engine
speed down: the engine will warm up much faster this way.
Unnecessar y actions
Avoid revving up when starting at traffic lights or before stopping
the engine. The latter action, like double-declutching, is unneces-
sary and causes increased fuel consumption and pollution.
Gear selection
When traffic and road conditions allow, use a high gear. Using a
low gear for faster acceleration will increase fuel consumption. In
the same way improper use of a high gear increases consump-
tion, emissions and engine wear.
Top speed
Fuel consumption considerably increases as speed increases. Keep
your speed as even as possible, avoiding unnecessary braking
and acceleration which cause excessive fuel consumption and in-
creased emissions.
Page 197 of 262
196IN AN EMERGENCY
RECHARGING THE BATTERY
IMPORTANT The battery recharging procedure is provided as an ex-
ample only. Contact an Alfa Romeo Authorised Services to carry
out this operation.
We recommend recharging the battery slowly for approximately
24 hours at low amperage. A prolonged recharge might damage
the battery.
VERSIONS WITHOUT Start&Stop SYSTEM
(for versions/markets, where provided)
Charge the battery as follows:
❍disconnect the battery negative terminal;
❍connect the charger leads to the battery terminals, observing
the polarity;
❍turn on the charger;
❍when you have finished, turn the charger off before discon-
necting the battery;
❍reconnect battery negative terminal.
Page 198 of 262
IN AN EMERGENCY197
4
VERSIONS WITH Start&Stop SYSTEM
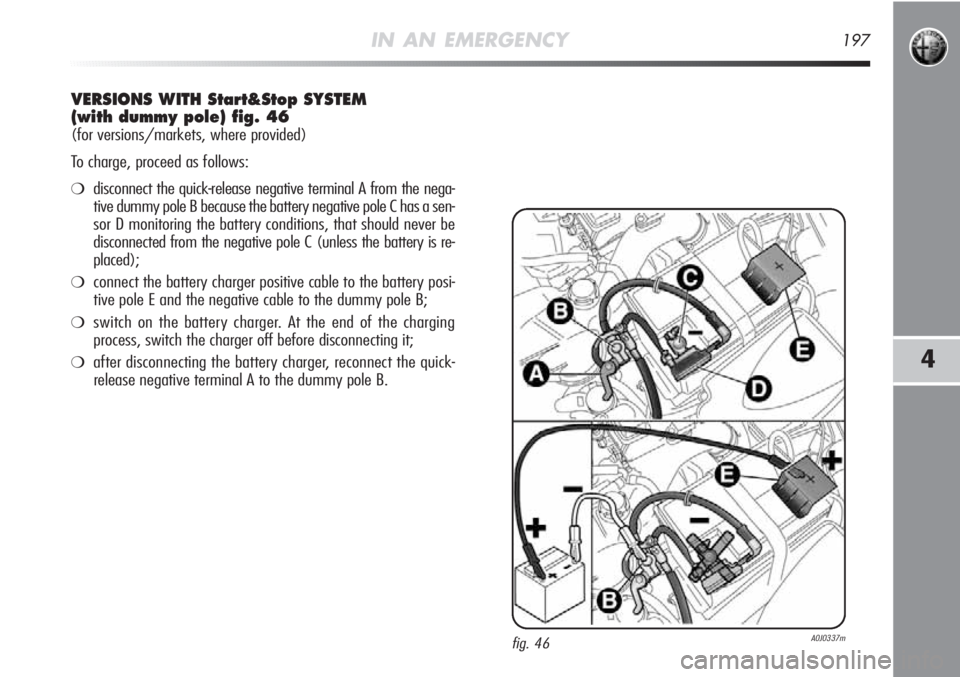
(with dummy pole) fig. 46
(for versions/markets, where provided)
To charge, proceed as follows:
❍disconnect the quick-release negative terminal A from the nega-
tive dummy pole B because the battery negative pole C has a sen-
sor D monitoring the battery conditions, that should never be
disconnected from the negative pole C (unless the battery is re-
placed);
❍connect the battery charger positive cable to the battery posi-
tive pole E and the negative cable to the dummy pole B;
❍switch on the battery charger. At the end of the charging
process, switch the charger off before disconnecting it;
❍after disconnecting the battery charger, reconnect the quick-
release negative terminal A to the dummy pole B.
fig. 46A0J0337m
Page 199 of 262

198IN AN EMERGENCY
VERSIONS WITH Start&Stop SYSTEM
(without dummy pole) fig. 47
(for versions/markets, where provided)
To charge, proceed as follows:
❍disconnect the connector A (pressing the button B) from the
sensor C monitoring the battery conditions, on the negative
pole D of the battery;
❍connect the battery charger positive cable E and the negative
cable to the terminal of sensor D, according to figure;
❍turn on the battery charger. At the end of the charging process,
switch the battery charger off;
❍after disconnecting the battery charger, reconnect the connec-
tor A to the sensor C according to figure.
fig. 47A0J0338m
Page 220 of 262
CARE AND MAINTENANCE219
5
WHEELS AND TYRES
Before embarking on a long trip check the tyre inflation pressure
(and small spare wheel); check the pressure with the tyres cold.
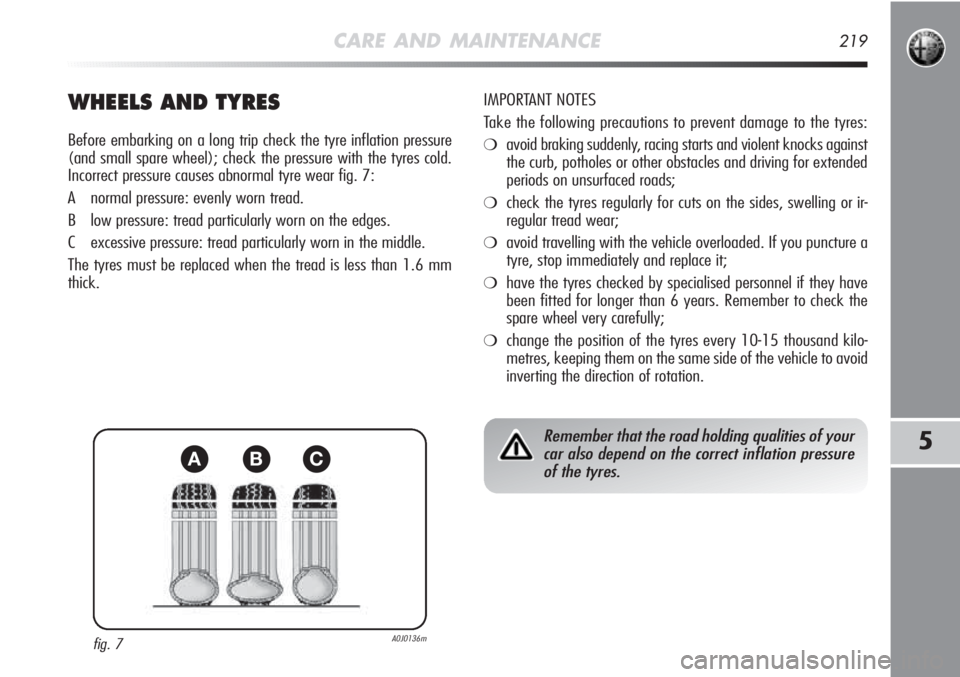
Incorrect pressure causes abnormal tyre wear fig. 7:
A normal pressure: evenly worn tread.
B low pressure: tread particularly worn on the edges.
C excessive pressure: tread particularly worn in the middle.
The tyres must be replaced when the tread is less than 1.6 mm
thick.IMPORTANT NOTES
Take the following precautions to prevent damage to the tyres:❍avoid braking suddenly, racing starts and violent knocks against
the curb, potholes or other obstacles and driving for extended
periods on unsurfaced roads;
❍check the tyres regularly for cuts on the sides, swelling or ir-
regular tread wear;
❍avoid travelling with the vehicle overloaded. If you puncture a
tyre, stop immediately and replace it;
❍have the tyres checked by specialised personnel if they have
been fitted for longer than 6 years. Remember to check the
spare wheel very carefully;
❍change the position of the tyres every 10-15 thousand kilo-
metres, keeping them on the same side of the vehicle to avoid
inverting the direction of rotation.
fig. 7A0J0136m
ABC
Remember that the road holding qualities of your
car also depend on the correct inflation pressure
of the tyres.
Page 257 of 262
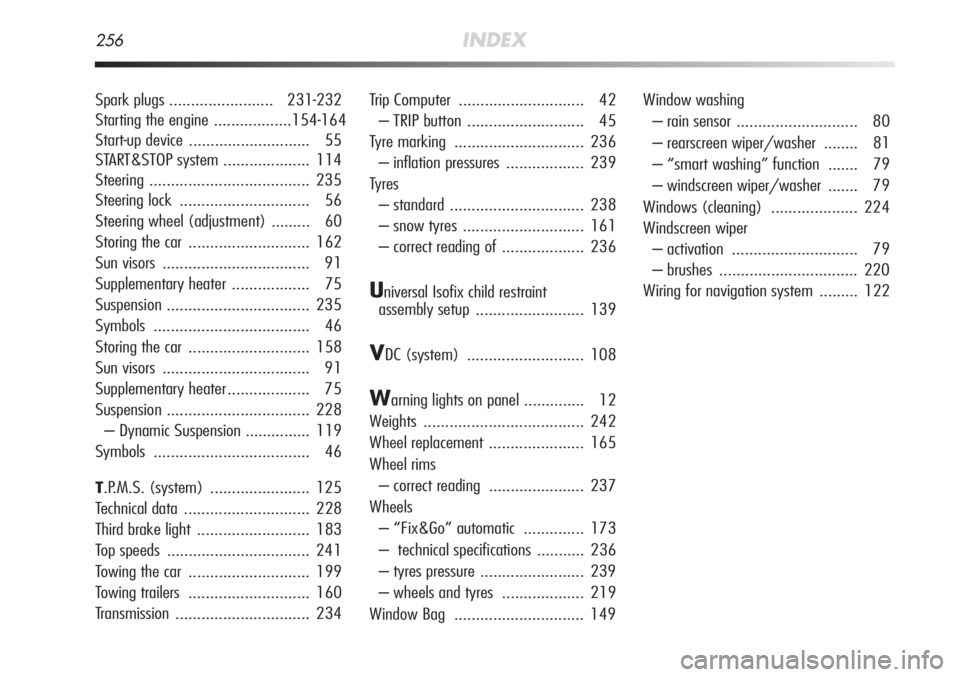
256INDEX
Spark plugs ........................231-232
Starting the engine ..................154-164
Start-up device ............................ 55
START&STOP system .................... 114
Steering ..................................... 235
Steering lock.............................. 56
Steering wheel (adjustment) ......... 60
Storing the car ............................ 162
Sun visors .................................. 91
Supplementary heater .................. 75
Suspension ................................. 235
Symbols .................................... 46
Storing the car ............................ 158
Sun visors .................................. 91
Supplementary heater ................... 75
Suspension ................................. 228
– Dynamic Suspension ............... 119
Symbols .................................... 46
T.P.M.S. (system) ....................... 125
Technical data............................. 228
Third brake light.......................... 183
Top speeds ................................. 241
Towing the car ............................ 199
Towing trailers............................ 160
Transmission ............................... 234Trip Computer ............................. 42
– TRIP button ........................... 45
Tyre marking .............................. 236
– inflation pressures.................. 239
Tyres
– standard ............................... 238
– snow tyres ............................ 161
– correct reading of ................... 236
Universal Isofix child restraint
assembly setup......................... 139
VDC (system)........................... 108
Warning lights on panel .............. 12
Weights ..................................... 242
Wheel replacement...................... 165
Wheel rims
– correct reading ...................... 237
Wheels
– “Fix&Go” automatic .............. 173
– technical specifications ........... 236
– tyres pressure ........................ 239
– wheels and tyres ................... 219
Window Bag .............................. 149Window washing
– rain sensor ............................ 80
– rearscreen wiper/washer ........ 81
– “smart washing” function ....... 79
– windscreen wiper/washer ....... 79
Windows (cleaning).................... 224
Windscreen wiper
– activation............................. 79
– brushes ................................ 220
Wiring for navigation system ......... 122