headlights Alfa Romeo MiTo 2014 Owner's Manual
[x] Cancel search | Manufacturer: ALFA ROMEO, Model Year: 2014, Model line: MiTo, Model: Alfa Romeo MiTo 2014Pages: 280, PDF Size: 8.79 MB
Page 19 of 280
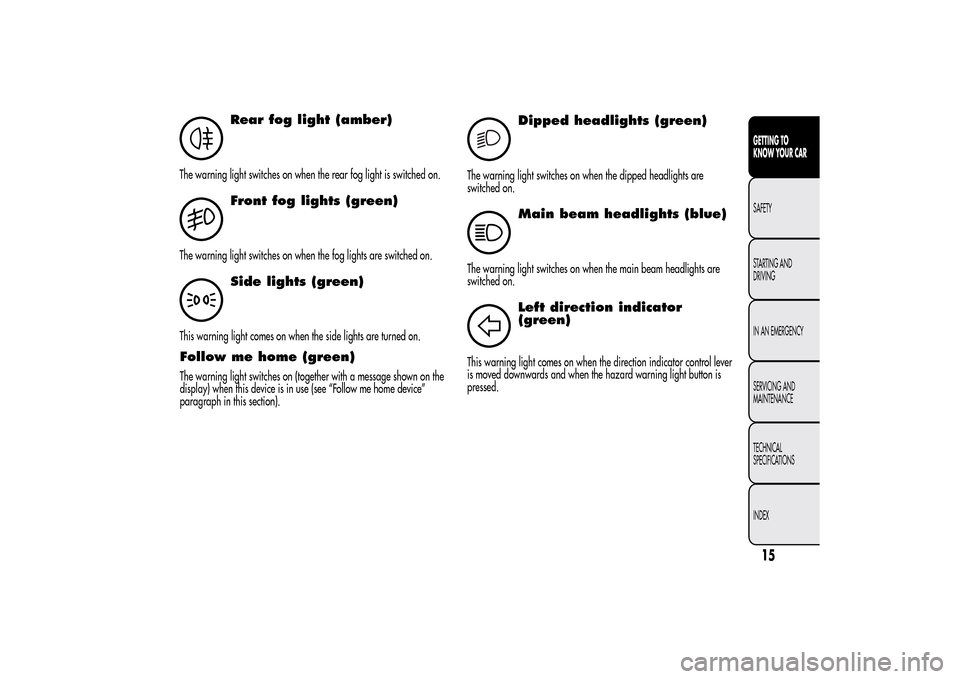
Rear fog light (amber)
The warning light switches on when the rear fog light is switched on.
Front fog lights (green)
The warning light switches on when the fog lights are switched on.
Side lights (green)
This warning light comes on when the side lights are turned on.Follow me home (green)The warning light switches on (together with a message shown on the
display) when this device is in use (see “Follow me home device”
paragraph in this section).
2
Dipped headlights (green)
The warning light switches on when the dipped headlights are
switched on.
Main beam headlights (blue)
The warning light switches on when the main beam headlights are
switched on.
Left direction indicator
(green)
This warning light comes on when the direction indicator control lever
is moved downwards and when the hazard warning light button is
pressed.
15GETTING TO
KNOW YOUR CARSAFETY
STARTING AND
DRIVING
IN AN EMERGENCY
SERVICING AND
MAINTENANCE
TECHNICAL
SPECIFICATIONS
INDEX
Page 29 of 280
Briefly press the SET/
button to go back to the menu screen or
hold the button down to go back to the standard screen without saving.
To cancel the setting, proceed as follows:
❒briefly press the SET/
button, "On" will flash in the display;
❒press the − button, the display flashes ("Off");
❒briefly press the SET/button to go back to the menu screen or
hold the button down to go back to the standard screen without
saving.
Headlight sensor (Automatic
headlight/dusk sensor sensitivity
adjustment)(for versions/markets, where provided)
This function enables the headlights to come on or go off depending on
external lighting conditions.
The dusk sensor sensitivity can be adjusted according to 3 levels (level
1= minimum sensitivity, level 2= average sensitivity, level 3= maximum
sensitivity).
The higher the sensitivity set, the lesser is the external light variation
needed to switch the lights on (e.g. with a setting on level 3 at sunset
the headlights come on in advance in relation to levels 1 and 2).
Proceed as follows to set the desired adjustment:
❒press the SET/
button briefly to make the display flash the
previously set level;
❒press the "+" or "−" button to select;
❒briefly press the SET/
button to go back to the menu screen or
hold the button down to go back to the standard screen without
saving.
Rain sensor (Rain sensor sensitivity
adjustment)This function allows you to adjust the rain sensor sensitivity to 4 levels.
To set the required sensitivity level proceed as follows:
❒briefly press the SET/
button, the previously set sensitivity level
will flash on the display;
❒press the "+" or "−" button to adjust;
❒briefly press the SET/button to go back to the menu screen or
hold the button down to go back to the standard screen without
saving.
Activation/Trip B data
(Trip B enablement)This function may be used to activate (On) or deactivate (Off) the Trip B
(partial trip). For further information see “Trip computer”.
Proceed as follows to switch the function on and off:
❒press the SET/
button briefly to make the display flash "On" or
"Off" according to what was previously set;
❒press the "+" or "−" button to select;
❒briefly press the SET/
button to go back to the menu screen or
hold the button down to go back to the standard screen without
saving.
25GETTING TO
KNOW YOUR CARSAFETY
STARTING AND
DRIVING
IN AN EMERGENCY
SERVICING AND
MAINTENANCE
TECHNICAL
SPECIFICATIONS
INDEX
Page 66 of 280
SIDE LIGHTS/DIPPED BEAM
HEADLIGHTSWith the ignition key turned to MAR, turn ring nut A fig. 35 to
.
The daytime running lights are switched off and the side lights and
dipped headlights are switched on. The warning light
switches
on on the instrument panel.
PARKING LIGHTSThese lights can only be switched on with ignition key at STOP or
removed, by moving ring nut A first to position
and then to position
.
When the parking lights are switched on, the number plate lights and
the front and rear side lights switch on as well (the daytime running
lights (DRLs) remain off however).
The warning light
switches on on the instrument panel.
When the direction indicator stalk is activated the side for the lights
(left or right) can be selected.
AUTOMATIC LIGHTING CONTROL
(AUTOLIGHT) (Dusk sensor)(for versions/markets, where provided)
This infrared LED sensor, combined with the rain sensor and located on
the windscreen, detects the variations in outside brightness depending
on the light sensitivity set with the Set-up Menu: the greater the
sensitivity, the less external light is required to activate the exterior
lights.Activation
The dusk sensor activates when ring nut A fig. 35 is turned to
.In
this way the side lights and dipped headlights are activated
automatically according to the external light level.
IMPORTANT The sensor is unable to detect the presence of fog.
Therefore under these circumstances, these lights must be turned on
manually.
When the lights are turned on by the sensor, the fog lights (for
versions/markets, where provided) and the rear fog lights may be
turned on.
When the lights are automatically switched off, the front and rear fog
lights (if activated) are also switched off. The next time the lights are
switched on automatically, the fog lights must be reactivated manually
(if required).
With the sensor active, it is possible to flash the headlights but the
main beam headlights cannot be switched on. If you need to turn these
lights on, turn ring nut A to position
and turn the dipped
headlights on.
When the lights have been activated automatically and are then
switched off by the sensor, the dipped beam headlights are switched
off first, followed by the side lights a few seconds later.
If the sensor is activated but is malfunctioning, the side lights and
dipped beam headlights are switched on irrespective of the outside
light level and the sensor failure is indicated on the instrument panel
display.
It is also possible to deactivate the sensor and switch on these lights if
necessary.
62GETTING TO
KNOW YOUR CAR
SAFETY
STARTING AND
DRIVING
IN AN EMERGENCY
SERVICING AND
MAINTENANCE
TECHNICAL
SPECIFICATIONS
INDEX
Page 67 of 280
MAIN BEAM HEADLIGHTSTo activate the main beam headlights, with ring nut A at
, pull the
stalk towards the steering wheel beyond the end of travel position.
The warning light
switches on on the instrument panel.
When the stalk is pulled towards the steering wheel again, beyond the
end of travel position, the main beam headlights deactivate, the
dipped beam headlights reactivate and the warning light
switches
off.
FLASHINGTo do this, pull the stalk towards the steering wheel (unstable position)
regardless of the position of ring nut A.
The warning light
switches on on the instrument panel.
DIRECTION INDICATORSBring the stalk into (stable) position:
❒upwards: activates right direction indicator;
❒downwards: activates left direction indicator.
Warning light
or
will flash in the instrument panel.
The indicators are switched off automatically when the steering wheel
is straightened."Lane change" function
If you want to signal that you are changing lane, hold the left stalk in
the unstable position for less than half a second. The direction indicator
on the selected side flashes 3 times and then switches off automatically.
"FOLLOW ME HOME" DEVICEThis device allows you to illuminate the area in front of the car for a
certain amount of time.
Activation
With the ignition key at STOP or removed, pull stalk A towards the
steering wheel and move it within 2 minutes of the engine switching
off.
At each single movement of the stalk, the lights will remain on for an
extra 30 seconds up to a maximum of 210 seconds; then the lights are
switched off automatically.
The
warning light on the instrument panel will light up (and the
corresponding message will appear on the display) as long as the
function is active.
The light comes on when the stalk is first moved and stays on until the
function is automatically deactivated. Each movement of the stalk
only increases the amount of time the lights stay on.
Deactivation
Keep stalk A pulled towards the steering wheel for more than 2
seconds.
63GETTING TO
KNOW YOUR CARSAFETY
STARTING AND
DRIVING
IN AN EMERGENCY
SERVICING AND
MAINTENANCE
TECHNICAL
SPECIFICATIONS
INDEX
Page 68 of 280
EXTERNAL COURTESY LIGHTSThis function lights up the car and the space in front of it when the
doors are unlocked.
Activation
When the car is parked and the doors are unlocked by pressing thebutton on the remote control (or the luggage compartment is
unlocked by pressing
), the dipped headlights, side lights and
number plate lights are activated.
The lights remain lit for approximately 25 seconds unless the doors
and boot are locked again with the remote control or the doors or boot
are opened and reclosed. In these cases they go out after 5 seconds.
The exterior courtesy lights can be enabled/disabled using the Setup
Menu (see the paragraph “Menu Items” in this chapter).
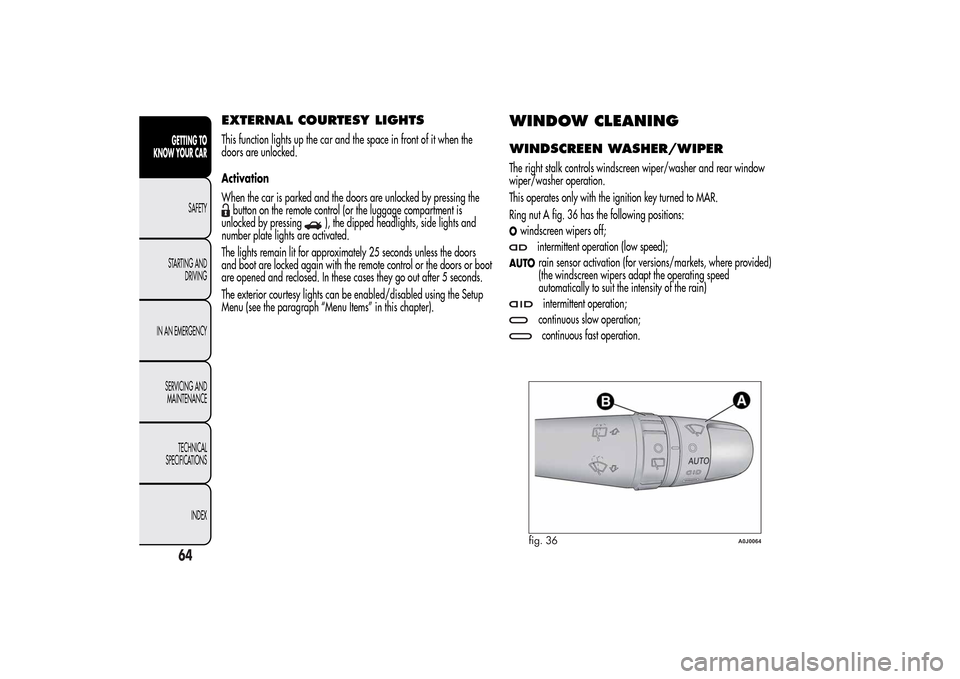
WINDOW CLEANINGWINDSCREEN WASHER/WIPERThe right stalk controls windscreen wiper/washer and rear window
wiper/washer operation.
This operates only with the ignition key turned to MAR.
Ring nut A fig. 36 has the following positions:Owindscreen wipers off;
intermittent operation (low speed);
AUTO
rain sensor activation (for versions/markets, where provided)
(the windscreen wipers adapt the operating speed
automatically to suit the intensity of the rain)intermittent operation;continuous slow operation;continuous fast operation.
fig. 36
A0J0064
64GETTING TO
KNOW YOUR CAR
SAFETY
STARTING AND
DRIVING
IN AN EMERGENCY
SERVICING AND
MAINTENANCE
TECHNICAL
SPECIFICATIONS
INDEX
Page 76 of 280
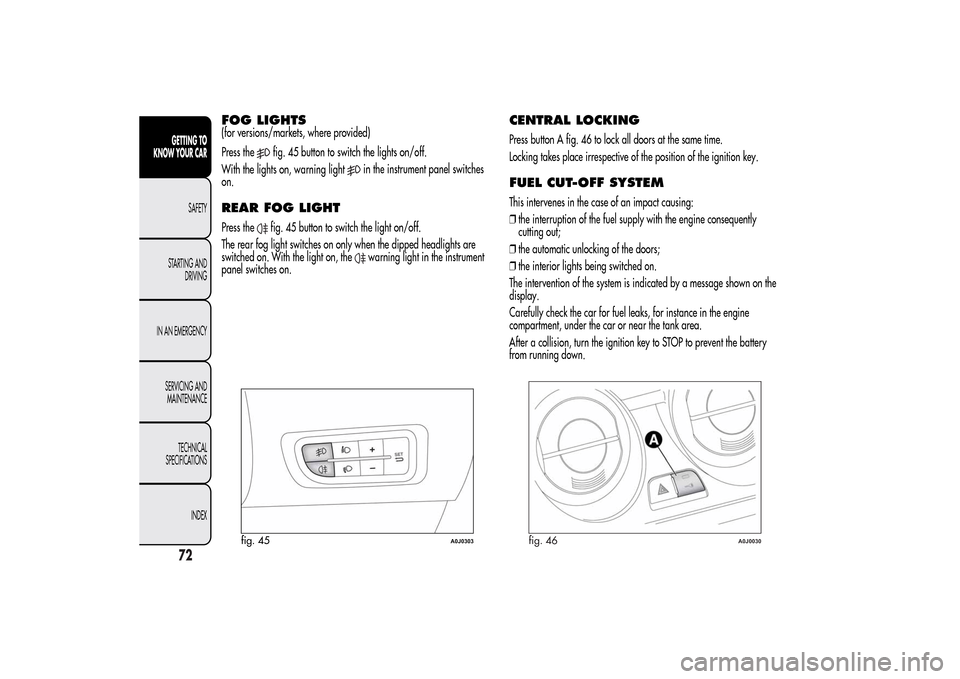
FOG LIGHTS(for versions/markets, where provided)
Press the
fig. 45 button to switch the lights on/off.
With the lights on, warning light
in the instrument panel switches
on.
REAR FOG LIGHTPress the
fig. 45 button to switch the light on/off.
The rear fog light switches on only when the dipped headlights are
switched on. With the light on, the
warning light in the instrument
panel switches on.
CENTRAL LOCKINGPress button A fig. 46 to lock all doors at the same time.
Locking takes place irrespective of the position of the ignition key.FUEL CUT-OFF SYSTEMThis intervenes in the case of an impact causing:
❒the interruption of the fuel supply with the engine consequently
cutting out;
❒the automatic unlocking of the doors;
❒the interior lights being switched on.
The intervention of the system is indicated by a message shown on the
display.
Carefully check the car for fuel leaks, for instance in the engine
compartment, under the car or near the tank area.
After a collision, turn the ignition key to STOP to prevent the battery
from running down.
fig. 45
A0J0303
fig. 46
A0J0030
72GETTING TO
KNOW YOUR CAR
SAFETY
STARTING AND
DRIVING
IN AN EMERGENCY
SERVICING AND
MAINTENANCE
TECHNICAL
SPECIFICATIONS
INDEX
Page 94 of 280
HEADLIGHTSLIGHT BEAM DIRECTIONThe correct orientation of the headlights is important for the driver's
comfort and safety as well as for all other road users. This is also
covered by a specific rule of the highway code.
The headlights must be correctly aligned to ensure the best visibility
conditions for yourself and others when driving with lights on. To check
and, if necessary, adjust, contact Alfa Romeo Authorized Services.HEADLIGHT ALIGNMENT CORRECTORThis device works with the ignition key in the MAR position and the
dipped headlights on.
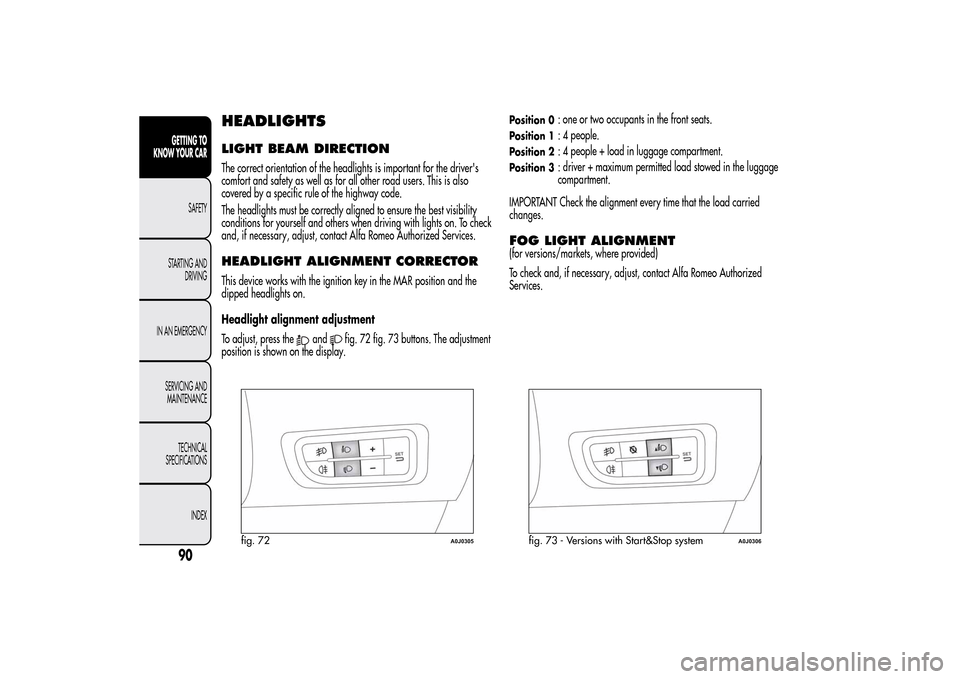
Headlight alignment adjustment
To adjust, press the
and
fig. 72 fig. 73 buttons. The adjustment
position is shown on the display.
Position 0
: one or two occupants in the front seats.
Position 1
: 4 people.
Position 2
: 4 people + load in luggage compartment.
Position 3
: driver + maximum permitted load stowed in the luggage
compartment.
IMPORTANT Check the alignment every time that the load carried
changes.
FOG LIGHT ALIGNMENT(for versions/markets, where provided)
To check and, if necessary, adjust, contact Alfa Romeo Authorized
Services.
fig. 72
A0J0305
fig. 73 - Versions with Start&Stop system
A0J0306
90GETTING TO
KNOW YOUR CAR
SAFETY
STARTING AND
DRIVING
IN AN EMERGENCY
SERVICING AND
MAINTENANCE
TECHNICAL
SPECIFICATIONS
INDEX
Page 95 of 280
ADJUSTING THE HEADLIGHTS ABROADThe dipped headlights are aligned to comply with the regulations of
the country of purchase. When travelling in countries with opposite
driving direction, to avoid dazzling the drivers on the other side of the
road, you need to cover areas of the headlight according to the
Highway code of the country you are travelling in.
ABS SYSTEMThe car is fitted with an ABS braking system, which prevents the wheels
from locking when braking, makes the most of road grip and gives
the best control when performing emergency braking under difficult
road conditions.
The EBD system (Electronic Braking Force Distribution) completes the
system allowing the brake force to be distributed between the front and
rear wheels.
IMPORTANT To obtain the maximum efficiency of the braking system,
a bedding-in period of about 500 km is needed: during this period
it is better to avoid sharp, repeated and prolonged braking.SYSTEM INTERVENTIONIt can be detected because the brake pedal pulsates slightly and the
system gets noisier: it means that the car speed should be altered
to suit the type of road surface.MECHANICAL BRAKE ASSIST
(emergency braking assistance)(for versions/markets, where provided)
This system, which cannot be deactivated, recognises emergency
braking conditions (according to the brake pedal operation speed) and
provides an additional hydraulic braking pressure to support that
provided by the driver. This allows faster and more powerful operation
of the braking system.
IMPORTANT When the Mechanical Brake Assist intervenes, noises may
be heard from the system. This is normal. In any case, while braking
keep the brake pedal firmly depressed.
91GETTING TO
KNOW YOUR CARSAFETY
STARTING AND
DRIVING
IN AN EMERGENCY
SERVICING AND
MAINTENANCE
TECHNICAL
SPECIFICATIONS
INDEX
Page 142 of 280
SAVING FUELHere are some suggestions which can help you to save fuel and lower
harmful emissions.GENERAL CONSIDERATIONSCar maintenance
Have checks and adjustments carried out in accordance with the
“Scheduled Servicing Plan” (see chapter “Maintenance and care”).
Ty r e s
Check the tyre pressure at least once every 4 weeks: if the pressure is
too low, consumption levels increase as resistance to rolling is higher.
Unnecessary loads
Do not travel with an overloaded boot. The weight of the car and its
arrangement greatly affect fuel consumption and stability.
Roof rack/ski rack
Remove the roof rack or the ski rack from the roof after use. These
accessories lower aerodynamic penetration and adversely affect
consumption levels. It is better to use a trailer to transport particularly
bulky objects.
Electrical devices
Only use electrical devices for the time needed. The heated rear
window, additional headlights, windscreen wipers and heater fan
require a considerable amount of energy; increasing the current uptake
increases fuel consumption (by up to +25% in an urban cycle).Climate control system
Using the climate control system will increase consumption: use the air
vents when the external temperature allows it.
Devices for aerodynamic control
The use of non-certified devices for aerodynamic control may adversely
affect air drag and fuel consumption.
DRIVING STYLEStarting
Do not warm up the engine at low or high revs when the vehicle is
stationary; this causes the engine to warm up more slowly, thereby
increasing fuel consumption and emissions. It is therefore advisable to
move off immediately, slowly, avoiding high speeds: in this way the
engine will warm up more quickly.
Unnecessary actions
Avoid revving up when at traffic lights or before switching off the
engine. The latter action, like double-declutching, is unnecessary and
causes increased fuel consumption and pollution.
Gear selection
Use a higher gear when traffic and road conditions allow it. Using a
low gear for faster acceleration will increase consumption. In the same
way improper use of a high gear increases consumption, emissions
and engine wear.
138GETTING TO KNOW
YOUR CAR
SAFETYSTARTING AND
DRIVINGIN AN EMERGENCY
SERVICING AND
MAINTENANCE
TECHNICAL
SPECIFICATIONS
INDEX
Page 157 of 280
CHANGING A BULBGENERAL INSTRUCTIONS❒Before changing a bulb check the contacts for oxidation;
❒blown bulbs must be replaced with others of the same type and
power;
❒after replacing a headlight bulb, always check its alignment;
❒when a light is not working, check that the corresponding fuse is
intact before changing a bulb. For the location of fuses, refer to
the paragraph “Replacing fuses” in this section.
Halogen bulbs must be handled holding the metal part
only. Touching the transparent part of the bulb with your
fingers may reduce the intensity of the emitted light and
even reduce the lifespan of the bulb. In case of accidental contact, wipe
the bulb with a cloth moistened with alcohol and let the bulb dry.Modifications or repairs to the electric system that are
not carried out properly or do not take the system
technical specifications into account can cause
malfunctions leading to the risk of fire.Halogen bulbs contain pressurised gas which may
cause small fragments of glass to be projected
outwards if the bulb is broken.
IMPORTANT When the weather is cold or damp or after heavy rain or
washing, the surface of headlights or rear lights, may steam up and/or
form drops of condensation on the inside. This is a natural
phenomenon due to the difference in temperature and humidity
between the inside and the outside of the glass which does not indicate
a fault and does not compromise the normal operation of lighting
devices. The mist disappears quickly when the lights are turned on,
starting from the centre of the diffuser, extending progressively towards
the edges.
153GETTING TO KNOW
YOUR CAR
SAFETY
STARTING AND
DRIVINGIN AN
EMERGENCYSERVICING AND
MAINTENANCE
TECHNICAL
SPECIFICATIONS
INDEX