door lock Alfa Romeo MiTo 2015 User Guide
[x] Cancel search | Manufacturer: ALFA ROMEO, Model Year: 2015, Model line: MiTo, Model: Alfa Romeo MiTo 2015Pages: 280, PDF Size: 8.52 MB
Page 46 of 280

IGNITION DEVICE
The key can be turned to three different positions fig. 21:
❒STOP: engine off, key can be removed, steering column locked.
Some electrical devices (e.g. car radio, central door locking system,
alarm, etc.) are enabled;
❒MAR: driving position. All electrical devices are enabled;
❒AVV: engine start-up.
The ignition switch is fitted with a safety system that requires the
ignition key to be turned back to STOP if the engine does not start,
before the starting operation can be repeated.
If the ignition switch is tampered with (e.g.: attempted
theft), have it checked over by Alfa Romeo Authorized
Services before driving again.
Always remove the key when you leave the car to
prevent someone from accidentally operating the
controls. Remember to engage the handbrake. Engage
1
stgear if the car is parked uphill or reverse if the car is parked
downhill. Never leave children unattended in the car.
STEERING LOCK
Engagement
When the key is at STOP, remove the key and turn the steering wheel
until it locks.
Disengagement
Move the steering wheel slightly and turn the ignition key to MAR.
It is absolutely forbidden to carry out any after-market
operation involving steering system or steering column
modifications (e.g.: installation of anti-theft device)
that could badly affect performance and safety, invalidate the
warranty and also result in non-compliance of the car with
type-approval requirements.
Never remove the key while the car is moving. The
steering wheel will lock as soon as it is turned. This
holds true for cars being towed as well.
fig. 21A0J0031
42
GETTING TO
KNOW YOUR CAR
SAFETY
STARTING AND
DRIVING
IN AN EMERGENCY
SERVICING AND
MAINTENANCE
TECHNICAL
SPECIFICATIONS
INDEX
Page 66 of 280
EXTERNAL COURTESY LIGHTS
This function lights up the car and the space in front of it when the
doors are unlocked.
Activation
When the car is parked and the doors are unlocked by pressing the
button on the remote control (or the luggage compartment is
unlocked by pressing
), the dipped headlights, side lights and
number plate lights are activated.
The lights remain lit for approximately 25 seconds unless the doors
and boot are locked again with the remote control or the doors or boot
are opened and reclosed. In these cases they go out after 5 seconds.
The exterior courtesy lights can be enabled/disabled using the Setup
Menu (see the paragraph “Menu Items” in this chapter).
WINDOW CLEANING
WINDSCREEN WASHER/WIPER
The right stalk controls windscreen wiper/washer and rear window
wiper/washer operation.
This operates only with the ignition key turned to MAR.
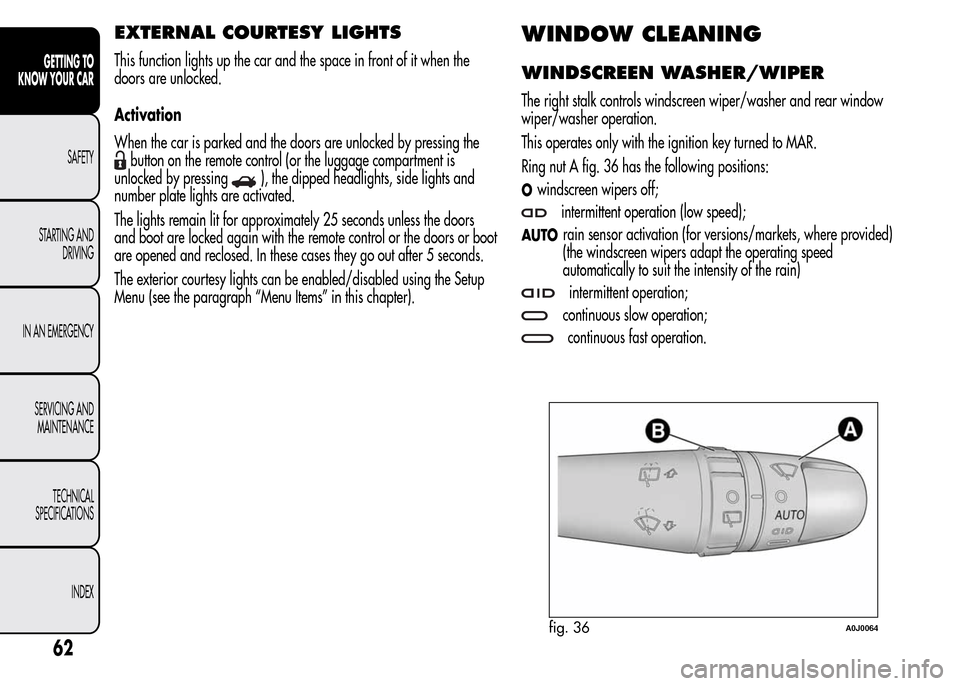
Ring nut A fig. 36 has the following positions:
Owindscreen wipers off;
intermittent operation (low speed);
AUTOrain sensor activation (for versions/markets, where provided)
(the windscreen wipers adapt the operating speed
automatically to suit the intensity of the rain)
intermittent operation;
continuous slow operation;
continuous fast operation.
fig. 36A0J0064
62
GETTING TO
KNOW YOUR CAR
SAFETY
STARTING AND
DRIVING
IN AN EMERGENCY
SERVICING AND
MAINTENANCE
TECHNICAL
SPECIFICATIONS
INDEX
Page 71 of 280
ROOF LIGHTS
FRONT ROOF LIGHT
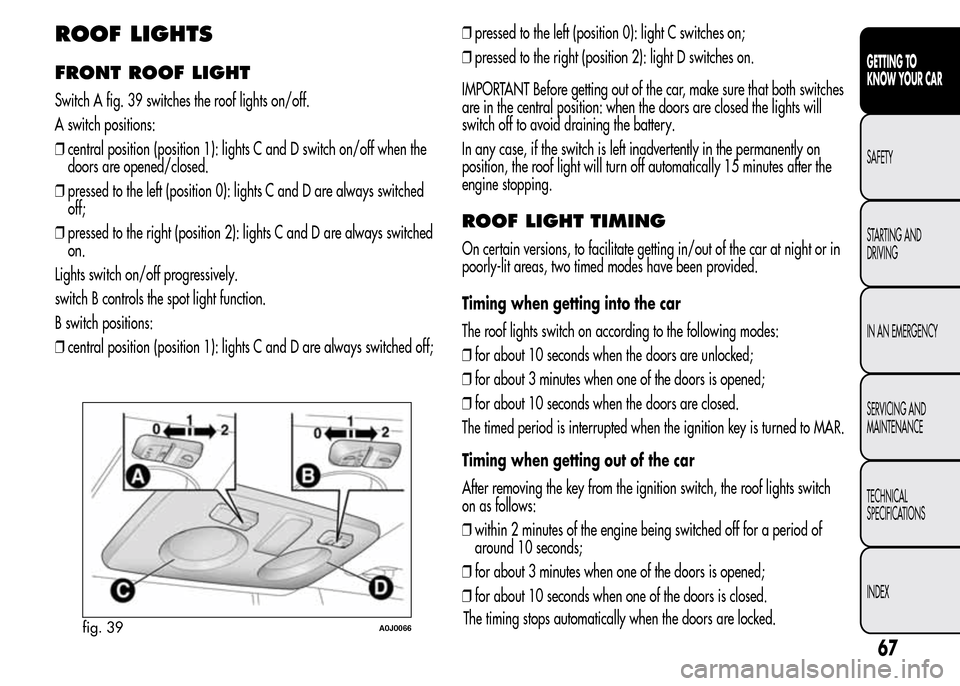
Switch A fig. 39 switches the roof lights on/off.
A switch positions:
❒central position (position 1): lights C and D switch on/off when the
doors are opened/closed.
❒pressed to the left (position 0): lights C and D are always switched
off;
❒pressed to the right (position 2): lights C and D are always switched
on.
Lights switch on/off progressively.
switch B controls the spot light function.
B switch positions:
❒central position (position 1): lights C and D are always switched off;❒pressed to the left (position 0): light C switches on;
❒pressed to the right (position 2): light D switches on.
IMPORTANT Before getting out of the car, make sure that both switches
are in the central position: when the doors are closed the lights will
switch off to avoid draining the battery.
In any case, if the switch is left inadvertently in the permanently on
position, the roof light will turn off automatically 15 minutes after the
engine stopping.
ROOF LIGHT TIMING
On certain versions, to facilitate getting in/out of the car at night or in
poorly-lit areas, two timed modes have been provided.
Timing when getting into the car
The roof lights switch on according to the following modes:
❒for about 10 seconds when the doors are unlocked;
❒for about 3 minutes when one of the doors is opened;
❒for about 10 seconds when the doors are closed.
The timed period is interrupted when the ignition key is turned to MAR.
Timing when getting out of the car
After removing the key from the ignition switch, the roof lights switch
on as follows:
❒within 2 minutes of the engine being switched off for a period of
around 10 seconds;
❒for about 3 minutes when one of the doors is opened;
❒for about 10 seconds when one of the doors is closed.
fig. 39A0J0066
67
GETTING TO
KNOW YOUR CAR
SAFETY
STARTING AND
DRIVING
IN AN EMERGENCY
SERVICING AND
MAINTENANCE
TECHNICAL
SPECIFICATIONS
INDEX
The timing stops automatically when the doors are locked.
Page 74 of 280
FOG LIGHTS
(for versions/markets, where provided)
Operation
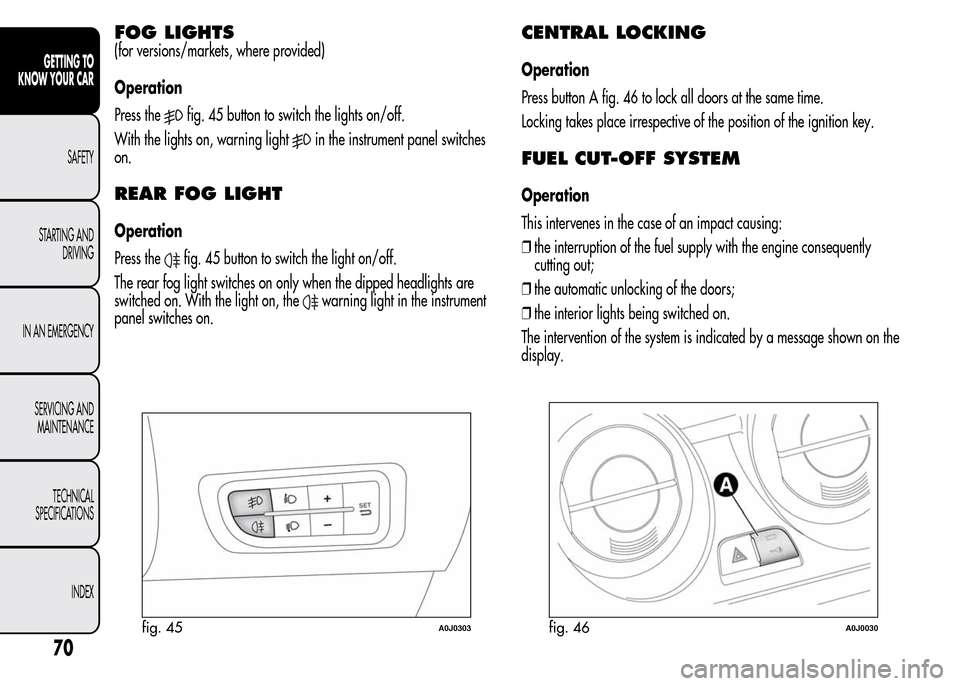
Press the
fig. 45 button to switch the lights on/off.
With the lights on, warning light
in the instrument panel switches
on.
REAR FOG LIGHT
Operation
Press the
fig. 45 button to switch the light on/off.
The rear fog light switches on only when the dipped headlights are
switched on. With the light on, the
warning light in the instrument
panel switches on.
CENTRAL LOCKING
Operation
Press button A fig. 46 to lock all doors at the same time.
Locking takes place irrespective of the position of the ignition key.
FUEL CUT-OFF SYSTEM
Operation
This intervenes in the case of an impact causing:
❒the interruption of the fuel supply with the engine consequently
cutting out;
❒the automatic unlocking of the doors;
❒the interior lights being switched on.
The intervention of the system is indicated by a message shown on the
display.
fig. 45A0J0303fig. 46A0J0030
70
GETTING TO
KNOW YOUR CAR
SAFETY
STARTING AND
DRIVING
IN AN EMERGENCY
SERVICING AND
MAINTENANCE
TECHNICAL
SPECIFICATIONS
INDEX
Page 81 of 280

MAINTENANCE/EMERGENCY
In the event of emergency or maintenance, the roof can be moved
manually when there is no power supply (opening/closing of the front
glass panel) by carrying out the following operations:
❒remove the protective cap A fig. 56 located on the internal lining,
between the two sun blinds;
❒take the Allen key B supplied, which is located in the on-board
documentation container or in the tool container in the luggage
compartment;
❒introduce the key into housing C and turn it clockwise to open the
roof or anticlockwise to close the roof.
DOORS
DOOR CENTRAL LOCKING/
UNLOCKING
Locking from the outside
With the doors closed, press the
button on the key or turn the metal
insert (located inside the key) in the driver side door lock.
The LED above fig. 57 button A switches on to indicate that the doors
have been locked.
The door locking function is operated:
❒with all the doors closed;
❒with all the doors closed and the luggage compartment open.
fig. 56A0J0328fig. 57A0J0030
77
GETTING TO
KNOW YOUR CAR
SAFETY
STARTING AND
DRIVING
IN AN EMERGENCY
SERVICING AND
MAINTENANCE
TECHNICAL
SPECIFICATIONS
INDEX
Page 82 of 280

Door unlocking from the outside
Press the
button on the key or turn the metal insert (located inside
the key) in the driver side door lock.
Door locking/unlocking from the inside
Press fig. 57 button A. The button has an LED that indicates whether
the car doors are locked or unlocked.
LED on: doors locked. Press button
once again to centrally unlock
all doors. The LED will switch off.
LED off: doors unlocked. Press the button
again to centrally lock all
doors. The doors will be locked only if all the doors are properly
shut.
Once the doors have been locked via the remote control or the key
pawl, it will no longer be possible to unlock them by pressing button
.
IMPORTANT With the central locking system on, pull the door lever of
one of the doors to open that door only (the LED on button A will
stay on if it is the passenger door).
In the absence of electrical power supply (blown fuse, battery
disconnected, etc.) it is still possible to lock the doors manually.
PASSENGER SIDE EMERGENCY FRONT
DOOR LOCKING DEVICE
The front passenger side door has a device to lock it when there is no
current.
To lock it, fit the metal insert of the ignition key in the housing A fig. 58
and move it upwards.
IMPORTANT If the battery is disconnected or the protection fuse blows,
the door opening/closing mechanism must be initialised as follows:
❒close all the doors;
❒press button
on the key or buttonfor locking/unlocking the
doors on the instrument panel;
❒press button
on the key or buttonfor locking/unlocking the
doors on the instrument panel.
fig. 58A0J0309
78
GETTING TO
KNOW YOUR CAR
SAFETY
STARTING AND
DRIVING
IN AN EMERGENCY
SERVICING AND
MAINTENANCE
TECHNICAL
SPECIFICATIONS
INDEX
Page 85 of 280
❒proceed in the same way as described in points 1 and 2 for the
passenger side door;
❒make sure that the initialisation is correct by checking that the
windows work automatically.
IMPORTANT With the central locking on, pulling the internal opening
lever for one of the doors switches the locking off for all the doors.
In the absence of electrical power supply (blown fuse, battery
disconnected, etc.) it is still possible to lock the doors manually. In this
case, the automatic lowering function of the windows is not available.
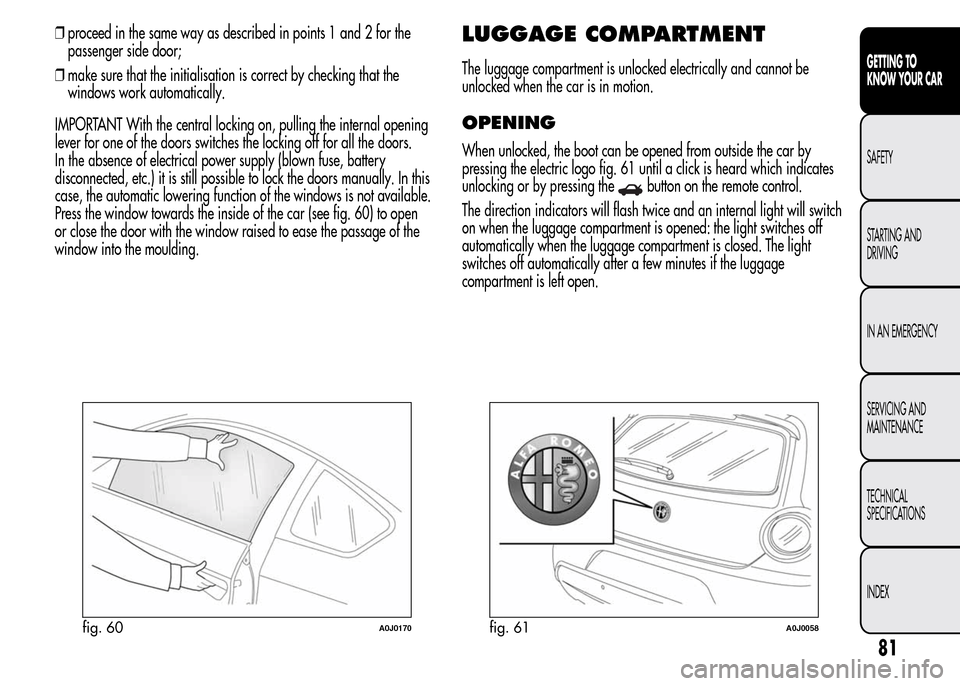
Press the window towards the inside of the car (see fig. 60) to open
or close the door with the window raised to ease the passage of the
window into the moulding.LUGGAGE COMPARTMENT
The luggage compartment is unlocked electrically and cannot be
unlocked when the car is in motion.
OPENING
When unlocked, the boot can be opened from outside the car by
pressing the electric logo fig. 61 until a click is heard which indicates
unlocking or by pressing the
button on the remote control.
The direction indicators will flash twice and an internal light will switch
on when the luggage compartment is opened: the light switches off
automatically when the luggage compartment is closed. The light
switches off automatically after a few minutes if the luggage
compartment is left open.
fig. 60A0J0170fig. 61A0J0058
81
GETTING TO
KNOW YOUR CAR
SAFETY
STARTING AND
DRIVING
IN AN EMERGENCY
SERVICING AND
MAINTENANCE
TECHNICAL
SPECIFICATIONS
INDEX
Page 86 of 280

Emergency opening from the inside
Proceed as follows:
❒remove the rear head restraints and completely fold back the seats
(see the paragraph “Expanding the luggage compartment”);
❒push lever A fig. 62.
CLOSING
Lower the tailgate, pressing near the lock until you hear it click into
place.
Pull the tab A fig. 63 and lower the tailgate, pressing next to the lock
until it clicks.
IMPORTANT Before closing the luggage compartment make sure that
you have the keys since the luggage compartment is automatically
locked.
LUGGAGE COMPARTMENT
INITIALISATION
IMPORTANT If the battery is disconnected or the protection fuse blows,
the luggage compartment opening/closing mechanism must be
initialised as follows:
❒close all the doors and the luggage compartment;
❒Press the
button on the remote control;
❒Press the
button on the remote control.
fig. 62A0J0178fig. 63A0J0079
82
GETTING TO
KNOW YOUR CAR
SAFETY
STARTING AND
DRIVING
IN AN EMERGENCY
SERVICING AND
MAINTENANCE
TECHNICAL
SPECIFICATIONS
INDEX
Page 164 of 280
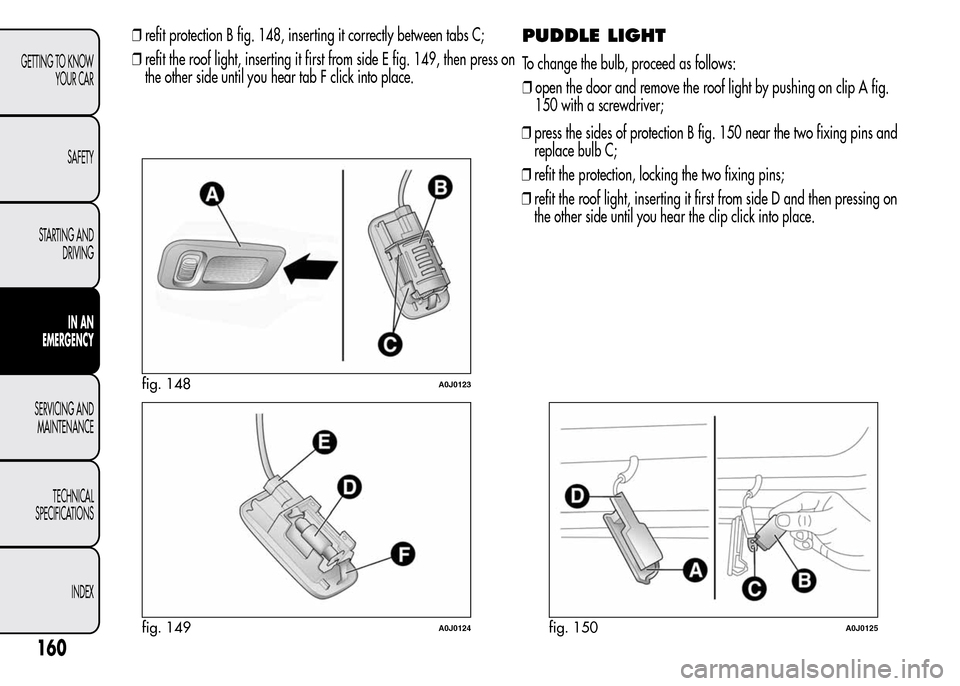
PUDDLE LIGHT
To change the bulb, proceed as follows:
❒open the door and remove the roof light by pushing on clip A fig.
150 with a screwdriver;
❒press the sides of protection B fig. 150 near the two fixing pins and
replace bulb C;
❒refit the protection, locking the two fixing pins;
❒refit the roof light, inserting it first from side D and then pressing on
the other side until you hear the clip click into place.
fig. 148A0J0123
fig. 149A0J0124fig. 150A0J0125
160
GETTING TO KNOW
YOUR CAR
SAFETY
STARTING AND
DRIVING
IN AN
EMERGENCY
SERVICING AND
MAINTENANCE
TECHNICAL
SPECIFICATIONS
INDEX
❒refit protection B fig. 148, inserting it correctly between tabs C;
❒refit the roof light, inserting it first from side E fig. 149, then press on
the other side until you hear tab F click into place.
Page 170 of 280
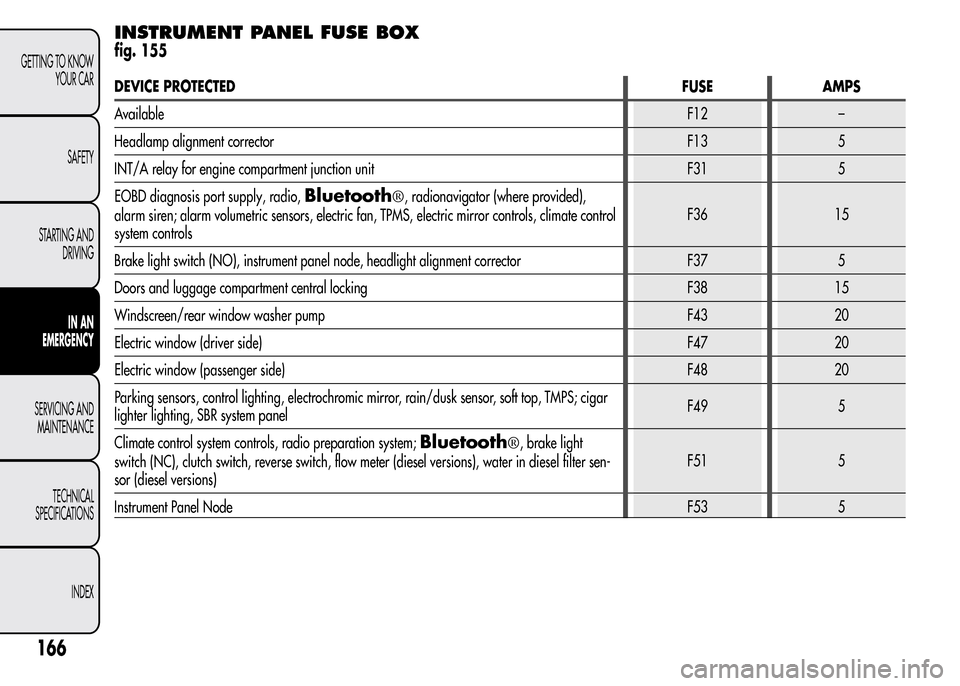
INSTRUMENT PANEL FUSE BOX
fig. 155
DEVICE PROTECTEDFUSE AMPS
AvailableF12 –
Headlamp alignment correctorF13 5
INT/A relay for engine compartment junction unit F31 5
EOBD diagnosis port supply, radio,
Bluetooth®, radionavigator (where provided),
alarm siren; alarm volumetric sensors, electric fan, TPMS, electric mirror controls, climate control
system controlsF36 15
Brake light switch (NO), instrument panel node, headlight alignment corrector F37 5
Doors and luggage compartment central locking F38 15
Windscreen/rear window washer pump F43 20
Electric window (driver side)F47 20
Electric window (passenger side)F48 20
Parking sensors, control lighting, electrochromic mirror, rain/dusk sensor, soft top, TMPS; cigar
lighter lighting, SBR system panelF49 5
Climate control system controls, radio preparation system;
Bluetooth®, brake light
switch (NC), clutch switch, reverse switch, flow meter (diesel versions), water in diesel filter sen-
sor (diesel versions)F51 5
Instrument Panel NodeF53 5
166
GETTING TO KNOW
YOUR CAR
SAFETY
STARTING AND
DRIVING
IN AN
EMERGENCY
SERVICING AND
MAINTENANCE
TECHNICAL
SPECIFICATIONS
INDEX