lock Alfa Romeo MiTo 2015 Owner's Manual
[x] Cancel search | Manufacturer: ALFA ROMEO, Model Year: 2015, Model line: MiTo, Model: Alfa Romeo MiTo 2015Pages: 280, PDF Size: 8.52 MB
Page 7 of 280
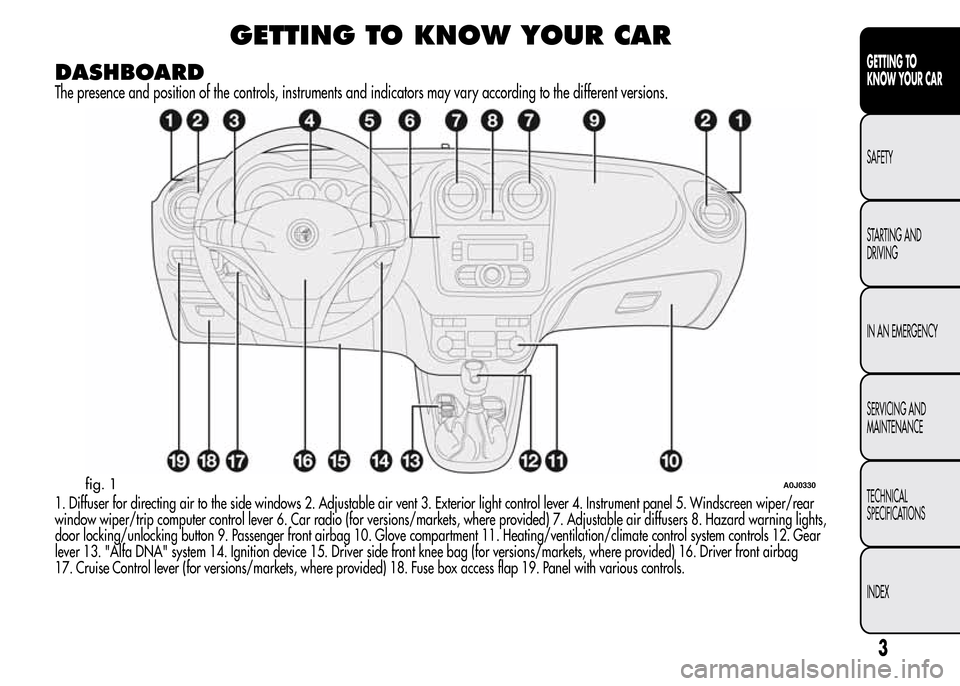
GETTING TO KNOW YOUR CAR
DASHBOARD
The presence and position of the controls, instruments and indicators may vary according to the different versions.
1. Diffuser for directing air to the side windows 2. Adjustable air vent 3. Exterior light control lever 4. Instrument panel 5. Windscreen wiper/rear
window wiper/trip computer control lever 6. Car radio (for versions/markets, where provided) 7. Adjustable air diffusers 8. Hazard warning lights,
door locking/unlocking button 9. Passenger front airbag 10. Glove compartment 11. Heating/ventilation/climate control system controls 12. Gear
lever 13. "Alfa DNA" system 14. Ignition device 15. Driver side front knee bag (for versions/markets, where provided) 16. Driver front airbag
17. Cruise Control lever (for versions/markets, where provided) 18. Fuse box access flap 19. Panel with various controls.
fig. 1A0J0330
3
GETTING TO
KNOW YOUR CAR
SAFETY
STARTING AND
DRIVING
IN AN EMERGENCY
SERVICING AND
MAINTENANCE
TECHNICAL
SPECIFICATIONS
INDEX
Page 11 of 280
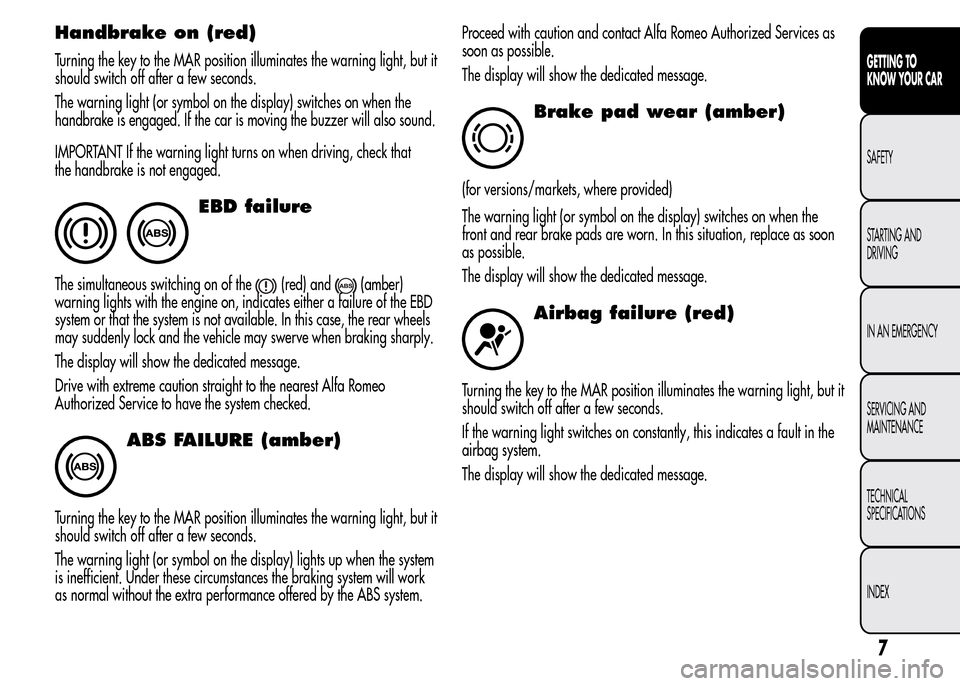
Handbrake on (red)
Turning the key to the MAR position illuminates the warning light, but it
should switch off after a few seconds.
The warning light (or symbol on the display) switches on when the
handbrake is engaged. If the car is moving the buzzer will also sound.
IMPORTANT If the warning light turns on when driving, check that
the handbrake is not engaged.
EBD failure
The simultaneous switching on of the(red) and(amber)
warning lights with the engine on, indicates either a failure of the EBD
system or that the system is not available. In this case, the rear wheels
may suddenly lock and the vehicle may swerve when braking sharply.
The display will show the dedicated message.
Drive with extreme caution straight to the nearest Alfa Romeo
Authorized Service to have the system checked.
ABS FAILURE (amber)
Turning the key to the MAR position illuminates the warning light, but it
should switch off after a few seconds.
The warning light (or symbol on the display) lights up when the system
is inefficient. Under these circumstances the braking system will work
as normal without the extra performance offered by the ABS system.Proceed with caution and contact Alfa Romeo Authorized Services as
soon as possible.
The display will show the dedicated message.
Brake pad wear (amber)
(for versions/markets, where provided)
The warning light (or symbol on the display) switches on when the
front and rear brake pads are worn. In this situation, replace as soon
as possible.
The display will show the dedicated message.
Airbag failure (red)
Turning the key to the MAR position illuminates the warning light, but it
should switch off after a few seconds.
If the warning light switches on constantly, this indicates a fault in the
airbag system.
The display will show the dedicated message.
7
GETTING TO
KNOW YOUR CAR
SAFETY
STARTING AND
DRIVING
IN AN EMERGENCY
SERVICING AND
MAINTENANCE
TECHNICAL
SPECIFICATIONS
INDEX
Page 29 of 280
Rain sensor (Rain sensor sensitivity
adjustment)
(for versions/markets, where provided)
This function allows you to adjust the rain sensor sensitivity to 4 levels.
To set the required sensitivity level proceed as follows:
❒briefly press the SET/
button, the previously set sensitivity level
will flash on the display;
❒press the "+" or "−" button to adjust;
❒briefly press the SET/
button to go back to the menu screen or
hold the button down to go back to the standard screen without
saving.
Activation/Trip B data (Trip B
enablement)
This function may be used to activate (On) or deactivate (Off) the Trip B
(partial trip). For further information see “Trip computer”.
Proceed as follows to switch the function on and off:
❒press the SET/
button briefly to make the display flash "On" or
"Off" according to what was previously set;
❒press the "+" or "−" button to select;
❒briefly press the SET/
button to go back to the menu screen or
hold the button down to go back to the standard screen without
saving.
Time adjustment (Clock adjustment)
This function enables to set the clock through two submenus: "Time"
and "Format".
To carry out the adjustment, proceed as follows:
❒briefly press the SET/
button and two submenus ("Time" and
"Format") will be displayed;
❒press the "+" or "–" button to move between the two submenus;
❒once you have selected a sub-menu to be modified, press SET/
briefly;
❒when the “Time” submenu is entered, by briefly pressing SET/
the hours flash on the display;
❒press the "+" or "−" button to adjust;
❒briefly press the SET/
button, which makes the display flash the
"minutes";
❒press the "+" or "−" button to adjust.
IMPORTANT Each press on the "+" or "−" buttons causes an increase
or decrease of one unit. Hold down the button to increase/decrease
the setting rapidly and automatically. Complete the adjustment with
single presses of the button when you approach the desired value.
❒When you select "Format": briefly pressing the SET/
button
makes the display mode flash on the display;
❒press "+" or "–" to select “24h” or “12h”.
When you have made the required settings, briefly press the SET/
button to go back to the submenu screen or hold the button down
to go back to the main menu screen without saving the new settings.
Hold the SET/
button down again to return to the standard screen
or to the main menu according to where you are in the menu.
25
GETTING TO
KNOW YOUR CAR
SAFETY
STARTING AND
DRIVING
IN AN EMERGENCY
SERVICING AND
MAINTENANCE
TECHNICAL
SPECIFICATIONS
INDEX
Page 31 of 280
Autoclose (Automatic door lock
operation with car running)
When activated (On), this function locks the doors automatically when
the vehicle speed exceeds 20 km/h.
Proceed as follows to activate or deactivate this function:
❒press the SET/
button briefly to display a submenu;
❒press the SET/
button briefly to make the display flash "On" or
"Off" according to what was previously set;
❒press the "+" or "−" button to select;
❒press the SET/
button briefly to return to the submenu screen or
hold the button down to return to the main menu screen without
saving;
❒hold the SET/
button down again to return to the standard
screen or to the main menu according to where you are in the menu.
Unit of measurement (Setting the
unit of measurement)
With this function it is possible to set the measurement units through
three sub-menus: “Distance”, “Consumption” and “Temperature”.
To set the desired measurement unit, proceed as follows:
❒briefly press the SET/
button to display the three sub-menus;
❒press the "+" or "−" button to move between the three submenus;
❒once the submenu to be modified has been selected, briefly press the
SET/
button;
❒when the “Distance” submenu is entered: briefly pressing SET/
displays "km" or "mi" depending on the previous setting;❒press the "+" or "−" button to select;
❒when the “Consumption” submenu is entered, pressing SET/
displays km/l, l/100 km or mpg depending on the previous
setting;
If the set distance unit is "km", the fuel consumption unit will be
displayed in km/l or l/100 km.
If the distance unit set is “mi” the fuel consumption unit will be
displayed in “mpg”.
❒press the "+" or "−" button to select;
❒when the “Temperature” submenu is entered, pressing SET/
displays “°C” or “°F” depending on the previous setting;
❒press the "+" or "−" button to select;
When you have made the required settings, briefly press the SET/
button to go back to the submenu screen or hold the button down
to go back to the main menu screen without saving the new settings.
Hold the SET/
button down again to return to the standard screen
or to the main menu according to where you are in the menu.
Language (Language selection)
Display messages can be shown in different languages: Italian,
English, German, Portuguese, Spanish, French, Dutch, Turkish and
Brazilian.
To set the desired language proceed as follows:
❒briefly press the SET/
button: the previously set "language"
starts flashing on the display;
❒press the "+" or "−" button to select;
❒briefly press the SET/
button to go back to the menu screen or
hold the button down to go back to the standard screen without
saving.
27
GETTING TO
KNOW YOUR CAR
SAFETY
STARTING AND
DRIVING
IN AN EMERGENCY
SERVICING AND
MAINTENANCE
TECHNICAL
SPECIFICATIONS
INDEX
Page 34 of 280
Courtesy lights (Activation/
deactivation of “Greeting lights”)
(for versions/markets, where provided)
With this function it is possible to turn on the side lights, the number
plate lights and the ceiling lights for approximately 25 seconds when
the doors or boot are opened using the remote control, with the
following exceptions:
❒interruption after 5 seconds from when the door closes
❒interruption after locking using the remote control
❒interruption after a lock or other action using the remote control
Proceed as follows to activate or deactivate this function:
❒press the SET/
button briefly to make the display flash "On" or
"Off" according to what was previously set;
❒press the "+" or "−" button to select;
❒briefly press the SET/
button to go back to the menu screen or
hold the button down to go back to the standard screen without
saving.
Menu exit
This is the last function that closes the cycle of settings listed in the
menu screen.
Pressing the SET/
button briefly will return the display to the
standard screen without saving.
Press the − button to return to the first menu option.
TRIP COMPUTER
GENERAL INFORMATION
The Trip computer is used to display information on car operation
when the key is turned to MAR.
This function allows you to define two separate trips called “Trip A”
and “Trip B” for monitoring the car's "complete journey" in a
reciprocally independent manner.
Both functions are resettable (reset - start of a new journey).
“Trip A” is used to display the figures relating to:
❒Range
❒Distance travelled
❒Average fuel consumption
❒Instant fuel consumption
❒Average speed
❒Trip time (driving time).
“Trip B” may be used to display the figures relating to:
❒Distance travelled B
❒Average consumption B
❒Average speed B
❒Trip time B (driving time).
The “Trip B” function may be disabled (see “Activating Trip B”).
“Range” and “Instant consumption" parameters cannot be reset.
30
GETTING TO
KNOW YOUR CAR
SAFETY
STARTING AND
DRIVING
IN AN EMERGENCY
SERVICING AND
MAINTENANCE
TECHNICAL
SPECIFICATIONS
INDEX
Page 38 of 280
ALFA ROMEO CODE SYSTEM
To further protect your car from theft, it has been fitted with an engine
immobilising system. It is automatically activated when the ignition
key is removed.
Each key contains an electronic device which modulates the signal
emitted during ignition by an antenna built into the ignition device. The
modulated signal, which changes each time the engine is started, is
the “password”, by means of which the control unit recognises the key
and enables to start the engine.
OPERATION
Each time the car is started by turning the ignition key to MAR, the
Alfa Romeo CODE system control unit sends an acknowledgement
code to the engine management control unit to deactivate the inhibitor.
The code is sent only if the Alfa Romeo CODE system control unit has
recognised the code transmitted from the key.
Each time the ignition key is turned to STOP, the Alfa Romeo CODE
system deactivates the functions of the engine management control
unit. If, during starting, the code is not correctly recognised, the
warning light switches on in the instrument panel.
In this case, turn the key to STOP and then to MAR; if it is still locked,
try again with the other keys that come with the vehicle. If you are
still unable to start the engine contact Alfa Romeo Authorized Services.Activation of warning light while driving
❒If the
warning light switches on, this means that the system is
running a self-diagnosis (for example due to a voltage drop).
❒If the
warning light remains on, contact Alfa Romeo Authorized
Services.
The electronic components inside the key may be damaged
if the key is subjected to strong shocks.
34
GETTING TO
KNOW YOUR CAR
SAFETY
STARTING AND
DRIVING
IN AN EMERGENCY
SERVICING AND
MAINTENANCE
TECHNICAL
SPECIFICATIONS
INDEX
Page 39 of 280
THE KEYS
CODE CARD
(for versions/markets, where provided)
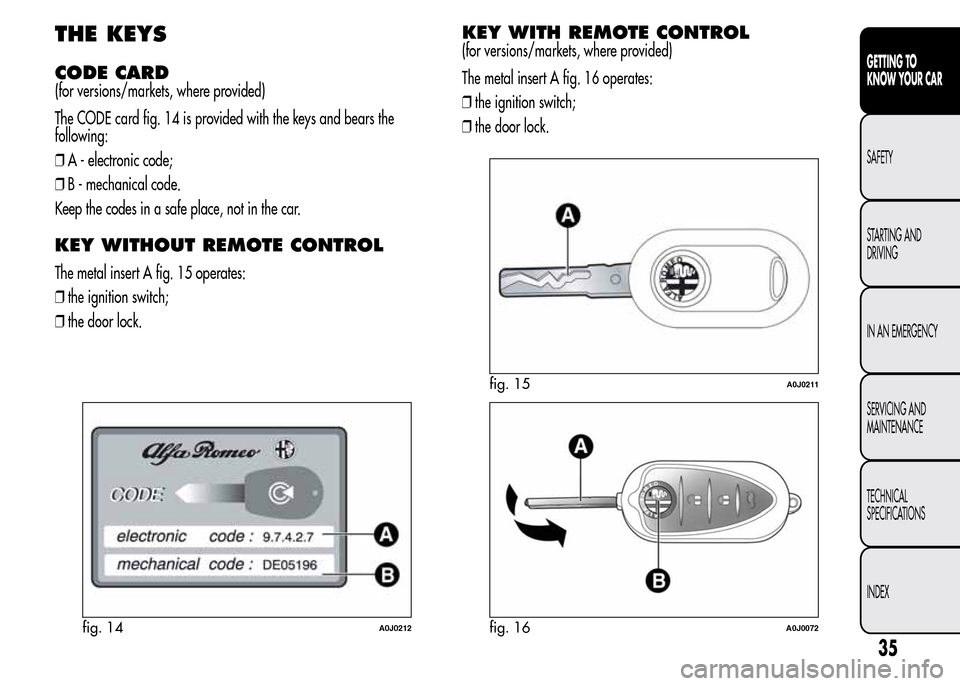
The CODE card fig. 14 is provided with the keys and bears the
following:
❒A - electronic code;
❒B - mechanical code.
Keep the codes in a safe place, not in the car.
KEY WITHOUT REMOTE CONTROL
The metal insert A fig. 15 operates:
❒the ignition switch;
❒the door lock.
KEY WITH REMOTE CONTROL
(for versions/markets, where provided)
The metal insert A fig. 16 operates:
❒the ignition switch;
❒the door lock.
fig. 14A0J0212
fig. 15A0J0211
fig. 16A0J0072
35
GETTING TO
KNOW YOUR CAR
SAFETY
STARTING AND
DRIVING
IN AN EMERGENCY
SERVICING AND
MAINTENANCE
TECHNICAL
SPECIFICATIONS
INDEX
Page 40 of 280
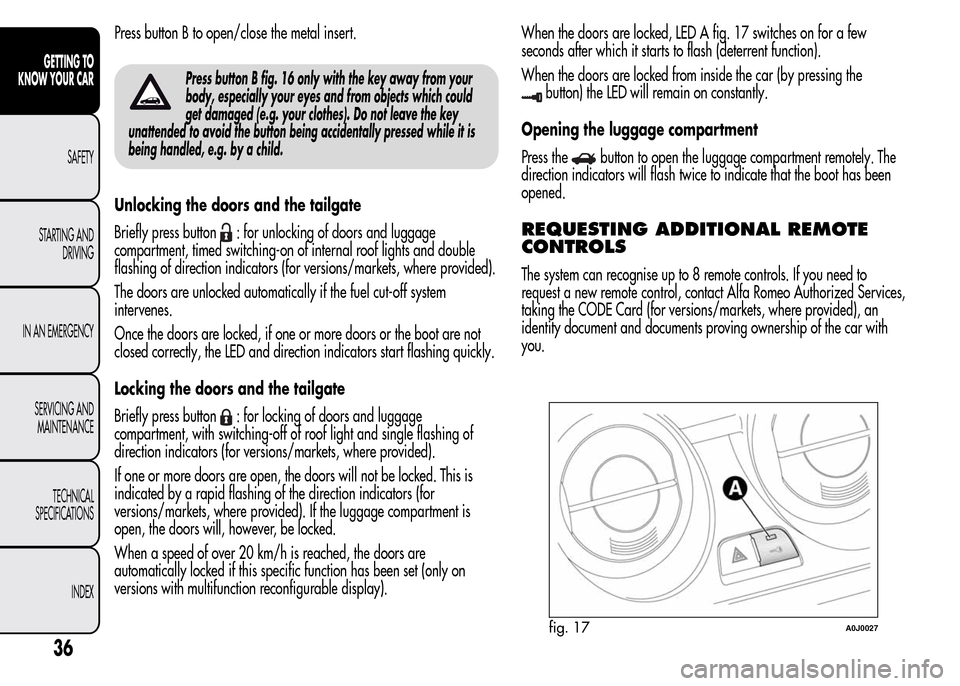
Press button B to open/close the metal insert.
Press button B fig. 16 only with the key away from your
body, especially your eyes and from objects which could
get damaged (e.g. your clothes). Do not leave the key
unattended to avoid the button being accidentally pressed while it is
being handled, e.g. by a child.
Unlocking the doors and the tailgate
Briefly press button
: for unlocking of doors and luggage
compartment, timed switching-on of internal roof lights and double
flashing of direction indicators (for versions/markets, where provided).
The doors are unlocked automatically if the fuel cut-off system
intervenes.
Once the doors are locked, if one or more doors or the boot are not
closed correctly, the LED and direction indicators start flashing quickly.
Locking the doors and the tailgate
Briefly press button
: for locking of doors and luggage
compartment, with switching-off of roof light and single flashing of
direction indicators (for versions/markets, where provided).
If one or more doors are open, the doors will not be locked. This is
indicated by a rapid flashing of the direction indicators (for
versions/markets, where provided). If the luggage compartment is
open, the doors will, however, be locked.
When a speed of over 20 km/h is reached, the doors are
automatically locked if this specific function has been set (only on
versions with multifunction reconfigurable display).When the doors are locked, LED A fig. 17 switches on for a few
seconds after which it starts to flash (deterrent function).
When the doors are locked from inside the car (by pressing the
button) the LED will remain on constantly.
Opening the luggage compartment
Press the
button to open the luggage compartment remotely. The
direction indicators will flash twice to indicate that the boot has been
opened.
REQUESTING ADDITIONAL REMOTE
CONTROLS
The system can recognise up to 8 remote controls. If you need to
request a new remote control, contact Alfa Romeo Authorized Services,
taking the CODE Card (for versions/markets, where provided), an
identity document and documents proving ownership of the car with
you.
fig. 17A0J0027
36
GETTING TO
KNOW YOUR CAR
SAFETY
STARTING AND
DRIVING
IN AN EMERGENCY
SERVICING AND
MAINTENANCE
TECHNICAL
SPECIFICATIONS
INDEX
Page 41 of 280
REPLACING THE BATTERY IN THE KEY
WITH REMOTE CONTROL
Proceed as follows:
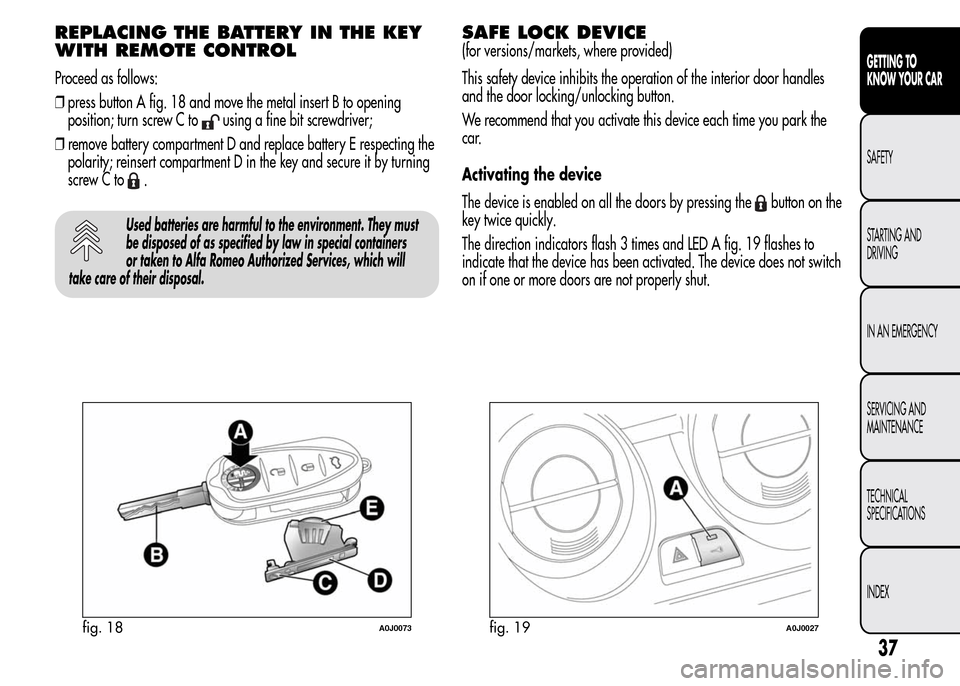
❒press button A fig. 18 and move the metal insert B to opening
position; turn screw C to
using a fine bit screwdriver;
❒remove battery compartment D and replace battery E respecting the
polarity; reinsert compartment D in the key and secure it by turning
screw C to
.
Used batteries are harmful to the environment. They must
be disposed of as specified by law in special containers
or taken to Alfa Romeo Authorized Services, which will
take care of their disposal.
SAFE LOCK DEVICE
(for versions/markets, where provided)
This safety device inhibits the operation of the interior door handles
and the door locking/unlocking button.
We recommend that you activate this device each time you park the
car.
Activating the device
The device is enabled on all the doors by pressing the
button on the
key twice quickly.
The direction indicators flash 3 times and LED A fig. 19 flashes to
indicate that the device has been activated. The device does not switch
on if one or more doors are not properly shut.
fig. 18A0J0073fig. 19A0J0027
37
GETTING TO
KNOW YOUR CAR
SAFETY
STARTING AND
DRIVING
IN AN EMERGENCY
SERVICING AND
MAINTENANCE
TECHNICAL
SPECIFICATIONS
INDEX
Page 42 of 280
Deactivating the device
The device deactivates automatically when:
❒the key insert is turned to opening position in the driver side door;
❒the
button is pressed on the remote control;
❒the ignition key is turned to MAR.
Once the safe lock device is engaged it is impossible to
open the doors from inside the car. Before engaging
the device, check that there is no one left on board. If
the remote control battery is flat, the device can only be
deactivated by using the metal insert in one of the door locks.
38
GETTING TO
KNOW YOUR CAR
SAFETY
STARTING AND
DRIVING
IN AN EMERGENCY
SERVICING AND
MAINTENANCE
TECHNICAL
SPECIFICATIONS
INDEX