wipers Alfa Romeo MiTo 2017 Owner's Manual
[x] Cancel search | Manufacturer: ALFA ROMEO, Model Year: 2017, Model line: MiTo, Model: Alfa Romeo MiTo 2017Pages: 212, PDF Size: 4.36 MB
Page 9 of 212
In-depth knowledge of your new car starts here.
The booklet that you are reading simply and directly explains how
it is made and how it works.
That’s why we advise you to read it seated comfortably on board,
so that you can see what is described here for yourself.
GETTING TO KNOW YOUR CAR
INSTRUMENT PANEL . . . . . . . ......................8
INSTRUMENT PANEL . . . .........................9
THEKEYS...................................10
IGNITION DEVICE . . ............................11
ALFA ROMEO CODE SYSTEM . . . ....................12
ALARM SYSTEM ...............................13
DOORS.....................................13
SEATS.....................................14
HEADRESTS.................................16
STEERING WHEEL..............................17
REAR VIEW MIRRORS . . . . . ......................18
EXTERNAL LIGHTS .............................19
INTERIOR LIGHTS . . . ...........................21
WINDSCREEN / REAR WINDOW WIPERS ...............22
CLIMATE CONTROL . . . . .........................24
ELECTRIC WINDOWS ............................29
ELECTRIC SUNROOF . . . .........................30
ENGINE BONNET . .............................32
BOOT......................................33
HEADLIGHTS . . . . . . . . . . .......................34
Alfa DNA SYSTEM (Car dynamic control system) . . .........34
DYNAMIC SUSPENSION (active shock absorber system) . . . . . .35
VERSION WITH LPG SYSTEM . . . . . . .................36
Page 24 of 212
pressed to the left (0 position): light
3 switches on;
pressed to the right (B position): light
4 switches on.
IMPORTANT Before getting out of the
car, make sure that both switches are in
the central position: when the doors are
closed the lights will switch off to avoid
draining the battery. In any case, if the
switch is left in the on position, the roof
light switches off automatically about
15 minutes after the engine has been
switched off.
ROOF LIGHT TIMING
Timing while getting into the car
The roof lights come on won unlocking,
opening and closing. The timed period is
interrupted when the ignition is turned to
"MAR-ON".
Timing while getting out of the car
The roof lights come on when the key is
removed from the ignition within
2 minutes of switching off the engine, on
opening and closing a door with the
removed key. The timing stops
automatically when the doors are locked.
WINDSCREEN / REAR WINDOW
WIPERS
This operates only with the ignition key
turned to MAR.
WINDSCREEN WASHER / WIPER
Operation
13) 14)
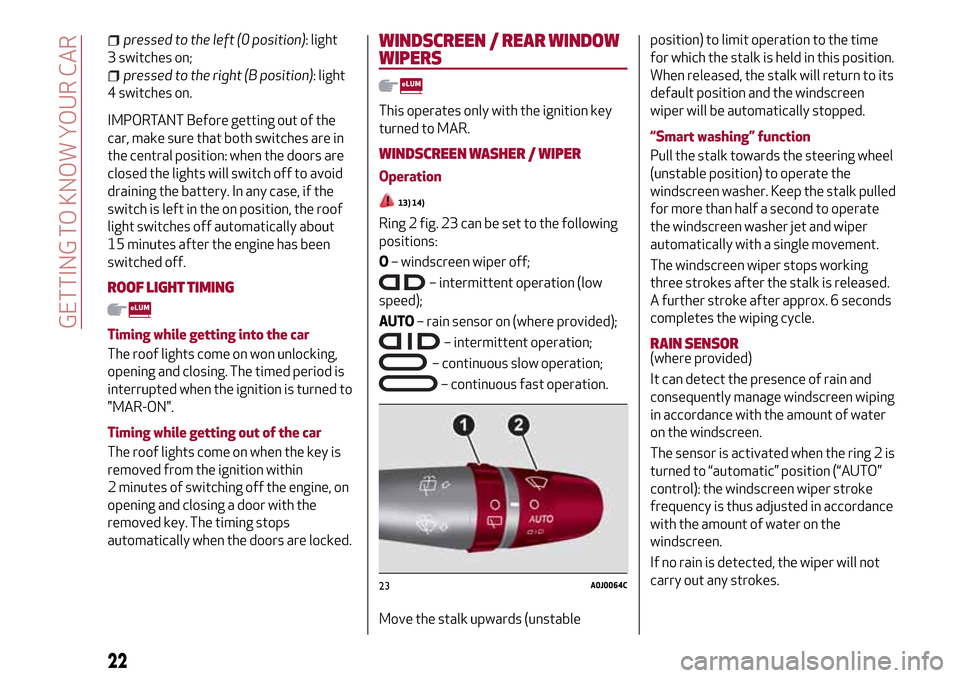
Ring 2 fig. 23 can be set to the following
positions:
O– windscreen wiper off;
– intermittent operation (low
speed);
AUTO– rain sensor on (where provided);
– intermittent operation;
– continuous slow operation;
– continuous fast operation.
Move the stalk upwards (unstableposition) to limit operation to the time
for which the stalk is held in this position.
When released, the stalk will return to its
default position and the windscreen
wiper will be automatically stopped.
“Smart washing” function
Pull the stalk towards the steering wheel
(unstable position) to operate the
windscreen washer. Keep the stalk pulled
for more than half a second to operate
the windscreen washer jet and wiper
automatically with a single movement.
The windscreen wiper stops working
three strokes after the stalk is released.
A further stroke after approx. 6 seconds
completes the wiping cycle.
RAIN SENSOR(where provided)
It can detect the presence of rain and
consequently manage windscreen wiping
in accordance with the amount of water
on the windscreen.
The sensor is activated when the ring 2 is
turned to “automatic” position (“AUTO”
control): the windscreen wiper stroke
frequency is thus adjusted in accordance
with the amount of water on the
windscreen.
If no rain is detected, the wiper will not
carry out any strokes.
23A0J0064C
22
GETTING TO KNOW YOUR CAR
Page 25 of 212
REAR WINDOW WIPER / WASHER
(where provided)
This operates only with the ignition key
turned to MAR.
Turn ring 1 fromOposition to
position to operate the rear window
wiper as follows:
in intermittent mode when the
windscreen wiper is not operating;
in synchronous mode (at half the
speed of the windscreen wiper) when the
windscreen wiper is operating;
in continuous mode with reverse gear
engaged and the control active.
Pushing the stalk towards the dashboard
(rocking position) will activate the rear
window washer jet. Keep the stalk pushed
for more than half a second to activate
the rear window wiper as well. Releasing
the stalk will activate the smart washing
function, as described for the windscreen
wiper.
WARNING
13)Never use the windscreen wipers to
remove layers of snow or ice from the
windscreen. In such conditions, the
windscreen wiper may be subjected to
excessive stress and the motor cut-out
switch, which prevents operation for a few
seconds, may intervene. If operation is not
restored (even after restarting that car with
the key), contact an Alfa Romeo Dealership.14)Do not operate the windscreen wiper
with the blades lifted from the windscreen.
23
Page 34 of 212
ENGINE BONNET
17) 18) 19)
OPENING
Proceed as follows:
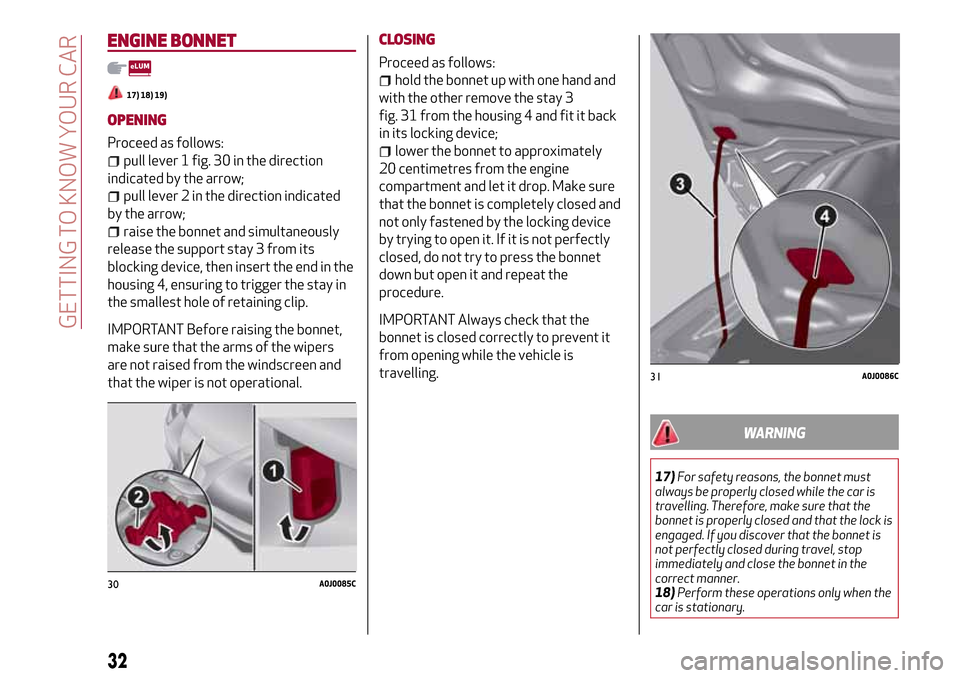
pull lever 1 fig. 30 in the direction
indicated by the arrow;
pull lever 2 in the direction indicated
by the arrow;
raise the bonnet and simultaneously
release the support stay 3 from its
blocking device, then insert the end in the
housing 4, ensuring to trigger the stay in
the smallest hole of retaining clip.
IMPORTANT Before raising the bonnet,
make sure that the arms of the wipers
are not raised from the windscreen and
that the wiper is not operational.CLOSING
Proceed as follows:
hold the bonnet up with one hand and
with the other remove the stay 3
fig. 31 from the housing 4 and fit it back
in its locking device;
lower the bonnet to approximately
20 centimetres from the engine
compartment and let it drop. Make sure
that the bonnet is completely closed and
not only fastened by the locking device
by trying to open it. If it is not perfectly
closed, do not try to press the bonnet
down but open it and repeat the
procedure.
IMPORTANT Always check that the
bonnet is closed correctly to prevent it
from opening while the vehicle is
travelling.
WARNING
17)For safety reasons, the bonnet must
always be properly closed while the car is
travelling. Therefore, make sure that the
bonnet is properly closed and that the lock is
engaged. If you discover that the bonnet is
not perfectly closed during travel, stop
immediately and close the bonnet in the
correct manner.
18)Perform these operations only when the
car is stationary.
30A0J0085C
31A0J0086C
32
GETTING TO KNOW YOUR CAR
Page 129 of 212
Correct maintenance permits the performance of the car to be
maintained over time, as well as limited running costs and
safeguarding the efficiency of the safety systems.
This chapter explains how.
SERVICING AND MAINTENANCE
SCHEDULED SERVICING . . .......................128
SCHEDULED MAINTENANCE PLAN . . . . ..............129
PERIODIC CHECKS............................136
DEMANDING USE OF THE CAR . . . . . . ...............136
CHECKING LEVELS ............................137
BATTERY RECHARGING .........................143
WINDSCREEN / REAR WINDOW WIPERS . . . . . . . . .......144
BATTERY..................................146
LIFTING THE VEHICLE . .........................147
BODYWORK.................................147
INTERIOR . . . . ..............................149
Page 146 of 212
be correctly reconnected to the battery,
i.e. the positive cable (+) to the positive
terminal and the negative cable (–) to the
negative terminal. The battery terminals
are marked with the positive (+) and
negative (–) symbols, and are shown on
the battery cover. The battery terminals
must also be corrosion-free and firmly
secured to the terminals.
VERSIONS WITHOUT START&STOP
SYSTEM
(where provided)
To recharge, proceed as follows:
disconnect the terminal from the
negative battery pole;
connect the charger cables to the
battery terminals, observing the polarity;
turn on the charger;
when it is recharged, turn the charger
off before disconnecting it from the
battery;
reconnect the terminal to the negative
battery pole.
VERSIONS WITH START&STOP
SYSTEM
To recharge, proceed as follows:
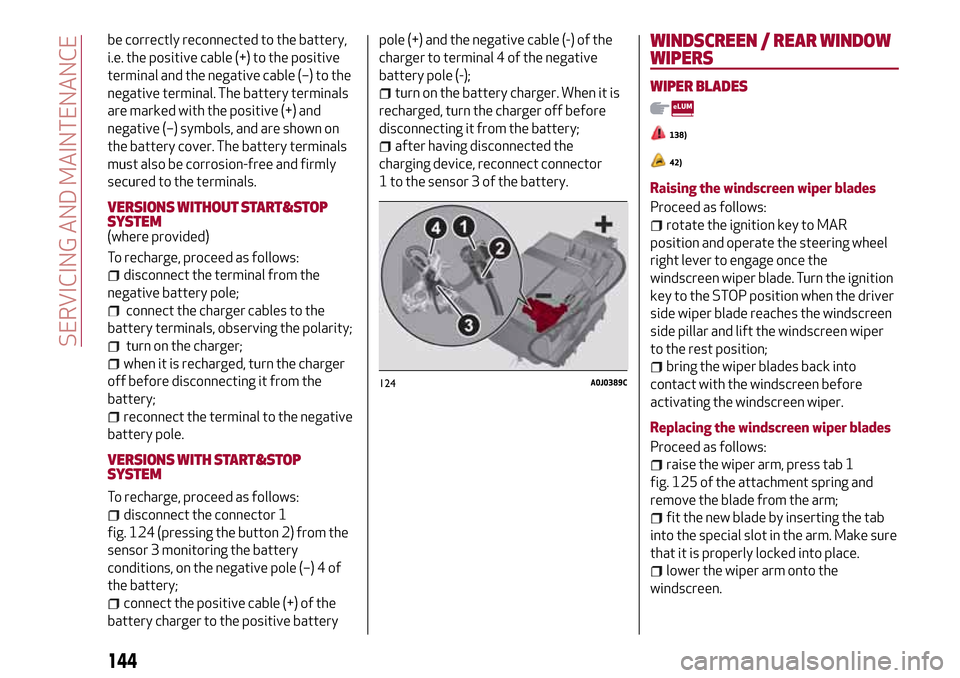
disconnect the connector 1
fig. 124 (pressing the button 2) from the
sensor 3 monitoring the battery
conditions, on the negative pole (–) 4 of
the battery;
connect the positive cable (+) of the
battery charger to the positive batterypole (+) and the negative cable (-) of the
charger to terminal 4 of the negative
battery pole (-);
turn on the battery charger. When it is
recharged, turn the charger off before
disconnecting it from the battery;
after having disconnected the
charging device, reconnect connector
1 to the sensor 3 of the battery.
WINDSCREEN / REAR WINDOW
WIPERS
WIPER BLADES
138)
42)
Raising the windscreen wiper blades
Proceed as follows:
rotate the ignition key to MAR
position and operate the steering wheel
right lever to engage once the
windscreen wiper blade. Turn the ignition
key to the STOP position when the driver
side wiper blade reaches the windscreen
side pillar and lift the windscreen wiper
to the rest position;
bring the wiper blades back into
contact with the windscreen before
activating the windscreen wiper.
Replacing the windscreen wiper blades
Proceed as follows:
raise the wiper arm, press tab 1
fig. 125 of the attachment spring and
remove the blade from the arm;
fit the new blade by inserting the tab
into the special slot in the arm. Make sure
that it is properly locked into place.
lower the wiper arm onto the
windscreen.
124A0J0389C
144
SERVICING AND MAINTENANCE