door lock Alfa Romeo MiTo 2018 Owner handbook (in English)
[x] Cancel search | Manufacturer: ALFA ROMEO, Model Year: 2018, Model line: MiTo, Model: Alfa Romeo MiTo 2018Pages: 212, PDF Size: 5.18 MB
Page 10 of 212
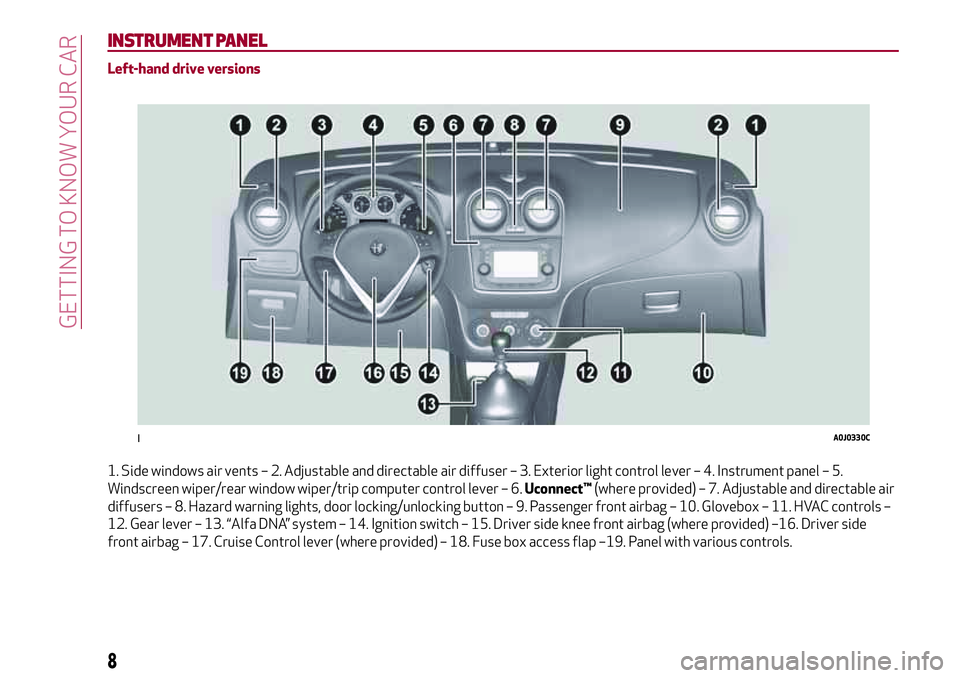
INSTRUMENT PANEL
Left-hand drive versions
1. Side windows air vents – 2. Adjustable and directable air diffuser – 3. Exterior light control lever – 4. Instrument panel – 5.
Windscreen wiper/rear window wiper/trip computer control lever – 6.Uconnect™(where provided) – 7. Adjustable and directable air
diffusers – 8. Hazard warning lights, door locking/unlocking button – 9. Passenger front airbag – 10. Glovebox – 11. HVAC controls –
12. Gear lever – 13. “Alfa DNA” system – 14. Ignition switch – 15. Driver side knee front airbag (where provided) –16. Driver side
front airbag – 17. Cruise Control lever (where provided) – 18. Fuse box access flap –19. Panel with various controls.
1A0J0330C
8
GETTING TO KNOW YOUR CAR
Page 11 of 212
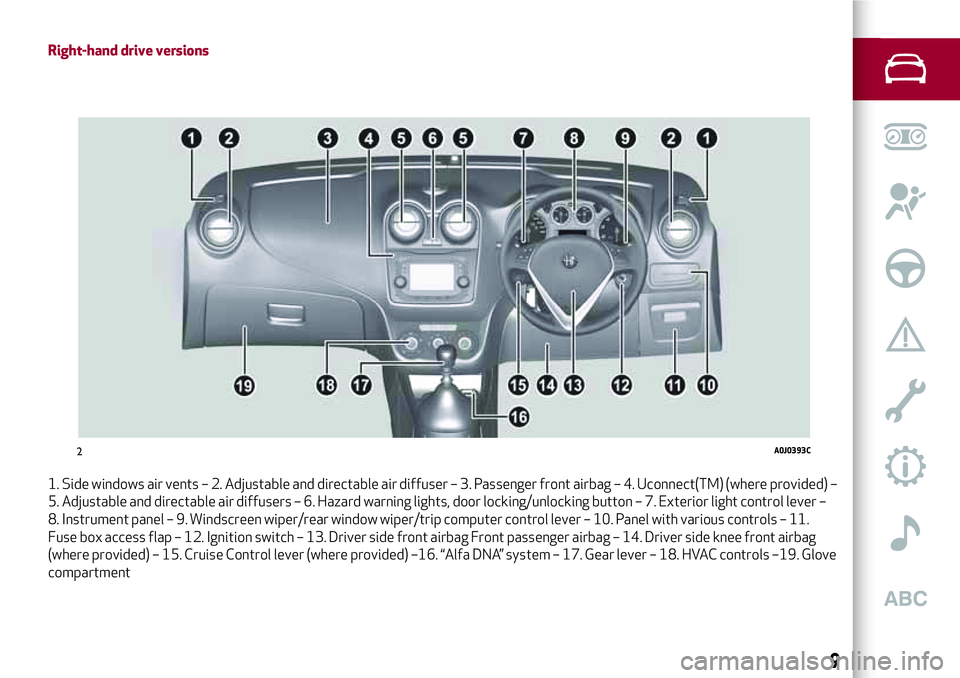
Right-hand drive versions
1. Side windows air vents – 2. Adjustable and directable air diffuser – 3. Passenger front airbag – 4. Uconnect(TM) (where provided) –
5. Adjustable and directable air diffusers – 6. Hazard warning lights, door locking/unlocking button – 7. Exterior light control lever –
8. Instrument panel – 9. Windscreen wiper/rear window wiper/trip computer control lever – 10. Panel with various controls – 11.
Fuse box access flap – 12. Ignition switch – 13. Driver side front airbag Front passenger airbag – 14. Driver side knee front airbag
(where provided) – 15. Cruise Control lever (where provided) –16. “Alfa DNA” system – 17. Gear lever – 18. HVAC controls –19. Glove
compartment
2A0J0393C
9
Page 12 of 212
THE KEYS
MECHANICAL KEY
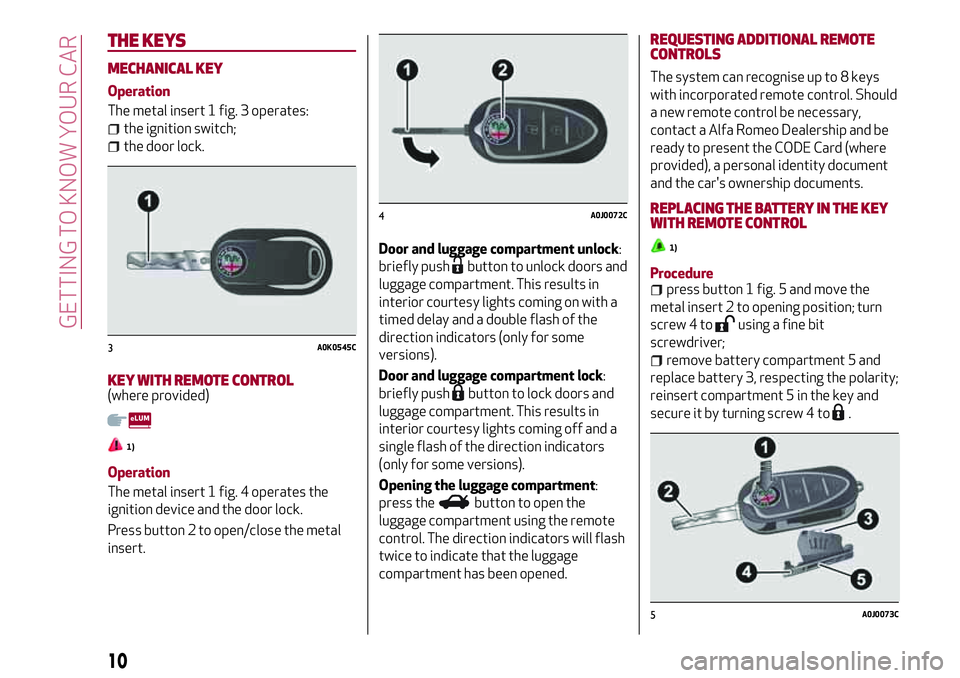
Operation
The metal insert 1 fig. 3 operates:
the ignition switch;
the door lock.
KEY WITH REMOTE CONTROL(where provided)
1)
Operation
The metal insert 1 fig. 4 operates the
ignition device and the door lock.
Press button 2 to open/close the metal
insert.Door and luggage compartment unlock:
briefly push
button to unlock doors and
luggage compartment. This results in
interior courtesy lights coming on with a
timed delay and a double flash of the
direction indicators (only for some
versions).
Door and luggage compartment lock:
briefly push
button to lock doors and
luggage compartment. This results in
interior courtesy lights coming off and a
single flash of the direction indicators
(only for some versions).
Opening the luggage compartment:
press the
button to open the
luggage compartment using the remote
control. The direction indicators will flash
twice to indicate that the luggage
compartment has been opened.
REQUESTING ADDITIONAL REMOTE
CONTROLS
The system can recognise up to 8 keys
with incorporated remote control. Should
a new remote control be necessary,
contact a Alfa Romeo Dealership and be
ready to present the CODE Card (where
provided), a personal identity document
and the car's ownership documents.
REPLACING THE BATTERY IN THE KEY
WITH REMOTE CONTROL
1)
Procedurepress button 1 fig. 5 and move the
metal insert 2 to opening position; turn
screw 4 to
using a fine bit
screwdriver;
remove battery compartment 5 and
replace battery 3, respecting the polarity;
reinsert compartment 5 in the key and
secure it by turning screw 4 to
.
3A0K0545C
4A0J0072C
5A0J0073C
10
GETTING TO KNOW YOUR CAR
Page 13 of 212
SAFE LOCK DEVICE(where provided)
This safety device inhibits the operation
of the interior door handles and the door
locking/unlocking button. We recommend
that you activate this device each time
you park your car.
Activating the device
The device is enabled on all the doors by
pressing the button
on the key twice
quickly. Device activation is indicated by
3 flashes of the direction indicators and a
flash of the LED on the button
on the
dashboard. The device does not come on
if one or more doors is not properly shut.
Deactivating the device
The device disengages automatically:
the key insert is turned to opening
position in the driver side door;
by pressing the buttonon the key;
by turning the ignition key to the MAR
position.
IMPORTANT Once the safe lock system
is engaged, it is impossible to open the
doors from inside the car. Therefore,
before getting out of the car check that
there is no one left on board. If the
remote control battery is flat, the device
can only be deactivated by using the
metal insert in one of the door locks.
WARNING
1)Press button 2 only with the key away
from your body, especially your eyes and
from objects which could get damaged (e.g.
your clothes). Do not leave the key
unattended to avoid the button being
accidentally pressed while it is being
handled, e.g. by a child.
IMPORTANT
1)Used batteries may be harmful to the
environment if not disposed of correctly.
They must be disposed of as specified by law
in the special containers or taken to an Alfa
Romeo Dealership, which will take care of
their disposal.
IGNITION DEVICE
2) 3)
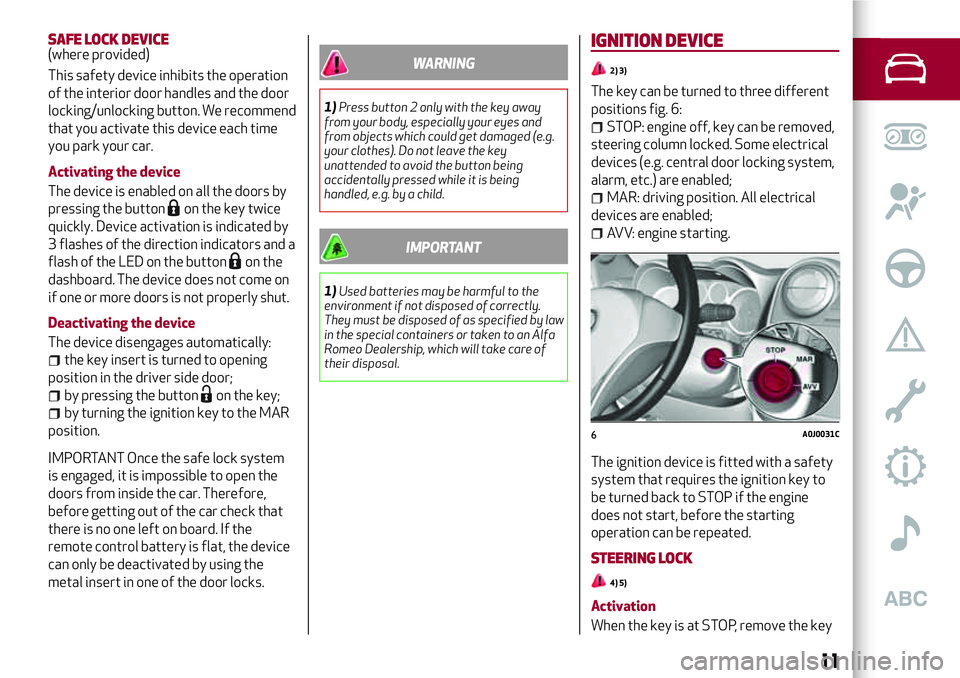
The key can be turned to three different
positions fig. 6:
STOP: engine off, key can be removed,
steering column locked. Some electrical
devices (e.g. central door locking system,
alarm, etc.) are enabled;
MAR: driving position. All electrical
devices are enabled;
AVV: engine starting.
The ignition device is fitted with a safety
system that requires the ignition key to
be turned back to STOP if the engine
does not start, before the starting
operation can be repeated.
STEERING LOCK
4) 5)
6A0J0031C
11
Activation
When the key is at STOP, remove the key
Page 15 of 212
ALARMSYSTEM
(where provided)
ALARM ACTIVATION
Activation of the alarm triggers the
acoustic warning and the direction
indicators.
IMPORTANT The alarm is adapted by the
Manufacturer to meet the requirements
of the various countries where the
vehicle is marketed.
SWITCHING ON THE ALARM
With the doors, bonnet and tailgate
closed and the ignition key either turned
to STOP or removed, point the key with
remote control towards the car and press
and release the button
.
Except on some versions for specific
markets, the system produces a visual
and acoustic warning and enables door
locking.
ALARM SELF-ACTIVATION(where provided)
If the alarm has not been activated using
the remote control, approximately
30 seconds after the key is turned to the
STOP position and the last time one of
the doors or tailgate was opened and
reclosed, the alarm is activated
automatically.This condition is indicated by the
intermittent illumination of the LED on
the alarm deactivation button on the roof
light and by the activation indications
described previously.
To deactivate the alarm, press the button
on the remote control.
Alarm self-activation also occurs when
the doors are closed by turning the metal
insert of the key in the driver door lock. If
the alarm is self-activated, the doors will
not be locked.
TURNING THE ALARM OFF
Press thebutton. The following
operations are performed (excluding
some markets):
two brief flashes of the direction
indicators;
there are two short acoustic signals;
doors are unlocked.
IMPORTANT The alarm does not switch
off when the central opening is activated
using the metal insert in the key.
DOORS
DOOR CENTRAL LOCKING/UNLOCKING
Locking from the outside
With the doors closed, press the
button on the key or fit and then turn
the metal insert (located inside the key)
in the driver side door lock.
The door locking function is operated:
with all the doors closed;
with all the doors closed and boot
open.
Door unlocking from the outside
Press the
button on the key or turn the
metal insert (located inside the key) in
the driver side door lock.
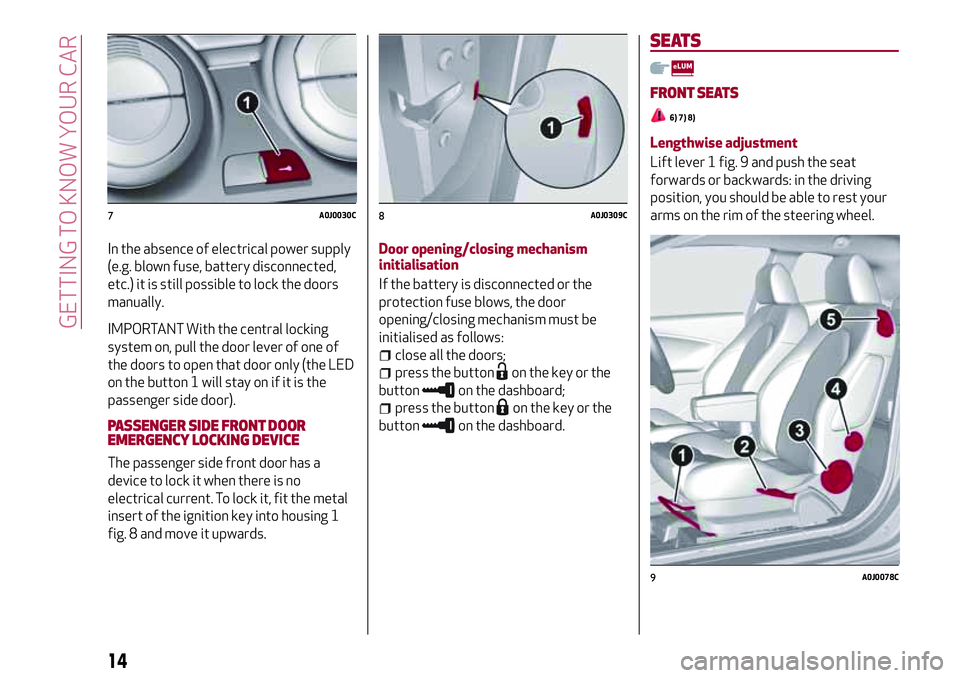
Door locking/unlocking from the inside
Press the 1 fig. 7 button on the
dashboard. The button has an LED that
indicates whether the doors are locked or
unlocked.LED on: doors locked.LED off:
doors unlocked.
13
Page 16 of 212
In the absence of electrical power supply
(e.g. blown fuse, battery disconnected,
etc.) it is still possible to lock the doors
manually.
IMPORTANT With the central locking
system on, pull the door lever of one of
the doors to open that door only (the LED
on the button 1 will stay on if it is the
passenger side door).
PASSENGER SIDE FRONT DOOR
EMERGENCY LOCKING DEVICE
The passenger side front door has a
device to lock it when there is no
electrical current. To lock it, fit the metal
insert of the ignition key into housing 1
fig. 8 and move it upwards.Door opening/closing mechanism
initialisation
If the battery is disconnected or the
protection fuse blows, the door
opening/closing mechanism must be
initialised as follows:
close all the doors;
press the buttonon the key or the
button
on the dashboard;
press the buttonon the key or the
button
on the dashboard.
SEATS
FRONT SEATS
6) 7) 8)
Lengthwise adjustment
Lift lever 1 fig. 9 and push the seat
forwards or backwards: in the driving
position, you should be able to rest your
arms on the rim of the steering wheel.
7A0J0030C8A0J0309C
9A0J0078C
14
GETTING TO KNOW YOUR CAR
Page 23 of 212
The direction indicators are switched off
automatically when the steering wheel is
straightened.
"Lane change" function
If you wish to signal a lane change, place
the left stalk in the unstable position for
less than half a second. The direction
indicator on the selected side flashes
three times and then switches off
automatically.
"FOLLOW ME HOME" DEVICE
This device allows you to illuminate the
area in front of the car for a certain
amount of time.
Activation
With the key turned to STOP or removed,
pull the left-hand stalk 1 towards the
steering wheel within 2 minutes from
when the engine is turned off.
Each time the stalk is moved, the lights
stay on for an extra 30 seconds up to a
maximum of 210 seconds; then the lights
are switched off automatically.
When the stalk is operated, the warning
light
on the instrument panel
switches on. The display shows a
message and the time set for the
function.
The warning light comes on when the
stalk is operated and stays on until the
function is automatically deactivated.Each movement of the stalk only
increases the amount of time the lights
stay on.
Deactivation
Keep the stalk pulled towards the
steering wheel for more than 2 seconds.
EXTERNAL COURTESY LIGHTS
These light up the car and the space in
front of it when the doors are unlocked.
Activation
When the car is parked and the doors are
unlocked by pressing the
button on the
remote control (or the luggage
compartment is unlocked by pressing
), the dipped beam headlights, rear
side lights and number plate lights are
activated.
The lights stay on for approximately
25 seconds unless the doors and luggage
compartment are locked again with the
remote control or the doors (or luggage
compartment) are opened and reclosed.
In these cases they switch off after
5 seconds.
INTERIOR LIGHTS
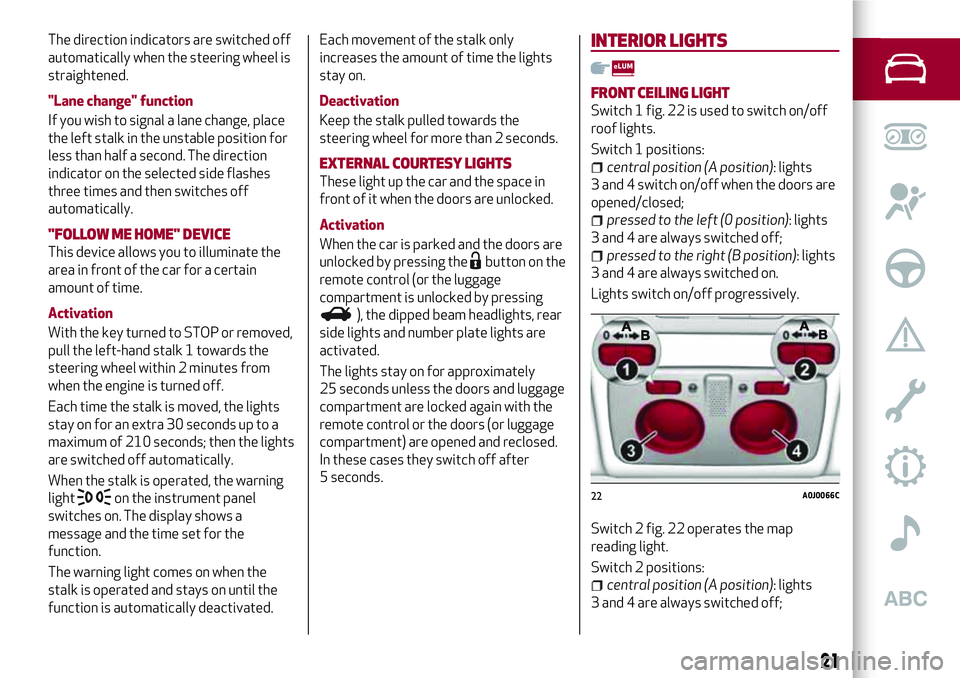
FRONT CEILING LIGHT
Switch 1 fig. 22 is used to switch on/off
roof lights.
Switch 1 positions:
central position (A position): lights
3 and 4 switch on/off when the doors are
opened/closed;
pressed to the left (0 position): lights
3 and 4 are always switched off;
pressed to the right (B position): lights
3 and 4 are always switched on.
Lights switch on/off progressively.
Switch 2 fig. 22 operates the map
reading light.
Switch 2 positions:
central position (A position): lights
3 and 4 are always switched off;
22A0J0066C
21
Page 24 of 212
pressed to the left (0 position): light
3 switches on;
pressed to the right (B position): light
4 switches on.
IMPORTANT Before getting out of the
car, make sure that both switches are in
the central position: when the doors are
closed the lights will switch off to avoid
draining the battery. In any case, if the
switch is left in the on position, the roof
light switches off automatically about
15 minutes after the engine has been
switched off.
ROOF LIGHT TIMING
Timing while getting into the car
The roof lights come on won unlocking,
opening and closing. The timed period is
interrupted when the ignition is turned to
"MAR-ON".
Timing while getting out of the car
The roof lights come on when the key is
removed from the ignition within
2 minutes of switching off the engine, on
opening and closing a door with the
removed key. The timing stops
automatically when the doors are locked.
WINDSCREEN / REAR WINDOW
WIPERS
This operates only with the ignition key
turned to MAR.
WINDSCREEN WASHER / WIPER
Operation
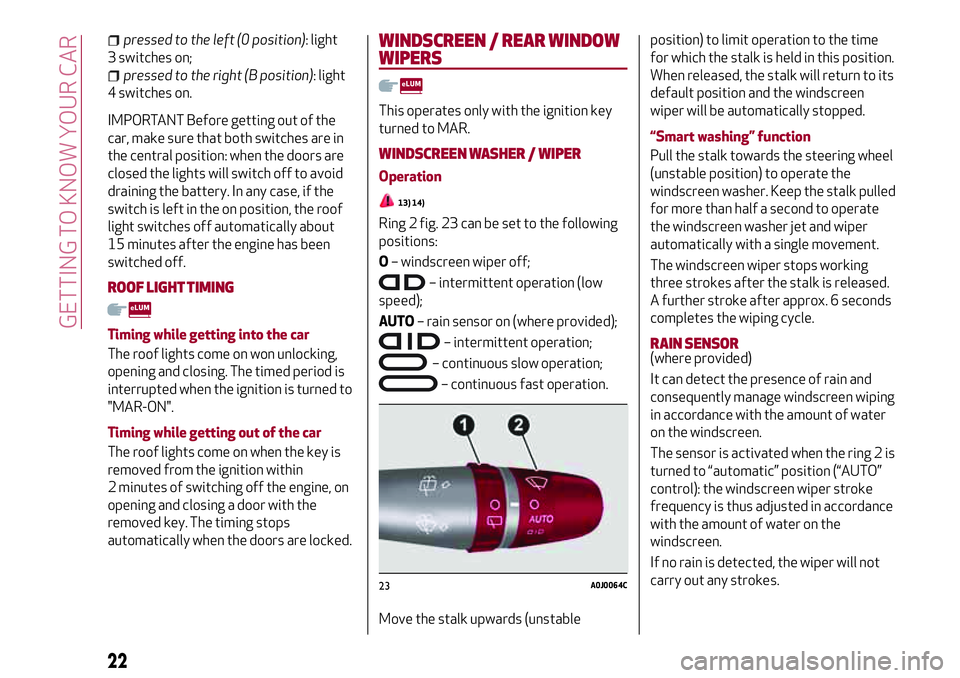
13) 14)
Ring 2 fig. 23 can be set to the following
positions:
O– windscreen wiper off;
– intermittent operation (low
speed);
AUTO– rain sensor on (where provided);
– intermittent operation;
– continuous slow operation;
– continuous fast operation.
Move the stalk upwards (unstableposition) to limit operation to the time
for which the stalk is held in this position.
When released, the stalk will return to its
default position and the windscreen
wiper will be automatically stopped.
“Smart washing” function
Pull the stalk towards the steering wheel
(unstable position) to operate the
windscreen washer. Keep the stalk pulled
for more than half a second to operate
the windscreen washer jet and wiper
automatically with a single movement.
The windscreen wiper stops working
three strokes after the stalk is released.
A further stroke after approx. 6 seconds
completes the wiping cycle.
RAIN SENSOR(where provided)
It can detect the presence of rain and
consequently manage windscreen wiping
in accordance with the amount of water
on the windscreen.
The sensor is activated when the ring 2 is
turned to “automatic” position (“AUTO”
control): the windscreen wiper stroke
frequency is thus adjusted in accordance
with the amount of water on the
windscreen.
If no rain is detected, the wiper will not
carry out any strokes.
23A0J0064C
22
GETTING TO KNOW YOUR CAR
Page 46 of 212
Rain sensor
(where provided)
Adjustment (4 levels) of the sensitivity of
the rain sensor.
TripB activation
Activation (“On”) and deactivation (“Off”)
of Trip B display (partial trip counter). For
more information see the "Trip computer"
section.
Set time
Clock setting through two sub-menus:
“Time” and “Format”.
Set date
Date setting (day - month - year).
First page
(where provided)
Selection of the information you would
like to see on the main screen. You can
view the date or the trip distance.
See radio
On the instrument panel display, the
information onUconnect™system is
shown.
Autoclose
Activation of the automatic locking of the
doors on exceeding the speed of
20 km/h.
Measurement unit
Unit of measurement setting via three
submenus: “Distances”, “Fuelconsumption” and “Temperature”. If the
set distance unit is “km”, the display
allows the fuel consumption unit to be set
as km/l or l/100km. If the set distance
unit is “mi” the fuel consumption unit will
be displayed in “mpg”.
Language
Display language selection.
Warning volume
Adjustment (8 levels) of the volume of
the buzzer which accompanies the
display of failures/warnings.
Seat belt beep
This function can be displayed only after
an Alfa Romeo Dealership has
deactivated the SBR system (see
paragraph “SBR system” in the “Safety”
chapter).
Service
Display of information about km/mileage
intervals or, for versions/markets, where
provided, time intervals for car servicing.
Passenger airbag
Activation/deactivation of front
passenger side airbag and side air bag for
pelvis, chest and shoulder protection -
Side bag
Daytime running lights
Activation/deactivation of Daytime
Running Lights (DRL).Courtesy lights
This function turns on the internal
courtesy lights for approximately
25 seconds when the doors or luggage
compartment are opened using the
remote control. The courtesy lights are
turned off when the doors are closed or
locked using the remote control.
Exit Menu
Return to standard display screen.
44
KNOWING THE INSTRUMENT PANEL
Page 116 of 212
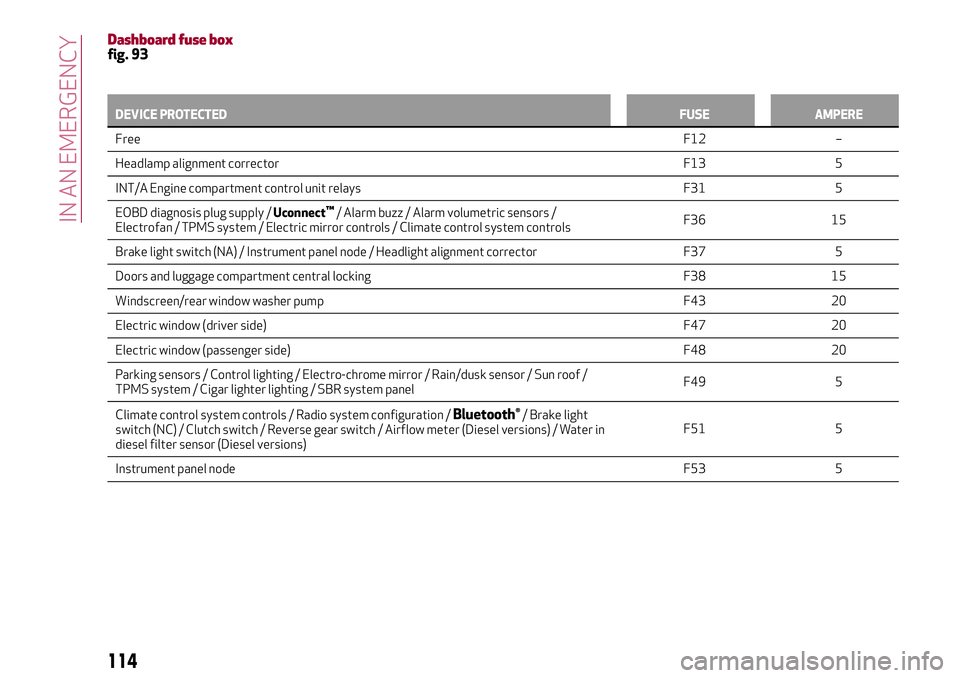
Dashboard fuse boxfig. 93
DEVICE PROTECTEDFUSE AMPERE
FreeF12 –
Headlamp alignment corrector F13 5
INT/A Engine compartment control unit relays F31 5
EOBD diagnosis plug supply /Uconnect
™/ Alarm buzz / Alarm volumetric sensors /
Electrofan / TPMS system / Electric mirror controls / Climate control system controlsF36 15
Brake light switch (NA) / Instrument panel node / Headlight alignment corrector F37 5
Doors and luggage compartment central locking F38 15
Windscreen/rear window washer pump F43 20
Electric window (driver side)F47 20
Electric window (passenger side) F48 20
Parking sensors / Control lighting / Electro-chrome mirror / Rain/dusk sensor / Sun roof /
TPMS system / Cigar lighter lighting / SBR system panelF49 5
Climate control system controls / Radio system configuration /
Bluetooth®/ Brake light
switch (NC) / Clutch switch / Reverse gear switch / Airflow meter (Diesel versions) / Water in
diesel filter sensor (Diesel versions)F51 5
Instrument panel nodeF53 5
114
IN AN EMERGENCY