bonnet Alfa Romeo MiTo 2019 Owner handbook (in English)
[x] Cancel search | Manufacturer: ALFA ROMEO, Model Year: 2019, Model line: MiTo, Model: Alfa Romeo MiTo 2019Pages: 212, PDF Size: 5.18 MB
Page 9 of 212
In-depth knowledge of your new car starts here.
The booklet that you are reading simply and directly explains how
it is made and how it works.
That’s why we advise you to read it seated comfortably on board,
so that you can see what is described here for yourself.
GETTING TO KNOW YOUR CAR
INSTRUMENT PANEL . . . . . . . ......................8
INSTRUMENT PANEL . . . .........................9
THEKEYS...................................10
IGNITION DEVICE . . ............................11
ALFA ROMEO CODE SYSTEM . . . ....................12
ALARM SYSTEM ...............................13
DOORS.....................................13
SEATS.....................................14
HEADRESTS.................................16
STEERING WHEEL..............................17
REAR VIEW MIRRORS . . . . . ......................18
EXTERNAL LIGHTS .............................19
INTERIOR LIGHTS . . . ...........................21
WINDSCREEN / REAR WINDOW WIPERS ...............22
CLIMATE CONTROL . . . . .........................24
ELECTRIC WINDOWS ............................29
ELECTRIC SUNROOF . . . .........................30
ENGINE BONNET . .............................32
BOOT......................................33
HEADLIGHTS . . . . . . . . . . .......................34
Alfa DNA SYSTEM (Car dynamic control system) . . .........34
DYNAMIC SUSPENSION (active shock absorber system) . . . . . .35
VERSION WITH LPG SYSTEM . . . . . . .................36
Page 15 of 212
ALARMSYSTEM
(where provided)
ALARM ACTIVATION
Activation of the alarm triggers the
acoustic warning and the direction
indicators.
IMPORTANT The alarm is adapted by the
Manufacturer to meet the requirements
of the various countries where the
vehicle is marketed.
SWITCHING ON THE ALARM
With the doors, bonnet and tailgate
closed and the ignition key either turned
to STOP or removed, point the key with
remote control towards the car and press
and release the button
.
Except on some versions for specific
markets, the system produces a visual
and acoustic warning and enables door
locking.
ALARM SELF-ACTIVATION(where provided)
If the alarm has not been activated using
the remote control, approximately
30 seconds after the key is turned to the
STOP position and the last time one of
the doors or tailgate was opened and
reclosed, the alarm is activated
automatically.This condition is indicated by the
intermittent illumination of the LED on
the alarm deactivation button on the roof
light and by the activation indications
described previously.
To deactivate the alarm, press the button
on the remote control.
Alarm self-activation also occurs when
the doors are closed by turning the metal
insert of the key in the driver door lock. If
the alarm is self-activated, the doors will
not be locked.
TURNING THE ALARM OFF
Press thebutton. The following
operations are performed (excluding
some markets):
two brief flashes of the direction
indicators;
there are two short acoustic signals;
doors are unlocked.
IMPORTANT The alarm does not switch
off when the central opening is activated
using the metal insert in the key.
DOORS
DOOR CENTRAL LOCKING/UNLOCKING
Locking from the outside
With the doors closed, press the
button on the key or fit and then turn
the metal insert (located inside the key)
in the driver side door lock.
The door locking function is operated:
with all the doors closed;
with all the doors closed and boot
open.
Door unlocking from the outside
Press the
button on the key or turn the
metal insert (located inside the key) in
the driver side door lock.
Door locking/unlocking from the inside
Press the 1 fig. 7 button on the
dashboard. The button has an LED that
indicates whether the doors are locked or
unlocked.LED on: doors locked.LED off:
doors unlocked.
13
Page 34 of 212
ENGINE BONNET
17) 18) 19)
OPENING
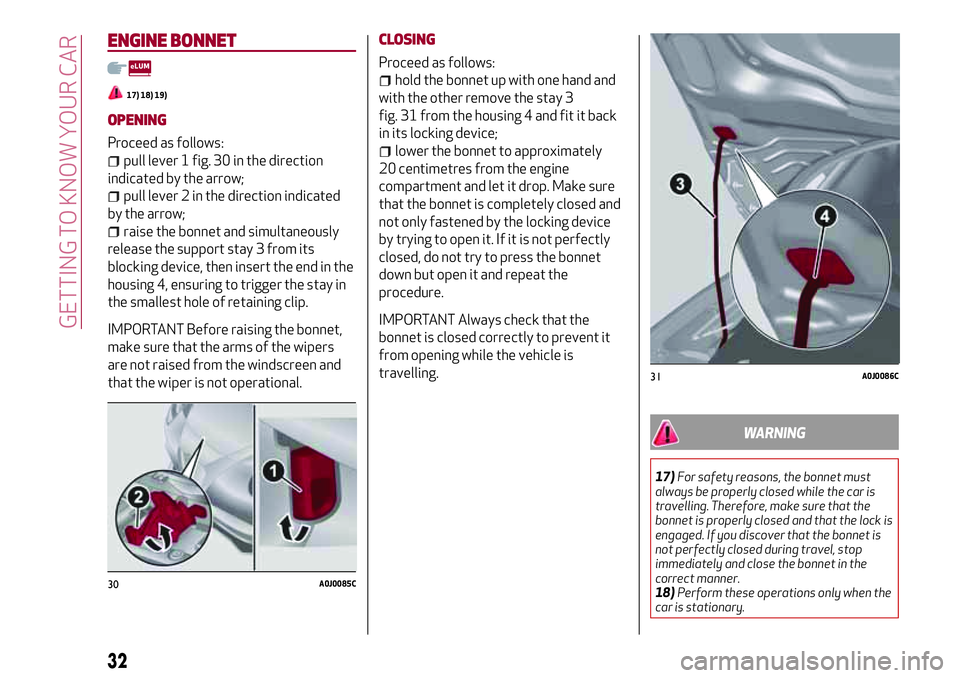
Proceed as follows:
pull lever 1 fig. 30 in the direction
indicated by the arrow;
pull lever 2 in the direction indicated
by the arrow;
raise the bonnet and simultaneously
release the support stay 3 from its
blocking device, then insert the end in the
housing 4, ensuring to trigger the stay in
the smallest hole of retaining clip.
IMPORTANT Before raising the bonnet,
make sure that the arms of the wipers
are not raised from the windscreen and
that the wiper is not operational.CLOSING
Proceed as follows:
hold the bonnet up with one hand and
with the other remove the stay 3
fig. 31 from the housing 4 and fit it back
in its locking device;
lower the bonnet to approximately
20 centimetres from the engine
compartment and let it drop. Make sure
that the bonnet is completely closed and
not only fastened by the locking device
by trying to open it. If it is not perfectly
closed, do not try to press the bonnet
down but open it and repeat the
procedure.
IMPORTANT Always check that the
bonnet is closed correctly to prevent it
from opening while the vehicle is
travelling.
WARNING
17)For safety reasons, the bonnet must
always be properly closed while the car is
travelling. Therefore, make sure that the
bonnet is properly closed and that the lock is
engaged. If you discover that the bonnet is
not perfectly closed during travel, stop
immediately and close the bonnet in the
correct manner.
18)Perform these operations only when the
car is stationary.
30A0J0085C
31A0J0086C
32
GETTING TO KNOW YOUR CAR
Page 35 of 212
19)The bonnet may drop suddenly if the
supporting rod is not positioned correctly.BOOT
The luggage compartment unlocking is
electrically operated and is deactivated
when the car is in motion.
OPENING
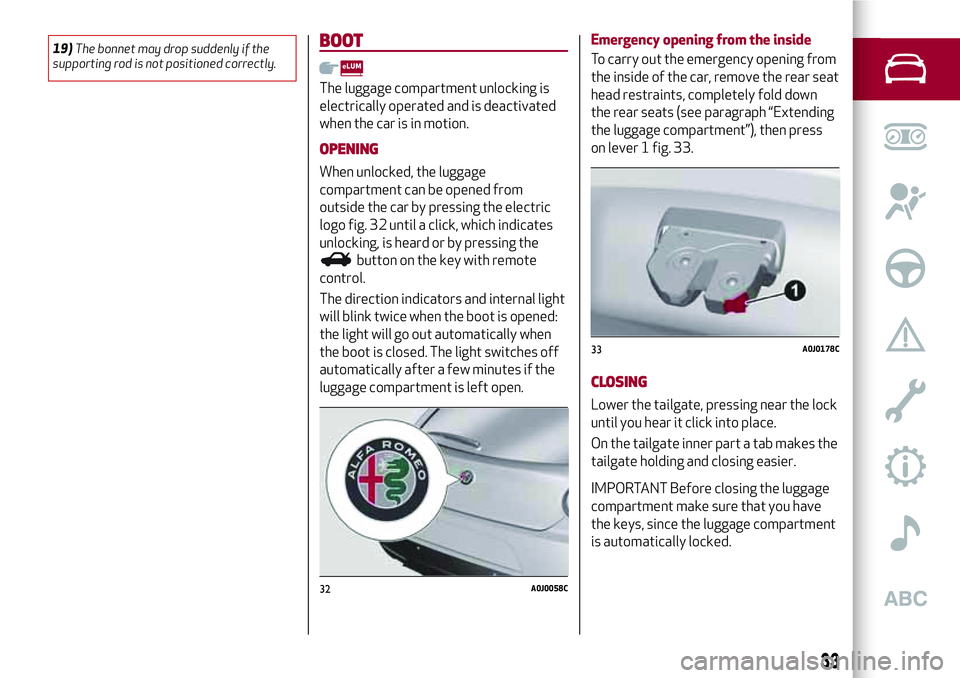
When unlocked, the luggage
compartment can be opened from
outside the car by pressing the electric
logo fig. 32 until a click, which indicates
unlocking, is heard or by pressing the
button on the key with remote
control.
The direction indicators and internal light
will blink twice when the boot is opened:
the light will go out automatically when
the boot is closed. The light switches off
automatically after a few minutes if the
luggage compartment is left open.Emergency opening from the inside
To carry out the emergency opening from
the inside of the car, remove the rear seat
head restraints, completely fold down
the rear seats (see paragraph “Extending
the luggage compartment”), then press
on lever 1 fig. 33.
CLOSING
Lower the tailgate, pressing near the lock
until you hear it click into place.
On the tailgate inner part a tab makes the
tailgate holding and closing easier.
IMPORTANT Before closing the luggage
compartment make sure that you have
the keys, since the luggage compartment
is automatically locked.
32A0J0058C
33A0J0178C
33
Page 60 of 212

SYMBOLS ON THE DISPLAY
Symbol on the display What it means What to do
ALTERNATOR FAILURE
The symbol appears on the display in case of alternator
failure.If the symbol continues to be displayed, contact an Alfa
Romeo Dealership immediately.
ELECTRIC POWER STEERING FAILURE
(where provided)
The symbol appears on display in case of electric Power
Steering failure. If the symbol is still displayed (together
with a message) you will not benefit from the electric
power steering and the effort needed to turn the wheel
will be significantly increased, although it will still be
possible to steer the car.If the symbol continues to be displayed, contact an Alfa
Romeo Dealership immediately.
DOOR OPEN
(where provided)
The symbol appears on the display when one or more
doors are not completely shut. An acoustic signal is
activated with the doors open and the car moving.Close the door(s) properly.
LUGGAGE COMPARTMENT OPEN
The symbol appears on the display (together with a
message) when the luggage compartment is openClose the boot correctly.
BONNET OPEN
The symbol appears on the display (together with a
message) when the bonnet is openClose the bonnet properly.
SPEED LIMIT EXCEEDED
(where provided)
The symbol appears on the display when the vehicle
speed exceeds 120 km/h. An acoustic signal is also
emitted.Contact an Alfa Romeo Dealership as soon as possible.
58
KNOWING THE INSTRUMENT PANEL
Page 125 of 212
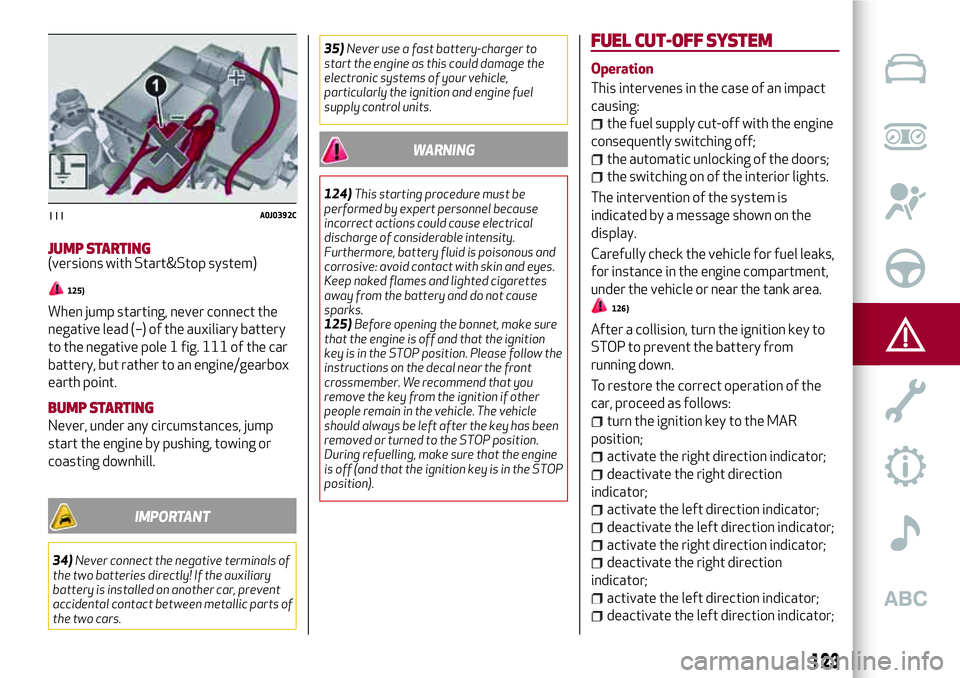
JUMP STARTING(versions with Start&Stop system)
125)
When jump starting, never connect the
negative lead (–) of the auxiliary battery
to the negative pole 1 fig. 111 of the car
battery, but rather to an engine/gearbox
earth point.
BUMP STARTING
Never, under any circumstances, jump
start the engine by pushing, towing or
coasting downhill.
IMPORTANT
34)Never connect the negative terminals of
the two batteries directly! If the auxiliary
battery is installed on another car, prevent
accidental contact between metallic parts of
the two cars.35)Never use a fast battery-charger to
start the engine as this could damage the
electronic systems of your vehicle,
particularly the ignition and engine fuel
supply control units.
WARNING
124)This starting procedure must be
performed by expert personnel because
incorrect actions could cause electrical
discharge of considerable intensity.
Furthermore, battery fluid is poisonous and
corrosive: avoid contact with skin and eyes.
Keep naked flames and lighted cigarettes
away from the battery and do not cause
sparks.
125)Before opening the bonnet, make sure
that the engine is off and that the ignition
key is in the STOP position. Please follow the
instructions on the decal near the front
crossmember. We recommend that you
remove the key from the ignition if other
people remain in the vehicle. The vehicle
should always be left after the key has been
removed or turned to the STOP position.
During refuelling, make sure that the engine
is off (and that the ignition key is in the STOP
position).
FUEL CUT-OFFSYSTEM
Operation
This intervenes in the case of an impact
causing:
the fuel supply cut-off with the engine
consequently switching off;
the automatic unlocking of the doors;
the switching on of the interior lights.
The intervention of the system is
indicated by a message shown on the
display.
Carefully check the vehicle for fuel leaks,
for instance in the engine compartment,
under the vehicle or near the tank area.
126)
After a collision, turn the ignition key to
STOP to prevent the battery from
running down.
To restore the correct operation of the
car, proceed as follows:
turn the ignition key to the MAR
position;
activate the right direction indicator;
deactivate the right direction
indicator;
activate the left direction indicator;
deactivate the left direction indicator;
activate the right direction indicator;
deactivate the right direction
indicator;
activate the left direction indicator;
deactivate the left direction indicator;
111A0J0392C
123
Page 132 of 212
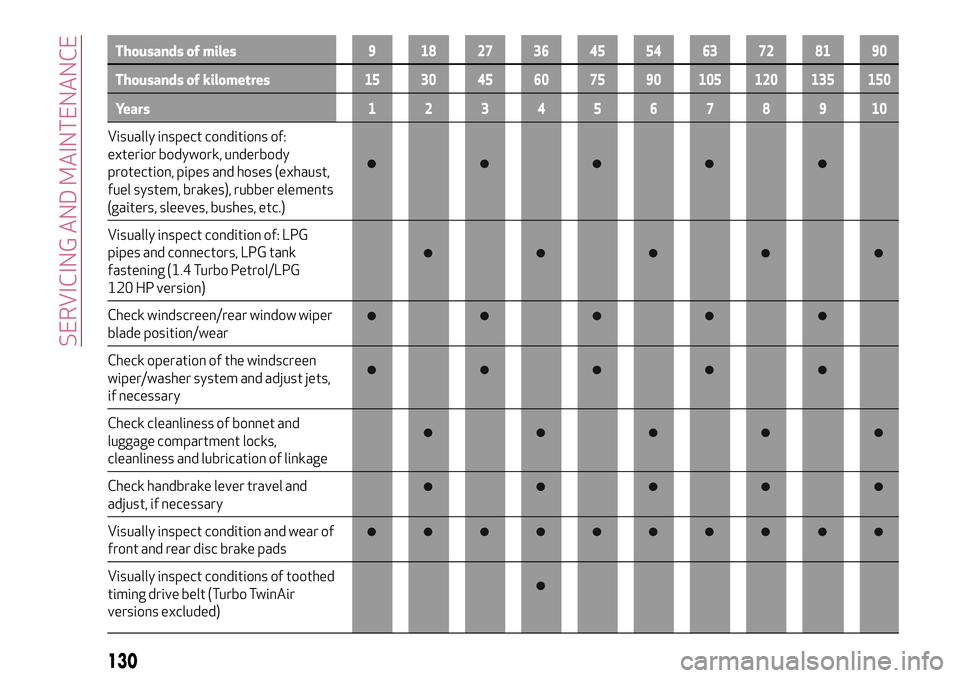
Thousands of miles9 182736455463728190
Thousands of kilometres15 30 45 60 75 90 105 120 135 150
Years12345678910
Visually inspect conditions of:
exterior bodywork, underbody
protection, pipes and hoses (exhaust,
fuel system, brakes), rubber elements
(gaiters, sleeves, bushes, etc.)
Visually inspect condition of: LPG
pipes and connectors, LPG tank
fastening (1.4 Turbo Petrol/LPG
120 HP version)
Check windscreen/rear window wiper
blade position/wear
Check operation of the windscreen
wiper/washer system and adjust jets,
if necessary
Check cleanliness of bonnet and
luggage compartment locks,
cleanliness and lubrication of linkage
Check handbrake lever travel and
adjust, if necessary
Visually inspect condition and wear of
front and rear disc brake pads
Visually inspect conditions of toothed
timing drive belt (Turbo TwinAir
versions excluded)
130
SERVICING AND MAINTENANCE
Page 136 of 212
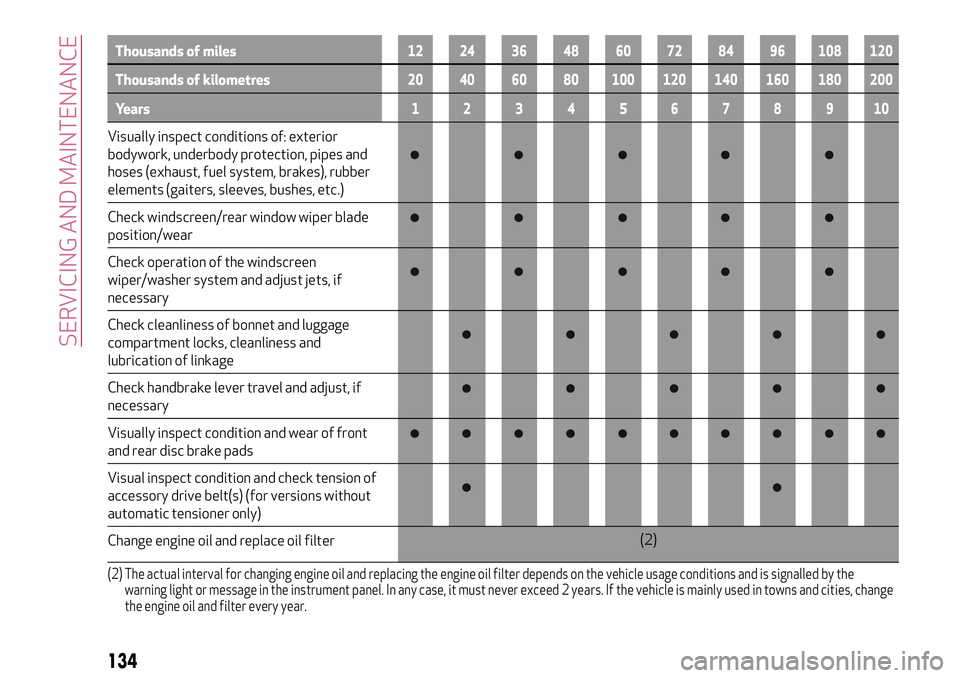
Thousands of miles12 24 36 48 60 72 84 96 108 120
Thousands of kilometres20 40 60 80 100 120 140 160 180 200
Years12345678910
Visually inspect conditions of: exterior
bodywork, underbody protection, pipes and
hoses (exhaust, fuel system, brakes), rubber
elements (gaiters, sleeves, bushes, etc.)
Check windscreen/rear window wiper blade
position/wear
Check operation of the windscreen
wiper/washer system and adjust jets, if
necessary
Check cleanliness of bonnet and luggage
compartment locks, cleanliness and
lubrication of linkage
Check handbrake lever travel and adjust, if
necessary
Visually inspect condition and wear of front
and rear disc brake pads
Visual inspect condition and check tension of
accessory drive belt(s) (for versions without
automatic tensioner only)
Change engine oil and replace oil filter(2)
(2) The actual interval for changing engine oil and replacing the engine oil filter depends on the vehicle usage conditions and is signalled by the
warning light or message in the instrument panel. In any case, it must never exceed 2 years. If the vehicle is mainly used in towns and cities, change
the engine oil and filter every year.
134
SERVICING AND MAINTENANCE
Page 138 of 212
PERIODIC CHECKS
Every 1,000 km or before long trips
check and, if necessary, top up:
engine coolant, brake fluid and
windscreen washer fluid level;
tyre inflation pressure and condition;
operation of lighting system
(headlights, direction indicators, hazard
warning lights, etc.);
operation of screen wash/wipe system
and positioning/wear of windscreen/
rearscreen wiper blades
Every 3,000 km check and top up if
required: engine oil level.
IMPORTANT To find out the correct oil
quantity, always check using the dipstick.
Carry out the check with the vehicle
parked on level ground.
DEMANDING USE OF THE CAR
If the vehicle is used mainly under one of
the following conditions:
towing a trailer or caravan;
dusty roads;
short, repeated journeys (less than
7-8 km) at sub-zero outside
temperatures;
engine often idling or driving long
distances at low speeds or long periods
of inactivity;
the following checks must be carried out
more often than indicated in the
Scheduled Servicing Plan:
check front disc brake pad condition
and wear;
check cleanliness of bonnet and
luggage compartment locks, cleanliness
and lubrication of linkage;
visually inspect condition of: engine,
gearbox, transmission, pipes and hoses
(exhaust - fuel system - brakes) and
rubber elements (boots - sleeves - bushes
- etc.);
check battery charge and battery fluid
level (electrolyte);
visually inspect conditions of the
accessory drive belts;
check and, if necessary, change engine
oil and replace oil filter;
check and, if necessary, replace pollen
filter;
check and, if necessary, replace air
cleaner.
136
SERVICING AND MAINTENANCE
Page 148 of 212
BATTERY
The battery 6 (see previous pages) does
not require the electrolyte to be topped
up with distilled water. A periodic check
carried out at an Alfa Romeo Dealership
is, however, necessary to check
efficiency.
INSPECTING THE CHARGE AND THE
ELECTROLYTE LEVEL
139) 140) 141) 142)
43)
4)
If necessary, replace the battery with
another original battery with the same
specifications. Follow the battery
manufacturer's instructions for
maintenance.
USEFUL ADVICE FOR EXTENDING THE
LIFE OF YOUR BATTERY
To avoid draining your battery and make
it last longer, observe the following
instructions:
when you park the car, ensure that the
doors, tailgate and bonnet are closed
properly, to prevent any lights from
remaining on inside the passenger's
compartment;
switch off all roof lights inside the car:
the car is however equipped with a
system which switches all internal lights
off automatically;
do not keep accessories (e.g. radio,
hazard warning lights, etc.) switched on
for a long time when the engine is not
running;
before performing any operation on
the electrical system, disconnect the
negative battery cable.
IMPORTANT If the charge level remains
under 50% for a long time, the battery is
damaged by sulphation, reducing its
capacity and efficiency at start-up.
The battery will also be more at risk of
freezing (this can happen as early as
-10°C). Refer to the "Vehicle inactivity"
paragraph in "Starting and driving"
chapter if the vehicle is left parked for a
long time.
If, after purchasing the car, you wish to
install electrical accessories which
require permanent electrical supply (e.g.
alarm, etc.) or accessories which
influence the electrical supply
requirements, contact an Alfa Romeo
Dealership, whose qualified staff will
evaluate the overall electrical
consumption.
WARNING
139)Battery fluid is poisonous and
corrosive. Avoid contact with the skin and
eyes. Keep open flames away from the
battery and do not use objects that might
create sparks: risk of explosion and fire.
140)Using the battery with insufficient
fluid irreparably damages the battery and
may cause an explosion.
141)If the vehicle must remain unused for a
long time at a very low temperature, remove
the battery and take it to a warm place, to
avoid freezing.
142)When performing any operation on the
battery or near it, always protect your eyes
with special goggles.
IMPORTANT
43)Incorrect installation of electric and
electronic devices may cause severe damage
to your car. After purchasing your vehicle, if
you wish to install any accessories (e.g.
anti-theft, radio phone, etc.), go to an Alfa
Romeo Dealership, which will suggest the
most suitable devices and advise you
whether a higher capacity battery needs to
be installed.
146
SERVICING AND MAINTENANCE