fuse box Alfa Romeo MiTo 2020 Owner handbook (in English)
[x] Cancel search | Manufacturer: ALFA ROMEO, Model Year: 2020, Model line: MiTo, Model: Alfa Romeo MiTo 2020Pages: 212, PDF Size: 5.18 MB
Page 10 of 212
INSTRUMENT PANEL
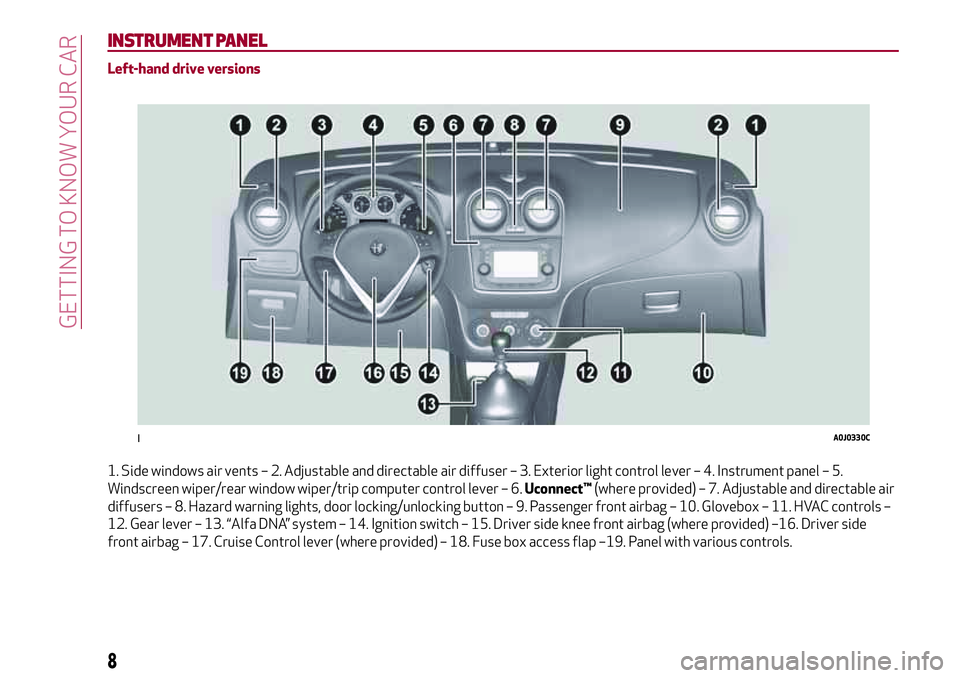
Left-hand drive versions
1. Side windows air vents – 2. Adjustable and directable air diffuser – 3. Exterior light control lever – 4. Instrument panel – 5.
Windscreen wiper/rear window wiper/trip computer control lever – 6.Uconnect™(where provided) – 7. Adjustable and directable air
diffusers – 8. Hazard warning lights, door locking/unlocking button – 9. Passenger front airbag – 10. Glovebox – 11. HVAC controls –
12. Gear lever – 13. “Alfa DNA” system – 14. Ignition switch – 15. Driver side knee front airbag (where provided) –16. Driver side
front airbag – 17. Cruise Control lever (where provided) – 18. Fuse box access flap –19. Panel with various controls.
1A0J0330C
8
GETTING TO KNOW YOUR CAR
Page 11 of 212
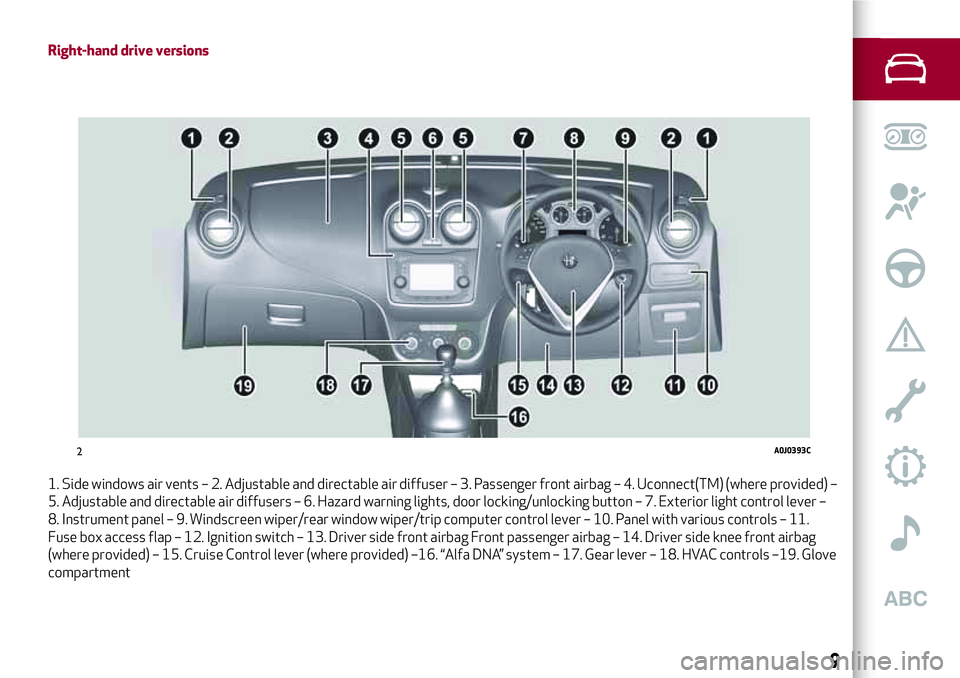
Right-hand drive versions
1. Side windows air vents – 2. Adjustable and directable air diffuser – 3. Passenger front airbag – 4. Uconnect(TM) (where provided) –
5. Adjustable and directable air diffusers – 6. Hazard warning lights, door locking/unlocking button – 7. Exterior light control lever –
8. Instrument panel – 9. Windscreen wiper/rear window wiper/trip computer control lever – 10. Panel with various controls – 11.
Fuse box access flap – 12. Ignition switch – 13. Driver side front airbag Front passenger airbag – 14. Driver side knee front airbag
(where provided) – 15. Cruise Control lever (where provided) –16. “Alfa DNA” system – 17. Gear lever – 18. HVAC controls –19. Glove
compartment
2A0J0393C
9
Page 33 of 212
stopped in intermediate positions by
pressing the button again
Brief button pressure: “manual” sunroof
closing. If button is pressed briefly, the
front glass panel moves from the
completely open position and stops in the
position where the button is released. In
this case, the panel closes by pressing it.
This function makes it possible to place
the front glass panel in intermediate
positions in relation to those produced
through automatic closing.
IMPORTANT The sun roof must stay
closed if a transverse roof rack is fitted.
ANTI-PINCH DEVICE
The sun roof has an anti-pinch safety
system capable of detecting the
presence of an obstacle whilst the roof is
closing; when this happens, the system
stops and the movement of the front
glass is immediately reversed.
IMPORTANT The anti-pinch system is
disabled through continuous pressure of
button 2.
INITIALISATION PROCEDURE
The sunroof must be re-initialised after
disconnecting the battery or if the
relevant protection fuse is blown.Perform the following:
press button 2 until the roof is
completely closed. Then release the
button;
press button 2 and hold it down for at
least 10 seconds and/or until the glass
panel clicks forwards. Release the button
at this point;
within 5 seconds of the previous
operation, press button B and hold it
down: the front glass panel will complete
a full opening and closing cycle. Only
release the button at the end of this
cycle.
MAINTENANCE/EMERGENCY
In case of emergency or maintenance the
roof can be moved manually when there
is no power supply (opening/closing of
the front glass panel) by carrying out the
following operations:
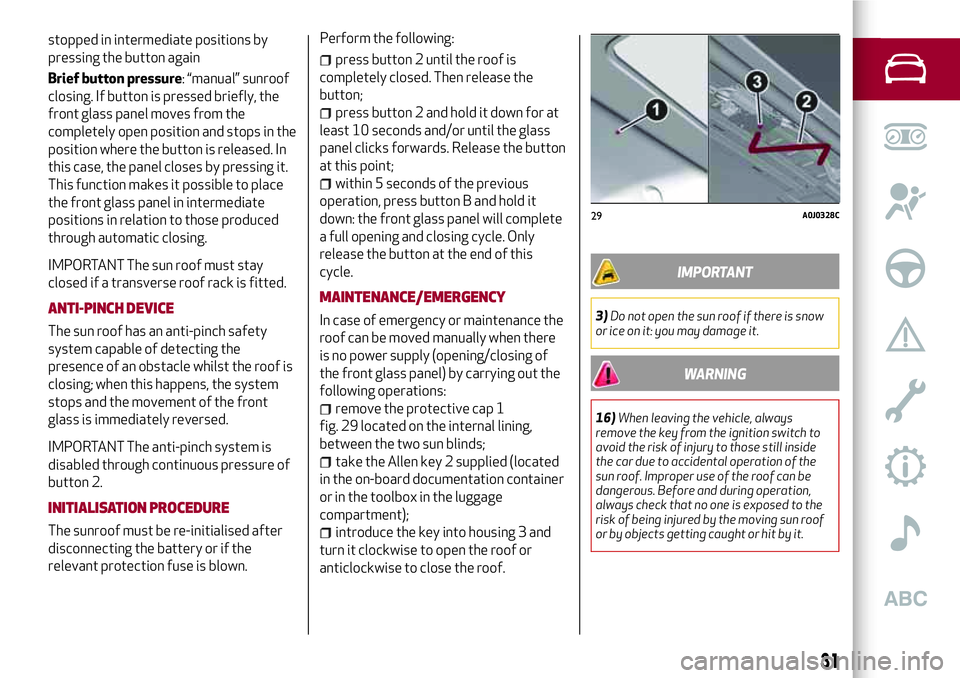
remove the protective cap 1
fig. 29 located on the internal lining,
between the two sun blinds;
take the Allen key 2 supplied (located
in the on-board documentation container
or in the toolbox in the luggage
compartment);
introduce the key into housing 3 and
turn it clockwise to open the roof or
anticlockwise to close the roof.
IMPORTANT
3)Do not open the sun roof if there is snow
or ice on it: you may damage it.
WARNING
16)When leaving the vehicle, always
remove the key from the ignition switch to
avoid the risk of injury to those still inside
the car due to accidental operation of the
sun roof. Improper use of the roof can be
dangerous. Before and during operation,
always check that no one is exposed to the
risk of being injured by the moving sun roof
or by objects getting caught or hit by it.
29A0J0328C
31
Page 112 of 212
Direction indicators
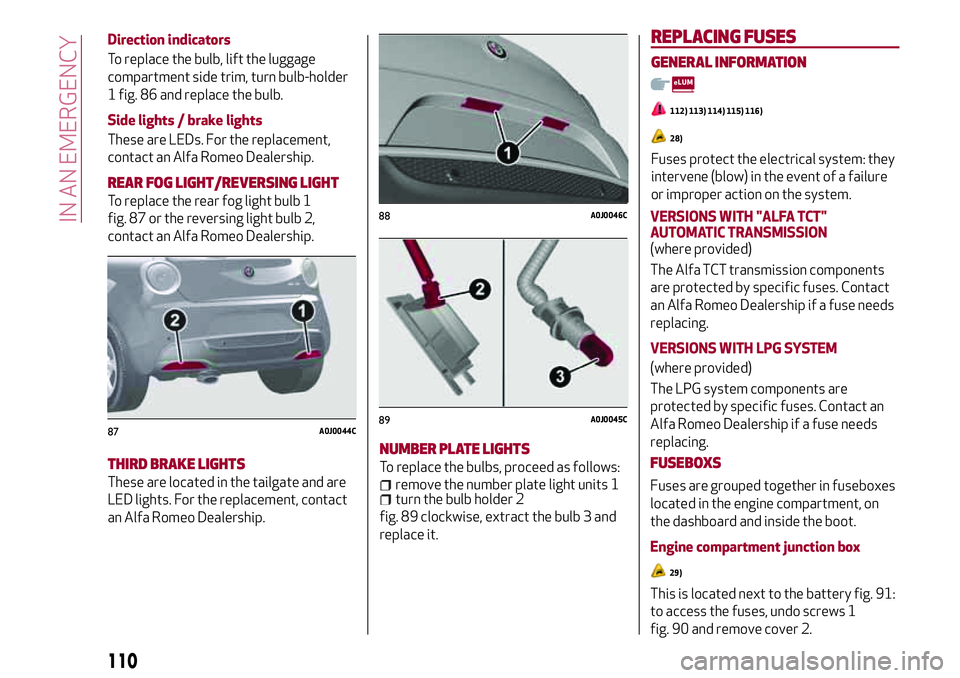
To replace the bulb, lift the luggage
compartment side trim, turn bulb-holder
1 fig. 86 and replace the bulb.
Side lights / brake lights
These are LEDs. For the replacement,
contact an Alfa Romeo Dealership.
REAR FOG LIGHT/REVERSING LIGHT
To replace the rear fog light bulb 1
fig. 87 or the reversing light bulb 2,
contact an Alfa Romeo Dealership.
THIRD BRAKE LIGHTS
These are located in the tailgate and are
LED lights. For the replacement, contact
an Alfa Romeo Dealership.
NUMBER PLATE LIGHTS
To replace the bulbs, proceed as follows:
remove the number plate light units 1turn the bulb holder 2
fig. 89 clockwise, extract the bulb 3 and
replace it.
REPLACING FUSES
GENERAL INFORMATION
112) 113) 114) 115) 116)
28)
Fuses protect the electrical system: they
intervene (blow) in the event of a failure
or improper action on the system.
VERSIONS WITH "ALFA TCT"
AUTOMATIC TRANSMISSION
(where provided)
The Alfa TCT transmission components
are protected by specific fuses. Contact
an Alfa Romeo Dealership if a fuse needs
replacing.
VERSIONS WITH LPGSYSTEM
(where provided)
The LPG system components are
protected by specific fuses. Contact an
Alfa Romeo Dealership if a fuse needs
replacing.
FUSEBOXS
Fuses are grouped together in fuseboxes
located in the engine compartment, on
the dashboard and inside the boot.
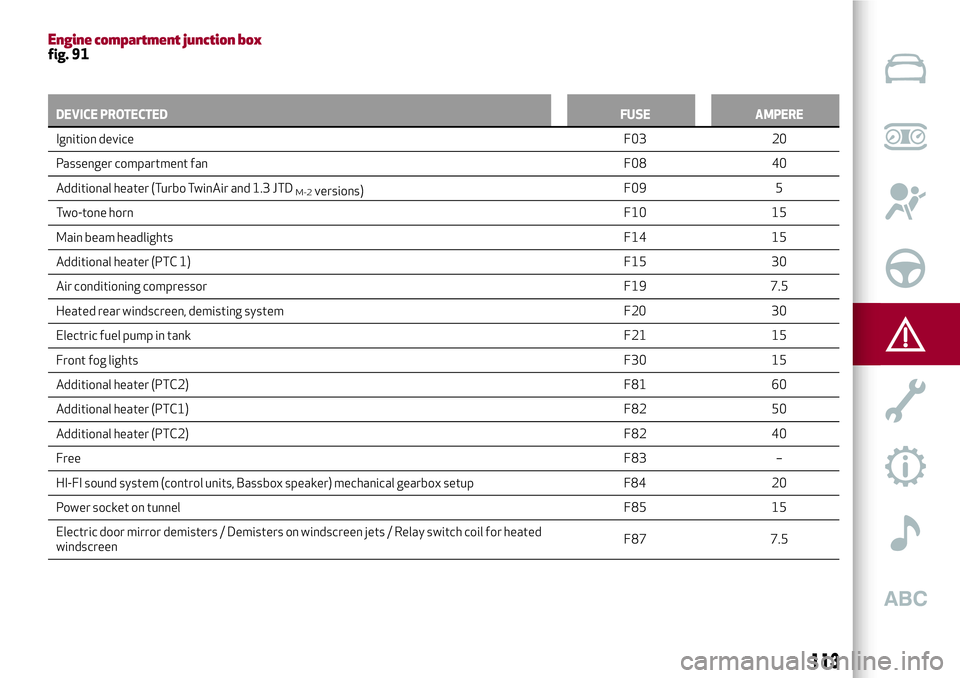
Engine compartment junction box
29)
This is located next to the battery fig. 91:
to access the fuses, undo screws 1
fig. 90 and remove cover 2.
87A0J0044C
88A0J0046C
89A0J0045C
110
IN AN EMERGENCY
Page 113 of 212

The number identifying the electricalcomponent corresponding to each fuse is
shown on the back of the cover. After
replacing the fuse, make sure you close
cover 2 on the fuse box.
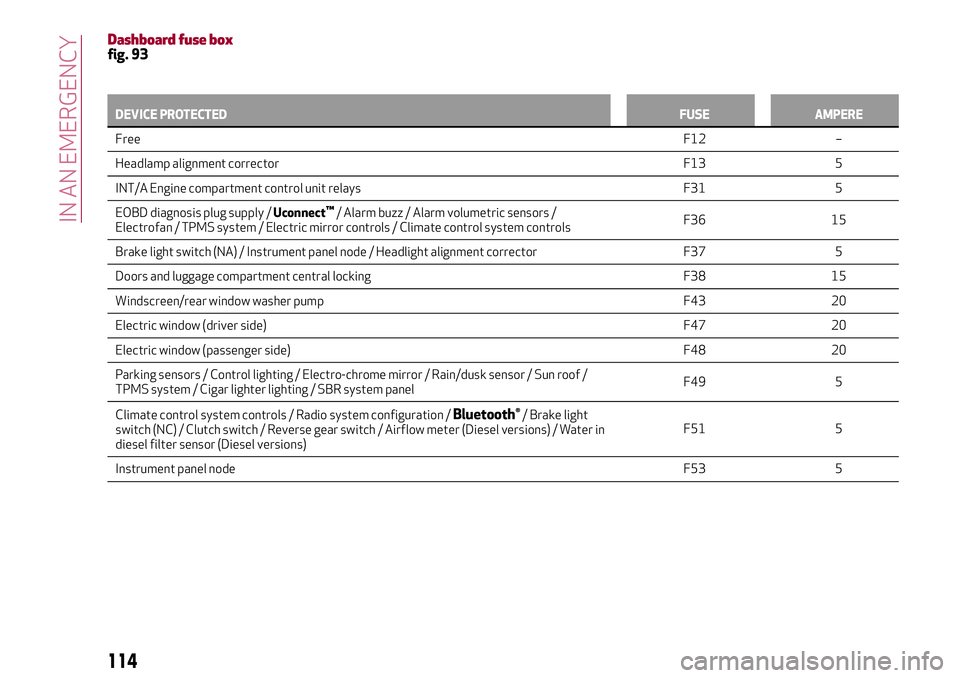
Dashboard fuse box
To access the fuses fig. 93 lower the flap
1 fig. 92, with a hand hold the cover 2 in
the area indicated in figure and remove it
operating in the sense indicated by the
arrow, in order to disengage internal
retainers 3 first, and then the tabs 4.
90A0J0126C
91A0J0417C92A0J0334C
93A0J0205C
111
Page 114 of 212

94A0J0264C
95A0J0175C
112
IN AN EMERGENCY
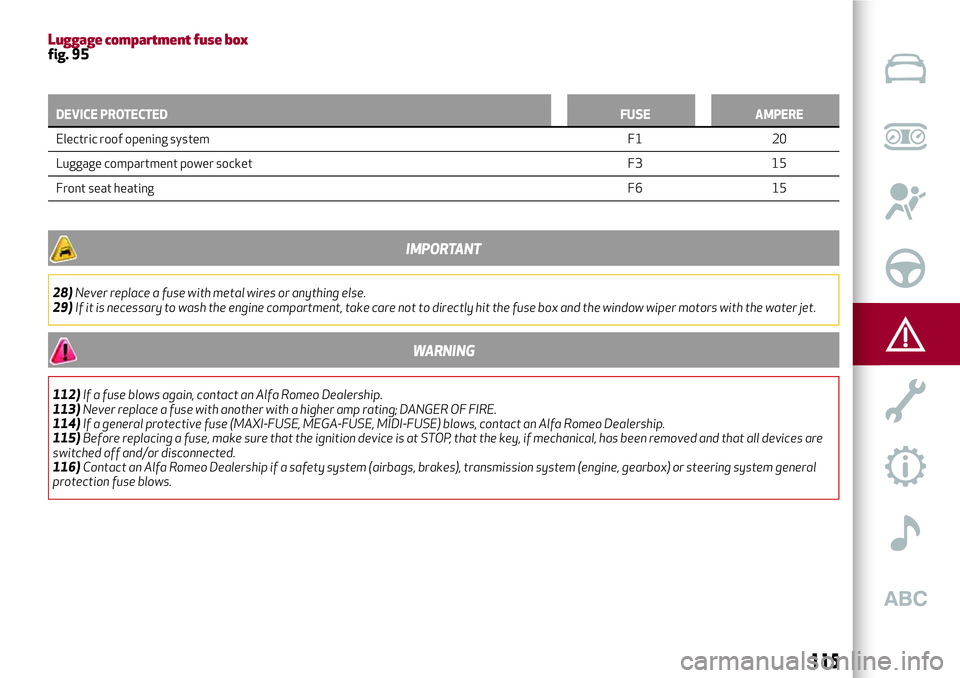
Luggage compartment fuse box
To access the fuse box fig. 95 (located on
the left side of the luggage
compartment), open the relevant
inspection lid as illustrated in figure
fig. 94.
Page 115 of 212
Engine compartment junction boxfig. 91
DEVICE PROTECTEDFUSE AMPERE
Ignition deviceF03 20
Passenger compartment fanF08 40
Additional heater (Turbo TwinAir and 1.3 JTD
M-2versions)F09 5
Two-tone hornF10 15
Main beam headlightsF14 15
Additional heater (PTC 1)F15 30
Air conditioning compressorF19 7.5
Heated rear windscreen, demisting system F20 30
Electric fuel pump in tankF21 15
Front fog lightsF30 15
Additional heater (PTC2)F81 60
Additional heater (PTC1)F82 50
Additional heater (PTC2)F82 40
FreeF83 –
HI-FI sound system (control units, Bassbox speaker) mechanical gearbox setup F84 20
Power socket on tunnelF85 15
Electric door mirror demisters / Demisters on windscreen jets / Relay switch coil for heated
windscreenF87 7.5
113
Page 116 of 212
Dashboard fuse boxfig. 93
DEVICE PROTECTEDFUSE AMPERE
FreeF12 –
Headlamp alignment corrector F13 5
INT/A Engine compartment control unit relays F31 5
EOBD diagnosis plug supply /Uconnect
™/ Alarm buzz / Alarm volumetric sensors /
Electrofan / TPMS system / Electric mirror controls / Climate control system controlsF36 15
Brake light switch (NA) / Instrument panel node / Headlight alignment corrector F37 5
Doors and luggage compartment central locking F38 15
Windscreen/rear window washer pump F43 20
Electric window (driver side)F47 20
Electric window (passenger side) F48 20
Parking sensors / Control lighting / Electro-chrome mirror / Rain/dusk sensor / Sun roof /
TPMS system / Cigar lighter lighting / SBR system panelF49 5
Climate control system controls / Radio system configuration /
Bluetooth®/ Brake light
switch (NC) / Clutch switch / Reverse gear switch / Airflow meter (Diesel versions) / Water in
diesel filter sensor (Diesel versions)F51 5
Instrument panel nodeF53 5
114
IN AN EMERGENCY
Page 117 of 212
Luggage compartment fuse boxfig. 95
DEVICE PROTECTEDFUSE AMPERE
Electric roof opening systemF1 20
Luggage compartment power socket F3 15
Front seat heatingF6 15
IMPORTANT
28)Never replace a fuse with metal wires or anything else.
29)If it is necessary to wash the engine compartment, take care not to directly hit the fuse box and the window wiper motors with the water jet.
WARNING
112)If a fuse blows again, contact an Alfa Romeo Dealership.
113)Never replace a fuse with another with a higher amp rating; DANGER OF FIRE.
114)If a general protective fuse (MAXI-FUSE, MEGA-FUSE, MIDI-FUSE) blows, contact an Alfa Romeo Dealership.
115)Before replacing a fuse, make sure that the ignition device is at STOP, that the key, if mechanical, has been removed and that all devices are
switched off and/or disconnected.
116)Contact an Alfa Romeo Dealership if a safety system (airbags, brakes), transmission system (engine, gearbox) or steering system general
protection fuse blows.
115